Evaluating models

After training a model, AutoML Vision uses items from the TEST set to evaluate the quality and accuracy of the new model.

Evaluation overview

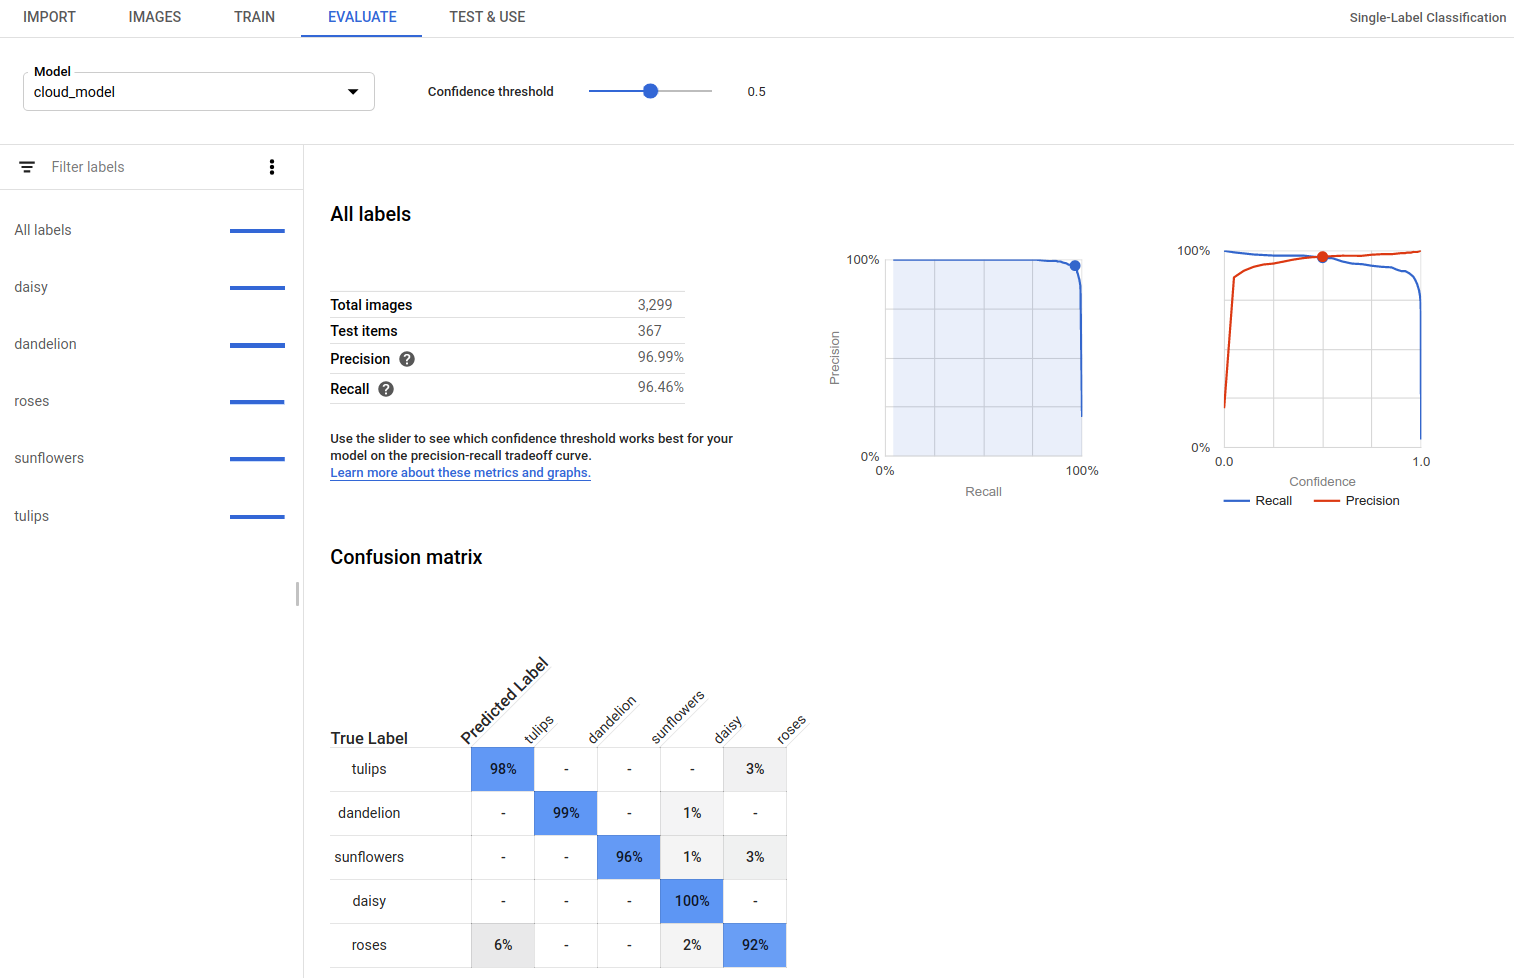
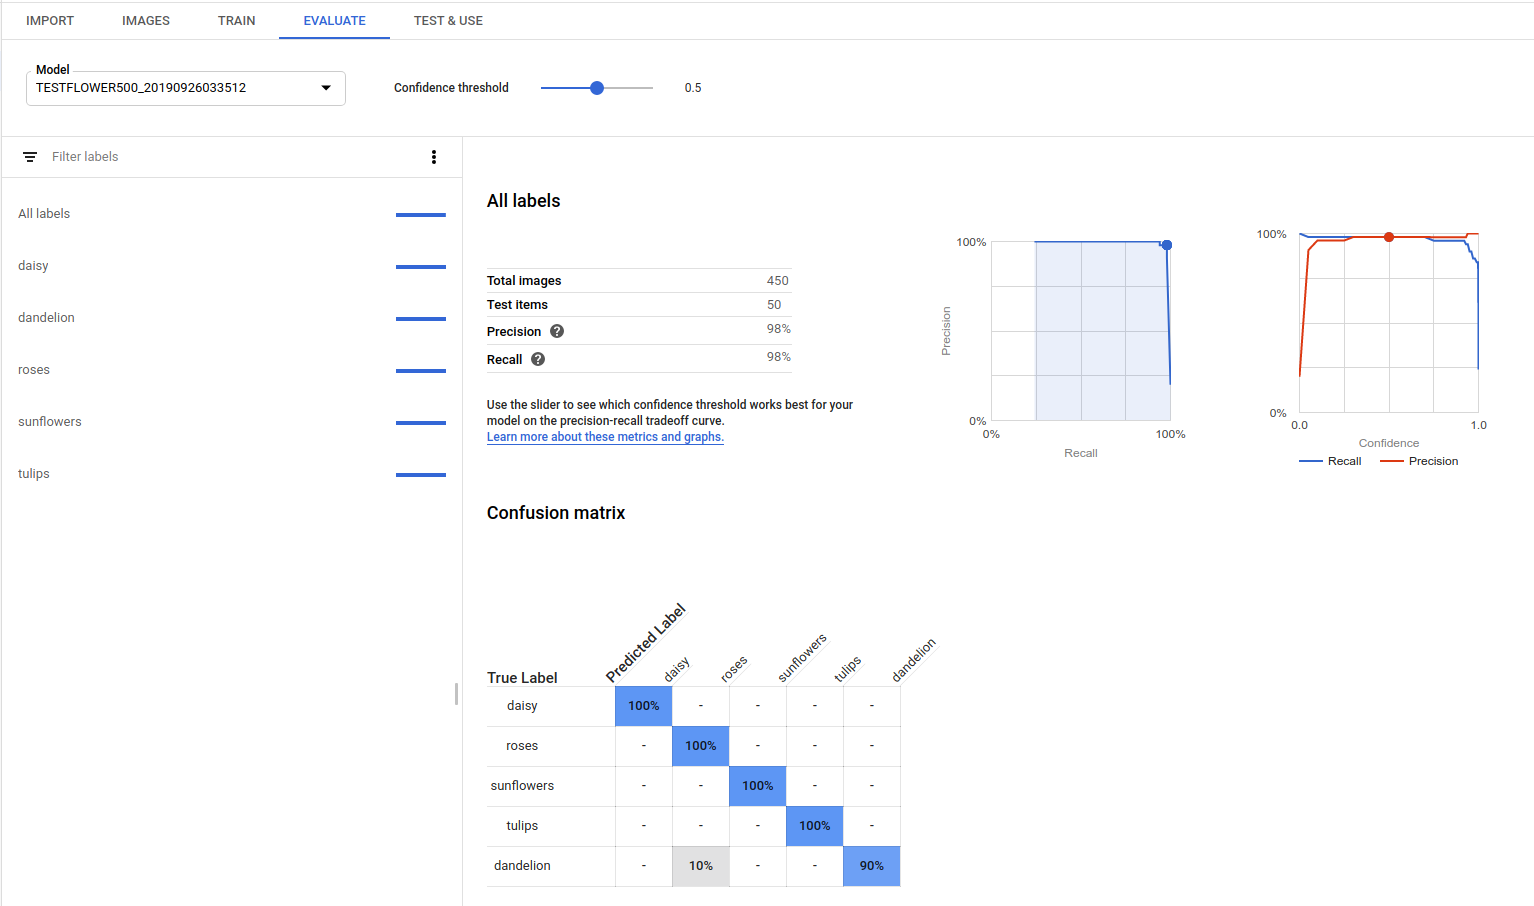
AutoML Vision provides an aggregate set of evaluation metrics indicating how well the model performs overall, as well as evaluation metrics for each category label, indicating how well the model performs for that label.

  • AuPRC : Area under Precision/Recall curve, also referred to as "average precision." Generally between 0.5 and 1.0. Higher values indicate more accurate models.

  • The Confidence threshold curves show how different confidence thresholds would affect precision, recall, true and false positive rates. Read about the relationship of precision and recall.

  • Confusion matrix: Only present for single-label-per-image models. Represents the percentage of times each label was predicted for each label in the training set during evaluation.
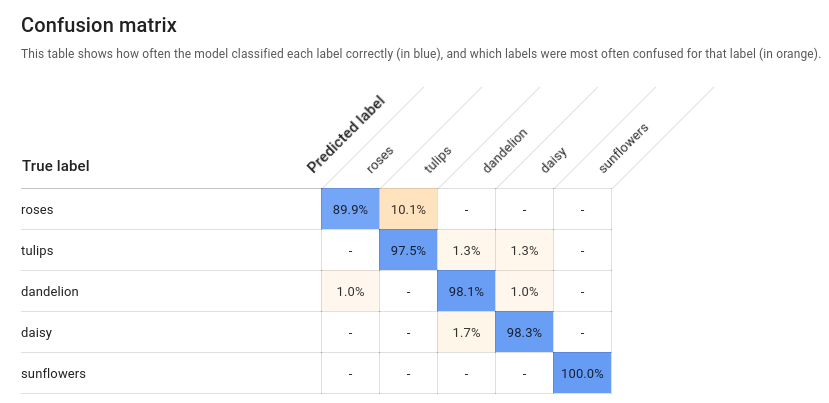
    Sample confusion matrix

    Ideally, label one would be assigned only to images classified as label one, etc, so a perfect matrix would look like:

    100  0   0   0
     0  100  0   0
     0   0  100  0
     0   0   0  100
    

    In the example above, if an image was classified as one but the model predicted two, the first row would instead look like:

    99  1  0  0
    

    More information can be found by searching for 'confusion matrix machine learning'.

    AutoML Vision creates the confusion matrix for up to 10 labels. If you have more than 10 labels, the matrix includes the 10 labels with the most confusion (incorrect predictions).

Use this data to evaluate your model's readiness. High confusion, low AUC scores, or low precision and recall scores can indicate that your model needs additional training data or has inconsistent labels. A very high AUC score and perfect precision and recall can indicate that the data is too easy and may not generalize well.

List model evaluations

Once you have trained a model, you can list evaluation metrics for that model.

Web UI

  1. Open the AutoML Vision UI and click the Models tab (with lightbulb icon) in the left navigation bar to display the available models.

    To view the models for a different project, select the project from the drop-down list in the upper right of the title bar.

  2. Click the row for the model you want to evaluate.

  3. If necessary, click the Evaluate tab just below the title bar.

    If training has been completed for the model, AutoML Vision shows its evaluation metrics.

    Model evaluation page

REST

Before using any of the request data, make the following replacements:

  • project-id: your GCP project ID.
  • model-id: the ID of your model, from the response when you created the model. The ID is the last element of the name of your model. For example:
    • model name: projects/project-id/locations/location-id/models/IOD4412217016962778756
    • model id: IOD4412217016962778756
  • model-evaluation-id: the ID value of the model evaluation. You can get model evaluation IDs from the list model evaluations operation.

HTTP method and URL:

GET https://automl.googleapis.com/v1/projects/PROJECT_ID/locations/us-central1/models/MODEL_ID/modelEvaluations/MODEL_EVALUATION_ID

To send your request, choose one of these options:

curl

Execute the following command:

curl -X GET \
-H "Authorization: Bearer $(gcloud auth print-access-token)" \
-H "x-goog-user-project: project-id" \
"https://automl.googleapis.com/v1/projects/PROJECT_ID/locations/us-central1/models/MODEL_ID/modelEvaluations/MODEL_EVALUATION_ID"

PowerShell

Execute the following command:

$cred = gcloud auth print-access-token
$headers = @{ "Authorization" = "Bearer $cred"; "x-goog-user-project" = "project-id" }

Invoke-WebRequest `
-Method GET `
-Headers $headers `
-Uri "https://automl.googleapis.com/v1/projects/PROJECT_ID/locations/us-central1/models/MODEL_ID/modelEvaluations/MODEL_EVALUATION_ID" | Select-Object -Expand Content

You should receive a JSON response similar to the following sample. Key object detection specific fields are in bold, and a shortened version of classificationEvaluationMetrics entries are shown for clarity:

Go

Before trying this sample, follow the setup instructions for this language on the Client Libraries page.

import (
	"context"
	"fmt"
	"io"

	automl "cloud.google.com/go/automl/apiv1"
	"cloud.google.com/go/automl/apiv1/automlpb"
	"google.golang.org/api/iterator"
)

// listModelEvaluation lists existing model evaluations.
func listModelEvaluations(w io.Writer, projectID string, location string, modelID string) error {
	// projectID := "my-project-id"
	// location := "us-central1"
	// modelID := "TRL123456789..."

	ctx := context.Background()
	client, err := automl.NewClient(ctx)
	if err != nil {
		return fmt.Errorf("NewClient: %w", err)
	}
	defer client.Close()

	req := &automlpb.ListModelEvaluationsRequest{
		Parent: fmt.Sprintf("projects/%s/locations/%s/models/%s", projectID, location, modelID),
	}

	it := client.ListModelEvaluations(ctx, req)

	// Iterate over all results
	for {
		evaluation, err := it.Next()
		if err == iterator.Done {
			break
		}
		if err != nil {
			return fmt.Errorf("ListModelEvaluations.Next: %w", err)
		}

		fmt.Fprintf(w, "Model evaluation name: %v\n", evaluation.GetName())
		fmt.Fprintf(w, "Model annotation spec id: %v\n", evaluation.GetAnnotationSpecId())
		fmt.Fprintf(w, "Create Time:\n")
		fmt.Fprintf(w, "\tseconds: %v\n", evaluation.GetCreateTime().GetSeconds())
		fmt.Fprintf(w, "\tnanos: %v\n", evaluation.GetCreateTime().GetNanos())
		fmt.Fprintf(w, "Evaluation example count: %v\n", evaluation.GetEvaluatedExampleCount())
		fmt.Fprintf(w, "Classification model evaluation metrics: %v\n", evaluation.GetClassificationEvaluationMetrics())
	}

	return nil
}

Java

Before trying this sample, follow the setup instructions for this language on the Client Libraries page.


import com.google.cloud.automl.v1.AutoMlClient;
import com.google.cloud.automl.v1.ListModelEvaluationsRequest;
import com.google.cloud.automl.v1.ModelEvaluation;
import com.google.cloud.automl.v1.ModelName;
import java.io.IOException;

class ListModelEvaluations {

  public static void main(String[] args) throws IOException {
    // TODO(developer): Replace these variables before running the sample.
    String projectId = "YOUR_PROJECT_ID";
    String modelId = "YOUR_MODEL_ID";
    listModelEvaluations(projectId, modelId);
  }

  // List model evaluations
  static void listModelEvaluations(String projectId, String modelId) throws IOException {
    // Initialize client that will be used to send requests. This client only needs to be created
    // once, and can be reused for multiple requests. After completing all of your requests, call
    // the "close" method on the client to safely clean up any remaining background resources.
    try (AutoMlClient client = AutoMlClient.create()) {
      // Get the full path of the model.
      ModelName modelFullId = ModelName.of(projectId, "us-central1", modelId);
      ListModelEvaluationsRequest modelEvaluationsrequest =
          ListModelEvaluationsRequest.newBuilder().setParent(modelFullId.toString()).build();

      // List all the model evaluations in the model by applying filter.
      System.out.println("List of model evaluations:");
      for (ModelEvaluation modelEvaluation :
          client.listModelEvaluations(modelEvaluationsrequest).iterateAll()) {

        System.out.format("Model Evaluation Name: %s\n", modelEvaluation.getName());
        System.out.format("Model Annotation Spec Id: %s", modelEvaluation.getAnnotationSpecId());
        System.out.println("Create Time:");
        System.out.format("\tseconds: %s\n", modelEvaluation.getCreateTime().getSeconds());
        System.out.format("\tnanos: %s", modelEvaluation.getCreateTime().getNanos() / 1e9);
        System.out.format(
            "Evalution Example Count: %d\n", modelEvaluation.getEvaluatedExampleCount());
        System.out.format(
            "Classification Model Evaluation Metrics: %s\n",
            modelEvaluation.getClassificationEvaluationMetrics());
      }
    }
  }
}

Node.js

Before trying this sample, follow the setup instructions for this language on the Client Libraries page.

/**
 * TODO(developer): Uncomment these variables before running the sample.
 */
// const projectId = 'YOUR_PROJECT_ID';
// const location = 'us-central1';
// const modelId = 'YOUR_MODEL_ID';

// Imports the Google Cloud AutoML library
const {AutoMlClient} = require('@google-cloud/automl').v1;

// Instantiates a client
const client = new AutoMlClient();

async function listModelEvaluations() {
  // Construct request
  const request = {
    parent: client.modelPath(projectId, location, modelId),
    filter: '',
  };

  const [response] = await client.listModelEvaluations(request);

  console.log('List of model evaluations:');
  for (const evaluation of response) {
    console.log(`Model evaluation name: ${evaluation.name}`);
    console.log(`Model annotation spec id: ${evaluation.annotationSpecId}`);
    console.log(`Model display name: ${evaluation.displayName}`);
    console.log('Model create time');
    console.log(`\tseconds ${evaluation.createTime.seconds}`);
    console.log(`\tnanos ${evaluation.createTime.nanos / 1e9}`);
    console.log(
      `Evaluation example count: ${evaluation.evaluatedExampleCount}`
    );
    console.log(
      `Classification model evaluation metrics: ${evaluation.classificationEvaluationMetrics}`
    );
  }
}

listModelEvaluations();

Python

Before trying this sample, follow the setup instructions for this language on the Client Libraries page.

from google.cloud import automl

# TODO(developer): Uncomment and set the following variables
# project_id = "YOUR_PROJECT_ID"
# model_id = "YOUR_MODEL_ID"

client = automl.AutoMlClient()
# Get the full path of the model.
model_full_id = client.model_path(project_id, "us-central1", model_id)

print("List of model evaluations:")
for evaluation in client.list_model_evaluations(parent=model_full_id, filter=""):
    print(f"Model evaluation name: {evaluation.name}")
    print(f"Model annotation spec id: {evaluation.annotation_spec_id}")
    print(f"Create Time: {evaluation.create_time}")
    print(f"Evaluation example count: {evaluation.evaluated_example_count}")
    print(
        "Classification model evaluation metrics: {}".format(
            evaluation.classification_evaluation_metrics
        )
    )

Additional languages

C#: Please follow the C# setup instructions on the client libraries page and then visit the AutoML Vision reference documentation for .NET.

PHP: Please follow the PHP setup instructions on the client libraries page and then visit the AutoML Vision reference documentation for PHP.

Ruby: Please follow the Ruby setup instructions on the client libraries page and then visit the AutoML Vision reference documentation for Ruby.

Get model evaluation values

You can also get a specific model evaluation for a label (displayName) using an evaluation ID. To get your model evaluation ID, run the list model evaluations function shown in List model evaluations.

Web UI

  1. Open the Vision Dashboard and click the lightbulb icon in the left navigation bar to display the available models.

    To view the models for a different project, select the project from the drop-down list in the upper right of the title bar.

  2. Click the row for the model you want to evaluate.

  3. If necessary, click the Evaluate tab just below the title bar.

    If training has been completed for the model, AutoML Vision shows its evaluation metrics.

    updated evaluate page
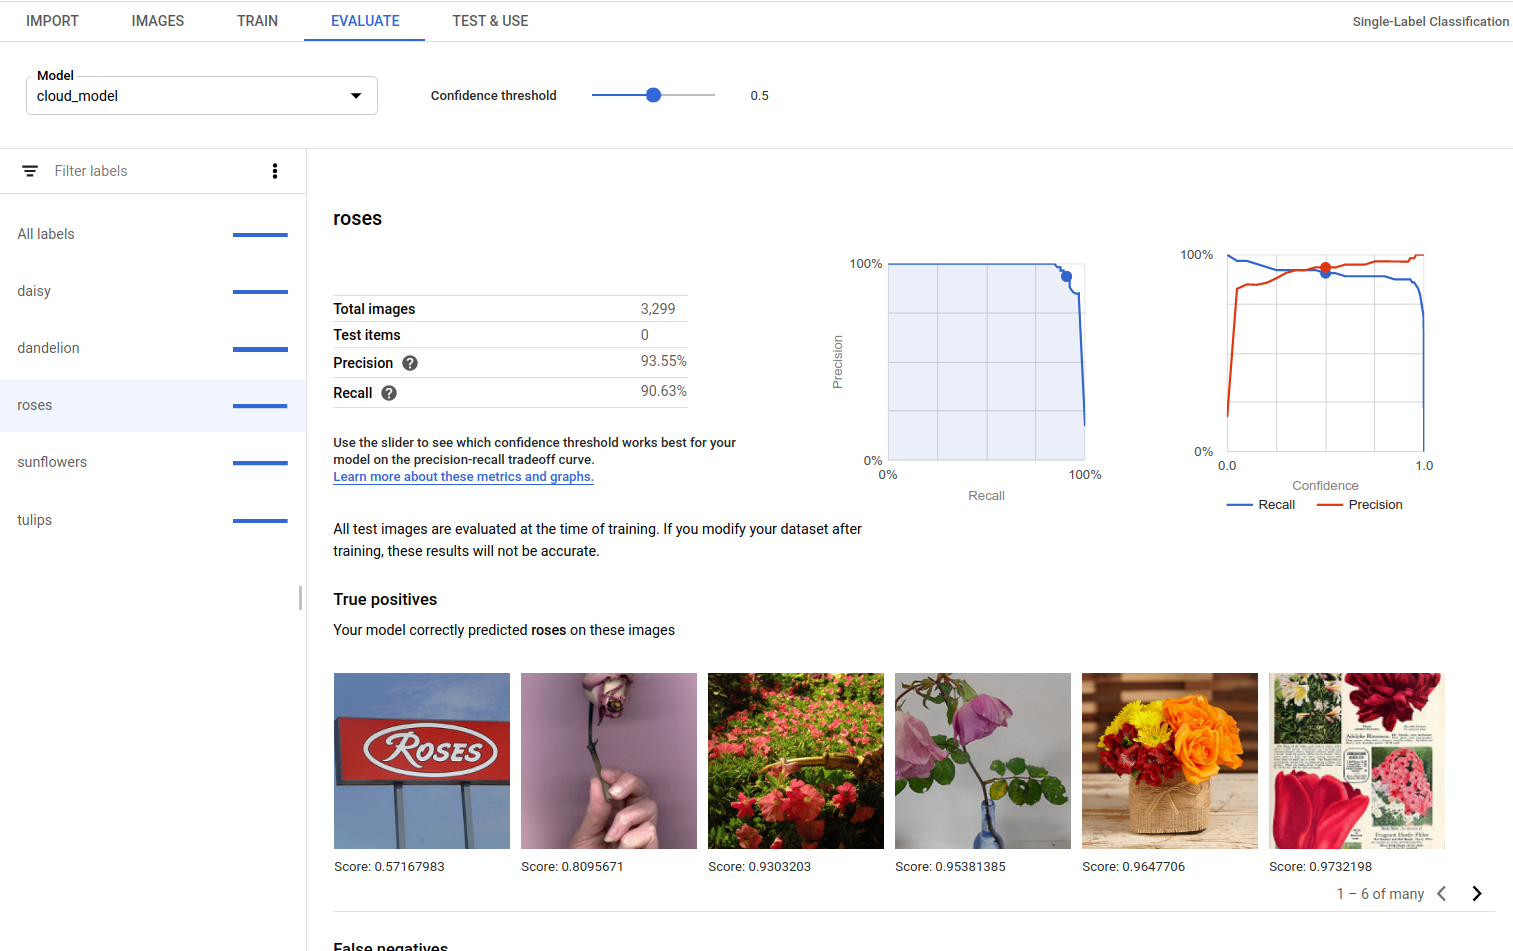
  4. To view the metrics for a specific label, select the label name from the list of labels in the lower part of the page.

    Model evaluation page specific label

REST

To get just the evaluation metrics for a specific label, add /{MODEL_EVALUATION_ID} to the request above from the response.

For example, you can find the model evaluation ID for the rose label (displayName) in the evaluation name returned from the list operation:

  • "name": "projects/PROJECT_ID/locations/us-central1/models/MODEL_ID/modelEvaluations/858136867710915695"

Before using any of the request data, make the following replacements:

  • project-id: your GCP project ID.
  • model-id: the ID of your model, from the response when you created the model. The ID is the last element of the name of your model. For example:
    • model name: projects/project-id/locations/location-id/models/IOD4412217016962778756
    • model id: IOD4412217016962778756
  • model-evaluation-id: the ID value of the model evaluation. You can get model evaluation IDs from the list model evaluations operation.

HTTP method and URL:

GET https://automl.googleapis.com/v1/projects/PROJECT_ID/locations/us-central1/models/MODEL_ID/modelEvaluations/MODEL_EVALUATION_ID

To send your request, choose one of these options:

curl

Execute the following command:

curl -X GET \
-H "Authorization: Bearer $(gcloud auth print-access-token)" \
-H "x-goog-user-project: project-id" \
"https://automl.googleapis.com/v1/projects/PROJECT_ID/locations/us-central1/models/MODEL_ID/modelEvaluations/MODEL_EVALUATION_ID"

PowerShell

Execute the following command:

$cred = gcloud auth print-access-token
$headers = @{ "Authorization" = "Bearer $cred"; "x-goog-user-project" = "project-id" }

Invoke-WebRequest `
-Method GET `
-Headers $headers `
-Uri "https://automl.googleapis.com/v1/projects/PROJECT_ID/locations/us-central1/models/MODEL_ID/modelEvaluations/MODEL_EVALUATION_ID" | Select-Object -Expand Content

You should receive a JSON response similar to the following:

Go

Before trying this sample, follow the setup instructions for this language on the Client Libraries page.

import (
	"context"
	"fmt"
	"io"

	automl "cloud.google.com/go/automl/apiv1"
	"cloud.google.com/go/automl/apiv1/automlpb"
)

// getModelEvaluation gets a model evaluation.
func getModelEvaluation(w io.Writer, projectID string, location string, modelID string, modelEvaluationID string) error {
	// projectID := "my-project-id"
	// location := "us-central1"
	// modelID := "TRL123456789..."
	// modelEvaluationID := "123456789..."

	ctx := context.Background()
	client, err := automl.NewClient(ctx)
	if err != nil {
		return fmt.Errorf("NewClient: %w", err)
	}
	defer client.Close()

	req := &automlpb.GetModelEvaluationRequest{
		Name: fmt.Sprintf("projects/%s/locations/%s/models/%s/modelEvaluations/%s", projectID, location, modelID, modelEvaluationID),
	}

	evaluation, err := client.GetModelEvaluation(ctx, req)
	if err != nil {
		return fmt.Errorf("GetModelEvaluation: %w", err)
	}

	fmt.Fprintf(w, "Model evaluation name: %v\n", evaluation.GetName())
	fmt.Fprintf(w, "Model annotation spec id: %v\n", evaluation.GetAnnotationSpecId())
	fmt.Fprintf(w, "Create Time:\n")
	fmt.Fprintf(w, "\tseconds: %v\n", evaluation.GetCreateTime().GetSeconds())
	fmt.Fprintf(w, "\tnanos: %v\n", evaluation.GetCreateTime().GetNanos())
	fmt.Fprintf(w, "Evaluation example count: %v\n", evaluation.GetEvaluatedExampleCount())
	fmt.Fprintf(w, "Classification model evaluation metrics: %v\n", evaluation.GetClassificationEvaluationMetrics())

	return nil
}

Java

Before trying this sample, follow the setup instructions for this language on the Client Libraries page.


import com.google.cloud.automl.v1.AutoMlClient;
import com.google.cloud.automl.v1.ModelEvaluation;
import com.google.cloud.automl.v1.ModelEvaluationName;
import java.io.IOException;

class GetModelEvaluation {

  static void getModelEvaluation() throws IOException {
    // TODO(developer): Replace these variables before running the sample.
    String projectId = "YOUR_PROJECT_ID";
    String modelId = "YOUR_MODEL_ID";
    String modelEvaluationId = "YOUR_MODEL_EVALUATION_ID";
    getModelEvaluation(projectId, modelId, modelEvaluationId);
  }

  // Get a model evaluation
  static void getModelEvaluation(String projectId, String modelId, String modelEvaluationId)
      throws IOException {
    // Initialize client that will be used to send requests. This client only needs to be created
    // once, and can be reused for multiple requests. After completing all of your requests, call
    // the "close" method on the client to safely clean up any remaining background resources.
    try (AutoMlClient client = AutoMlClient.create()) {
      // Get the full path of the model evaluation.
      ModelEvaluationName modelEvaluationFullId =
          ModelEvaluationName.of(projectId, "us-central1", modelId, modelEvaluationId);

      // Get complete detail of the model evaluation.
      ModelEvaluation modelEvaluation = client.getModelEvaluation(modelEvaluationFullId);

      System.out.format("Model Evaluation Name: %s\n", modelEvaluation.getName());
      System.out.format("Model Annotation Spec Id: %s", modelEvaluation.getAnnotationSpecId());
      System.out.println("Create Time:");
      System.out.format("\tseconds: %s\n", modelEvaluation.getCreateTime().getSeconds());
      System.out.format("\tnanos: %s", modelEvaluation.getCreateTime().getNanos() / 1e9);
      System.out.format(
          "Evalution Example Count: %d\n", modelEvaluation.getEvaluatedExampleCount());
      System.out.format(
          "Classification Model Evaluation Metrics: %s\n",
          modelEvaluation.getClassificationEvaluationMetrics());
    }
  }
}

Node.js

Before trying this sample, follow the setup instructions for this language on the Client Libraries page.

/**
 * TODO(developer): Uncomment these variables before running the sample.
 */
// const projectId = 'YOUR_PROJECT_ID';
// const location = 'us-central1';
// const modelId = 'YOUR_MODEL_ID';
// const modelEvaluationId = 'YOUR_MODEL_EVALUATION_ID';

// Imports the Google Cloud AutoML library
const {AutoMlClient} = require('@google-cloud/automl').v1;

// Instantiates a client
const client = new AutoMlClient();

async function getModelEvaluation() {
  // Construct request
  const request = {
    name: client.modelEvaluationPath(
      projectId,
      location,
      modelId,
      modelEvaluationId
    ),
  };

  const [response] = await client.getModelEvaluation(request);

  console.log(`Model evaluation name: ${response.name}`);
  console.log(`Model annotation spec id: ${response.annotationSpecId}`);
  console.log(`Model display name: ${response.displayName}`);
  console.log('Model create time');
  console.log(`\tseconds ${response.createTime.seconds}`);
  console.log(`\tnanos ${response.createTime.nanos / 1e9}`);
  console.log(`Evaluation example count: ${response.evaluatedExampleCount}`);
  console.log(
    `Classification model evaluation metrics: ${response.classificationEvaluationMetrics}`
  );
}

getModelEvaluation();

Python

Before trying this sample, follow the setup instructions for this language on the Client Libraries page.

from google.cloud import automl

# TODO(developer): Uncomment and set the following variables
# project_id = "YOUR_PROJECT_ID"
# model_id = "YOUR_MODEL_ID"
# model_evaluation_id = "YOUR_MODEL_EVALUATION_ID"

client = automl.AutoMlClient()
# Get the full path of the model evaluation.
model_path = client.model_path(project_id, "us-central1", model_id)
model_evaluation_full_id = f"{model_path}/modelEvaluations/{model_evaluation_id}"

# Get complete detail of the model evaluation.
response = client.get_model_evaluation(name=model_evaluation_full_id)

print(f"Model evaluation name: {response.name}")
print(f"Model annotation spec id: {response.annotation_spec_id}")
print(f"Create Time: {response.create_time}")
print(f"Evaluation example count: {response.evaluated_example_count}")
print(
    "Classification model evaluation metrics: {}".format(
        response.classification_evaluation_metrics
    )
)

True Positives, False Negatives, and False Positives (UI only)

In the user interface you can observe specific examples of model performance, namely true positive (TP), false negative (FN), and false positive (FP) instances from your TRAINING and VALIDATION sets.

Web UI

Before trying this sample, follow the setup instructions for this language on the Client Libraries page.

You can access the TP, FN, and FP view in the UI by selecting the Evaluate tab, and then selecting any specific label.

By viewing trends in these predictions, you can modify your training set to improve model performance.

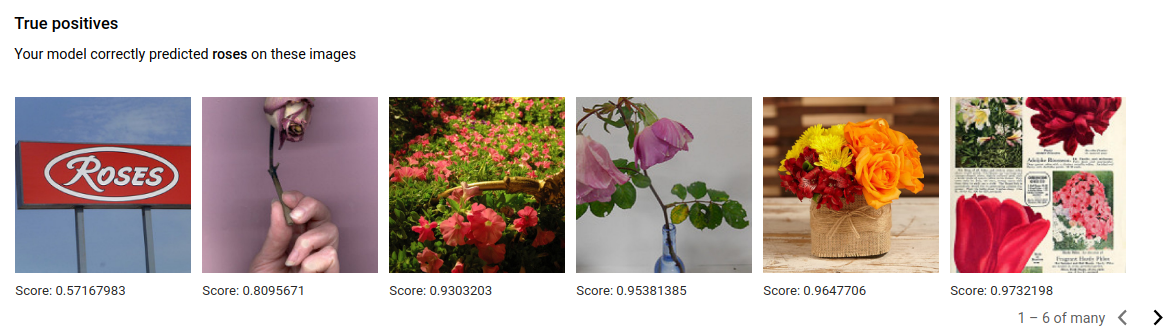
True positive images are sample images provided to the trained model that the model correctly annotated:

true positives shown

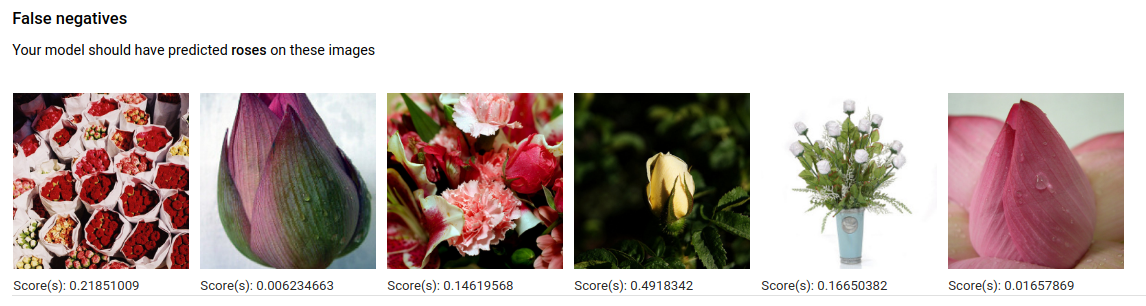
False negative images are similarly provided to the trained model, but the model failed to correctly annotate the image for the given label:

false negatives shown

Lastly, false positive images are those provided to the trained model that were annotated with the given label, but should not have been annotated:

false positives shown

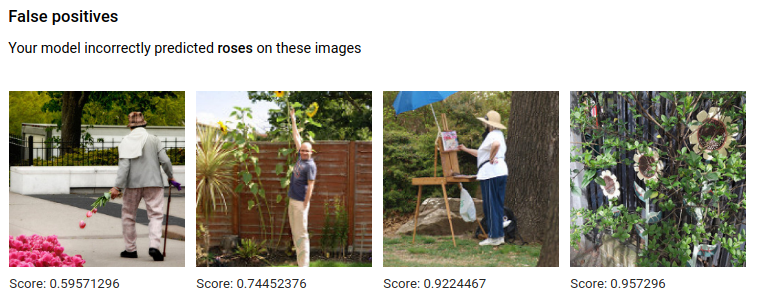
The model is selecting interesting corner cases, which presents an opportunity to refine your definitions and labels to help the model understand your label interpretations. For example, a stricter definition would help the model understand if you consider an abstract painting of a rose a "rose" (or not).

With repeated label, train, and evaluate loops your model will surface other such ambiguities in your data.

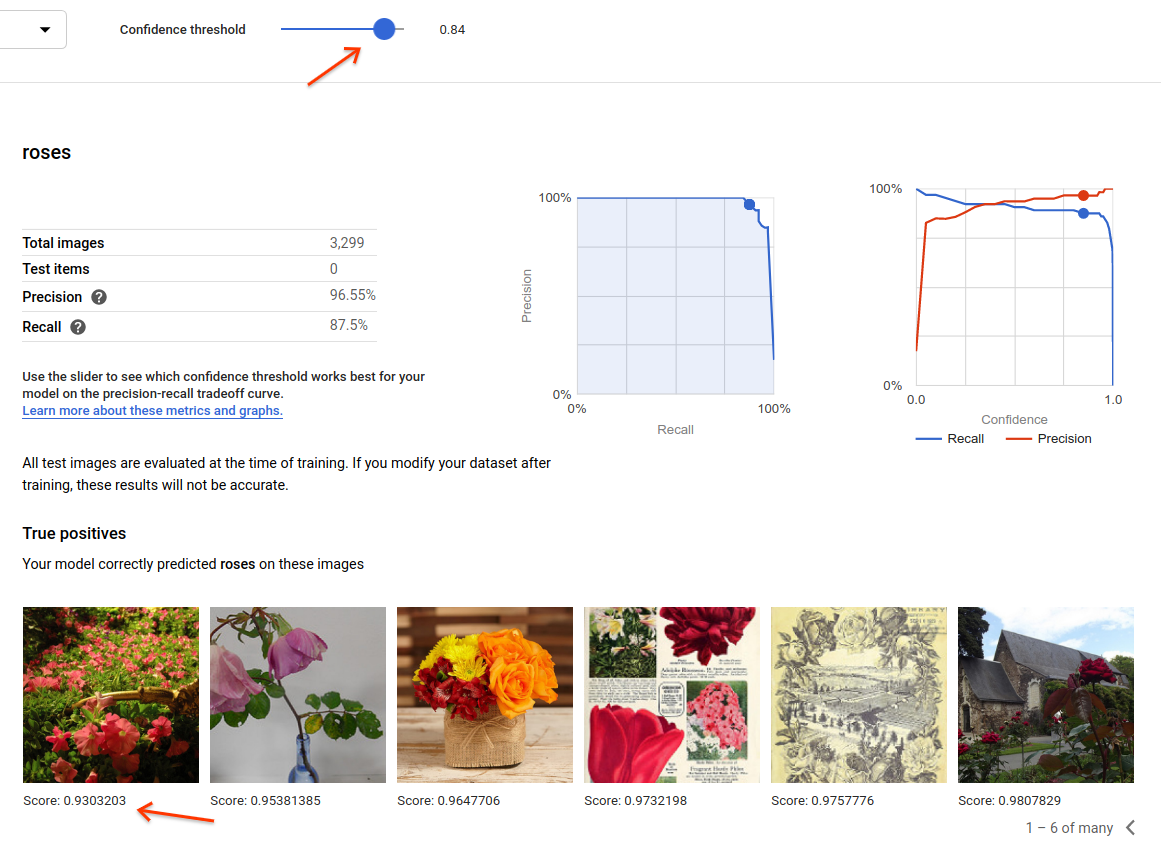
You can also adjust the score threshold in this view in the user interface, and the TP, FN, and FP images displayed will reflect the threshold change:

true positives with updated threshold

Iterate on your model

If you're not happy with the quality levels, you can go back to earlier steps to improve the quality:

  • AutoML Vision allows you to sort the images by how “confused” the model is, by the true label and its predicted label. Look through these images and make sure they're labeled correctly.
  • Consider adding more images to any labels with low quality.
  • You may need to add different types of images (e.g. wider angle, higher or lower resolution, different points of view).
  • Consider removing labels altogether if you don't have enough training images.
  • Remember that machines can’t read your label name; it's just a random string of letters to them. If you have one label that says "door" and another that says "door_with_knob" the machine has no way of figuring out the nuance other than the images you provide it.
  • Augment your data with more examples of true positives and negatives. Especially important examples are the ones that are close to the decision boundary (i.e. likely to produce confusion, but still correctly labeled).
  • Specify your own TRAIN, TEST, VALIDATION split. The tool randomly assigns images, but near-duplicates may end up in TRAIN and VALIDATION which could lead to overfitting and then poor performance on the TEST set.

Once you've made changes, train and evaluate a new model until you reach a high enough quality level.