Mengelola model

Model dilatih menggunakan set data yang sudah disiapkan dan Anda berikan. Pelacakan Objek AutoML Video Intelligence menggunakan item dari set data Anda untuk melatih, menguji, dan evaluate performa model. Selanjutnya, Anda harus meninjau hasilnya, menyesuaikan set data pelatihan sesuai kebutuhan, dan melatih model baru menggunakan set data yang ditingkatkan

Proses pelatihan model dapat memakan waktu beberapa jam untuk diselesaikan. AutoML API memungkinkan Anda memeriksa status pelatihan.

Karena AutoML Video Intelligence Object Tracking membuat model baru setiap kali Anda memulai pelatihan, project Anda dapat menyertakan banyak model. Anda bisa mendapatkan daftar model di project dan dapat menghapus model yang tidak diperlukan lagi.

Masa pakai maksimum untuk model adalah dua tahun. Anda harus membuat dan melatih model baru untuk terus melacak objek setelah jangka waktu tersebut.

Menggunakan curl atau PowerShell

Agar lebih mudah untuk menjalankan contoh curl (atau PowerShell) dalam topik ini, tetapkan variabel lingkungan berikut. Ganti project-id dengan nama project Google Cloud Anda.

export PROJECT_ID="project-id"

Melatih model

Jika memiliki set data dengan set item pelatihan berlabel yang solid, Anda dapat membuat dan melatih model.

UI Web

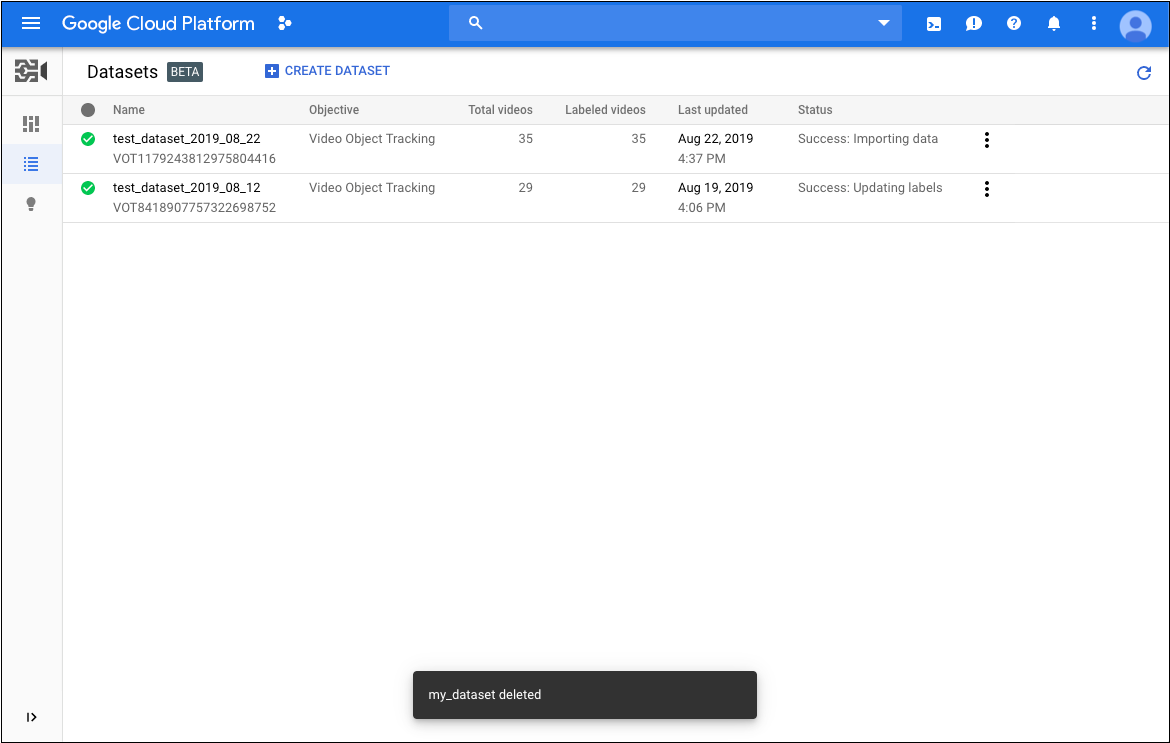
  1. Buka AutoML Video Object Tracking UI dan buka halaman Datasets.

    Halaman set data di Konsol Google Cloud
  2. Pilih set data yang ingin digunakan untuk melatih model Anda.

    Nama tampilan set data yang dipilih akan muncul di panel judul, dan halaman tersebut mencantumkan setiap item dalam set data beserta labelnya.

    Tab Video dengan dua video ditampilkan
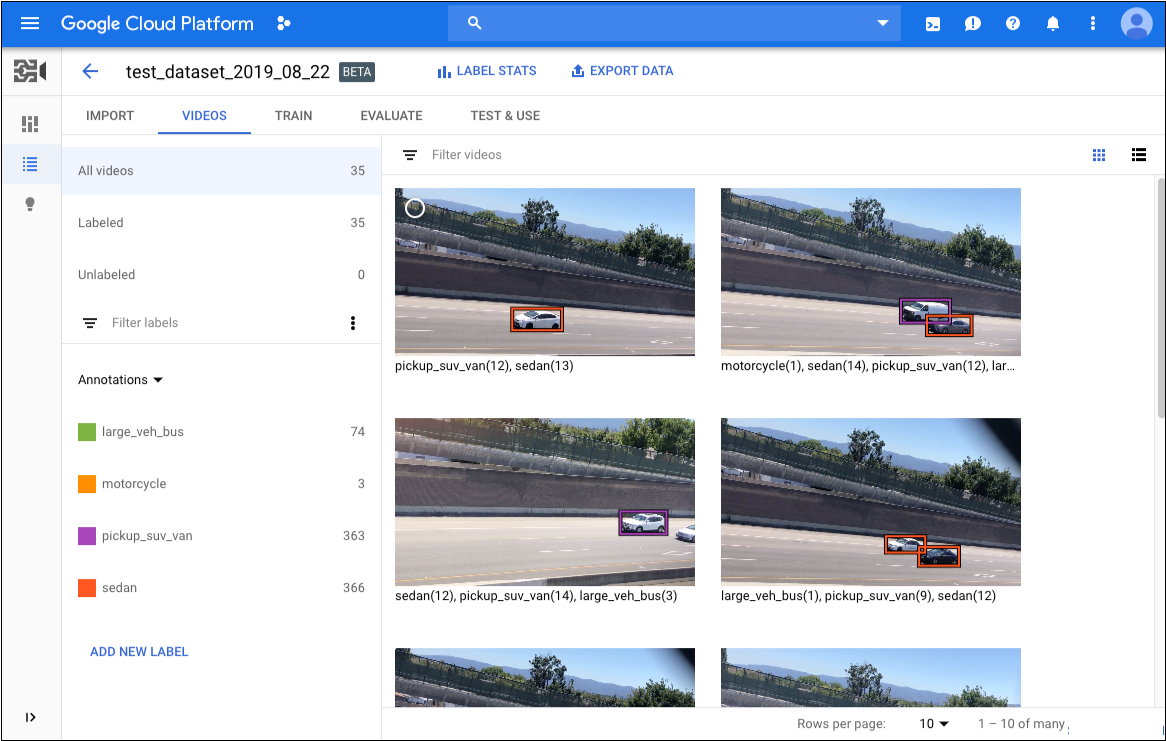
  3. Setelah selesai meninjau set data, klik tab Train di bawah panel judul.

    Halaman pelatihan memberikan analisis dasar set data Anda dan memberi tahu Anda apakah set data tersebut memadai untuk pelatihan. Jika Pelacakan Objek Video AutoML menyarankan perubahan, pertimbangkan untuk kembali ke halaman Video dan menambahkan item atau label.

  4. Setelah set data siap, klik Start Training untuk membuat model baru atau Train New Model jika ingin membuat model tambahan.

REST

Sebelum menggunakan salah satu data permintaan, lakukan penggantian berikut:

  • dataset-id: nama set data target Anda. Misalnya, nama tampilan my_dataset_01).
  • model-name: ganti dengan nama yang Anda pilih untuk model Anda.
  • Catatan:
    • project-number: nomor project Anda
    • location-id: region Cloud tempat anotasi seharusnya dilakukan. Region cloud yang didukung adalah: us-east1, us-west1, europe-west1, asia-east1. Jika tidak ada wilayah yang ditentukan, wilayah akan ditentukan berdasarkan lokasi file video.

Metode HTTP dan URL:

POST https://automl.googleapis.com/v1beta1/projects/project-number/locations/location-id/models

Isi JSON permintaan:

{
  "datasetId": "dataset-id",
  "displayName": "model-name",
  "videoObjectTrackingModelMetadata": {},
}

Untuk mengirim permintaan Anda, pilih salah satu opsi berikut:

curl

Simpan isi permintaan dalam file bernama request.json, dan jalankan perintah berikut:

curl -X POST \
-H "Authorization: Bearer $(gcloud auth print-access-token)" \
-H "x-goog-user-project: project-number" \
-H "Content-Type: application/json; charset=utf-8" \
-d @request.json \
"https://automl.googleapis.com/v1beta1/projects/project-number/locations/location-id/models"

PowerShell

Simpan isi permintaan dalam file bernama request.json, dan jalankan perintah berikut:

$cred = gcloud auth print-access-token
$headers = @{ "Authorization" = "Bearer $cred"; "x-goog-user-project" = "project-number" }

Invoke-WebRequest `
-Method POST `
-Headers $headers `
-ContentType: "application/json; charset=utf-8" `
-InFile request.json `
-Uri "https://automl.googleapis.com/v1beta1/projects/project-number/locations/location-id/models" | Select-Object -Expand Content
Anda akan menerima ID operasi untuk operasi pelatihan model Anda. Contoh di atas menunjukkan respons yang berisi ID operasi pelatihan model VOT1741767155885539328.

Java

Untuk mengautentikasi ke AutoML Video Object Tracking, siapkan Kredensial Default Aplikasi. Untuk mengetahui informasi selengkapnya, baca Menyiapkan autentikasi untuk lingkungan pengembangan lokal.

import com.google.api.gax.longrunning.OperationFuture;
import com.google.cloud.automl.v1beta1.AutoMlClient;
import com.google.cloud.automl.v1beta1.LocationName;
import com.google.cloud.automl.v1beta1.Model;
import com.google.cloud.automl.v1beta1.OperationMetadata;
import com.google.cloud.automl.v1beta1.VideoObjectTrackingModelMetadata;
import java.io.IOException;
import java.util.concurrent.ExecutionException;

class VideoObjectTrackingCreateModel {

  public static void main(String[] args)
      throws IOException, ExecutionException, InterruptedException {
    // TODO(developer): Replace these variables before running the sample.
    String projectId = "YOUR_PROJECT_ID";
    String datasetId = "YOUR_DATASET_ID";
    String displayName = "YOUR_DATASET_NAME";
    createModel(projectId, datasetId, displayName);
  }

  // Create a model
  static void createModel(String projectId, String datasetId, String displayName)
      throws IOException, ExecutionException, InterruptedException {
    // Initialize client that will be used to send requests. This client only needs to be created
    // once, and can be reused for multiple requests. After completing all of your requests, call
    // the "close" method on the client to safely clean up any remaining background resources.
    try (AutoMlClient client = AutoMlClient.create()) {
      // A resource that represents Google Cloud Platform location.
      LocationName projectLocation = LocationName.of(projectId, "us-central1");
      // Set model metadata.
      VideoObjectTrackingModelMetadata metadata =
          VideoObjectTrackingModelMetadata.newBuilder().build();
      Model model =
          Model.newBuilder()
              .setDisplayName(displayName)
              .setDatasetId(datasetId)
              .setVideoObjectTrackingModelMetadata(metadata)
              .build();

      // Create a model with the model metadata in the region.
      OperationFuture<Model, OperationMetadata> future =
          client.createModelAsync(projectLocation, model);
      // OperationFuture.get() will block until the model is created, which may take several hours.
      // You can use OperationFuture.getInitialFuture to get a future representing the initial
      // response to the request, which contains information while the operation is in progress.
      System.out.format("Training operation name: %s%n", future.getInitialFuture().get().getName());
      System.out.println("Training started...");
    }
  }
}

Node.js

Untuk mengautentikasi ke AutoML Video Object Tracking, siapkan Kredensial Default Aplikasi. Untuk mengetahui informasi selengkapnya, baca Menyiapkan autentikasi untuk lingkungan pengembangan lokal.

/**
 * TODO(developer): Uncomment these variables before running the sample.
 */
// const projectId = 'YOUR_PROJECT_ID';
// const location = 'us-central1';
// const dataset_id = 'YOUR_DATASET_ID';
// const displayName = 'YOUR_DISPLAY_NAME';

// Imports the Google Cloud AutoML library
const {AutoMlClient} = require('@google-cloud/automl').v1beta1;

// Instantiates a client
const client = new AutoMlClient();

async function createModel() {
  // Construct request
  const request = {
    parent: client.locationPath(projectId, location),
    model: {
      displayName: displayName,
      datasetId: datasetId,
      videoObjectTrackingModelMetadata: {},
    },
  };

  // Don't wait for the LRO
  const [operation] = await client.createModel(request);
  console.log(`Training started... ${operation}`);
  console.log(`Training operation name: ${operation.name}`);
}

createModel();

Python

Untuk mengautentikasi ke AutoML Video Object Tracking, siapkan Kredensial Default Aplikasi. Untuk mengetahui informasi selengkapnya, baca Menyiapkan autentikasi untuk lingkungan pengembangan lokal.

from google.cloud import automl_v1beta1 as automl

def create_model(
    project_id="YOUR_PROJECT_ID",
    dataset_id="YOUR_DATASET_ID",
    display_name="your_models_display_name",
):
    """Create a automl video classification model."""
    client = automl.AutoMlClient()

    # A resource that represents Google Cloud Platform loacation.
    project_location = f"projects/{project_id}/locations/us-central1"
    # Leave model unset to use the default base model provided by Google
    metadata = automl.VideoObjectTrackingModelMetadata()
    model = automl.Model(
        display_name=display_name,
        dataset_id=dataset_id,
        video_object_tracking_model_metadata=metadata,
    )

    # Create a model with the model metadata in the region.
    response = client.create_model(parent=project_location, model=model)

    print(f"Training operation name: {response.operation.name}")
    print("Training started...")

Mendapatkan status operasi

Anda dapat memeriksa status tugas yang berjalan lama seperti mengimpor item ke set data atau melatih model menggunakan ID operasi dari respons saat Anda memulai tugas.

REST

Sebelum menggunakan salah satu data permintaan, lakukan penggantian berikut:

  • operation-id: ID operasi yang berjalan lama yang dibuat untuk permintaan dan diberikan dalam respons saat Anda memulai operasi, misalnya VOT12345....
  • Catatan:
    • project-number: nomor project Anda
    • location-id: region Cloud tempat anotasi seharusnya dilakukan. Region cloud yang didukung adalah: us-east1, us-west1, europe-west1, asia-east1. Jika tidak ada wilayah yang ditentukan, wilayah akan ditentukan berdasarkan lokasi file video.

Metode HTTP dan URL:

GET https://automl.googleapis.com/v1beta1/projects/project-number/locations/location-id/operations/operation-id

Untuk mengirim permintaan Anda, pilih salah satu opsi berikut:

curl

Jalankan perintah berikut:

curl -X GET \
-H "Authorization: Bearer $(gcloud auth print-access-token)" \
-H "x-goog-user-project: project-number" \
"https://automl.googleapis.com/v1beta1/projects/project-number/locations/location-id/operations/operation-id"

PowerShell

Jalankan perintah berikut:

$cred = gcloud auth print-access-token
$headers = @{ "Authorization" = "Bearer $cred"; "x-goog-user-project" = "project-number" }

Invoke-WebRequest `
-Method GET `
-Headers $headers `
-Uri "https://automl.googleapis.com/v1beta1/projects/project-number/locations/location-id/operations/operation-id" | Select-Object -Expand Content
Operasi impor dapat memerlukan waktu beberapa saat untuk diselesaikan. Saat tugas impor selesai, status operasi menunjukkan done: true tanpa error yang tercantum, seperti yang ditunjukkan pada contoh di atas.
  • operation-name: nama operasi seperti yang ditampilkan oleh AutoML Video Intelligence Object Tracking API. Nama operasi memiliki format projects/project-number/locations/location-id/operations/operation-id

Java

Untuk mengautentikasi ke AutoML Video Object Tracking, siapkan Kredensial Default Aplikasi. Untuk mengetahui informasi selengkapnya, baca Menyiapkan autentikasi untuk lingkungan pengembangan lokal.

import com.google.cloud.automl.v1beta1.AutoMlClient;
import com.google.longrunning.Operation;
import java.io.IOException;

class GetOperationStatus {

  static void getOperationStatus() throws IOException {
    // TODO(developer): Replace these variables before running the sample.
    String operationFullId = "projects/[projectId]/locations/us-central1/operations/[operationId]";
    getOperationStatus(operationFullId);
  }

  // Get the status of an operation
  static void getOperationStatus(String operationFullId) throws IOException {
    // Initialize client that will be used to send requests. This client only needs to be created
    // once, and can be reused for multiple requests. After completing all of your requests, call
    // the "close" method on the client to safely clean up any remaining background resources.
    try (AutoMlClient client = AutoMlClient.create()) {
      // Get the latest state of a long-running operation.
      Operation operation = client.getOperationsClient().getOperation(operationFullId);

      // Display operation details.
      System.out.println("Operation details:");
      System.out.format("\tName: %s%n", operation.getName());
      System.out.format("\tMetadata Type Url: %s%n", operation.getMetadata().getTypeUrl());
      System.out.format("\tDone: %s%n", operation.getDone());
      if (operation.hasResponse()) {
        System.out.format("\tResponse Type Url: %s%n", operation.getResponse().getTypeUrl());
      }
      if (operation.hasError()) {
        System.out.println("\tResponse:");
        System.out.format("\t\tError code: %s%n", operation.getError().getCode());
        System.out.format("\t\tError message: %s%n", operation.getError().getMessage());
      }
    }
  }
}

Node.js

Untuk mengautentikasi ke AutoML Video Object Tracking, siapkan Kredensial Default Aplikasi. Untuk mengetahui informasi selengkapnya, baca Menyiapkan autentikasi untuk lingkungan pengembangan lokal.

/**
 * TODO(developer): Uncomment these variables before running the sample.
 */
// const projectId = 'YOUR_PROJECT_ID';
// const location = 'us-central1';
// const operationId = 'YOUR_OPERATION_ID';

// Imports the Google Cloud AutoML library
const {AutoMlClient} = require('@google-cloud/automl').v1beta1;

// Instantiates a client
const client = new AutoMlClient();

async function getOperationStatus() {
  // Construct request
  const request = {
    name: `projects/${projectId}/locations/${location}/operations/${operationId}`,
  };

  const [response] = await client.operationsClient.getOperation(request);

  console.log(`Name: ${response.name}`);
  console.log('Operation details:');
  console.log(response);
}

getOperationStatus();

Python

Untuk mengautentikasi ke AutoML Video Object Tracking, siapkan Kredensial Default Aplikasi. Untuk mengetahui informasi selengkapnya, baca Menyiapkan autentikasi untuk lingkungan pengembangan lokal.

from google.cloud import automl_v1beta1 as automl

def get_operation_status(
    operation_full_id="projects/YOUR_PROJECT_ID/locations/us-central1/"
    "operations/YOUR_OPERATION_ID",
):
    """Get operation status."""
    client = automl.AutoMlClient()

    # Get the latest state of a long-running operation.
    response = client._transport.operations_client.get_operation(operation_full_id)

    print(f"Name: {response.name}")
    print("Operation details:")
    print(response)

Membatalkan Operasi

Anda dapat membatalkan tugas prediksi batch, pelatihan, atau impor menggunakan ID operasi.

REST

Sebelum menggunakan salah satu data permintaan, lakukan penggantian berikut:

  • operation id: diberikan dalam respons saat Anda memulai operasi, misalnya VOT123....
  • Catatan:
    • project-id: project ID GCP Anda
    • location-id: region Cloud tempat anotasi seharusnya dilakukan. Region cloud yang didukung adalah: us-east1, us-west1, europe-west1, asia-east1. Jika tidak ada wilayah yang ditentukan, wilayah akan ditentukan berdasarkan lokasi file video.

Metode HTTP dan URL:

POST https://automl.googleapis.com/v1beta1/projects/project-id/locations/location-id/operations/operation-id:cancel

Untuk mengirim permintaan, perluas salah satu opsi berikut:

Anda akan menerima kode status yang berhasil (2xx), serta respons yang kosong.

Java

Untuk mengautentikasi ke AutoML Video Object Tracking, siapkan Kredensial Default Aplikasi. Untuk mengetahui informasi selengkapnya, baca Menyiapkan autentikasi untuk lingkungan pengembangan lokal.


import com.google.cloud.automl.v1beta1.AutoMlClient;
import io.grpc.StatusRuntimeException;
import java.io.IOException;

class CancelOperation {

  static void cancelOperation() throws IOException, InterruptedException, StatusRuntimeException {
    // TODO(developer): Replace these variables before running the sample.
    String projectId = "YOUR_PROJECT_ID";
    String location = "us-central1";
    String operationId = "YOUR_OPERATION_ID";
    String operationFullId =
        String.format("projects/%s/locations/%s/operations/%s", projectId, location, operationId);
    cancelOperation(operationFullId);
  }

  static void cancelOperation(String operationFullId)
      throws IOException, InterruptedException, StatusRuntimeException {
    // Initialize client that will be used to send requests. This client only needs to be created
    // once, and can be reused for multiple requests. After completing all of your requests, call
    // the "close" method on the client to safely clean up any remaining background resources.
    try (AutoMlClient client = AutoMlClient.create()) {
      client.getOperationsClient().cancelOperation(operationFullId);
      System.out.println("Operation cancelled");
    }
  }
}

Mendapatkan informasi tentang model

Setelah pelatihan selesai, Anda bisa mendapatkan informasi tentang model yang baru dibuat.

Contoh di bagian ini menampilkan metadata dasar tentang suatu model. Untuk mendapatkan detail tentang akurasi dan kesiapan model, silakan melihat Mengevaluasi model.

UI Web

  1. Buka halaman Models di AutoML Video Object Tracking UI.

    Halaman Model dengan satu model ditampilkan
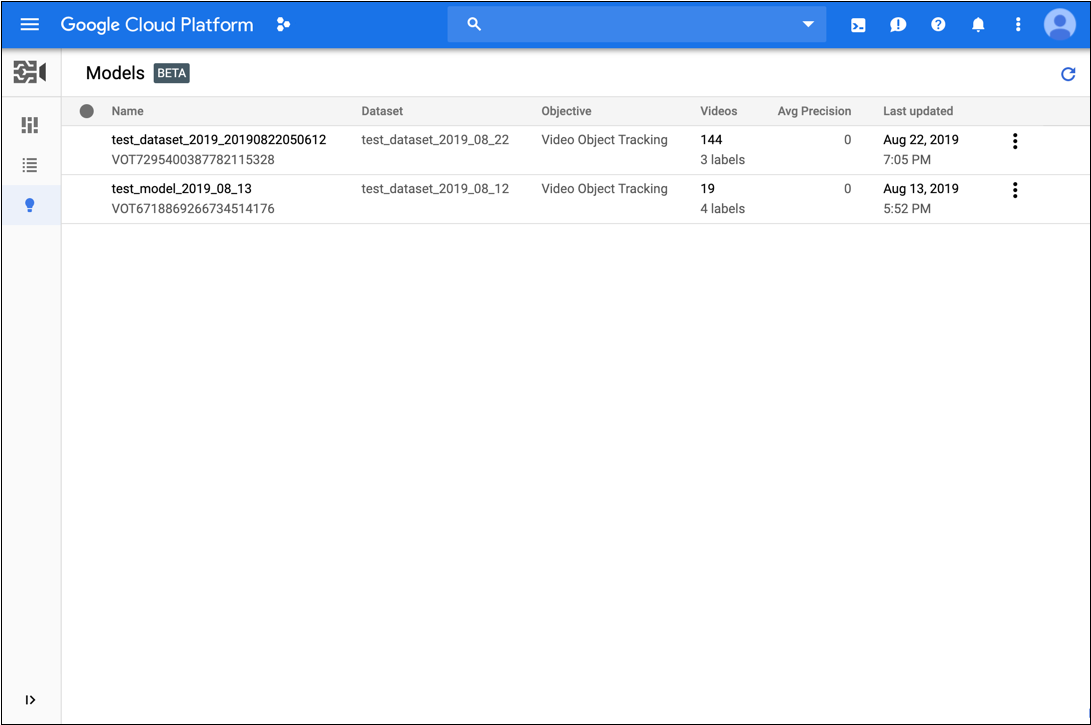
  2. Klik nama model yang ingin Anda lihat.

REST

Sebelum menggunakan salah satu data permintaan, lakukan penggantian berikut:

  • model-id:ID model Anda berasal dari respons saat Anda membuat model. ID adalah elemen terakhir dari nama model Anda. Contoh:
    • nama model: projects/project-number/locations/location-id/models/model-id
    • id model: model-id
  • dataset-id: ganti dengan ID set data untuk set data Anda (bukan nama tampilan). Contoh: VOT3940649673949184000
  • project-number: jumlah project Anda

Metode HTTP dan URL:

GET https://automl.googleapis.com/v1beta1/projects/project-id/locations/location-id/models/model-id

Meminta isi JSON:

{
  "displayName": "display-name",
  "dataset_id": "dataset-id",
  "videoClassificationModelMetadata": {}
}

Untuk mengirim permintaan Anda, perluas salah satu opsi berikut:

Anda akan melihat respons JSON seperti berikut:

Java

Untuk mengautentikasi ke AutoML Video Object Tracking, siapkan Kredensial Default Aplikasi. Untuk mengetahui informasi selengkapnya, baca Menyiapkan autentikasi untuk lingkungan pengembangan lokal.

import com.google.cloud.automl.v1beta1.AutoMlClient;
import com.google.cloud.automl.v1beta1.Model;
import com.google.cloud.automl.v1beta1.ModelName;
import io.grpc.StatusRuntimeException;
import java.io.IOException;

class GetModel {

  static void getModel() throws IOException, StatusRuntimeException {
    // TODO(developer): Replace these variables before running the sample.
    String projectId = "YOUR_PROJECT_ID";
    String modelId = "YOUR_MODEL_ID";
    getModel(projectId, modelId);
  }

  // Get a model
  static void getModel(String projectId, String modelId)
      throws IOException, StatusRuntimeException {
    // Initialize client that will be used to send requests. This client only needs to be created
    // once, and can be reused for multiple requests. After completing all of your requests, call
    // the "close" method on the client to safely clean up any remaining background resources.
    try (AutoMlClient client = AutoMlClient.create()) {
      // Get the full path of the model.
      ModelName modelFullId = ModelName.of(projectId, "us-central1", modelId);
      Model model = client.getModel(modelFullId);

      // Display the model information.
      System.out.format("Model name: %s%n", model.getName());
      // To get the model id, you have to parse it out of the `name` field. As models Ids are
      // required for other methods.
      // Name Format: `projects/{project_id}/locations/{location_id}/models/{model_id}`
      String[] names = model.getName().split("/");
      String retrievedModelId = names[names.length - 1];
      System.out.format("Model id: %s%n", retrievedModelId);
      System.out.format("Model display name: %s%n", model.getDisplayName());
      System.out.println("Model create time:");
      System.out.format("\tseconds: %s%n", model.getCreateTime().getSeconds());
      System.out.format("\tnanos: %s%n", model.getCreateTime().getNanos());
      System.out.format("Model deployment state: %s%n", model.getDeploymentState());
    }
  }
}

Node.js

Untuk mengautentikasi ke AutoML Video Object Tracking, siapkan Kredensial Default Aplikasi. Untuk mengetahui informasi selengkapnya, baca Menyiapkan autentikasi untuk lingkungan pengembangan lokal.

/**
 * TODO(developer): Uncomment these variables before running the sample.
 */
// const projectId = 'YOUR_PROJECT_ID';
// const location = 'us-central1';
// const modelId = 'YOUR_MODEL_ID';

// Imports the Google Cloud AutoML library
const {AutoMlClient} = require('@google-cloud/automl').v1beta1;

// Instantiates a client
const client = new AutoMlClient();

async function getModel() {
  // Construct request
  const request = {
    name: client.modelPath(projectId, location, modelId),
  };

  const [response] = await client.getModel(request);

  console.log(`Model name: ${response.name}`);
  console.log(
    `Model id: ${
      response.name.split('/')[response.name.split('/').length - 1]
    }`
  );
  console.log(`Model display name: ${response.displayName}`);
  console.log('Model create time');
  console.log(`\tseconds ${response.createTime.seconds}`);
  console.log(`\tnanos ${response.createTime.nanos / 1e9}`);
  console.log(`Model deployment state: ${response.deploymentState}`);
}

getModel();

Python

Untuk mengautentikasi ke AutoML Video Object Tracking, siapkan Kredensial Default Aplikasi. Untuk mengetahui informasi selengkapnya, baca Menyiapkan autentikasi untuk lingkungan pengembangan lokal.

from google.cloud import automl_v1beta1 as automl

# TODO(developer): Uncomment and set the following variables
# project_id = "YOUR_PROJECT_ID"
# model_id = "YOUR_MODEL_ID"

client = automl.AutoMlClient()
# Get the full path of the model.
model_full_id = client.model_path(project_id, "us-central1", model_id)
model = client.get_model(name=model_full_id)

# Retrieve deployment state.
if model.deployment_state == automl.Model.DeploymentState.DEPLOYED:
    deployment_state = "deployed"
else:
    deployment_state = "undeployed"

# Display the model information.
print(f"Model name: {model.name}")
print("Model id: {}".format(model.name.split("/")[-1]))
print(f"Model display name: {model.display_name}")
print(f"Model create time: {model.create_time}")
print(f"Model deployment state: {deployment_state}")

Membuat daftar model

Sebuah proyek dapat meliputi banyak model. Bagian ini menjelaskan cara mengambil daftar model yang tersedia untuk sebuah project.

UI Web

Buka halaman Models di UI Pelacakan Objek Video AutoML untuk melihat model dalam project Anda.

Halaman Model dengan satu model dalam daftar

Untuk melihat model bagi project yang berbeda, pilih project dari menu drop-down di kanan atas kolom judul.

REST

Sebelum menggunakan salah satu data permintaan, lakukan penggantian berikut:

  • project-number: jumlah project Anda
  • location-id: region Cloud tempat anotasi seharusnya dilakukan. Region cloud yang didukung adalah: us-east1, us-west1, europe-west1, asia-east1. Jika tidak ada wilayah yang ditentukan, wilayah akan ditentukan berdasarkan lokasi file video.

Metode HTTP dan URL:

GET https://automl.googleapis.com/v1beta1/projects/project-number/locations/location-id/models

Untuk mengirim permintaan, perluas salah satu opsi berikut:

Anda akan menerima respons JSON yang mirip dengan yang berikut ini:

Java

Untuk mengautentikasi ke AutoML Video Object Tracking, siapkan Kredensial Default Aplikasi. Untuk mengetahui informasi selengkapnya, baca Menyiapkan autentikasi untuk lingkungan pengembangan lokal.

import com.google.cloud.automl.v1beta1.AutoMlClient;
import com.google.cloud.automl.v1beta1.ListModelsRequest;
import com.google.cloud.automl.v1beta1.LocationName;
import com.google.cloud.automl.v1beta1.Model;
import java.io.IOException;

class ListModels {

  static void listModels() throws IOException {
    // TODO(developer): Replace these variables before running the sample.
    String projectId = "YOUR_PROJECT_ID";
    listModels(projectId);
  }

  // List the models available in the specified location
  static void listModels(String projectId) throws IOException {
    // Initialize client that will be used to send requests. This client only needs to be created
    // once, and can be reused for multiple requests. After completing all of your requests, call
    // the "close" method on the client to safely clean up any remaining background resources.
    try (AutoMlClient client = AutoMlClient.create()) {
      // A resource that represents Google Cloud Platform location.
      LocationName projectLocation = LocationName.of(projectId, "us-central1");

      // Create list models request.
      ListModelsRequest listModelsRequest =
          ListModelsRequest.newBuilder()
              .setParent(projectLocation.toString())
              .setFilter("")
              .build();

      // List all the models available in the region by applying filter.
      System.out.println("List of models:");
      for (Model model : client.listModels(listModelsRequest).iterateAll()) {
        // Display the model information.
        System.out.format("Model name: %s%n", model.getName());
        // To get the model id, you have to parse it out of the `name` field. As models Ids are
        // required for other methods.
        // Name Format: `projects/{project_id}/locations/{location_id}/models/{model_id}`
        String[] names = model.getName().split("/");
        String retrievedModelId = names[names.length - 1];
        System.out.format("Model id: %s%n", retrievedModelId);
        System.out.format("Model display name: %s%n", model.getDisplayName());
        System.out.println("Model create time:");
        System.out.format("\tseconds: %s%n", model.getCreateTime().getSeconds());
        System.out.format("\tnanos: %s%n", model.getCreateTime().getNanos());
        System.out.format("Model deployment state: %s%n", model.getDeploymentState());
      }
    }
  }
}

Node.js

Untuk mengautentikasi ke AutoML Video Object Tracking, siapkan Kredensial Default Aplikasi. Untuk mengetahui informasi selengkapnya, baca Menyiapkan autentikasi untuk lingkungan pengembangan lokal.

/**
 * TODO(developer): Uncomment these variables before running the sample.
 */
// const projectId = 'YOUR_PROJECT_ID';
// const location = 'us-central1';

// Imports the Google Cloud AutoML library
const {AutoMlClient} = require('@google-cloud/automl').v1beta1;

// Instantiates a client
const client = new AutoMlClient();

async function listModels() {
  // Construct request
  const request = {
    parent: client.locationPath(projectId, location),
    filter: 'translation_model_metadata:*',
  };

  const [response] = await client.listModels(request);

  console.log('List of models:');
  for (const model of response) {
    console.log(`Model name: ${model.name}`);
    console.log(`
      Model id: ${model.name.split('/')[model.name.split('/').length - 1]}`);
    console.log(`Model display name: ${model.displayName}`);
    console.log('Model create time');
    console.log(`\tseconds ${model.createTime.seconds}`);
    console.log(`\tnanos ${model.createTime.nanos / 1e9}`);
    console.log(`Model deployment state: ${model.deploymentState}`);
  }
}

listModels();

Python

Untuk mengautentikasi ke AutoML Video Object Tracking, siapkan Kredensial Default Aplikasi. Untuk mengetahui informasi selengkapnya, baca Menyiapkan autentikasi untuk lingkungan pengembangan lokal.

from google.cloud import automl_v1beta1 as automl

# TODO(developer): Uncomment and set the following variables
# project_id = "YOUR_PROJECT_ID"

client = automl.AutoMlClient()
# A resource that represents Google Cloud Platform location.
project_location = f"projects/{project_id}/locations/us-central1"
request = automl.ListModelsRequest(parent=project_location, filter="")
response = client.list_models(request=request)

print("List of models:")
for model in response:
    # Display the model information.
    if model.deployment_state == automl.Model.DeploymentState.DEPLOYED:
        deployment_state = "deployed"
    else:
        deployment_state = "undeployed"

    print(f"Model name: {model.name}")
    print("Model id: {}".format(model.name.split("/")[-1]))
    print(f"Model display name: {model.display_name}")
    print(f"Model create time: {model.create_time}")
    print(f"Model deployment state: {deployment_state}")

Menghapus model

Contoh berikut akan menghapus model.

UI Web

  1. Buka halaman Models di AutoML Video Object Tracking UI.

    Halaman Model dengan satu model ditampilkan
  2. Klik menu tiga titik di ujung kanan baris yang ingin Anda hapus, lalu pilih Delete.
  3. Klik Konfirmasi di kotak dialog konfirmasi.

REST

Sebelum menggunakan salah satu data permintaan, lakukan penggantian berikut:

  • project-number: jumlah project Anda
  • location-id: region Cloud tempat anotasi seharusnya dilakukan. Region cloud yang didukung adalah: us-east1, us-west1, europe-west1, asia-east1. Jika tidak ada wilayah yang ditentukan, wilayah akan ditentukan berdasarkan lokasi file video.
  • model-id: ganti dengan ID untuk model Anda.

Metode HTTP dan URL:

DELETE https://automl.googleapis.com/v1beta1/projects/project-number/locations/location-id/models/model-id

Untuk mengirim permintaan, perluas salah satu opsi berikut:

Anda akan menerima kode status yang berhasil (2xx), serta respons yang kosong.

Java

Untuk mengautentikasi ke AutoML Video Object Tracking, siapkan Kredensial Default Aplikasi. Untuk mengetahui informasi selengkapnya, baca Menyiapkan autentikasi untuk lingkungan pengembangan lokal.

import com.google.cloud.automl.v1beta1.AutoMlClient;
import com.google.cloud.automl.v1beta1.ModelName;
import com.google.protobuf.Empty;
import java.io.IOException;
import java.util.concurrent.ExecutionException;

class DeleteModel {

  public static void main(String[] args)
      throws IOException, ExecutionException, InterruptedException {
    // TODO(developer): Replace these variables before running the sample.
    String projectId = "YOUR_PROJECT_ID";
    String modelId = "YOUR_MODEL_ID";
    deleteModel(projectId, modelId);
  }

  // Delete a model
  static void deleteModel(String projectId, String modelId)
      throws IOException, ExecutionException, InterruptedException {
    // Initialize client that will be used to send requests. This client only needs to be created
    // once, and can be reused for multiple requests. After completing all of your requests, call
    // the "close" method on the client to safely clean up any remaining background resources.
    try (AutoMlClient client = AutoMlClient.create()) {
      // Get the full path of the model.
      ModelName modelFullId = ModelName.of(projectId, "us-central1", modelId);

      // Delete a model.
      Empty response = client.deleteModelAsync(modelFullId).get();

      System.out.println("Model deletion started...");
      System.out.println(String.format("Model deleted. %s", response));
    }
  }
}

Node.js

Untuk mengautentikasi ke AutoML Video Object Tracking, siapkan Kredensial Default Aplikasi. Untuk mengetahui informasi selengkapnya, baca Menyiapkan autentikasi untuk lingkungan pengembangan lokal.

/**
 * TODO(developer): Uncomment these variables before running the sample.
 */
// const projectId = 'YOUR_PROJECT_ID';
// const location = 'us-central1';
// const modelId = 'YOUR_MODEL_ID';

// Imports the Google Cloud AutoML library
const {AutoMlClient} = require('@google-cloud/automl').v1beta1;

// Instantiates a client
const client = new AutoMlClient();

async function deleteModel() {
  // Construct request
  const request = {
    name: client.modelPath(projectId, location, modelId),
  };

  const [response] = await client.deleteModel(request);
  console.log(`Model deleted: ${response}`);
}

deleteModel();

Python

Untuk mengautentikasi ke AutoML Video Object Tracking, siapkan Kredensial Default Aplikasi. Untuk mengetahui informasi selengkapnya, baca Menyiapkan autentikasi untuk lingkungan pengembangan lokal.

from google.cloud import automl_v1beta1 as automl

# TODO(developer): Uncomment and set the following variables
# project_id = "YOUR_PROJECT_ID"
# model_id = "YOUR_MODEL_ID"

client = automl.AutoMlClient()
# Get the full path of the model.
model_full_id = client.model_path(project_id, "us-central1", model_id)
response = client.delete_model(name=model_full_id)

print(f"Model deleted. {response.result()}")