목표
Cloud Vision API에서 인식한 텍스트를 Cloud Translation API에 전달합니다.
Cloud Translation 용어집을 만들고 사용하여 Cloud Translation API 번역을 맞춤설정합니다.
Text-to-Speech API를 사용하여 번역된 텍스트의 오디오 표현을 만듭니다.
비용
각 Google Cloud API에는 별도의 가격 책정 체계가 적용됩니다.가격 책정에 대한 자세한 내용은 Cloud Vision 가격 책정 가이드, Cloud Translation 가격 책정 가이드, Text-to-Speech 가격 책정 가이드를 참조하세요.
시작하기 전에
다음 사항을 확인하세요.- Vision API, Cloud Translation API, Text-to-Speech API가 사용 설정된 Google Cloud 콘솔의 프로젝트
- Python 프로그래밍에 대한 기본적인 지식 숙지
코드 샘플 다운로드
이 튜토리얼에서는 Python용 Cloud 클라이언트 라이브러리의 samples/snippets/hybrid_glossaries 디렉터리에 있는 코드를 사용합니다.
이 튜토리얼에 사용할 코드로 이동하여 다운로드하려면 터미널에서 다음 명령어를 실행하세요.
git clone https://github.com/googleapis/python-translate.git
cd samples/snippets/hybrid_glossaries/
클라이언트 라이브러리 설정
이 튜토리얼에서는 Vision, Translation, Text-to-Speech 클라이언트 라이브러리를 사용합니다.
관련 클라이언트 라이브러리를 설치하려면 터미널에서 다음 명령어를 실행하세요.
pip install --upgrade google-cloud-vision
pip install --upgrade google-cloud-translate
pip install --upgrade google-cloud-texttospeech
용어집 생성을 위한 권한 설정
Translation 용어집을 만들려면 'Cloud Translation API 편집자' 권한이 있는 서비스 계정 키를 사용해야 합니다.
Cloud Translation API 편집자 권한이 있는 서비스 계정 키를 설정하려면 다음을 수행합니다.
서비스 계정을 만듭니다.
Google Cloud 콘솔에서 서비스 계정 페이지로 이동합니다.
프로젝트를 선택합니다.
서비스 계정 만들기를 클릭합니다.
서비스 계정 이름 필드에 이름을 입력합니다.Google Cloud 콘솔은 이 이름을 기반으로 서비스 계정 ID 필드를 채웁니다.
선택사항: 서비스 계정 설명 필드에 서비스 계정의 설명을 입력합니다.
만들고 계속하기를 클릭합니다.
역할 선택 필드를 클릭하고 Cloud Translation > Cloud Translation API 편집자를 선택합니다.
완료를 클릭하여 서비스 계정 만들기를 마칩니다.
브라우저 창을 닫지 마세요. 다음 단계에서 사용합니다.
방금 만든 서비스 계정의 JSON 키를 다운로드합니다.
- Google Cloud 콘솔에서 만든 서비스 계정의 이메일 주소를 클릭합니다.
- 키를 클릭합니다.
- 키 추가를 클릭한 후 새 키 만들기를 클릭합니다.
만들기를 클릭합니다. JSON 키 파일이 컴퓨터에 다운로드됩니다.
키 파일은 서비스 계정으로 인증하는 데 사용될 수 있으므로 키 파일을 안전하게 저장해야 합니다. 원하는 경우 이 파일을 이동하고 이름을 변경할 수 있습니다.
닫기를 클릭합니다.
터미널의
hybrid_glossaries폴더에서 다음 명령어를 사용하여GOOGLE_APPLICATION_CREDENTIALS변수를 설정합니다.path_to_key를 다운로드한 JSON 파일(새 서비스 계정 키 포함)의 경로로 바꿉니다.Linux 또는 macOS
export GOOGLE_APPLICATION_CREDENTIALS=path_to_key
Windows
set GOOGLE_APPLICATION_CREDENTIALS=path_to_key
라이브러리 가져오기
이 튜토리얼에서는 다음과 같은 시스템 가져오기 및 클라이언트 라이브러리 가져오기를 사용합니다.
프로젝트 ID 설정
Google Cloud 프로젝트를 Google Cloud API에 대한 각 요청과 연결해야 합니다. 터미널에서 GOOGLE_CLOUD_PROJECT 환경 변수를 설정하여 Google Cloud 프로젝트를 지정합니다.
다음 명령어에서 PROJECT_NUMBER_OR_ID를 Google Cloud 프로젝트 번호 또는 ID로 바꿉니다. 터미널에서 다음 명령어를 실행합니다.
Linux 또는 macOS
export GOOGLE_CLOUD_PROJECT=PROJECT_NUMBER_OR_ID
Windows
set GOOGLE_CLOUD_PROJECT=PROJECT_NUMBER_OR_ID
이 튜토리얼에서는 다음과 같은 전역 프로젝트 ID 변수를 사용합니다.
Vision을 사용하여 이미지에서 텍스트 인식
Vision API를 사용하여 이미지에서 텍스트를 인식하고 추출합니다.
Vision API는 광학 문자 인식(OCR)을 사용하여 밀집 텍스트(또는 DOCUMENT_TEXT_DETECTION) 인식과 희소 텍스트 인식(또는 TEXT_DETECTION)의 2가지 텍스트 인식 기능을 지원합니다.
다음 코드는 Vision API DOCUMENT_TEXT_DETECTION 기능을 사용하여 밀집 텍스트가 있는 사진에서 텍스트를 인식하는 방법을 보여줍니다.
용어집에서 Translation 사용
이미지에서 텍스트를 추출한 후 Translation 용어집을 사용하여 추출된 텍스트의 번역을 맞춤설정합니다. 용어집은 지정된 용어의 Cloud Translation API 번역을 재정의하는 사전 정의된 번역을 제공합니다.
용어집의 사용 사례는 다음과 같습니다.
제품 이름: 예를 들어 'Google Home'은 'Google Home'으로 번역해야 합니다.
모호한 단어: 예를 들어 'bat'라는 단어는 스포츠 장비나 동물을 의미할 수 있습니다. 스포츠 관련 번역을 수행 중이라면 용어집을 사용하여 'bat'에 대한 동물 번역어가 아니라 스포츠 번역어를 Cloud Translation API에 제공할 수 있습니다.
차용어: 예를 들어 프랑스어 'bouillabaisse'는 영어로도 'bouillabaisse'입니다. 'bouillabaisse'라는 영어 단어는 프랑스어에서 들어왔습니다. 따라서 프랑스 문화에 대한 지식이 없는 영어 화자는 bouillabaisse가 '부야베스'라는 프랑스식 생선 스튜 요리라는 것을 모를 수 있습니다. 프랑스어 'bouillabaisse'가 영어 'fish stew'로 번역되도록 용어집 번역을 재정의할 수 있습니다.
용어집 파일 만들기
Cloud Translation API는 TSV, CSV 또는 TMX 용어집 파일을 허용합니다. 이 튜토리얼에서는 Cloud Storage에 업로드된 CSV 파일을 사용하여 동의어 세트를 정의합니다.
용어집 CSV 파일을 만들려면 다음 안내를 따르세요.
CSV 파일의 첫 번째 행에서 ISO-639 또는 BCP-47 언어 코드를 사용하여 열의 언어를 지정합니다.
fr,en,
CSV 파일의 각 행에 동의어 쌍을 나열합니다. 용어를 쉼표로 구분합니다. 다음 예시는 다양한 음식의 프랑스어 단어에 대해 영어 번역을 정의합니다.
fr,en,
chèvre,goat cheese,
crème brulée,crème brulée,
bouillabaisse,fish stew,
steak frites,steak with french fries,
단어의 변형을 정의합니다. Cloud Translation API는 대소문자를 구분하고 악센트 부호가 있는 단어와 같은 특수문자를 인식합니다. 단어의 다른 철자를 명시적으로 정의하여 용어집에서 단어의 변형을 처리하도록 합니다.
fr,en,
chevre,goat cheese,
Chevre,Goat cheese,
chèvre,goat cheese,
Chèvre,Goat cheese,
crème brulée,crème brulée,
Crème brulée,Crème brulée,
Crème Brulée,Crème Brulée,
bouillabaisse,fish stew,
Bouillabaisse,Fish stew,
steak frites,steak with french fries,
Steak frites,Steak with french fries,
Steak Frites,Steak with French Fries,
용어집을 Cloud Storage 버킷에 업로드합니다. 이 튜토리얼에서는 Cloud Storage 버킷에 용어집 파일을 업로드하거나 Cloud Storage 버킷을 만들지 않아도 됩니다. 대신 Cloud Storage 비용이 발생하지 않도록 이 튜토리얼용으로 생성된 공개적으로 사용 가능한 용어집 파일을 사용하세요. Cloud Storage에 있는 용어집 파일의 URI를 Cloud Translation API로 보내어 용어집 리소스를 만듭니다. 이 튜토리얼에서 공개적으로 사용할 수 있는 용어집 파일의 URI는 gs://cloud-samples-data/translation/bistro_glossary.csv입니다. 용어집을 다운로드하려면 위의 URI 링크를 클릭하되 새 탭에서 열지는 마세요.
용어집 리소스 만들기
용어집을 사용하려면 Cloud Translation API로 용어집 리소스를 만들어야 합니다. 용어집 리소스를 만들려면 Cloud Storage에 있는 용어집 파일의 URI를 Cloud Translation API로 보냅니다.
'Cloud Translation API 편집자' 권한이 있는 서비스 계정 키를 사용하고 터미널에서 프로젝트 ID를 설정해야 합니다.
다음 함수는 용어집 리소스를 만듭니다. 이 용어집 리소스를 사용하면 이 가이드의 다음 단계에서 번역 요청을 맞춤설정할 수 있습니다.
용어집으로 번역
용어집 리소스를 만들면 이 용어집 리소스를 사용하여 Cloud Translation API로 보내는 텍스트의 번역을 맞춤설정할 수 있습니다.
다음 함수는 이전에 만든 용어집 리소스를 사용하여 텍스트 번역을 맞춤설정합니다.
음성 합성 마크업 언어로 Text-to-Speech 사용
이제 이미지 인식 텍스트의 번역을 맞춤설정했으므로 Text-to-Speech API를 사용할 수 있습니다. Text-to-Speech API는 번역된 텍스트의 합성 오디오를 만들 수 있습니다.
Text-to-Speech API는 일반 텍스트 문자열 또는 음성 합성 마크업 언어(SSML)로 마크업된 텍스트 문자열에서 합성 오디오를 생성합니다. SSML은 SSML 태그로 텍스트에 주석을 달 수 있는 마크업 언어입니다. SSML 태그를 사용하면 Text-to-Speech API가 합성 음성의 형식을 지정하는 방법에 영향을 줄 수 있습니다.
다음 함수는 SSML 문자열을 MP3 파일 형식의 합성 음성으로 변환합니다.
요약 정리
이전 단계에서는 Vision, Translation, Text-to-Speech를 사용하는 hybrid_glossaries.py 함수를 정의했습니다. 이제 이러한 함수를 사용하여 다음 사진에서 번역된 텍스트의 합성 음성을 생성할 수 있습니다.
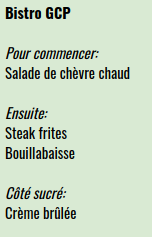
다음 코드는 hybrid_glossaries.py에 정의된 함수를 호출하여 다음을 수행합니다.
Cloud Translation API 용어집 리소스 만들기
Vision API를 사용하여 위의 이미지에서 텍스트 인식
인식된 텍스트의 Cloud Translation API 용어집 번역 수행
번역된 텍스트의 Text-to-Speech 합성 음성 생성
코드 실행
코드를 실행하려면 복제된 hybrid_glossaries 디렉터리의 터미널에 다음 명령어를 입력합니다.
python hybrid_tutorial.py
다음이 출력됩니다.
Created glossary bistro-glossary.
Audio content written to file resources/example.mp3
hybrid_glossaries.py를 실행한 후 hybrid_glossaries 디렉터리에서 resources 디렉터리로 이동합니다.
리소스 디렉터리에서 example.mp3 파일을 확인합니다.
다음 오디오 클립을 듣고 example.mp3 파일이 동일하게 소리나는지 확인합니다.
오류 메시지 문제 해결
403 IAM permission 'cloudtranslate.glossaries.create' denied.
'Cloud Translation API 편집자' 권한이 없는 서비스 계정 키를 사용하면 이 예외가 발생합니다.
KeyError: 'GOOGLE_CLOUD_PROJECT'
GOOGLE_CLOUD_PROJECT 변수를 설정하지 않으면 이 오류가 발생합니다.
400 Invalid resource name project id
소문자, 숫자, 마침표, 콜론, 하이픈 이외의 문자가 포함된 용어집 이름을 사용하거나 'Cloud Translation API 편집자' 권한이 없는 서비스 계정 키를 사용하면 이 예외가 발생합니다.
File filename was not found.
GOOGLE_APPLICATION_CREDENTIALS 변수를 잘못된 파일 경로로 설정하면 이 예외가 발생합니다.
Could not automatically determine credentials. Please set GOOGLE_APPLICATION_CREDENTIALS or explicitly create credentials and re-run the application
GOOGLE_APPLICATION_CREDENTIALS 변수를 설정하지 않으면 이 예외가 발생합니다.
Forbidden: 403 POST API has not been used or is disabled
API를 사용 설정하지 않고 Cloud Translation API, Cloud Vision API 또는 Text-to-Speech API를 호출하면 이 경고가 발생합니다.
AttributeError: 'module' object has no attribute 'escape'
Python 2.7.10 또는 그 이전 버전은
HTML과 호환되지 않습니다. 이 오류를 수정하려면 Python 가상 환경을 사용합니다. 가상 환경에서는 최신 버전의 Python이 사용됩니다.UnicodeEncodeError
Python 2.7.10 또는 그 이전 버전은
HTML과 호환되지 않습니다. 이 오류를 수정하려면 Python 가상 환경을 사용합니다. 가상 환경에서는 최신 버전의 Python이 사용됩니다.
삭제
불필요한 프로젝트가 있는 경우 Google Cloud 콘솔을 사용하여 삭제합니다. 프로젝트를 삭제하면 이 가이드에서 사용한 리소스에 대한 추가 비용이 Cloud Billing 계정에 부과되지 않습니다.
프로젝트 삭제
- Google Cloud 콘솔에서 프로젝트 페이지로 이동합니다.
- 프로젝트 목록에서 삭제할 프로젝트를 선택하고 삭제를 클릭합니다.
- 대화상자에서 프로젝트 ID를 입력하고 종료를 클릭하여 프로젝트를 삭제합니다.
다음 단계
수고하셨습니다. Vision OCR을 사용하여 이미지에서 텍스트를 인식했습니다. 또한 Translation 용어집을 만들고 이 용어집으로 번역을 수행했습니다. 그런 다음 Text-to-Speech를 사용하여 번역된 텍스트의 합성 오디오를 생성했습니다.
Vision, Cloud Translation, Text-to-Speech에 대한 지식을 쌓으려면 다음 안내를 따르세요.
- 나만의 용어집을 만듭니다. Cloud Storage 버킷을 만들고 용어집 CSV 파일을 버킷에 업로드하는 방법을 알아보세요.
- Translation 용어집을 사용하는 다른 방법을 실험해 보세요.
- Cloud Vision OCR에서 Cloud Storage를 사용하는 방법을 알아보세요.
- Text-to-Speech에서 SSML을 사용하는 방법을 자세히 알아보세요.
- Vision OCR을 사용할 때 Vision API
imageContext필드를 사용하여 사진에 대한 추가 컨텍스트를 전달하는 방법을 알아보세요. - 커뮤니티 가이드를 살펴보세요.