本文档介绍如何设置 Visual Studio 的发布向导,以简化将 .NET 应用部署到 Google Cloud的工作。
简介
借助最新版本的 Cloud Tools for Visual Studio,您可以更轻松地将 .NET 应用部署到 Google Cloud。我们现在在扩展程序中内置了一个部署向导,可将您的应用部署到以下受支持的目标:
- Compute Engine:适用于 ASP.NET 4.x 应用
- App Engine 柔性环境和 Google Kubernetes Engine:适用于 ASP.NET Core 应用
部署向导将自动检测项目支持的目标,并引导您完成部署过程。
开始使用
要调用部署向导,请依次点击工具 > Google Cloud Tools > 将 [项目名称] 发布到 Google Cloud (Publish [PROJECT-NAME] to Google Cloud),或右键点击“解决方案资源管理器”(Solution Explorer) 中的项目节点,然后点击将 [项目名称] 发布到 Google Cloud (Publish [PROJECT-NAME] to Google Cloud)。
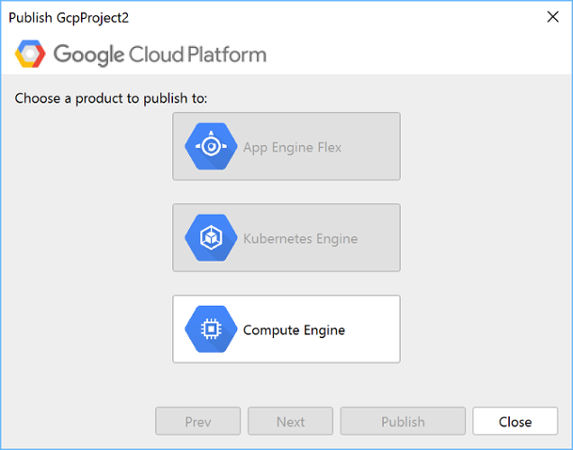
部署向导将显示与所选项目兼容的 Google Cloud 部署目标。
如果要更改项目,请依次点击工具 > Google Cloud Tools > 打开 Cloud Explorer (Open Cloud Explorer) 以打开 Cloud Explorer,然后选择要部署的项目。
部署 ASP.NET 4.x 应用
要在 Compute Engine 上部署 ASP.NET 4.x 应用,请执行以下操作:
依次点击工具 > Google Cloud Tools > 将 [项目名称] 发布到 Google Cloud (Publish [PROJECT-NAME] to Google Cloud),以打开部署向导。
选择 Compute Engine
选择 Windows 虚拟机实例和部署凭据
Windows 虚拟机必须运行 IIS 并能够运行 ASP.NET 4.x 应用(例如从 Deployment Manager 创建的 ASP.NET 虚拟机)。
选择部署凭据。要创建 Windows 凭据,请点击管理凭据。
点击发布以构建应用并将其部署到选定的虚拟机。
Visual Studio 输出窗口中将显示部署进度,并且 Visual Studio shell 状态栏中将显示进度指示器。
部署 ASP.NET Core 应用
ASP.NET Core 应用可以在 Docker 容器内运行,因此您的应用可以部署在 App Engine 柔性环境和 GKE 上。
在 App Engine 柔性环境中部署
要在柔性环境中部署,请执行以下操作:
依次点击工具 > Google Cloud Tools > 将 [项目名称] 发布到 Google Cloud (Publish [PROJECT-NAME] to Google Cloud),以打开部署向导。
选择 App Engine 柔性环境 (App Engine Flex)
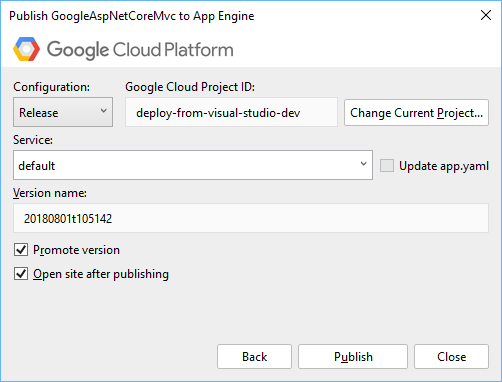
输入应用的版本名称和流量管理选项。
- 默认版本名称基于当前系统时间。您可以指定其他名称。
- 提升版本 (Promote version) 允许您选择此应用版本是否接收 100% 的流量。如果选中此复选框,新应用在部署后将立即接收所有流量。
点击发布以构建应用并将其部署到 App Engine 柔性环境。
大功告成!系统将部署您的应用,Visual Studio 输出窗口中将显示部署进度。
您可以通过在项目的根文件夹中创建 app.yaml 文件来完成自定义 App Engine 设置。
要生成 app.yaml,请右键点击要部署的项目,然后点击为 [项目名称] 生成 app.yaml 和 Dockerfile (Generate app.yaml and Dockerfile for [PROJECT-NAME])。如果要运行默认的 Docker 映像,您可以删除 Dockerfile。
在 GKE 上部署
要在 GKE 上部署,请执行以下操作:
依次点击工具 > Google Cloud Tools > 将 [项目名称] 发布到 Google Cloud (Publish [PROJECT-NAME] to Google Cloud),以打开部署向导。
选择 Container Engine。

选择要部署的集群,输入应用的部署名称、版本和副本数量。
要创建集群,请点击创建新集群 (Create new cluster)。系统会将您转至 Google Cloud 控制台上的集群创建页面。如需在 Visual Studio 中查看该集群,请点击刷新集群。
在创建 Kubernetes 部署时将使用部署名称,以及在集群上运行应用使用的 kubernetes 服务(如果选中)。您可以将名称更改为更具描述性的名称。
- 默认版本名称基于当前系统时间。您可以指定其他名称。
副本数量可以更改,默认值为 3。
您可以选择在互联网上公开 Kubernetes 服务。通过在互联网上公开公共服务,您将获得一个公共 IP 地址,您可以使用该 IP 地址从集群外部访问您的服务。
点击发布。
大功告成!您的应用将被打包到一个 Docker 映像中并部署到您的容器中。如果您的应用是一项公开服务,则 Visual Studio 将等待可用的服务 IP 地址。