Si tienes un proyecto basado en Gradle y usas IntelliJ IDEA Community Edition, configura tu proyecto con el Gradle App Engine Plugin.
Asegúrate de sincronizar tu proyecto con Gradle.
Si no tienes una aplicación, pero aun así deseas probar estos procedimientos de implementación, descarga la app de muestra:
Clona la app de muestra Hello World en tu máquina local:
Haz clic en la elipsis (…) junto al campo Server (Servidor).
En el cuadro de diálogo, verifica que el campo Name (Nombre) muestre Google App Engine.
Haz clic en Aceptar.
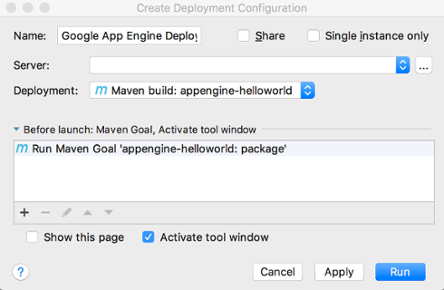
Selecciona la fuente de Deployment (Implementación).
Si usas la Community Edition, Cloud Code for IntelliJ únicamente admite implementaciones desde un artefacto de Maven o Gradle.
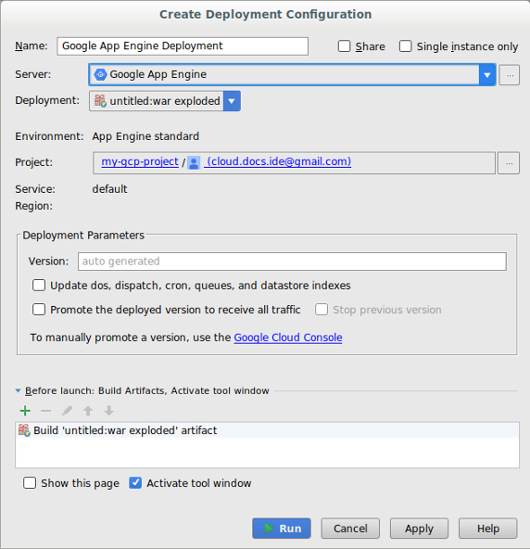
En el campo Project (Proyecto), selecciona uno.
La primera vez que configures la implementación, se te solicitará que accedas a la cuenta asociada con el proyecto de la consola de Google Cloud que deseas implementar.
Llena los otros campos según sea necesario a fin de configurar la implementación.
Haz clic en Run (Ejecutar) para compilar tu app y luego implementarla.
En la ventana Servidores de la aplicación, haz clic en el nombre de tu proyecto para supervisar el progreso de su implementación. Si la ventana no se abre, haz clic en View (Ver) > Tool Windows (Ventanas de herramientas) > Application Servers (Servidores de la aplicación).
Cuando se complete la implementación, podrás ver la URL de tu app en el resultado de la consola.
Actualiza la configuración estándar de App Engine
Después de crear la configuración inicial de la implementación, puedes modificarla según las necesidades de tu aplicación.
Selecciona File (Archivo) > Project Structure (Estructura del proyecto).
Aparecerá el cuadro de diálogo Project Structure (Estructura del proyecto).
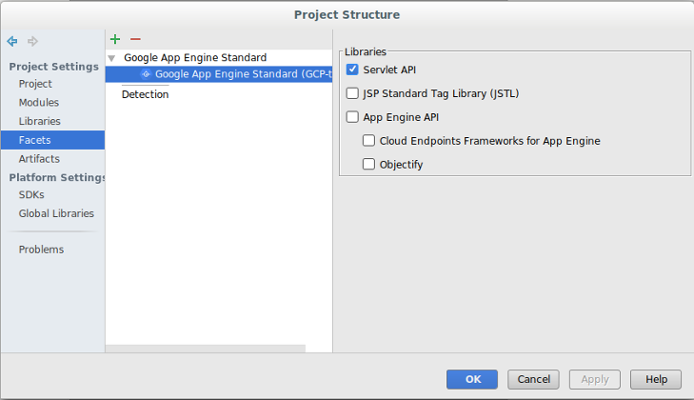
En Project Settings (Configuración del proyecto), selecciona Facets (Facetas).
Selecciona la faceta estándar de App Engine.
Selecciona las bibliotecas que desees agregar a tu proyecto.
Haz clic en Aceptar.
Borra el servidor
Si alguna vez deseas borrar el servidor que configuraste para tu proyecto, puedes hacerlo de la siguiente manera:
Para enviar comentarios o informar un problema en tu IDE de IntelliJ, ve a Tools > Cloud Code > Help / About > Submit feedback or report an issue para informar un problema en GitHub.
[[["Fácil de comprender","easyToUnderstand","thumb-up"],["Resolvió mi problema","solvedMyProblem","thumb-up"],["Otro","otherUp","thumb-up"]],[["Difícil de entender","hardToUnderstand","thumb-down"],["Información o código de muestra incorrectos","incorrectInformationOrSampleCode","thumb-down"],["Faltan la información o los ejemplos que necesito","missingTheInformationSamplesINeed","thumb-down"],["Problema de traducción","translationIssue","thumb-down"],["Otro","otherDown","thumb-down"]],["Última actualización: 2025-09-04 (UTC)"],[[["\u003cp\u003eCloud Code supports deploying Java 8 applications to the App Engine standard environment within IntelliJ IDEA, but App Engine Java 8 support is ending, and new projects using it are not recommended.\u003c/p\u003e\n"],["\u003cp\u003eTo deploy to App Engine using Cloud Code, users must first create an App Engine app, set up Cloud Code, and add App Engine standard framework support.\u003c/p\u003e\n"],["\u003cp\u003eIntelliJ IDEA Community Edition only supports deploying Maven or Gradle-based projects to App Engine, and if you have a Gradle project you must configure it with the App Engine Gradle plugin.\u003c/p\u003e\n"],["\u003cp\u003eUsers can configure and modify App Engine deployment settings, such as selecting the project, server, and deployment source, through the Cloud Code interface in IntelliJ IDEA.\u003c/p\u003e\n"],["\u003cp\u003eUsers can easily remove an App Engine server configuration from their project via the IDE settings, under the Clouds section.\u003c/p\u003e\n"]]],[],null,["# Deploy to the App Engine Standard Environment in Cloud Code for IntelliJ\n\n| **Caution:** As of January 31, 2024, Java 8 support for App Engine has ended, and will be deprecated on January 31, 2026. As a result, Cloud Code disables App Engine by default. To enable App Engine in your IDE, navigate to **Settings** \\\u003e **Google\n| Cloud Code** \\\u003e **App Engine** . Due to the upcoming deprecation of App Engine, we don't recommend creating new App Engine projects. For more information about App Engine deprecations, see [Feature deprecations](/appengine/docs/standard/deprecations). For more information about the runtime support schedule for App Engine, see [Runtime support schedule](/appengine/docs/standard/lifecycle/support-schedule).\n\nThis document describes how to deploy an App Engine application to the\n[App Engine standard\nenvironment](/appengine/docs/standard)\nfrom within IntelliJ IDEA.\n| **Note:** The following IDEs support this feature:\n|\n| - IntelliJ IDEA - Ultimate\n| - IntelliJ IDEA - Community\n| **Note:** For the App Engine standard environment, only Java applications using [Java 8 runtime](https://cloud.google.com/appengine/docs/standard/java/runtime) are supported on Cloud Code.\n| **Note:** If you are using IntelliJ IDEA Community Edition, you can deploy Maven-based and Gradle-based projects to the App Engine standard environment.\n\nBefore you begin\n----------------\n\n- Follow the [Create an App](/code/docs/intellij/create-standard)\n guide to install and set up Cloud Code as well as\n create an App Engine app for the standard\n environment. Be sure to add\n [App Engine standard framework\n support](/code/docs/intellij/create-standard#framework).\n\n- If you have a Gradle-based project and are using IntelliJ IDEA Community\n Edition, configure your project with the [App Engine Gradle\n plugin](https://github.com/GoogleCloudPlatform/app-gradle-plugin#how-to-use).\n Be sure to sync your project with Gradle.\n\n If you don't have an application but still want to try these deployment\n procedures, download the sample app:\n 1. Clone the **Hello World** sample app to your local machine:\n\n git clone https://github.com/GoogleCloudPlatform/java-docs-samples\n\n 2. In IntelliJ, select **File** \\\u003e **Open** to open the file selector.\n\n 3. Navigate to `/java-docs-samples/appengine-java8/`.\n\n 4. Select the `/helloworld/` directory.\n\n 5. Click **OK**.\n\nCreating the deployment configuration\n-------------------------------------\n\n1. Choose **Tools** \\\u003e **Cloud Code** \\\u003e **App Engine** \\\u003e\n **Deploy to App Engine**.\n\n2. Confirm the server configuration:\n\n 1. Click the ellipsis (...) next to the **Server** field.\n\n 2. In the dialog, verify that the **Name** field displays\n **Google App Engine**.\n\n 3. Click **OK**.\n\n3. Select the **Deployment** source.\n\n If you're using Community Edition, Cloud Code for IntelliJ only supports\n deploying from a Maven or a Gradle artifact.\n4. Select a project in the **Project** field.\n\n The first time you configure the deployment, you will be prompted to sign in\n to the account associated with the Google Cloud console project that\n you want to deploy.\n\n5. Fill in other fields as needed to configure the deployment.\n\n6. Click **Run** to build and deploy your app.\n\n7. In the Application Servers window, click the name of your project to monitor\n its deployment progress. If the window is not displaying, click\n **View** \\\u003e **Tool Windows** \\\u003e **Application Servers**.\n\n After deployment completes, you can view your app's URL in the console\n output.\n\nUpdate the App Engine standard configurations\n---------------------------------------------\n\nAfter creating the initial deployment configuration, you can make changes to\nthose configurations as needed by your application.\n\n1. Select **File** \\\u003e **Project Structure**.\n\n The **Project Structure** dialog displays.\n2. Under **Project Settings** , select **Facets**.\n\n3. Select the App Engine standard facet.\n\n \u003cbr /\u003e\n\n4. Select the libraries you want to add to your project.\n\n5. Click **OK**.\n\nDeleting the server\n-------------------\n\nIf you ever want to delete the server you configured for your\nproject, you can do so as follows:\n\n1. Choose **File** \\\u003e **Settings** \\\u003e **Build, Execution, Deployment** \\\u003e\n **Clouds**.\n\n On macOS, this is **IntelliJ IDEA** \\\u003e **Preferences** \\\u003e\n **Build, Execution, Deployment** \\\u003e **Clouds**.\n2. Select your server (App Engine) and click the minus sign (-) at the\n top of the window to remove it.\n\n3. Click **OK**.\n\nWhat's next\n-----------\n\n- You can add your project to [Cloud Source Repositories](/code/docs/intellij/vcs) if you haven't done so already.\n\nGet support\n-----------\n\nTo submit feedback or report an issue in your IntelliJ IDE, go to\n**Tools** \\\u003e **Cloud Code** \\\u003e **Help / About** \\\u003e **Submit\nfeedback or report an issue** to report an issue on [GitHub](https://github.com/GoogleCloudPlatform/cloud-code-intellij/issues)."]]