Wenn Sie ein auf Gradle basierendes Projekt und die IntelliJ IDEA Community Edition verwenden, konfigurieren Sie Ihr Projekt mit dem App Engine Gradle-Plug-in.
Wichtig ist, dass Sie Ihr Projekt mit Gradle synchronisieren.
Wenn Sie keine Anwendung haben, diese Bereitstellungsverfahren jedoch trotzdem ausprobieren möchten, laden Sie die Beispielanwendung herunter:
Klonen Sie die Hello World-Beispielanwendung auf Ihren lokalen Rechner:
Wählen Sie in IntelliJ Datei > Öffnen aus, um die Dateiauswahl zu öffnen.
Rufen Sie /java-docs-samples/appengine-java8/ auf.
Wählen Sie das Verzeichnis /helloworld/ aus.
Klicken Sie auf OK.
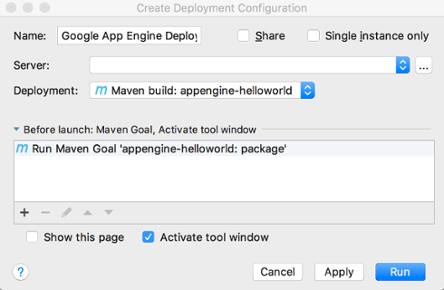
Bereitstellungskonfiguration erstellen
Wählen Sie Tools > Cloud Code > App Engine > In App Engine bereitstellen aus.
Bestätigen Sie die Serverkonfiguration:
Klicken Sie auf die drei Punkte (…) neben dem Feld Server.
Überprüfen Sie im Dialogfeld, ob im Feld Name der Name Google App Engine angezeigt wird.
Klicken Sie auf OK.
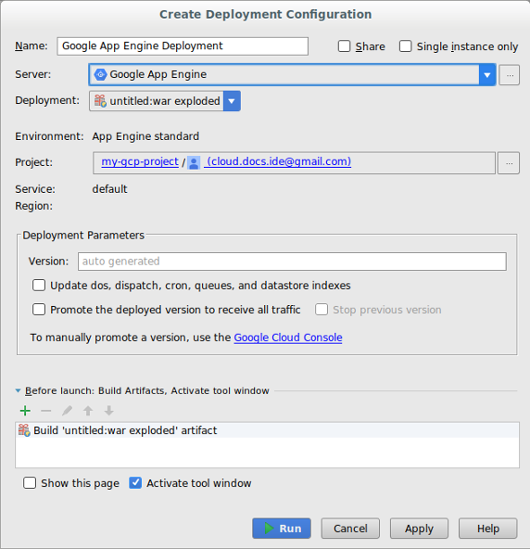
Wählen Sie die Bereitstellungsquelle aus.
Wenn Sie die Community Edition verwenden, unterstützt Cloud Code for IntelliJ nur die Bereitstellung aus einem Maven- oder Gradle-Artefakt.
Wählen Sie im Feld Projekt ein Projekt aus.
Wenn Sie die Bereitstellung zum ersten Mal konfigurieren, werden Sie aufgefordert, sich in dem Konto anzumelden, das mit dem bereitzustellenden Google Cloud -Konsolenprojekt verknüpft ist.
Füllen Sie gegebenenfalls andere Felder aus, um die Bereitstellung zu konfigurieren.
Klicken Sie auf Run (Ausführen), um Ihre Anwendung zu erstellen und bereitzustellen.
Klicken Sie im Anwendungsserver-Fenster auf den Namen Ihres Projekts, um den Bereitstellungsfortschritt zu überprüfen. Falls das Fenster nicht angezeigt wird, klicken Sie auf View > Tool Windows > Application Servers (Anzeigen > Toolfenster > Anwendungsserver).
Wenn die Bereitstellung abgeschlossen ist, können Sie die URL der Anwendung in der Konsolenausgabe sehen.
App Engine-Standardkonfigurationen aktualisieren
Nach dem Erstellen der anfänglichen Bereitstellungskonfiguration können Sie diese Konfigurationen nach Bedarf für Ihre Anwendung ändern.
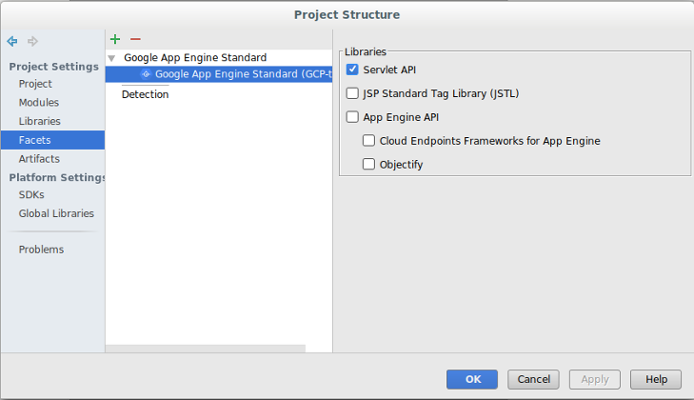
Wählen Sie File > Project Structure (Datei > Projektstruktur).
Das Dialogfeld Project Structure (Projektstruktur) wird angezeigt.
Wählen Sie unter Project Settings (Projekteinstellungen) die Option Facets (Attribute) aus.
Wählen Sie das App Engine-Standardattribut aus.
Wählen Sie die Bibliotheken aus, die Sie Ihrem Projekt hinzufügen möchten.
Klicken Sie auf OK.
Server löschen
Falls Sie den Server löschen möchten, den Sie für Ihr Projekt konfiguriert haben, müssen Sie folgendermaßen vorgehen:
So senden Sie Feedback oder melden ein Problem in Ihrer IntelliJ-IDE: Tools > Cloud Code > Hilfe / Info > Feedback geben oder Problem melden, um ein Problem auf GitHub zu melden.
[[["Leicht verständlich","easyToUnderstand","thumb-up"],["Mein Problem wurde gelöst","solvedMyProblem","thumb-up"],["Sonstiges","otherUp","thumb-up"]],[["Schwer verständlich","hardToUnderstand","thumb-down"],["Informationen oder Beispielcode falsch","incorrectInformationOrSampleCode","thumb-down"],["Benötigte Informationen/Beispiele nicht gefunden","missingTheInformationSamplesINeed","thumb-down"],["Problem mit der Übersetzung","translationIssue","thumb-down"],["Sonstiges","otherDown","thumb-down"]],["Zuletzt aktualisiert: 2025-09-04 (UTC)."],[[["\u003cp\u003eCloud Code supports deploying Java 8 applications to the App Engine standard environment within IntelliJ IDEA, but App Engine Java 8 support is ending, and new projects using it are not recommended.\u003c/p\u003e\n"],["\u003cp\u003eTo deploy to App Engine using Cloud Code, users must first create an App Engine app, set up Cloud Code, and add App Engine standard framework support.\u003c/p\u003e\n"],["\u003cp\u003eIntelliJ IDEA Community Edition only supports deploying Maven or Gradle-based projects to App Engine, and if you have a Gradle project you must configure it with the App Engine Gradle plugin.\u003c/p\u003e\n"],["\u003cp\u003eUsers can configure and modify App Engine deployment settings, such as selecting the project, server, and deployment source, through the Cloud Code interface in IntelliJ IDEA.\u003c/p\u003e\n"],["\u003cp\u003eUsers can easily remove an App Engine server configuration from their project via the IDE settings, under the Clouds section.\u003c/p\u003e\n"]]],[],null,["# Deploy to the App Engine Standard Environment in Cloud Code for IntelliJ\n\n| **Caution:** As of January 31, 2024, Java 8 support for App Engine has ended, and will be deprecated on January 31, 2026. As a result, Cloud Code disables App Engine by default. To enable App Engine in your IDE, navigate to **Settings** \\\u003e **Google\n| Cloud Code** \\\u003e **App Engine** . Due to the upcoming deprecation of App Engine, we don't recommend creating new App Engine projects. For more information about App Engine deprecations, see [Feature deprecations](/appengine/docs/standard/deprecations). For more information about the runtime support schedule for App Engine, see [Runtime support schedule](/appengine/docs/standard/lifecycle/support-schedule).\n\nThis document describes how to deploy an App Engine application to the\n[App Engine standard\nenvironment](/appengine/docs/standard)\nfrom within IntelliJ IDEA.\n| **Note:** The following IDEs support this feature:\n|\n| - IntelliJ IDEA - Ultimate\n| - IntelliJ IDEA - Community\n| **Note:** For the App Engine standard environment, only Java applications using [Java 8 runtime](https://cloud.google.com/appengine/docs/standard/java/runtime) are supported on Cloud Code.\n| **Note:** If you are using IntelliJ IDEA Community Edition, you can deploy Maven-based and Gradle-based projects to the App Engine standard environment.\n\nBefore you begin\n----------------\n\n- Follow the [Create an App](/code/docs/intellij/create-standard)\n guide to install and set up Cloud Code as well as\n create an App Engine app for the standard\n environment. Be sure to add\n [App Engine standard framework\n support](/code/docs/intellij/create-standard#framework).\n\n- If you have a Gradle-based project and are using IntelliJ IDEA Community\n Edition, configure your project with the [App Engine Gradle\n plugin](https://github.com/GoogleCloudPlatform/app-gradle-plugin#how-to-use).\n Be sure to sync your project with Gradle.\n\n If you don't have an application but still want to try these deployment\n procedures, download the sample app:\n 1. Clone the **Hello World** sample app to your local machine:\n\n git clone https://github.com/GoogleCloudPlatform/java-docs-samples\n\n 2. In IntelliJ, select **File** \\\u003e **Open** to open the file selector.\n\n 3. Navigate to `/java-docs-samples/appengine-java8/`.\n\n 4. Select the `/helloworld/` directory.\n\n 5. Click **OK**.\n\nCreating the deployment configuration\n-------------------------------------\n\n1. Choose **Tools** \\\u003e **Cloud Code** \\\u003e **App Engine** \\\u003e\n **Deploy to App Engine**.\n\n2. Confirm the server configuration:\n\n 1. Click the ellipsis (...) next to the **Server** field.\n\n 2. In the dialog, verify that the **Name** field displays\n **Google App Engine**.\n\n 3. Click **OK**.\n\n3. Select the **Deployment** source.\n\n If you're using Community Edition, Cloud Code for IntelliJ only supports\n deploying from a Maven or a Gradle artifact.\n4. Select a project in the **Project** field.\n\n The first time you configure the deployment, you will be prompted to sign in\n to the account associated with the Google Cloud console project that\n you want to deploy.\n\n5. Fill in other fields as needed to configure the deployment.\n\n6. Click **Run** to build and deploy your app.\n\n7. In the Application Servers window, click the name of your project to monitor\n its deployment progress. If the window is not displaying, click\n **View** \\\u003e **Tool Windows** \\\u003e **Application Servers**.\n\n After deployment completes, you can view your app's URL in the console\n output.\n\nUpdate the App Engine standard configurations\n---------------------------------------------\n\nAfter creating the initial deployment configuration, you can make changes to\nthose configurations as needed by your application.\n\n1. Select **File** \\\u003e **Project Structure**.\n\n The **Project Structure** dialog displays.\n2. Under **Project Settings** , select **Facets**.\n\n3. Select the App Engine standard facet.\n\n \u003cbr /\u003e\n\n4. Select the libraries you want to add to your project.\n\n5. Click **OK**.\n\nDeleting the server\n-------------------\n\nIf you ever want to delete the server you configured for your\nproject, you can do so as follows:\n\n1. Choose **File** \\\u003e **Settings** \\\u003e **Build, Execution, Deployment** \\\u003e\n **Clouds**.\n\n On macOS, this is **IntelliJ IDEA** \\\u003e **Preferences** \\\u003e\n **Build, Execution, Deployment** \\\u003e **Clouds**.\n2. Select your server (App Engine) and click the minus sign (-) at the\n top of the window to remove it.\n\n3. Click **OK**.\n\nWhat's next\n-----------\n\n- You can add your project to [Cloud Source Repositories](/code/docs/intellij/vcs) if you haven't done so already.\n\nGet support\n-----------\n\nTo submit feedback or report an issue in your IntelliJ IDE, go to\n**Tools** \\\u003e **Cloud Code** \\\u003e **Help / About** \\\u003e **Submit\nfeedback or report an issue** to report an issue on [GitHub](https://github.com/GoogleCloudPlatform/cloud-code-intellij/issues)."]]