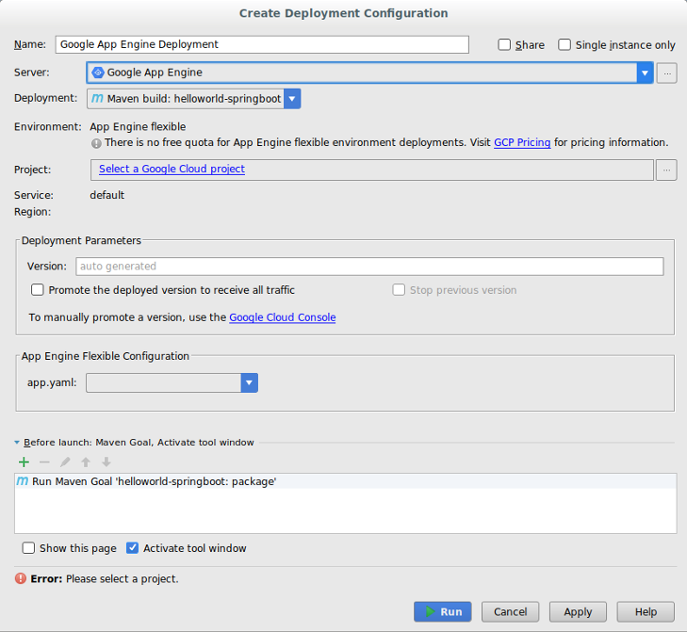
Dalam dialog, pastikan kolom Name menampilkan
Google App Engine.
Klik Oke.
Pilih sumber Deployment.
Cloud Code for IntelliJ mendukung deployment dari artefak Maven, artefak khusus IntelliJ, atau file JAR atau WAR sistem file.
Jika Anda memilih file JAR atau WAR sistem file sebagai sumber deployment, klik elipsis (...) di samping kolom Deployment archive untuk membuka arsip deployment.
Pilih project di kolom Project.
Saat pertama kali mengonfigurasi deployment, Anda akan diminta untuk login
ke akun yang terkait dengan project konsol Google Cloud yang
ingin Anda deploy.
Di bagian App Engine Flexible Configuration, pilih file app.yaml yang valid.
Jika Anda tidak melihat file app.yaml yang valid di menu drop-down, klik
Edit untuk memilih file. Lihat bagian Memperbarui konfigurasi fleksibel App Engine untuk mengetahui informasi selengkapnya.
Isi kolom lain sesuai kebutuhan untuk mengonfigurasi deployment.
Klik Run untuk membangun dan men-deploy aplikasi Anda.
Di jendela Application Servers, klik nama project Anda untuk memantau progres deployment-nya. Jika jendela tidak ditampilkan, klik
View > Tool Windows > Application Servers.
Setelah deployment selesai, Anda dapat melihat URL aplikasi di output
konsol.
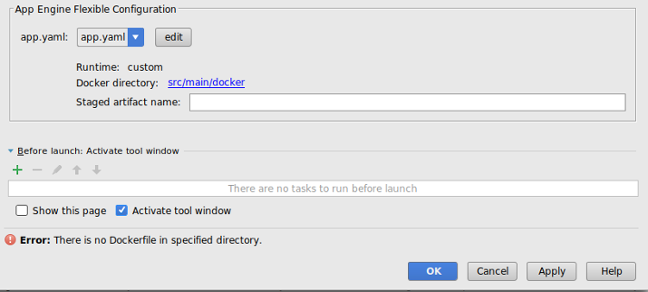
Men-deploy ke runtime kustom
Anda dapat mengubah file app.yaml untuk men-deploy aplikasi ke runtime kustom
menggunakan file Docker.
Di file app.yaml, tetapkan runtime ke custom.
Saat Anda menyelesaikan langkah-langkah membuat konfigurasi deployment, bagian Konfigurasi Fleksibel App Engine akan menampilkan jalur ke file app.yaml dan Docker Anda.
Klik Edit untuk memilih file app.yaml dan Docker yang valid.
Klik elipsis (...) di samping kolom app.yaml dan Dockerfile
Directory untuk membuka file yang sesuai.
Klik Oke.
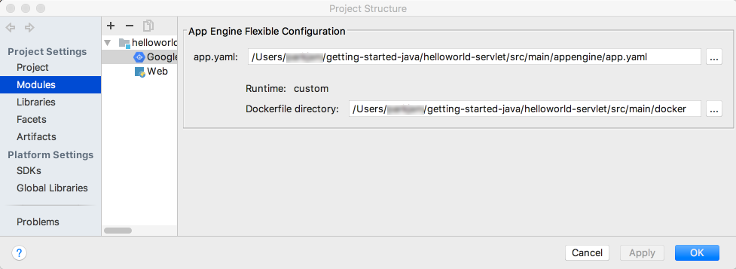
Memperbarui konfigurasi fleksibel App Engine
Setelah membuat konfigurasi deployment awal, Anda dapat membuat perubahan pada konfigurasi tersebut sesuai kebutuhan aplikasi Anda.
Pilih File > Project Structure.
Dialog Project Structure akan ditampilkan.
Di bagian Project Settings, pilih Facets.
Pilih aspek fleksibel App Engine.
Untuk memilih file app.yaml, klik elipsis (...) di samping kolom
app.yaml untuk membuka lokasi file yang valid.
Jika Anda men-deploy ke runtime kustom, klik elipsis (...) di samping kolom
Direktori Dockerfile untuk membuka lokasi file yang valid.
Klik Oke.
Menghapus server
Jika ingin menghapus server yang Anda konfigurasi untuk project, Anda dapat melakukannya sebagai berikut:
Untuk mengirimkan masukan atau melaporkan masalah di IDE IntelliJ, buka
Tools > Cloud Code > Help / About > Submit
feedback or report an issue untuk melaporkan masalah di GitHub.
[[["Mudah dipahami","easyToUnderstand","thumb-up"],["Memecahkan masalah saya","solvedMyProblem","thumb-up"],["Lainnya","otherUp","thumb-up"]],[["Sulit dipahami","hardToUnderstand","thumb-down"],["Informasi atau kode contoh salah","incorrectInformationOrSampleCode","thumb-down"],["Informasi/contoh yang saya butuhkan tidak ada","missingTheInformationSamplesINeed","thumb-down"],["Masalah terjemahan","translationIssue","thumb-down"],["Lainnya","otherDown","thumb-down"]],["Terakhir diperbarui pada 2025-09-04 UTC."],[[["\u003cp\u003eCloud Code in IntelliJ IDEA supports deploying Java applications to the App Engine flexible environment.\u003c/p\u003e\n"],["\u003cp\u003eApp Engine Java 8 support is ending soon, with deprecation scheduled for January 31, 2026, leading Cloud Code to disable App Engine by default.\u003c/p\u003e\n"],["\u003cp\u003eDeployment can be configured using a Maven artifact, IntelliJ-specific artifact, or a filesystem JAR/WAR file, with the process beginning with selection of your deployment source in the "Deploy to App Engine" configuration.\u003c/p\u003e\n"],["\u003cp\u003eYou can deploy to a custom runtime by modifying your \u003ccode\u003eapp.yaml\u003c/code\u003e file and referencing a Dockerfile in the App Engine flexible configuration section.\u003c/p\u003e\n"],["\u003cp\u003eThe server configuration for App Engine can be deleted from the "Clouds" settings within IntelliJ IDEA.\u003c/p\u003e\n"]]],[],null,["# Deploy to the App Engine Flexible Environment in Cloud Code for IntelliJ\n\n| **Caution:** As of January 31, 2024, Java 8 support for App Engine has ended, and will be deprecated on January 31, 2026. As a result, Cloud Code disables App Engine by default. To enable App Engine in your IDE, navigate to **Settings** \\\u003e **Google\n| Cloud Code** \\\u003e **App Engine** . Due to the upcoming deprecation of App Engine, we don't recommend creating new App Engine projects. For more information about App Engine deprecations, see [Feature deprecations](/appengine/docs/standard/deprecations). For more information about the runtime support schedule for App Engine, see [Runtime support schedule](/appengine/docs/standard/lifecycle/support-schedule).\n\nThis document describes how to deploy an App Engine application to the\n[App Engine flexible\nenvironment](/appengine/docs/flexible)\nfrom within IntelliJ IDEA.\n| **Note:** The following IDEs support this feature:\n|\n| - IntelliJ IDEA - Ultimate\n| - IntelliJ IDEA - Community\n| **Note:** Only Java applications are supported.\n\nBefore you begin\n----------------\n\n- Follow the [Create an App](/code/docs/intellij/create-flexible)\n guide to install and set up Cloud Code as well as\n create an App Engine app for the flexible\n environment. Be sure to add\n [App Engine flexible framework\n support](/code/docs/intellij/create-flexible#framework).\n\n If you don't have an application but still want to try these deployment\n procedures, download the sample app:\n 1. Clone the **Spring Boot** sample app to your local machine:\n\n git clone https://github.com/spring-guides/gs-spring-boot\n\n 2. In IntelliJ, choose **File** \\\u003e **Open** to open the file selector.\n\n 3. Navigate to `/gs-spring-boot/`.\n\n 4. Select the `/complete/` directory.\n\n 5. Click **OK**.\n\n 6. Add [App Engine flexible framework\n support](/code/docs/intellij/create-flexible#framework).\n\nCreating the deployment configuration\n-------------------------------------\n\n1. Choose **Tools** \\\u003e **Cloud Code** \\\u003e **App Engine** \\\u003e\n **Deploy to App Engine**.\n\n2. Confirm the server configuration:\n\n 1. Click the ellipsis (...) next to the **Server** field.\n\n 2. In the dialog, verify that the **Name** field displays\n **Google App Engine**.\n\n 3. Click **OK**.\n\n3. Select the **Deployment** source.\n\n Cloud Code for IntelliJ supports deploying from a Maven artifact, an\n IntelliJ-specific artifact, or a filesystem JAR or WAR file.\n 1. If you select a filesystem JAR or WAR file as your deployment source, click the ellipsis (...) next to the **Deployment archive** field to navigate to the deployment archive.\n4. Select a project in the **Project** field.\n\n The first time you configure the deployment, you will be prompted to sign in\n to the account associated with the Google Cloud console project that\n you want to deploy.\n5. In the **App Engine Flexible Configuration** section, select a\n valid `app.yaml` file.\n\n 1. If you don't see a valid `app.yaml` file in the drop-down menu, click **Edit** to select a file. See the [Update the App Engine\n flexible configurations](#config) section for more information.\n6. Fill in other fields as needed to configure the deployment.\n\n7. Click **Run** to build and deploy your app.\n\n8. In the Application Servers window, click the name of your project to monitor\n its deployment progress. If the window is not displaying, click\n **View** \\\u003e **Tool Windows** \\\u003e **Application Servers**.\n\n After deployment completes, you can view your app's URL in the console\n output.\n\nDeploying to a custom runtime\n-----------------------------\n\nYou can modify your `app.yaml` file to deploy your app to a custom runtime\nusing a Docker file.\n\n1. In your `app.yaml` file, set your runtime to **custom**.\n\n2. As you complete the [creating the deployment configuration](#deploy) steps,\n the **App Engine Flexible Configuration** section displays the path\n to your `app.yaml` and Docker file.\n\n3. Click **Edit** to select valid `app.yaml` and Docker files.\n\n4. Click the ellipsis (...) next to the `app.yaml` and the **Dockerfile\n Directory** fields to navigate to the appropriate files.\n\n5. Click **OK**.\n\nUpdate the App Engine flexible configurations\n---------------------------------------------\n\nAfter creating the initial deployment configuration, you can make changes to\nthose configurations as needed by your application.\n\n1. Select **File** \\\u003e **Project Structure**.\n\n The **Project Structure** dialog displays.\n2. Under **Project Settings** , select **Facets**.\n\n3. Select the App Engine flexible facet.\n\n4. To select an `app.yaml` file, click the ellipsis (...) next to the\n **app.yaml** field to navigate to the location of a valid file.\n\n5. If you deploy to a custom runtime, click the ellipsis (...) next to the\n **Dockerfile directory** field to navigate to the location of a valid file.\n\n6. Click **OK**.\n\nDeleting the server\n-------------------\n\nIf you ever want to delete the server you configured for your\nproject, you can do so as follows:\n\n1. Choose **File** \\\u003e **Settings** \\\u003e **Build, Execution, Deployment** \\\u003e\n **Clouds**.\n\n On macOS, this is **IntelliJ IDEA** \\\u003e **Preferences** \\\u003e\n **Build, Execution, Deployment** \\\u003e **Clouds**.\n2. Select your server (App Engine) and click the minus sign (-) at the\n top of the window to remove it.\n\n3. Click **OK**.\n\nWhat's next\n-----------\n\n- You can add your project to [Cloud Source Repositories](/code/docs/intellij/vcs) if you haven't done so already.\n\nGet support\n-----------\n\nTo submit feedback or report an issue in your IntelliJ IDE, go to\n**Tools** \\\u003e **Cloud Code** \\\u003e **Help / About** \\\u003e **Submit\nfeedback or report an issue** to report an issue on [GitHub](https://github.com/GoogleCloudPlatform/cloud-code-intellij/issues)."]]