Clique nas reticências (…) ao lado do campo Servidor.
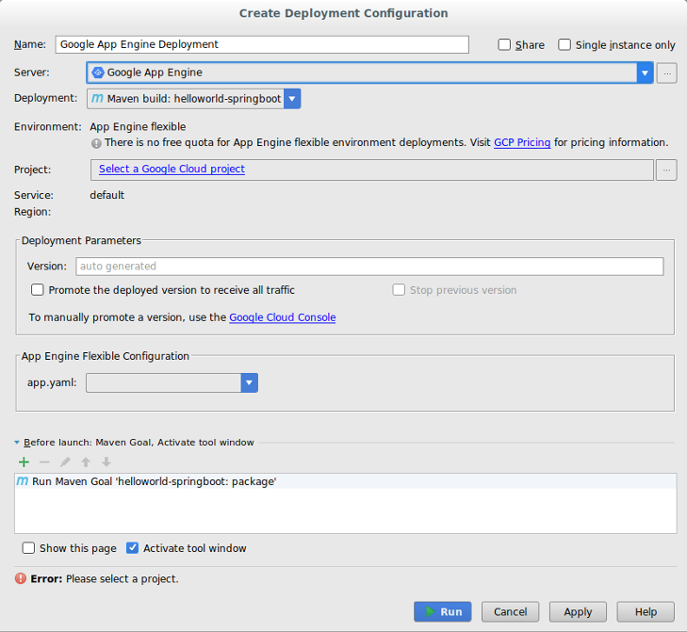
Na caixa de diálogo, verifique se o campo Nome exibe Google App Engine.
Clique em OK.
Selecione a origem da Implantação.
O Cloud Code para IntelliJ é compatível com a implantação de um artefato Maven, um
artefato específico do IntelliJ ou um arquivo JAR ou WAR do sistema de arquivos.
Se você selecionar um arquivo JAR ou WAR do sistema de arquivos como origem de implantação, clique nas reticências (...) ao lado do campo Arquivo de implantação para navegar até ele.
Selecione um projeto no campo Projeto.
Na primeira vez que configurar a implantação, será solicitado o login na conta associada ao projeto do console Google Cloud que será implantado.
Na seção Configuração flexível do App Engine, selecione um arquivo app.yaml válido.
Se não houver um arquivo app.yaml válido no menu suspenso, clique em Editar para selecionar um arquivo. Consulte a seção Atualizar as configurações flexíveis do App Engine para obter mais informações.
Preencha outros campos conforme necessário para configurar a implantação.
Clique em Executar para compilar e implantar seu aplicativo.
Na janela "Servidores de aplicativo", clique no nome do seu projeto para monitorar o progresso da implantação. Caso a janela não seja mostrada, clique em Exibir > Janelas de ferramentas > Servidores de aplicativo.
Após a conclusão da implantação, será possível ver o URL do seu aplicativo na saída do console.
Como implantar em um ambiente de execução personalizado
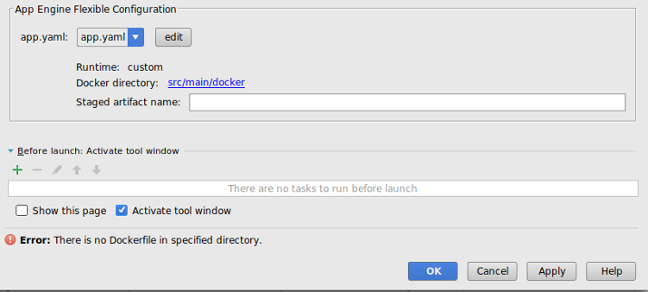
É possível modificar o arquivo app.yaml para implantar o aplicativo em um ambiente de execução personalizado usando um arquivo do Docker.
No arquivo app.yaml, defina o ambiente de execução como personalizado.
Ao concluir as etapas de criação da configuração de implantação, a seção Configuração flexível do App Engine exibirá o caminho para o arquivo do Docker e app.yaml.
Clique em Editar para selecionar arquivos do Docker e app.yaml válidos.
Clique nas reticências (...) ao lado dos campos do Diretório do Dockerfile e app.yaml para navegar até os arquivos apropriados.
Clique em OK.
Atualizar as configurações flexíveis do App Engine
Depois de criar a configuração de implantação inicial, é possível fazer alterações nas configurações conforme a necessidade do seu aplicativo.
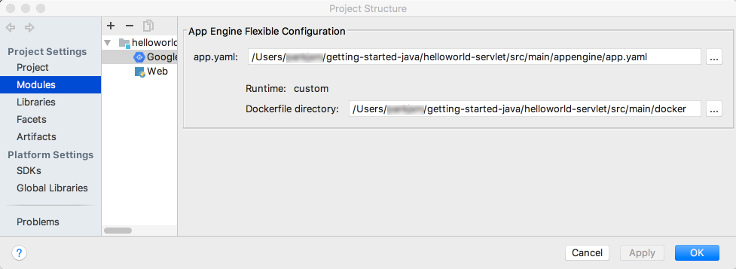
Selecione Arquivo > Estrutura do projeto.
A caixa de diálogo Estrutura do projeto é exibida.
Em Configurações do projeto, selecione Atributos.
Selecione o atributo flexível do App Engine.
Para selecionar um arquivo app.yaml, clique nas reticências (...) ao lado do campo app.yaml para navegar até o local de um arquivo válido.
Para implantar em um ambiente de execução personalizado, clique nas reticências (...) ao lado do campo Diretório do Dockerfile e navegue até o local de um arquivo válido.
Clique em OK.
Como excluir o servidor
Se você quiser excluir o servidor configurado para seu projeto, use o seguinte procedimento:
Para enviar um feedback ou informar um problema no ambiente de desenvolvimento integrado do IntelliJ, acesse
Tools > Cloud Code > Help / About > Envie
feedback ou informe um problema para informar um problema no GitHub.
[[["Fácil de entender","easyToUnderstand","thumb-up"],["Meu problema foi resolvido","solvedMyProblem","thumb-up"],["Outro","otherUp","thumb-up"]],[["Difícil de entender","hardToUnderstand","thumb-down"],["Informações incorretas ou exemplo de código","incorrectInformationOrSampleCode","thumb-down"],["Não contém as informações/amostras de que eu preciso","missingTheInformationSamplesINeed","thumb-down"],["Problema na tradução","translationIssue","thumb-down"],["Outro","otherDown","thumb-down"]],["Última atualização 2025-09-04 UTC."],[[["\u003cp\u003eCloud Code in IntelliJ IDEA supports deploying Java applications to the App Engine flexible environment.\u003c/p\u003e\n"],["\u003cp\u003eApp Engine Java 8 support is ending soon, with deprecation scheduled for January 31, 2026, leading Cloud Code to disable App Engine by default.\u003c/p\u003e\n"],["\u003cp\u003eDeployment can be configured using a Maven artifact, IntelliJ-specific artifact, or a filesystem JAR/WAR file, with the process beginning with selection of your deployment source in the "Deploy to App Engine" configuration.\u003c/p\u003e\n"],["\u003cp\u003eYou can deploy to a custom runtime by modifying your \u003ccode\u003eapp.yaml\u003c/code\u003e file and referencing a Dockerfile in the App Engine flexible configuration section.\u003c/p\u003e\n"],["\u003cp\u003eThe server configuration for App Engine can be deleted from the "Clouds" settings within IntelliJ IDEA.\u003c/p\u003e\n"]]],[],null,["# Deploy to the App Engine Flexible Environment in Cloud Code for IntelliJ\n\n| **Caution:** As of January 31, 2024, Java 8 support for App Engine has ended, and will be deprecated on January 31, 2026. As a result, Cloud Code disables App Engine by default. To enable App Engine in your IDE, navigate to **Settings** \\\u003e **Google\n| Cloud Code** \\\u003e **App Engine** . Due to the upcoming deprecation of App Engine, we don't recommend creating new App Engine projects. For more information about App Engine deprecations, see [Feature deprecations](/appengine/docs/standard/deprecations). For more information about the runtime support schedule for App Engine, see [Runtime support schedule](/appengine/docs/standard/lifecycle/support-schedule).\n\nThis document describes how to deploy an App Engine application to the\n[App Engine flexible\nenvironment](/appengine/docs/flexible)\nfrom within IntelliJ IDEA.\n| **Note:** The following IDEs support this feature:\n|\n| - IntelliJ IDEA - Ultimate\n| - IntelliJ IDEA - Community\n| **Note:** Only Java applications are supported.\n\nBefore you begin\n----------------\n\n- Follow the [Create an App](/code/docs/intellij/create-flexible)\n guide to install and set up Cloud Code as well as\n create an App Engine app for the flexible\n environment. Be sure to add\n [App Engine flexible framework\n support](/code/docs/intellij/create-flexible#framework).\n\n If you don't have an application but still want to try these deployment\n procedures, download the sample app:\n 1. Clone the **Spring Boot** sample app to your local machine:\n\n git clone https://github.com/spring-guides/gs-spring-boot\n\n 2. In IntelliJ, choose **File** \\\u003e **Open** to open the file selector.\n\n 3. Navigate to `/gs-spring-boot/`.\n\n 4. Select the `/complete/` directory.\n\n 5. Click **OK**.\n\n 6. Add [App Engine flexible framework\n support](/code/docs/intellij/create-flexible#framework).\n\nCreating the deployment configuration\n-------------------------------------\n\n1. Choose **Tools** \\\u003e **Cloud Code** \\\u003e **App Engine** \\\u003e\n **Deploy to App Engine**.\n\n2. Confirm the server configuration:\n\n 1. Click the ellipsis (...) next to the **Server** field.\n\n 2. In the dialog, verify that the **Name** field displays\n **Google App Engine**.\n\n 3. Click **OK**.\n\n3. Select the **Deployment** source.\n\n Cloud Code for IntelliJ supports deploying from a Maven artifact, an\n IntelliJ-specific artifact, or a filesystem JAR or WAR file.\n 1. If you select a filesystem JAR or WAR file as your deployment source, click the ellipsis (...) next to the **Deployment archive** field to navigate to the deployment archive.\n4. Select a project in the **Project** field.\n\n The first time you configure the deployment, you will be prompted to sign in\n to the account associated with the Google Cloud console project that\n you want to deploy.\n5. In the **App Engine Flexible Configuration** section, select a\n valid `app.yaml` file.\n\n 1. If you don't see a valid `app.yaml` file in the drop-down menu, click **Edit** to select a file. See the [Update the App Engine\n flexible configurations](#config) section for more information.\n6. Fill in other fields as needed to configure the deployment.\n\n7. Click **Run** to build and deploy your app.\n\n8. In the Application Servers window, click the name of your project to monitor\n its deployment progress. If the window is not displaying, click\n **View** \\\u003e **Tool Windows** \\\u003e **Application Servers**.\n\n After deployment completes, you can view your app's URL in the console\n output.\n\nDeploying to a custom runtime\n-----------------------------\n\nYou can modify your `app.yaml` file to deploy your app to a custom runtime\nusing a Docker file.\n\n1. In your `app.yaml` file, set your runtime to **custom**.\n\n2. As you complete the [creating the deployment configuration](#deploy) steps,\n the **App Engine Flexible Configuration** section displays the path\n to your `app.yaml` and Docker file.\n\n3. Click **Edit** to select valid `app.yaml` and Docker files.\n\n4. Click the ellipsis (...) next to the `app.yaml` and the **Dockerfile\n Directory** fields to navigate to the appropriate files.\n\n5. Click **OK**.\n\nUpdate the App Engine flexible configurations\n---------------------------------------------\n\nAfter creating the initial deployment configuration, you can make changes to\nthose configurations as needed by your application.\n\n1. Select **File** \\\u003e **Project Structure**.\n\n The **Project Structure** dialog displays.\n2. Under **Project Settings** , select **Facets**.\n\n3. Select the App Engine flexible facet.\n\n4. To select an `app.yaml` file, click the ellipsis (...) next to the\n **app.yaml** field to navigate to the location of a valid file.\n\n5. If you deploy to a custom runtime, click the ellipsis (...) next to the\n **Dockerfile directory** field to navigate to the location of a valid file.\n\n6. Click **OK**.\n\nDeleting the server\n-------------------\n\nIf you ever want to delete the server you configured for your\nproject, you can do so as follows:\n\n1. Choose **File** \\\u003e **Settings** \\\u003e **Build, Execution, Deployment** \\\u003e\n **Clouds**.\n\n On macOS, this is **IntelliJ IDEA** \\\u003e **Preferences** \\\u003e\n **Build, Execution, Deployment** \\\u003e **Clouds**.\n2. Select your server (App Engine) and click the minus sign (-) at the\n top of the window to remove it.\n\n3. Click **OK**.\n\nWhat's next\n-----------\n\n- You can add your project to [Cloud Source Repositories](/code/docs/intellij/vcs) if you haven't done so already.\n\nGet support\n-----------\n\nTo submit feedback or report an issue in your IntelliJ IDE, go to\n**Tools** \\\u003e **Cloud Code** \\\u003e **Help / About** \\\u003e **Submit\nfeedback or report an issue** to report an issue on [GitHub](https://github.com/GoogleCloudPlatform/cloud-code-intellij/issues)."]]