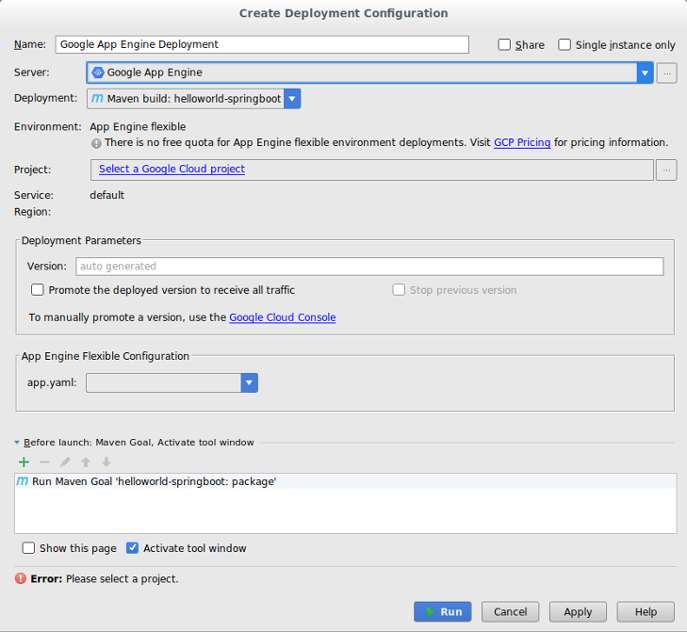
Cliquez sur les points de suspension (...) en regard du champ Server (Serveur).
Dans la boîte de dialogue, vérifiez que le champ Name (Nom) affiche Google App Engine.
Cliquez sur OK.
Sélectionnez la source du déploiement dans le champ Deployment.
Cloud Code for IntelliJ permet le déploiement à partir d'un artefact Maven, d'un artefact spécifique à IntelliJ ou d'un fichier JAR ou WAR.
Si vous sélectionnez un fichier JAR ou WAR comme source de déploiement, cliquez sur les points de suspension (...) en regard du champ Deployment archive (Archive de déploiement) pour accéder à l'archive de déploiement.
Sélectionnez un projet dans le champ Project.
La première fois que vous configurez le déploiement, vous êtes invité à vous connecter au compte associé au projet de la console Google Cloud que vous souhaitez déployer.
Dans la section App Engine Flexible Configuration (Configuration de l'environnement flexible App Engine), sélectionnez un fichier app.yaml valide.
Si vous ne voyez pas de fichier app.yaml valide dans le menu déroulant, cliquez sur Edit (Modifier) pour sélectionner un fichier. Reportez-vous à la section Mettre à jour les configurations flexibles App Engine pour plus d'informations.
Renseignez les autres champs nécessaires pour configurer le déploiement.
Cliquez sur Run (Exécuter) pour créer et déployer votre application.
Dans la fenêtre Application Servers (Serveurs d'applications), cliquez sur le nom de votre projet pour surveiller la progression de son déploiement. Si la fenêtre ne s'affiche pas, cliquez sur Display > Tools Windows > Application Servers (Affichage > Fenêtres d'outils > Serveurs d'applications).
Une fois le déploiement terminé, vous pouvez consulter l'URL de votre application dans la sortie de la console.
Déployer dans un environnement d'exécution personnalisé
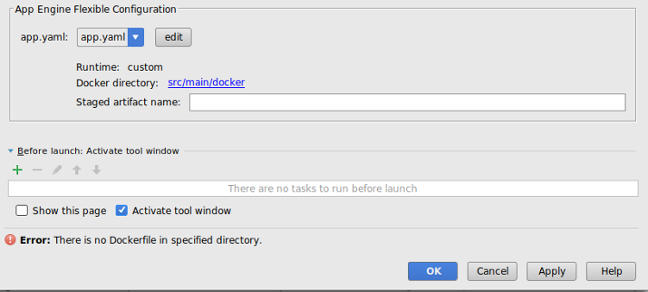
Vous pouvez modifier votre fichier app.yaml pour déployer votre application dans un environnement d'exécution personnalisé à l'aide d'un fichier Docker.
Dans votre fichier app.yaml, définissez votre environnement d'exécution sur custom (personnalisé).
À la fin de la procédure de création de la configuration de déploiement, la section App Engine Flexible Configuration (Configuration de l'environnement flexible App Engine) affiche le chemin d'accès à vos fichiers app.yaml et Docker.
Cliquez sur Edit (Modifier) pour sélectionner des fichiers app.yaml et Docker valides.
Cliquez sur les points de suspension (...) à côté des champs app.yaml et Dockerfile Directory (Répertoire Dockerfile) pour accéder aux fichiers appropriés.
Cliquez sur OK.
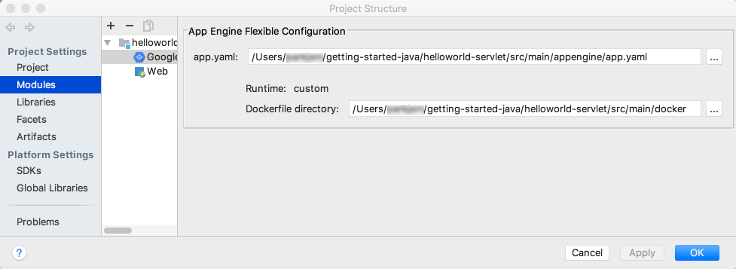
Mettre à jour les configurations flexibles App Engine
Après avoir créé la configuration de déploiement initiale, vous pouvez modifier cette configuration selon les besoins de votre application.
Sélectionnez File > Project Structure (Fichier > Structure du projet).
La boîte de dialogue Project Structure (Structure du projet) s’affiche.
Sous Project Settings (Paramètres du projet), sélectionnez Facets (Attributs).
Sélectionnez l'attribut Google App Engine Flexible.
Pour sélectionner un fichier app.yaml, cliquez sur les points de suspension (…) à côté du champ app.yaml pour accéder à l'emplacement d'un fichier valide.
Si vous déployez dans un environnement d'exécution personnalisé, cliquez sur les points de suspension (...) en regard du champ Dockerfile directory (Répertoire Dockerfile) pour accéder à l'emplacement d'un fichier valide.
Cliquez sur "OK".
Supprimer le serveur
Si vous souhaitez supprimer le serveur que vous avez configuré pour votre projet, procédez comme suit :
Pour envoyer des commentaires ou signaler un problème dans votre IDE IntelliJ, accédez à Outils > Cloud Code > Aide / À propos > Envoyer des commentaires ou signaler un problème pour signaler un problème sur GitHub.
Sauf indication contraire, le contenu de cette page est régi par une licence Creative Commons Attribution 4.0, et les échantillons de code sont régis par une licence Apache 2.0. Pour en savoir plus, consultez les Règles du site Google Developers. Java est une marque déposée d'Oracle et/ou de ses sociétés affiliées.
Dernière mise à jour le 2025/09/04 (UTC).
[[["Facile à comprendre","easyToUnderstand","thumb-up"],["J'ai pu résoudre mon problème","solvedMyProblem","thumb-up"],["Autre","otherUp","thumb-up"]],[["Difficile à comprendre","hardToUnderstand","thumb-down"],["Informations ou exemple de code incorrects","incorrectInformationOrSampleCode","thumb-down"],["Il n'y a pas l'information/les exemples dont j'ai besoin","missingTheInformationSamplesINeed","thumb-down"],["Problème de traduction","translationIssue","thumb-down"],["Autre","otherDown","thumb-down"]],["Dernière mise à jour le 2025/09/04 (UTC)."],[[["\u003cp\u003eCloud Code in IntelliJ IDEA supports deploying Java applications to the App Engine flexible environment.\u003c/p\u003e\n"],["\u003cp\u003eApp Engine Java 8 support is ending soon, with deprecation scheduled for January 31, 2026, leading Cloud Code to disable App Engine by default.\u003c/p\u003e\n"],["\u003cp\u003eDeployment can be configured using a Maven artifact, IntelliJ-specific artifact, or a filesystem JAR/WAR file, with the process beginning with selection of your deployment source in the "Deploy to App Engine" configuration.\u003c/p\u003e\n"],["\u003cp\u003eYou can deploy to a custom runtime by modifying your \u003ccode\u003eapp.yaml\u003c/code\u003e file and referencing a Dockerfile in the App Engine flexible configuration section.\u003c/p\u003e\n"],["\u003cp\u003eThe server configuration for App Engine can be deleted from the "Clouds" settings within IntelliJ IDEA.\u003c/p\u003e\n"]]],[],null,["# Deploy to the App Engine Flexible Environment in Cloud Code for IntelliJ\n\n| **Caution:** As of January 31, 2024, Java 8 support for App Engine has ended, and will be deprecated on January 31, 2026. As a result, Cloud Code disables App Engine by default. To enable App Engine in your IDE, navigate to **Settings** \\\u003e **Google\n| Cloud Code** \\\u003e **App Engine** . Due to the upcoming deprecation of App Engine, we don't recommend creating new App Engine projects. For more information about App Engine deprecations, see [Feature deprecations](/appengine/docs/standard/deprecations). For more information about the runtime support schedule for App Engine, see [Runtime support schedule](/appengine/docs/standard/lifecycle/support-schedule).\n\nThis document describes how to deploy an App Engine application to the\n[App Engine flexible\nenvironment](/appengine/docs/flexible)\nfrom within IntelliJ IDEA.\n| **Note:** The following IDEs support this feature:\n|\n| - IntelliJ IDEA - Ultimate\n| - IntelliJ IDEA - Community\n| **Note:** Only Java applications are supported.\n\nBefore you begin\n----------------\n\n- Follow the [Create an App](/code/docs/intellij/create-flexible)\n guide to install and set up Cloud Code as well as\n create an App Engine app for the flexible\n environment. Be sure to add\n [App Engine flexible framework\n support](/code/docs/intellij/create-flexible#framework).\n\n If you don't have an application but still want to try these deployment\n procedures, download the sample app:\n 1. Clone the **Spring Boot** sample app to your local machine:\n\n git clone https://github.com/spring-guides/gs-spring-boot\n\n 2. In IntelliJ, choose **File** \\\u003e **Open** to open the file selector.\n\n 3. Navigate to `/gs-spring-boot/`.\n\n 4. Select the `/complete/` directory.\n\n 5. Click **OK**.\n\n 6. Add [App Engine flexible framework\n support](/code/docs/intellij/create-flexible#framework).\n\nCreating the deployment configuration\n-------------------------------------\n\n1. Choose **Tools** \\\u003e **Cloud Code** \\\u003e **App Engine** \\\u003e\n **Deploy to App Engine**.\n\n2. Confirm the server configuration:\n\n 1. Click the ellipsis (...) next to the **Server** field.\n\n 2. In the dialog, verify that the **Name** field displays\n **Google App Engine**.\n\n 3. Click **OK**.\n\n3. Select the **Deployment** source.\n\n Cloud Code for IntelliJ supports deploying from a Maven artifact, an\n IntelliJ-specific artifact, or a filesystem JAR or WAR file.\n 1. If you select a filesystem JAR or WAR file as your deployment source, click the ellipsis (...) next to the **Deployment archive** field to navigate to the deployment archive.\n4. Select a project in the **Project** field.\n\n The first time you configure the deployment, you will be prompted to sign in\n to the account associated with the Google Cloud console project that\n you want to deploy.\n5. In the **App Engine Flexible Configuration** section, select a\n valid `app.yaml` file.\n\n 1. If you don't see a valid `app.yaml` file in the drop-down menu, click **Edit** to select a file. See the [Update the App Engine\n flexible configurations](#config) section for more information.\n6. Fill in other fields as needed to configure the deployment.\n\n7. Click **Run** to build and deploy your app.\n\n8. In the Application Servers window, click the name of your project to monitor\n its deployment progress. If the window is not displaying, click\n **View** \\\u003e **Tool Windows** \\\u003e **Application Servers**.\n\n After deployment completes, you can view your app's URL in the console\n output.\n\nDeploying to a custom runtime\n-----------------------------\n\nYou can modify your `app.yaml` file to deploy your app to a custom runtime\nusing a Docker file.\n\n1. In your `app.yaml` file, set your runtime to **custom**.\n\n2. As you complete the [creating the deployment configuration](#deploy) steps,\n the **App Engine Flexible Configuration** section displays the path\n to your `app.yaml` and Docker file.\n\n3. Click **Edit** to select valid `app.yaml` and Docker files.\n\n4. Click the ellipsis (...) next to the `app.yaml` and the **Dockerfile\n Directory** fields to navigate to the appropriate files.\n\n5. Click **OK**.\n\nUpdate the App Engine flexible configurations\n---------------------------------------------\n\nAfter creating the initial deployment configuration, you can make changes to\nthose configurations as needed by your application.\n\n1. Select **File** \\\u003e **Project Structure**.\n\n The **Project Structure** dialog displays.\n2. Under **Project Settings** , select **Facets**.\n\n3. Select the App Engine flexible facet.\n\n4. To select an `app.yaml` file, click the ellipsis (...) next to the\n **app.yaml** field to navigate to the location of a valid file.\n\n5. If you deploy to a custom runtime, click the ellipsis (...) next to the\n **Dockerfile directory** field to navigate to the location of a valid file.\n\n6. Click **OK**.\n\nDeleting the server\n-------------------\n\nIf you ever want to delete the server you configured for your\nproject, you can do so as follows:\n\n1. Choose **File** \\\u003e **Settings** \\\u003e **Build, Execution, Deployment** \\\u003e\n **Clouds**.\n\n On macOS, this is **IntelliJ IDEA** \\\u003e **Preferences** \\\u003e\n **Build, Execution, Deployment** \\\u003e **Clouds**.\n2. Select your server (App Engine) and click the minus sign (-) at the\n top of the window to remove it.\n\n3. Click **OK**.\n\nWhat's next\n-----------\n\n- You can add your project to [Cloud Source Repositories](/code/docs/intellij/vcs) if you haven't done so already.\n\nGet support\n-----------\n\nTo submit feedback or report an issue in your IntelliJ IDE, go to\n**Tools** \\\u003e **Cloud Code** \\\u003e **Help / About** \\\u003e **Submit\nfeedback or report an issue** to report an issue on [GitHub](https://github.com/GoogleCloudPlatform/cloud-code-intellij/issues)."]]