This tutorial describes how to use the Google Kubernetes Engine (GKE) Applications page in the Google Cloud console.
When you adopt Kubernetes for many applications and resources, it can be challenging to identify and track the various components related to one application. When you deploy multiple applications in each namespace, it can be difficult to know what resources are related to which application. Furthermore, you must often search in multiple locations for documentation and metadata that describe what the applications are, who the owners are, and how to interact with the services.
GKE helps solve these challenges with the Applications page:

The Applications page is an independent resource within your architecture that describes metadata about your system. You can use this page to visually organize your resources without changing the architecture. By defining values in a YAML file, you can group all your application resources and include vital metadata for your operations team. Creating, modifying, and deleting the YAML file doesn't affect existing resources, so you can immediately work with resources without risk to your system.
To demonstrate this page, this tutorial shows how to implement the Kubernetes Application resource against an application and add user-defined metadata in order to organize and simplify management of the application in GKE.
This tutorial is intended for developers who create applications to run in GKE. It assumes that you're familiar with basic Kubernetes concepts and have some experience writing Kubernetes resource YAML files.
Objectives
- Introduce the Kubernetes Application resource.
- Add the Kubernetes Application resource to an existing architecture.
- Create and view custom information about an application through the Google Cloud console.
Costs
In this document, you use the following billable components of Google Cloud:
To generate a cost estimate based on your projected usage,
use the pricing calculator.
When you finish the tasks that are described in this document, you can avoid continued billing by deleting the resources that you created. For more information, see Clean up.
Before you begin
-
In the Google Cloud console, on the project selector page, select or create a Google Cloud project.
Roles required to select or create a project
- Select a project: Selecting a project doesn't require a specific IAM role—you can select any project that you've been granted a role on.
-
Create a project: To create a project, you need the Project Creator
(
roles/resourcemanager.projectCreator), which contains theresourcemanager.projects.createpermission. Learn how to grant roles.
-
Verify that billing is enabled for your Google Cloud project.
-
Enable the Compute Engine and Kubernetes Engine APIs.
Roles required to enable APIs
To enable APIs, you need the Service Usage Admin IAM role (
roles/serviceusage.serviceUsageAdmin), which contains theserviceusage.services.enablepermission. Learn how to grant roles. -
In the Google Cloud console, activate Cloud Shell.
You run the commands for this tutorial in Cloud Shell or the Cloud Shell Editor.
Preparing your environment
In Cloud Shell, set the environment variables for your project:
export PROJECT_ID=PROJECT_ID
gcloud config set core/project $PROJECT_ID
gcloud config set compute/zone us-central1-c
Replace
PROJECT_IDwith your Google Cloud project ID.Create a GKE cluster:
gcloud container clusters create sample-clusterFor this tutorial, you run applications in a default GKE cluster.
Installing the sample applications
In this tutorial, you simulate multiple applications running in the same namespace by using a basic Nginx sample application and the Bank of Anthos sample application.
In Cloud Shell, install the Nginx sample application:
kubectl apply -f https://raw.githubusercontent.com/kubernetes/website/master/content/en/examples/application/web/web.yamlThis command creates a StatefulSet resource called
weband a service callednginx. In the Google Cloud console, you can view these resources on the GKE Workloads and Services & Ingress pages.Clone the GitHub repository that contains the Bank of Anthos sample application:
git clone https://github.com/GoogleCloudPlatform/bank-of-anthos.git
cd bank-of-anthos
Generate an SSH key and store it as a Kubernetes Secret:
openssl genrsa -out jwtRS256.key 4096
openssl rsa -in jwtRS256.key -outform PEM -pubout -out jwtRS256.key.pub
kubectl create secret generic jwt-key --from-file=./jwtRS256.key --from-file=./jwtRS256.key.pub
The Bank of Anthos sample application requires an SSH key to run.
Deploy the sample application to your cluster:
kubectl apply -f kubernetes-manifestsAfter a few moments, you can view the application resources on the following pages in the Google Cloud console:
Note the following:
- The resources for the Nginx and Bank of Anthos sample applications are intermingled.
- No resources are displayed yet on the Applications page. You populate the Applications page in later steps.
Preparing GKE
The resources that the Applications page displays are specified with the Kubernetes Application resource type, a custom resource definition (CRD) provided by the open source Kubernetes project. By default, the Application CRD isn't enabled in Kubernetes. Some services in GKE, such as Marketplace and Application Deployment, install the Application CRD, but if you're not using any of those services, the Application CRD isn't available by default.
To install the Application CRD, do the following:
In Cloud Shell, apply the Application CRD once on each cluster:
kubectl apply -f https://raw.githubusercontent.com/kubernetes-sigs/application/master/deploy/kube-app-manager-aio.yaml(Optional) After the command completes, view the Application CRD on the cluster:
kubectl get crdThe following output is a list of installed CRDs, including
applications.app.k8s.io:NAME CREATED AT applications.app.k8s.io 2020-07-24T19:32:20Z backendconfigs.cloud.google.com 2020-07-24T19:28:40Z managedcertificates.networking.gke.io 2020-07-24T19:28:57Z scalingpolicies.scalingpolicy.kope.io 2020-07-24T19:28:57Z updateinfos.nodemanagement.gke.io 2020-07-24T19:28:57Z
Including application resources
Now that the Application CRD is available in the cluster, the next step is to create and deploy an instance of the Application resource.
Because the Application resource is a Kubernetes resource, it has a similar
structure to other Kubernetes resources, including fields and options for
apiVersion, kind, metadata, and spec:
apiVersion: app.k8s.io/v1beta1
kind: Application
metadata:
  name: ...
spec:
   ...
In the following sections, you work with various fields and options that are available in the Application resource.
Create the base Application resource
You can add the Application resource to any existing set of resources. In this tutorial, you begin with an empty resource and fill in each section.
In Cloud Shell, create and edit an
application.yamlfile in thekubernetes-manifestsdirectory:touch kubernetes-manifests/application.yaml edit kubernetes-manifests/application.yamlThe Cloud Shell Editor opens and displays a blank file.
Paste the following lines to define your first application:
apiVersion: app.k8s.io/v1beta1
kind: Application
metadata:
  name: "bank-of-anthos"
On the Cloud Shell menu bar, click Open Terminal.
In Cloud Shell, apply the resource:
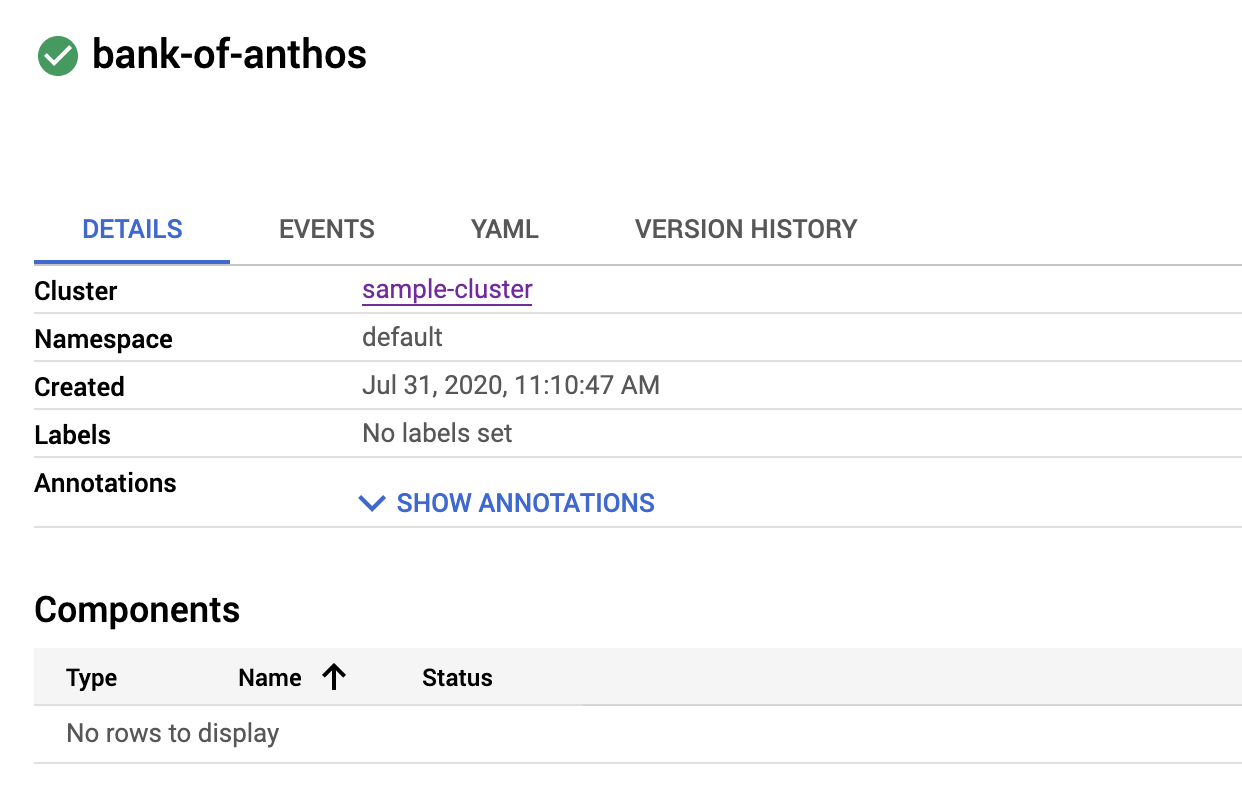
kubectl apply -f kubernetes-manifests/application.yamlIn the Google Cloud console, go to the Applications page.
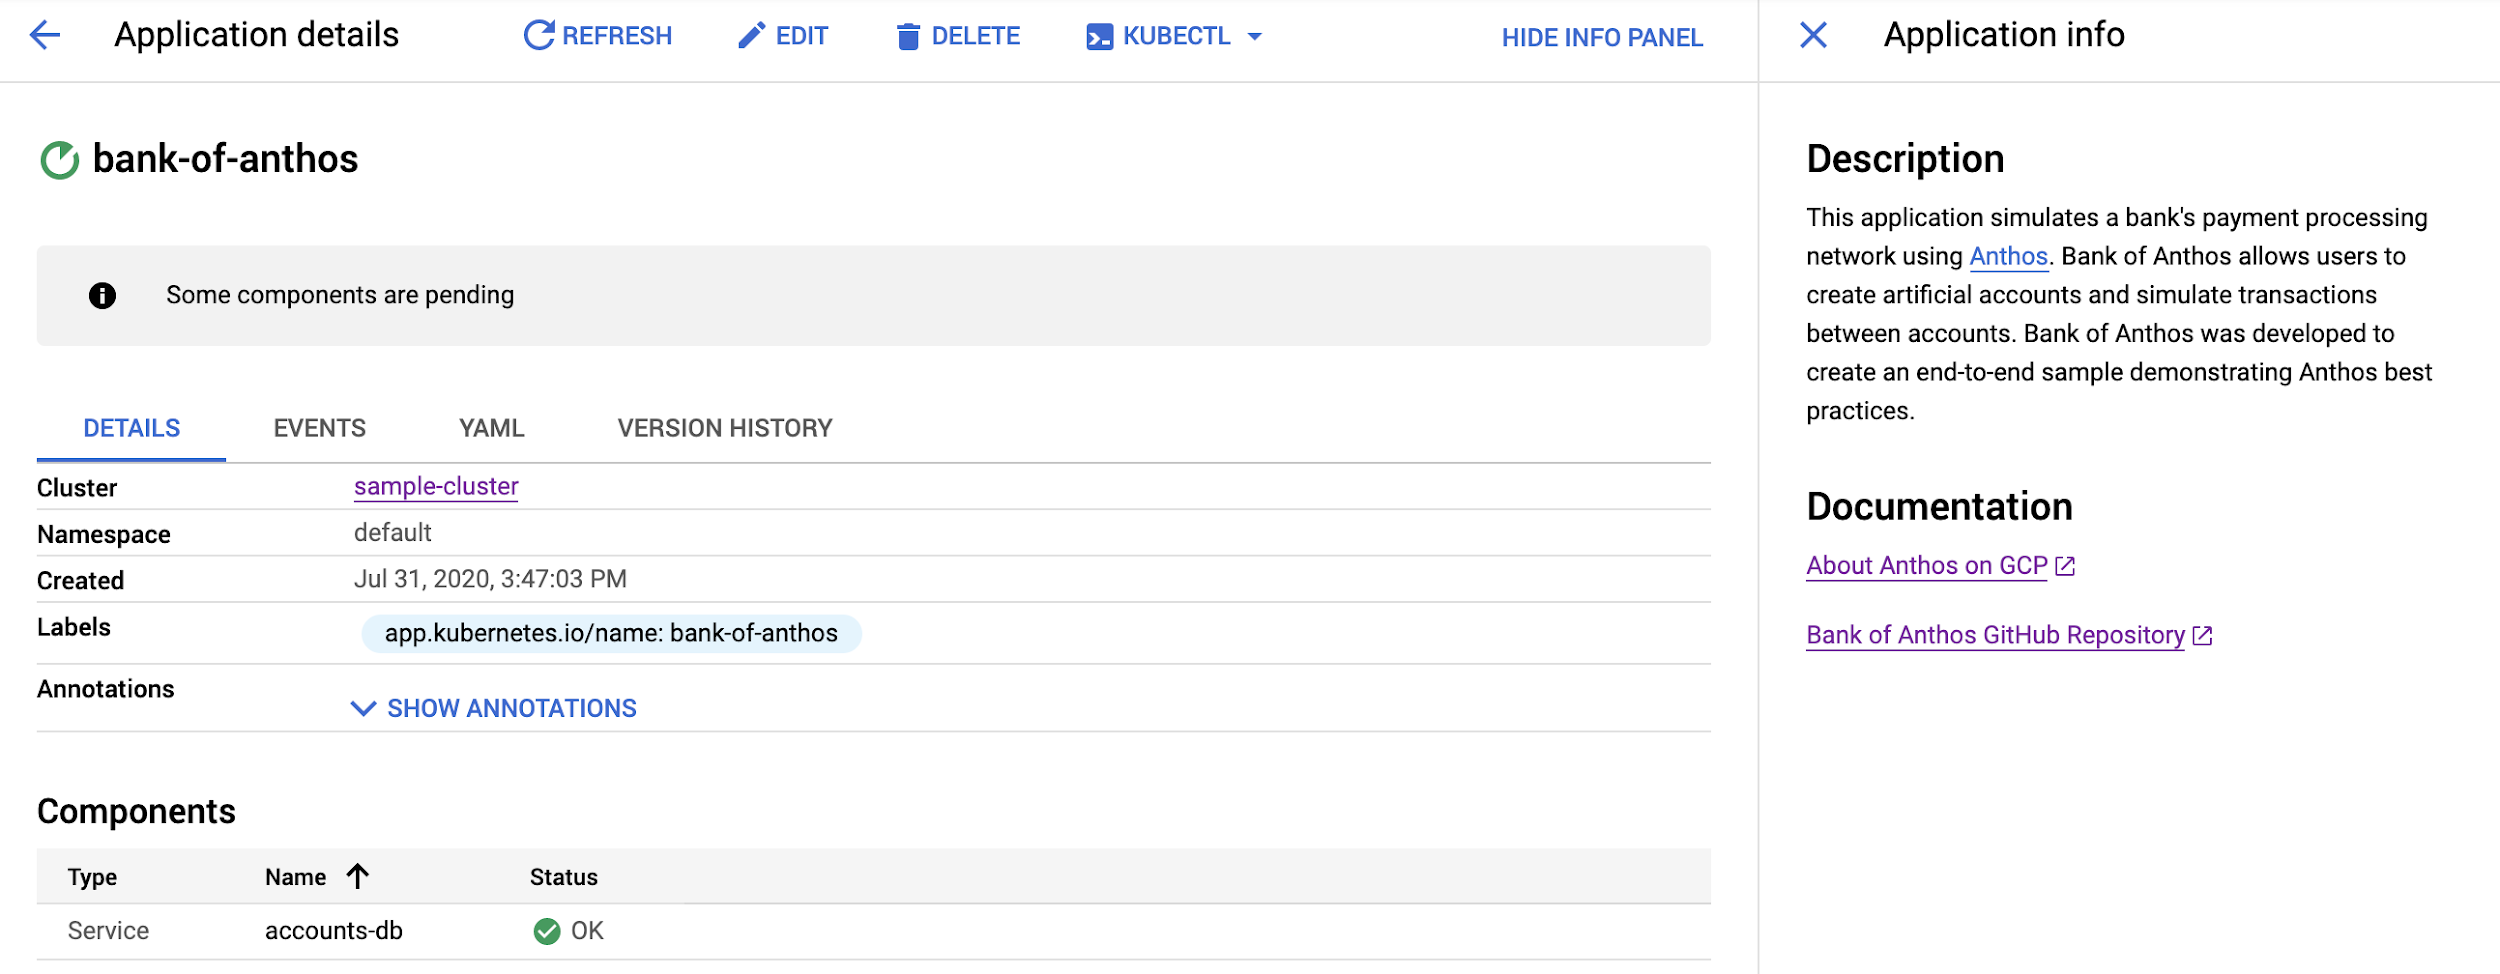
The Applications page displays the resources that you added:

Include resources by component
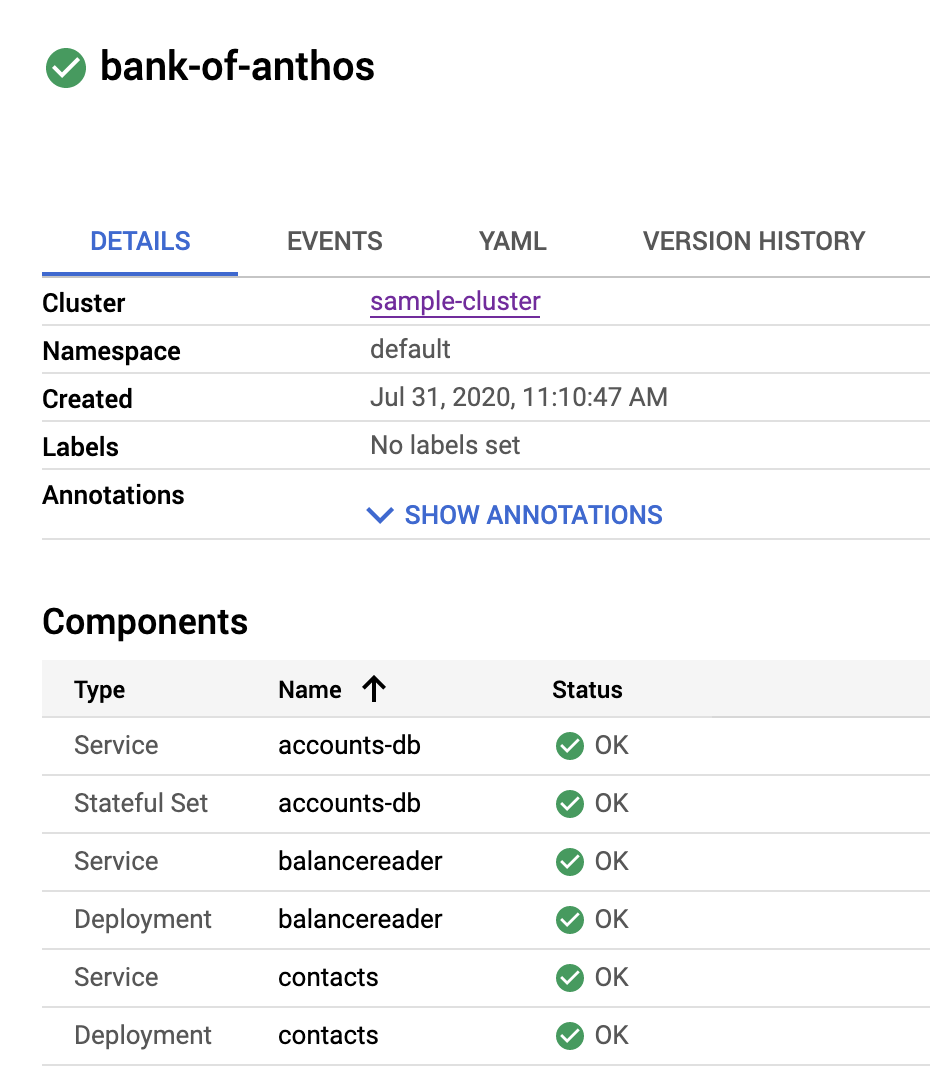
The Applications page shows the Bank of Anthos application. When you click bank-of-anthos in the Name field, you see basic information about the application:
You can add various types of components to display in the
Google Cloud console. For example, to show Services, Deployments, and
StatefulSets, you edit the componentKinds section of the application.yaml
definition—for example, as follows:
spec:
  componentKinds:
    - group: v1
      kind: Service
    - group: apps
      kind: Deployment
    - group: v1
      kind: StatefulSet
In the following steps, you add these components to the Bank of Anthos resource definition:
On the Cloud Shell menu bar, click Open Editor.
In the Cloud Shell Editor, overwrite the contents of the
kubernetes-manifests/application.yamlfile by pasting the following:apiVersion: app.k8s.io/v1beta1 kind: Application metadata: name: "bank-of-anthos" spec: componentKinds: - group: v1 kind: Service - group: apps kind: Deployment - group: v1 kind: StatefulSetThe addition of the
specsection addsService,Deployment, andStatefulSetto your application definition.In Cloud Shell, apply the resource:
kubectl apply -f kubernetes-manifests/application.yamlIn the Google Cloud console, go to the details page for the Bank of Anthos application.
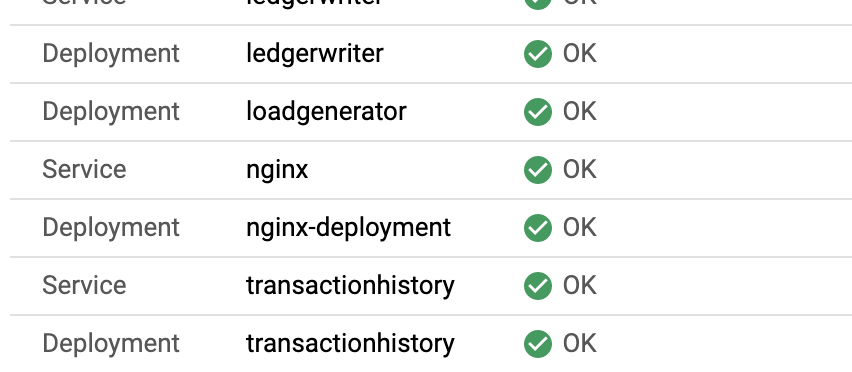
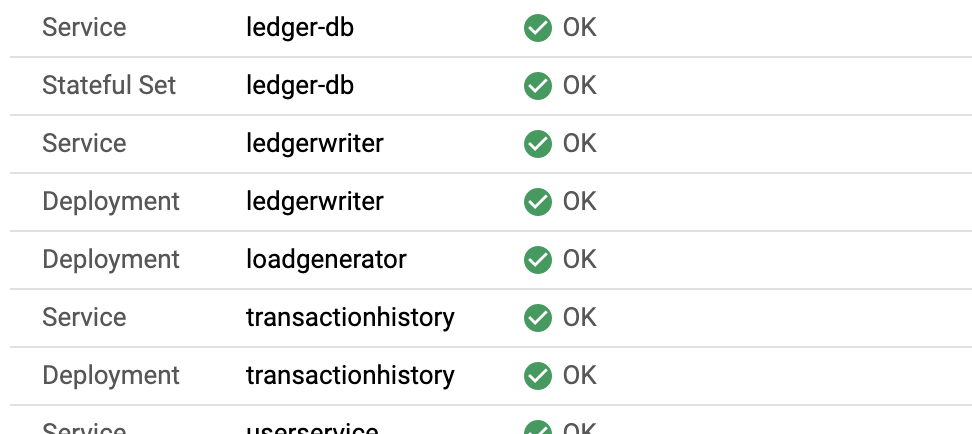
The components of a given type are displayed:
Filter resources with selectors
At this point in the tutorial, the list of components includes all the resources
for both sample applications for the defined set of components from the entire
namespace. For example, the following diagram shows the nginx Service from the
Nginx sample application and the transactionhistory Deployment from the Bank
of Anthos sample application:
To ensure that only the resources for one application are displayed—for instance, for the Bank of Anthos application—you can use selectors to identify specific resources. To see how selectors work, you add a label to your resource in the following steps:
In Cloud Shell, open the
frontend.yamlfile:edit kubernetes-manifests/frontend.yamlIn the Cloud Shell Editor, paste the following
labelentry after line 18:labels: app.kubernetes.io/name: "bank-of-anthos"The
metadatasection looks like following:apiVersion: apps/v1 kind: Deployment metadata: name: frontend labels: app.kubernetes.io/name: "bank-of-anthos" spec:The completed
application.yamlfile looks like the following:apiVersion: app.k8s.io/v1beta1 kind: Application metadata: name: "bank-of-anthos" labels: app.kubernetes.io/name: "bank-of-anthos" spec: selector: matchLabels: app.kubernetes.io/name: "bank-of-anthos" componentKinds: - group: v1 kind: Service - group: apps kind: Deployment - group: v1 kind: StatefulSetIn Cloud Shell, apply the resources:
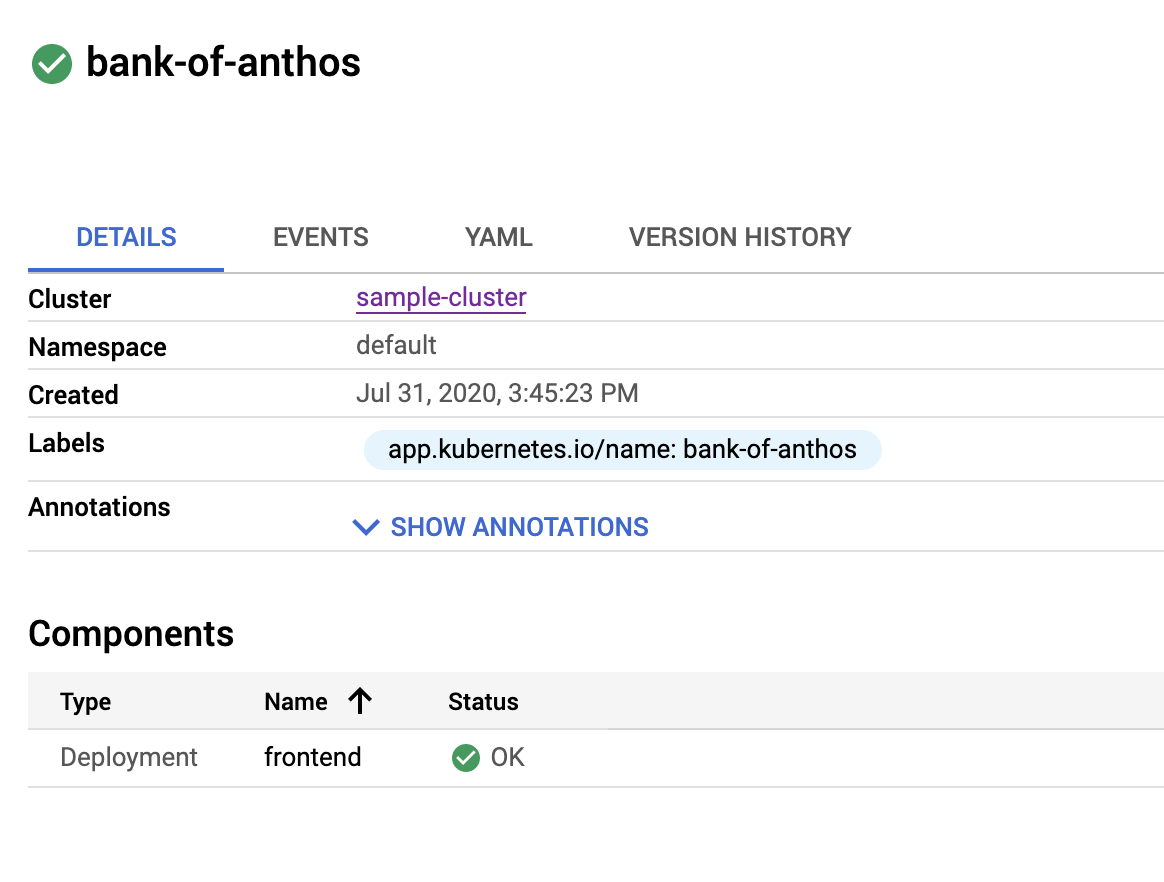
kubectl apply -f kubernetes-manifests/In the Google Cloud console, go to the details page for the Bank of Anthos application.
The only resource that matches a specific label is displayed:
Apply labels to all resources with kustomize
Manually applying labels to every resource in an application can be tedious.
The following steps show how to use
kustomize
to efficiently add labels to all resources:
In Cloud Shell, download
kustomize:curl -s "https://raw.githubusercontent.com/\ kubernetes-sigs/kustomize/master/hack/install_kustomize.sh" | bashCreate and edit a
kustomization.yamlfile:touch kubernetes-manifests/kustomization.yaml edit kubernetes-manifests/kustomization.yamlIn the Cloud Shell Editor, add the following lines to
kustomization.yaml:apiVersion: kustomize.config.k8s.io/v1beta1 kind: Kustomization resources: - accounts-db.yaml - application.yaml - balance-reader.yaml - config.yaml - contacts.yaml - frontend.yaml - ledger-db.yaml - ledger-writer.yaml - loadgenerator.yaml - transaction-history.yaml - userservice.yaml commonLabels: app.kubernetes.io/name: "bank-of-anthos"In this
kustomization.yamldefinition, you specify which resources to apply the modifications to and what modifications to make. In this case, you specify that all resources should have a common label ofapp.kubernetes.io/name: "bank-of-anthos".In Cloud Shell, delete the old resources:
kubectl delete -f kubernetes-manifests/It is necessary to delete the old resources before you apply the new resources that are specified in
kustomization.yaml.Apply the resources using the
kustomizeflag instead of thefileflag:./kustomize build kubernetes-manifests/ | kubectl apply -f -In the Google Cloud console, go to the details page for the Bank of Anthos application.
The details page displays the resources for the Bank of Anthos sample application and no resources from the Nginx sample application:
Adding useful metadata in the display
You can display custom metadata for an application in the Google Cloud console. You might include what the application does, who owns it, where to find more information about it, and how to log in to it. This type of information is valuable for various use cases—for instance, if you operate multiple applications within your organization.
The following sections describe some of the metadata that you can add.
Add a description and documentation
You can add a description and links that appear in the Application info panel. To access this panel from the Details page, click Show Info Panel.
To display information in this panel, you define elements such as
description and links in the descriptor section of your application.yaml
file.
descriptor:
    description:
    links:
    - description:
      url:
To update the descriptor section, do the following:
In Cloud Shell Editor, overwrite the contents of the
application.yamlfile by pasting the following:apiVersion: app.k8s.io/v1beta1 kind: Application metadata: name: "bank-of-anthos" labels: app.kubernetes.io/name: "bank-of-anthos" spec: selector: matchLabels: app.kubernetes.io/name: "bank-of-anthos" componentKinds: - group: v1 kind: Service - group: apps kind: Deployment - group: v1 kind: StatefulSet descriptor: description: |- This application simulates a bank's payment processing network using [Anthos](/anthos/). Bank of Anthos allows users to create artificial accounts and simulate transactions between accounts. Bank of Anthos was developed to create an end-to-end sample demonstrating Anthos best practices. links: - description: 'About Anthos on GCP' url: /anthos/ - description: 'Bank of Anthos GitHub Repository' url: https://github.com/GoogleCloudPlatform/bank-of-anthosIn Cloud Shell, deploy the Application resource:
kubectl apply -f kubernetes-manifests/application.yamlIn the Google Cloud console, go to the details page for the Bank of Anthos application.
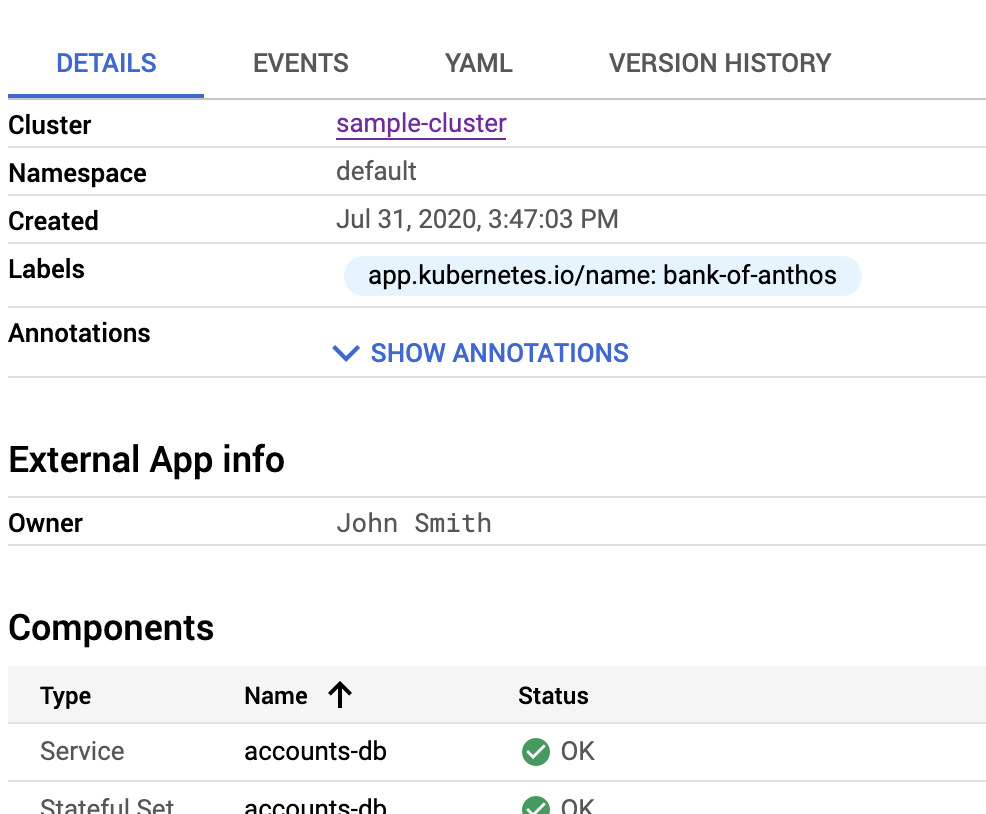
To review the updates, click Show Info Panel.
The Application info panel shows a description and a list of documents:
Include the software type
The Applications page includes a field (Software) for software type in the applications list. You can customize this field to help organize and categorize your applications according to your needs. For example, you might indicate that the software is internal or external. Or, if you have multiple apps built from a shared base type, you might indicate what base type an application implements.
To add a custom description to the software type, you use the type field in
the descriptor section of the application.yaml file:
 descriptor:
    type: External App
You can display the value for type as a hyperlink in the
Google Cloud console. You specify the URL for the hyperlink by using the first
entry from the links section. In the following steps, you update the links
section as follows:
    links:
    - description: 'Bank of Anthos GitHub Repository'
      url: https://github.com/GoogleCloudPlatform/bank-of-anthos
In the Cloud Shell Editor, overwrite the contents of
application.yamlby pasting the following:apiVersion: app.k8s.io/v1beta1 kind: Application metadata: name: "bank-of-anthos" labels: app.kubernetes.io/name: "bank-of-anthos" spec: selector: matchLabels: app.kubernetes.io/name: "bank-of-anthos" componentKinds: - group: v1 kind: Service - group: apps kind: Deployment - group: v1 kind: StatefulSet descriptor: type: External App description: |- This application simulates a bank's payment processing network using [Anthos](/anthos/). Bank of Anthos allows users to create artificial accounts and simulate transactions between accounts. Bank of Anthos was developed to create an end-to-end sample demonstrating Anthos best practices. links: - description: 'About Anthos on GCP' url: /anthos/ - description: 'Bank of Anthos GitHub Repository' url: https://github.com/GoogleCloudPlatform/bank-of-anthosIn Cloud Shell, deploy the Application resource:
kubectl apply -f kubernetes-manifests/application.yamlIn the Google Cloud console, go to the Applications page.
External App is displayed in the Software field:

Include an application version
The main Applications page includes a field for version. In practice, the value for this field is updated programmatically to reference the actual version deployed.
To populate the version field, you include the version field under
descriptor as in the following example:
  descriptor:
    type: External App
    version: "2.3.2"
In the following steps, you add a field for the application version.
In the Cloud Shell Editor, overwrite the contents of the
application.yamlfile by pasting the following:apiVersion: app.k8s.io/v1beta1 kind: Application metadata: name: "bank-of-anthos" labels: app.kubernetes.io/name: "bank-of-anthos" spec: selector: matchLabels: app.kubernetes.io/name: "bank-of-anthos" componentKinds: - group: v1 kind: Service - group: apps kind: Deployment - group: v1 kind: StatefulSet descriptor: type: External App version: "2.3.2" description: |- This application simulates a bank's payment processing network using [Anthos](/anthos/). Bank of Anthos allows users to create artificial accounts and simulate transactions between accounts. Bank of Anthos was developed to create an end-to-end sample demonstrating Anthos best practices. links: - description: 'About Anthos on GCP' url: /anthos/ - description: 'Bank of Anthos GitHub Repository' url: https://github.com/GoogleCloudPlatform/bank-of-anthosIn Cloud Shell, deploy the Application resource:
kubectl apply -f kubernetes-manifests/application.yamlIn the Google Cloud console, go to the Applications page.
The Version field for the Bank of Anthos application is shown as 2.3.2:

Add maintainer details
In this step, you add custom static text to the main section of the
Applications page. You specify these details in the info section of the
application.yaml file as follows:
  info:
  - name: LABEL
    value: STRING
To include static values, you provide details for LABEL and
STRING in the info section. For example, you might enter
Owner for name and John Smith for value.
In the Cloud Shell Editor, overwrite the contents of
application.yamlby pasting the following:apiVersion: app.k8s.io/v1beta1 kind: Application metadata: name: "bank-of-anthos" labels: app.kubernetes.io/name: "bank-of-anthos" spec: selector: matchLabels: app.kubernetes.io/name: "bank-of-anthos" componentKinds: - group: v1 kind: Service - group: apps kind: Deployment - group: v1 kind: StatefulSet descriptor: type: External App version: "2.3.2" description: |- This application simulates a bank's payment processing network using [Anthos](/anthos/). Bank of Anthos allows users to create artificial accounts and simulate transactions between accounts. Bank of Anthos was developed to create an end-to-end sample demonstrating Anthos best practices. links: - description: 'About Anthos on GCP' url: /anthos/ - description: 'Bank of Anthos GitHub Repository' url: https://github.com/GoogleCloudPlatform/bank-of-anthos info: - name: Owner value: John SmithIn Cloud Shell, deploy the Application resource:
kubectl apply -f kubernetes-manifests/application.yamlIn the Google Cloud console, go to the details page for the Bank of Anthos application.
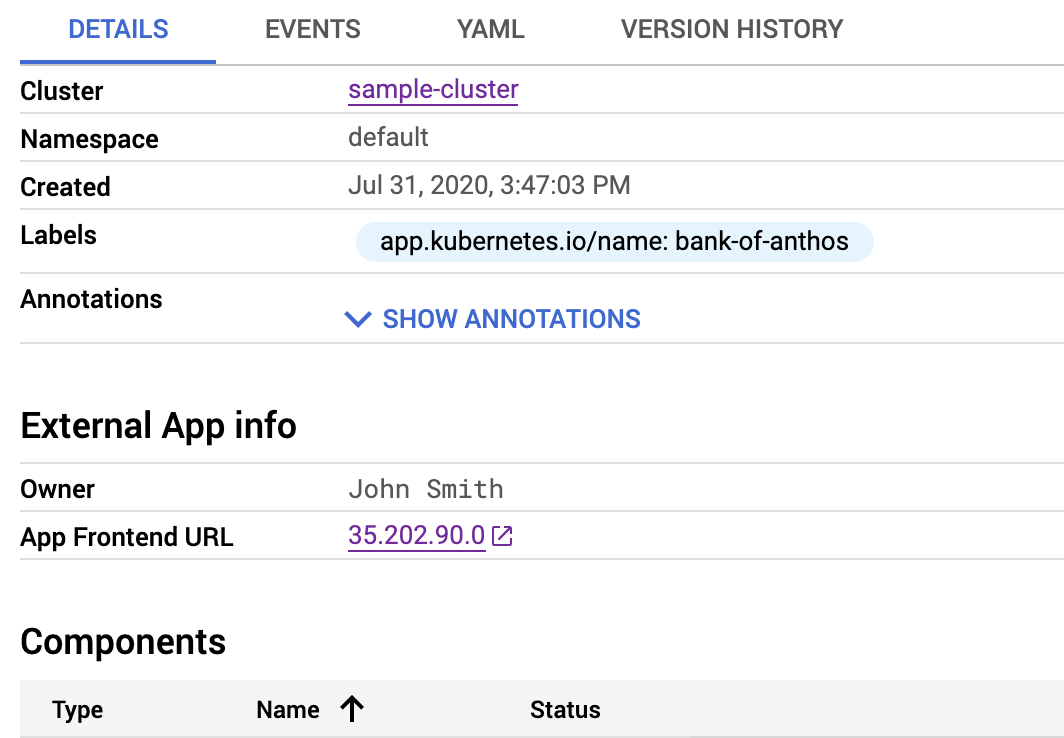
The details page includes an owner for the Bank of Anthos application:
Expose an application endpoint
In addition to static values, you can expose dynamic values from the Deployment itself. In the following steps, you surface the load balancer IP address so that anyone who views the application details page can access the application directly.
To surface this value, you use the
serviceRef
specification. Other valid specifications include
configMapKeyRef,
ingressRef,
and
secretKeyRef.
In the serviceRef specification, you include these dynamic values by using the
Reference type. For this tutorial, the specification for serviceRef is the
following:
 info:
  - name: LABEL
    type: Reference
    valueFrom:
      serviceRef:
        name: SERVICE_NAME
        fieldPath: DATA_LOCATION
You can replace the following values:
LABEL: a label that describes a specific Reference instance—for example,App Frontend URLSERVICE_NAME: the name that identifies the Service$mdash;for example,frontendDATA_LOCATION: the location of the data in the Service—for example,status.loadBalancer.ingress[0].ip
The serviceRef and ingressRef specifications also support the path
element. If your URL requires path-related details, you include those details in
the path field:
 info:
  - name: LABEL
    type: Reference
    valueFrom:
      serviceRef:
        name: SERVICE_NAME
        fieldPath: DATA_LOCATION
        path: /wp-admin
The endpoint IP address and path are concatenated—for example,
35.202.90.0/wp-admin.
You can also force the use of HTTP or HTTPS by using the protocol field as
follows:
 info:
  - name: LABEL
    type: Reference
    valueFrom:
      serviceRef:
        name: SERVICE_NAME
        fieldPath: DATA_LOCATION
        path: /wp-admin
        protocol: HTTPS
These details produce the following URL:
https://35.202.90.0/wp-admin
In the following steps, you use serviceRef to expose the Service load
balancer IP address for the Bank of Anthos application:
In the Cloud Shell Editor, overwrite the contents of the
application.yamlfile with the following:apiVersion: app.k8s.io/v1beta1 kind: Application metadata: name: "bank-of-anthos" labels: app.kubernetes.io/name: "bank-of-anthos" spec: selector: matchLabels: app.kubernetes.io/name: "bank-of-anthos" componentKinds: - group: v1 kind: Service - group: apps kind: Deployment - group: v1 kind: StatefulSet descriptor: type: External App version: "2.3.2" description: |- This application simulates a bank's payment processing network using [Anthos](/anthos/). Bank of Anthos allows users to create artificial accounts and simulate transactions between accounts. Bank of Anthos was developed to create an end-to-end sample demonstrating Anthos best practices. links: - description: 'About Anthos on GCP' url: /anthos/ - description: 'Bank of Anthos GitHub Repository' url: https://github.com/GoogleCloudPlatform/bank-of-anthos info: - name: Owner value: John Smith - name: App Frontend URL type: Reference valueFrom: serviceRef: name: frontend fieldPath: status.loadBalancer.ingress[0].ip protocol: HTTPSIn Cloud Shell, deploy the Application resource:
kubectl apply -f kubernetes-manifests/application.yamlIn the Google Cloud console, go to the details page for the Bank of Anthos application.
The details page includes an endpoint IP address for the Bank of Anthos application:
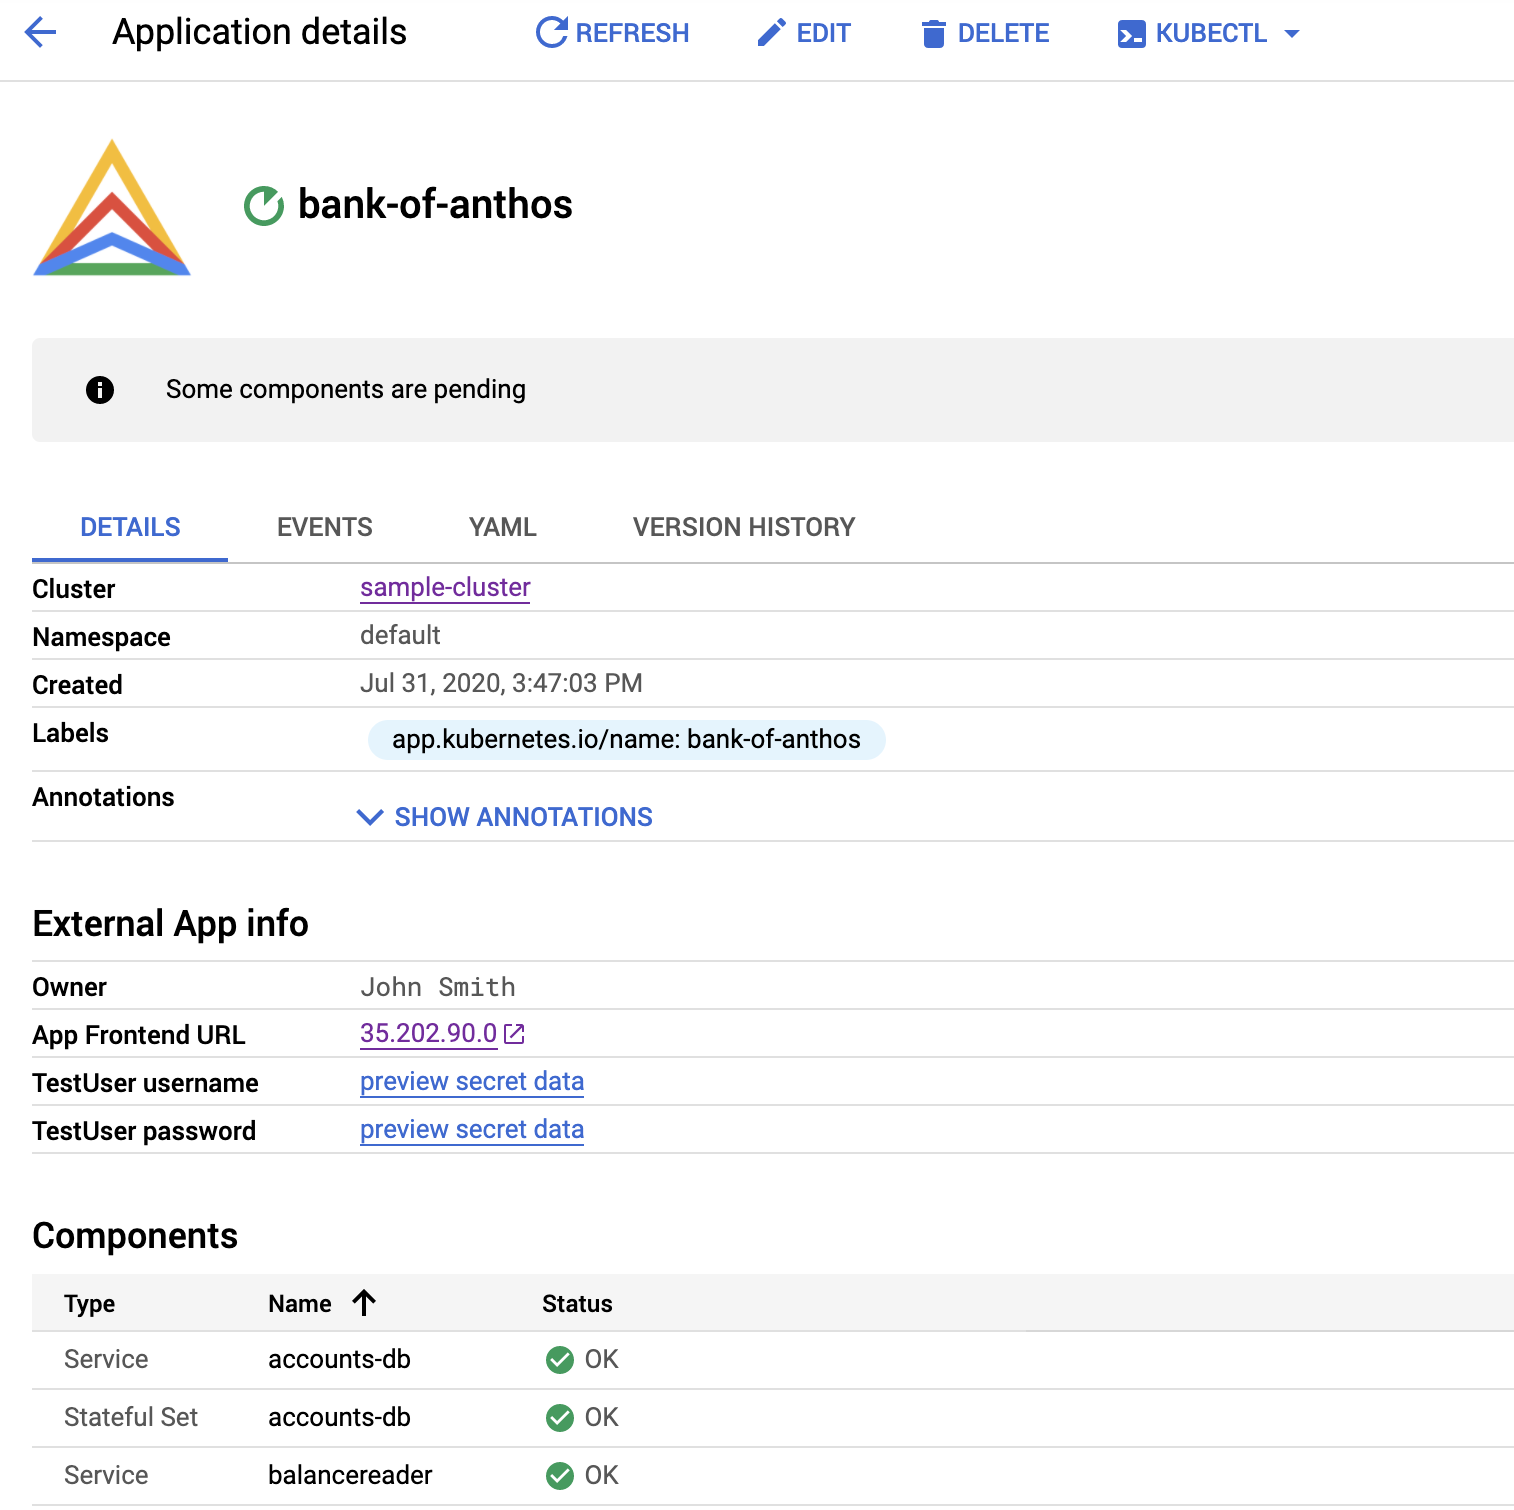
Provide access credentials
As mentioned earlier, you can expose Kubernetes Secrets through the
Google Cloud console using the
secretKeyRef
element. In this tutorial, you provide a username and password to the operator
so that they can log in to the application.
In Cloud Shell, create the Secret:
kubectl create secret generic boa-access --from-literal=boa-user=testuser --from-literal=boa-pass=passwordIn the Cloud Shell Editor, overwrite the contents of the
application.yamlfile by pasting the following. This update includes references to the username and password in thesecretKeyRefannotation.apiVersion: app.k8s.io/v1beta1 kind: Application metadata: name: "bank-of-anthos" labels: app.kubernetes.io/name: "bank-of-anthos" spec: selector: matchLabels: app.kubernetes.io/name: "bank-of-anthos" componentKinds: - group: v1 kind: Service - group: apps kind: Deployment - group: v1 kind: StatefulSet descriptor: type: External App version: "2.3.2" description: |- This application simulates a bank's payment processing network using [Anthos](/anthos/). Bank of Anthos allows users to create artificial accounts and simulate transactions between accounts. Bank of Anthos was developed to create an end-to-end sample demonstrating Anthos best practices. links: - description: 'About Anthos on GCP' url: /anthos/ - description: 'Bank of Anthos GitHub Repository' url: https://github.com/GoogleCloudPlatform/bank-of-anthos info: - name: Owner value: John Smith - name: App Frontend URL type: Reference valueFrom: serviceRef: name: frontend fieldPath: status.loadBalancer.ingress[0].ip protocol: HTTPS - name: TestUser username type: Reference valueFrom: secretKeyRef: name: boa-access key: boa-user - name: TestUser password type: Reference valueFrom: secretKeyRef: name: boa-access key: boa-passIn Cloud Shell, deploy the Application resource:
kubectl apply -f kubernetes-manifests/application.yamlIn the Google Cloud console, go to the details page for the Bank of Anthos application.
Click preview secret data. The username and password are revealed:
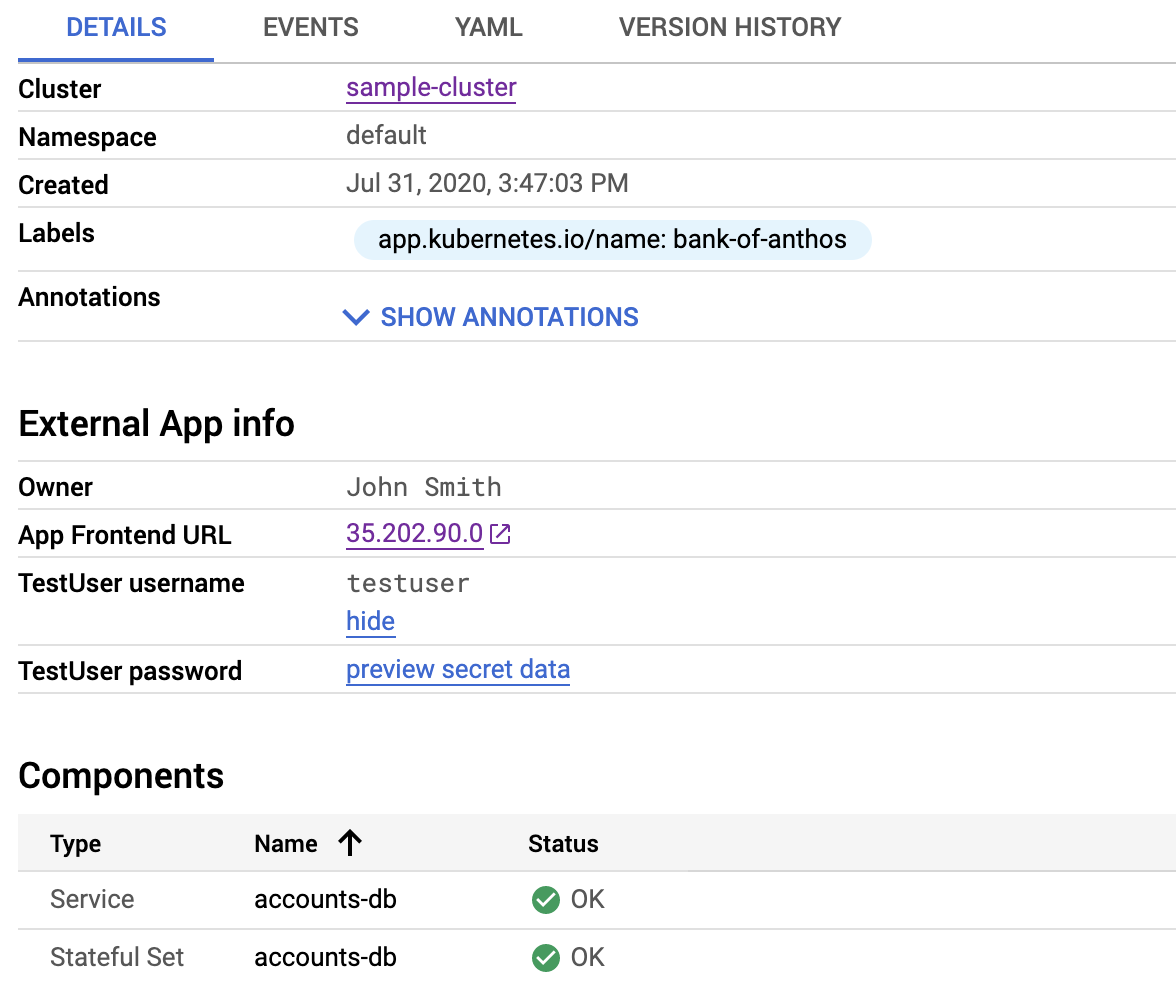
The ability to reveal Secret data can be a helpful feature for your operations teams. However, the ability to view these Secrets is governed by Identity and Access Management (IAM) access permissions for the GKE details page. Anyone with permissions to view clusters can also view Secrets, so it's important to consider carefully what you expose.
Add an application icon
To make your application stand out, you can include a logo that's displayed on
the applications list and your details page. To include a logo, you specify the
data URI
of the image in the kubernetes-engine.cloud.google.com/icon annotation.
Converting an image to a data URI is outside the scope of this tutorial.
However, a Google search on "convert image to data uri" returns various
utilities to help you produce the data string from an image. Because the data
URI for the image used in this section is so long, it's impractical to include
it in the tutorial. The full data URI can be seen in the
completed application.yaml file.
The data URI string should begin like this:
data:image/png;base64,iVBORw0KGgoAAAANSUhEUg.... It ends with K5CYII=. Be
sure not to include any trailing quotation marks or HTML characters.
The full
application.yaml file is available as a gist
for your reference.
To add an icon, you update the metadata section of application.yaml:
Copy the following code:
annotations:
  kubernetes-engine.cloud.google.com/icon: >-
    data:image/png;base64,DATA_URI
Replace
DATA_URIwith the string found in the completedapplication.yamlfile that is referenced earlier.In the Cloud Shell Editor, paste the code that you copied after the
labelssection in themetadatasection ofapplication.yaml.That section of
application.yamllooks similar to the following, whereDATA_URIrepresents the data URI value.apiVersion: app.k8s.io/v1beta1 kind: Application metadata: name: "bank-of-anthos" labels: app.kubernetes.io/name: "bank-of-anthos" annotations: kubernetes-engine.cloud.google.com/icon: >- data:image/png;base64,DATA_URI spec:In Cloud Shell, deploy the application resource:
kubectl apply -f kubernetes-manifests/application.yamlIn the Google Cloud console, go to the Applications page.
A logo is displayed in the list of applications:

In the Google Cloud console, go to the details page for the Bank of Anthos application.
A logo is displayed in the header of the details page:
Clean up
To avoid incurring charges to your Google Cloud account for the resources used in this tutorial, you can delete the Google Cloud project that you created for this tutorial.
Delete the project
- In the Google Cloud console, go to the Manage resources page.
- In the project list, select the project that you want to delete, and then click Delete.
- In the dialog, type the project ID, and then click Shut down to delete the project.
What's next
- Review other examples of
application.yamlfiles files in the Kubernetes folder of theclick-to-deployGitHub repository. Look for otherapplication.yamlfiles underchart/<application>/templates/for the various apps—for example, as seen in this file. - Use Marketplace deployments for Google Click to Deploy solutions for GKE.
- Explore reference architectures, diagrams, and best practices about Google Cloud. Take a look at our Cloud Architecture Center.