設定跨專案網路端點群組
跨專案網路端點群組 (NEG) 功能可讓客戶將不同專案的 NEG 附加至 Traffic Director/Cloud Service Mesh BackendService,實現下列用途:
在多專案部署中,
BackendServices以及相關聯的路由和流量政策,都位於集中式專案中,後端端點則來自不同專案。在多專案部署中,您可以在單一中央Google Cloud 專案中管理所有運算資源 (Compute Engine VM、GKE NEG 等),而服務團隊則擁有自己的 Google Cloud 服務專案,並在各自的服務專案中定義以
BackendServices和服務路由路徑表示的服務政策。這樣一來,他們就能委派服務管理權,同時密切控管運算資源,這些資源可能由不同服務團隊共用。
本頁說明如何建立基準的 2 個專案設定,其中專案 A (稱為工作負載專案) 中的 NEG 會附加至專案 B (稱為政策專案) 中的 BackendService。下列範例會在工作負載專案的預設 VPC 網路中設定工作負載 VM,並根據政策專案中的設定,示範用戶端如何將流量轉送至工作負載專案。
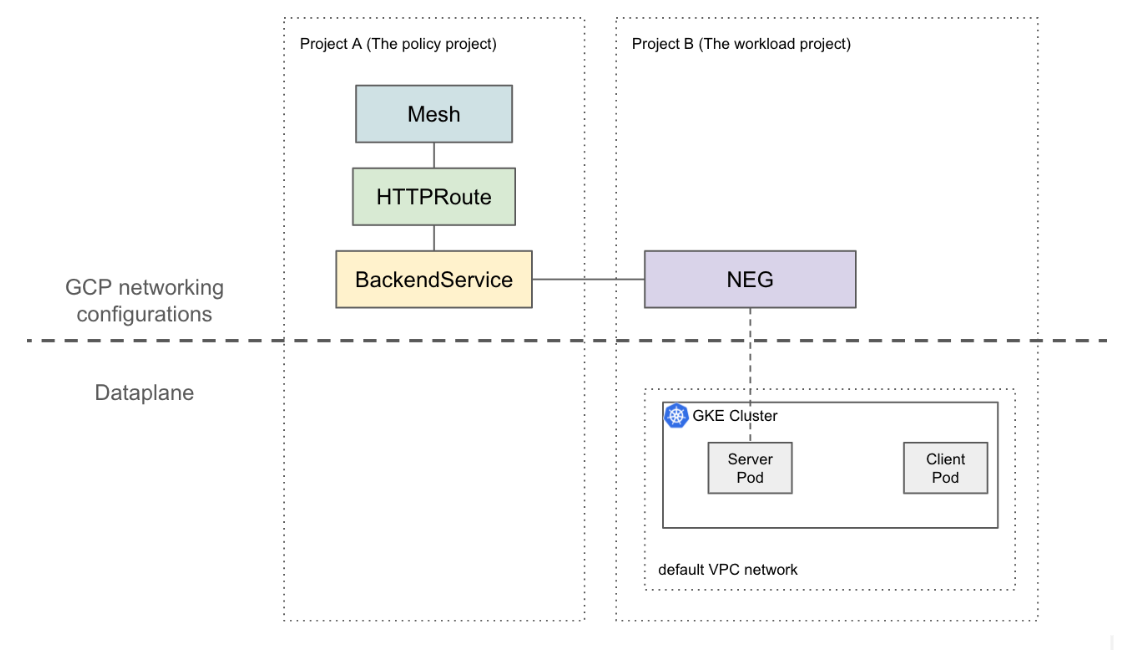
在更複雜的設定中,您需要共用虛擬私有雲等解決方案,才能跨多個專案互連資料平面。這也表示 NEG 端點具有不重複的 IP。這個範例設定可擴充至更複雜的情境,例如工作負載位於跨多個專案的共用虛擬私有雲網路。
限制
適用一般 Traffic Director 限制和 BackendService/NetworkEndpointGroup 限制。
下列限制也適用,但可能不屬於多專案設定專屬限制:
- 單一 BackendService 最多只能支援 50 個後端(包括 NEG、MIG)。
- 僅支援 GCP_VM_IP_PORT 類型的區域 NEG。
- 系統不支援跨專案的 BackendService 參照執行個體群組 (代管或非代管)。
- 系統不支援列出可附加至特定 BackendService 的跨專案 NEG。
- 系統不支援列出使用特定 NEG 的跨專案 BackendService。
事前準備
設定跨專案 NEG 前,您必須完成以下先決條件。
啟用必要的 API
如要完成本指南,必須啟用下列 API:
- osconfig.googleapis.com
- trafficdirector.googleapis.com
- compute.googleapis.com
- networkservices.googleapis.com
執行下列指令,在工作負載專案和政策專案中啟用必要 API:
gcloud services enable --project PROJECT_ID \
    osconfig.googleapis.com \
    trafficdirector.googleapis.com \
    compute.googleapis.com \
    networkservices.googleapis.com
授予必要的 IAM 權限
您必須具備足夠的 Identity and Access Management (IAM) 權限,才能完成本指南。如果您在啟用 Cloud Service Mesh 的專案中,具備專案擁有者或編輯者角色 (roles/owner 或 roles/editor),系統就會自動授予您正確的權限。
否則,您必須授予下列所有 IAM 角色。如果您擁有這些角色,也會具備相關聯的權限,詳情請參閱 Compute Engine IAM 說明文件。
您必須在工作負載和政策專案中具備下列角色:
- roles/iam.serviceAccountAdmin
- roles/serviceusage.serviceUsageAdmin
- roles/compute.networkAdmin
只有工作負載專案需要下列角色:
- roles/compute.securityAdmin
- roles/container.admin
- 包含下列權限的任何角色。如要將 NEG 附加至 BackendService,最細微的預先定義角色是 roles/compute.loadBalancerServiceUser。
- compute.networkEndpointGroups.get
- compute.networkEndpointGroups.use
此外,Traffic Director 管理的 xDS 用戶端 (例如 Envoy Proxy) 必須具備 roles/trafficdirector.client 下的權限。為示範起見,您可以使用下列指令,在政策專案中將這項權限授予工作負載專案的預設 Compute 服務帳戶:
gcloud projects add-iam-policy-binding POLICY_PROJECT_ID \
    --member "serviceAccount:WORKLOAD_PROJECT_NUMBER-compute@developer.gserviceaccount.com" \
    --role "roles/trafficdirector.client"
其中
- POLICY_PROJECT_ID 是政策專案的 ID。
- WORKLOAD_PROJECT_NUMBER 是工作負載專案的專案號碼。
在工作負載專案中設定服務後端
執行下列指令,將 Google Cloud CLI 指向政策專案,並設定偏好的 Google Cloud 運算區域:
gcloud config set project WORKLOAD_PROJECT_ID
gcloud config set compute/zone ZONE
其中
- WORKLOAD_PROJECT_ID 是工作負載專案的 ID。
- ZONE 是 GKE 叢集的區域,例如
us-central1。
建立 GKE 叢集。為方便示範,下列指令會建立可用區 GKE 叢集。不過,這項功能也適用於地區 GKE 叢集。
gcloud container clusters create test-cluster \
    --scopes=https://www.googleapis.com/auth/cloud-platform
    --zone=ZONE
建立防火牆規則:
gcloud compute firewall-rules create http-allow-health-checks \
    --network=default \
    --action=ALLOW \
    --direction=INGRESS \
    --source-ranges=35.191.0.0/16,130.211.0.0/22 \
    --rules=tcp:80
防火牆規則可讓控制平面將健康狀態檢查探測器傳送至預設 VPC 網路中的後端。 Google Cloud
將 kubectl 的目前內容變更為新建立的叢集:
gcloud container clusters get-credentials test-cluster \
    --zone=ZONE
建立及部署 whereami 範例應用程式:
kubectl apply -f - <<EOF
apiVersion: apps/v1
kind: Deployment
metadata:
  name: whereami
spec:
  replicas: 2
  selector:
    matchLabels:
      app: whereami
  template:
    metadata:
      labels:
        app: whereami
    spec:
      containers:
      - name: whereami
        image: us-docker.pkg.dev/google-samples/containers/gke/whereami:v1
        ports:
        - containerPort: 8080
---
apiVersion: v1
kind: Service
metadata:
  name: whereami
  annotations:
    cloud.google.com/neg: '{"exposed_ports":{"8080":{"name": "example-neg"}}}'
spec:
  selector:
    app: whereami
  ports:
  - port: 8080
    targetPort: 8080
EOF
執行下列指令,將 NEG 的參照儲存在變數中:
NEG_LINK=$(gcloud compute network-endpoint-groups describe example-neg --format="value(selfLink)")NEG 控制器會自動為每個區域中的服務後端建立區域性 NetworkEndpointGroup。在這個範例中,NEG 名稱會硬式編碼為 example-neg。將其儲存為變數,在下一個工作階段中將此 NEG 附加至政策專案的 BackendService 時,會很有用。
例如 $NEG_LINK 應如下所示:
$ echo ${NEG_LINK}
https://www.googleapis.com/compute/v1/projects/WORKLOAD_PROJECT/zones/ZONE/networkEndpointGroups/example-neg
或者,您也可以讀取服務的 neg-status 註解,擷取 NEG 網址:
kubectl get service whereami -o jsonpath="{.metadata.annotations['cloud\.google\.com/neg-status']}"
NEG_LINK="https://www.googleapis.com/compute/v1/projects/WORKLOAD_PROJECT_ID/zones/ZONE/networkEndpointGroups/example-neg"
在政策專案中設定 Google Cloud 網路資源
將 Google Cloud CLI 指向政策專案:
gcloud config set project POLICY_PROJECT_ID設定網格資源:
gcloud network-services meshes import example-mesh --source=- --location=global << EOF
name: example-mesh
EOF
網格資源名稱是 Sidecar Proxy 用來要求服務網格設定的金鑰。
使用健康狀態檢查設定基準
BackendService:gcloud compute health-checks create http http-example-health-check gcloud compute backend-services create example-service \ --global \ --load-balancing-scheme=INTERNAL_SELF_MANAGED \ --protocol=HTTP \ --health-checks http-example-health-check將前一節建立的
NetworkEndpointGroup附加至BackendService:gcloud compute backend-services add-backend example-service --global \ --network-endpoint-group=${NEG_LINK} \ --balancing-mode=RATE \ --max-rate-per-endpoint=5建立 HTTPRoute,將主機標頭為
example-service的所有 HTTP 要求導向至工作負載專案中的伺服器:gcloud network-services http-routes import example-route --source=- --location=global << EOF name: example-route hostnames: - example-service meshes: - projects/POLICY_PROJECT_NUMBER/locations/global/meshes/example-mesh rules: - action: destinations: - serviceName: "projects/POLICY_PROJECT_NUMBER/locations/global/backendServices/example-service" EOF其中 POLICY_PROJECT_NUMBER 是政策專案的專案編號。
驗證設定
如要驗證設定,請將 HOST 標頭設為 example-service,然後將 HTTP 要求傳送至 Traffic Director 管理的補充 Proxy 後方的 VIP:
curl -H "Host: example-service" http://10.0.0.1/
輸出內容類似如下:
{"cluster_name":"test-cluster","gce_instance_id":"4879146330986909656","gce_service_account":"...","host_header":"example-service","pod_name":"whereami-7fbffd489-nhkfg","pod_name_emoji":"...","project_id":"...","timestamp":"2024-10-15T00:42:22","zone":"us-west1-a"}
請注意,由於服務網格中 Pod 的所有輸出流量都會遭到 Envoy Sidecar 攔截,且先前的 HTTPRoute 設定是根據 L7 屬性 (主機標頭) 將所有流量傳送至「whereami」Kubernetes 服務,為方便說明,這個指令中的 VIP 為 10.0.0.1,但 VIP 可以是任何 IP。
Sidecar 代理程式應要求與政策專案中的網格資源相關聯的設定。如要這麼做,請確認節點 ID 的格式如下:
projects/POLICY_PROJECT_NUMBER/networks/mesh:example-mesh/nodes/UUID"