모델 학습

라벨이 지정된 학습 문서가 다수 포함된 데이터 세트가 있으면 커스텀 모델을 만들고 학습시킬 수 있습니다.

모델 학습이 완료되기까지 몇 시간 정도 걸릴 수 있습니다. 필요한 학습 시간은 데이터 세트의 크기, 학습 항목의 성격, 모델의 복잡성 등 몇 가지 요인에 따라 달라집니다. AutoML Natural Language는 조기 중단을 통해 과적합 없이 최상의 모델을 생성합니다.

분류 모델의 평균 학습 시간은 6시간에서 최대 24시간까지 소요될 수 있습니다. 항목 추출 및 감성 분석 모드의 경우 평균 학습 시간은 5시간에서 최대 6시간입니다.

모델 학습이 끝나면 프로젝트와 연결된 이메일 주소로 메시지가 발송됩니다.

커스텀 모델의 최대 수명은 18개월입니다. 이 기간이 지난 후에도 예측을 계속하려면 새 모델을 만들고 학습시켜야 합니다.

웹 UI

모델을 학습시키려면 다음 안내를 따르세요.

  1. AutoML Natural Language UI를 열고 학습시킬 모델 유형에 해당하는 상자에서 시작하기를 선택합니다.

    데이터 세트 페이지에는 현재 프로젝트용으로 이전에 만든 데이터 세트의 상태가 표시됩니다. 다른 프로젝트의 데이터 세트를 사용하여 학습시키려면 제목 표시줄의 오른쪽 위에 있는 드롭다운 목록에서 프로젝트를 선택하세요.

  2. 커스텀 모델 학습에 사용할 데이터 세트를 선택합니다.

    선택한 데이터 세트의 표시 이름이 제목 표시줄에 나타나고 페이지에는 데이터 세트에 있는 개별 문서가 라벨과 함께 나열됩니다.

    텍스트 항목 페이지

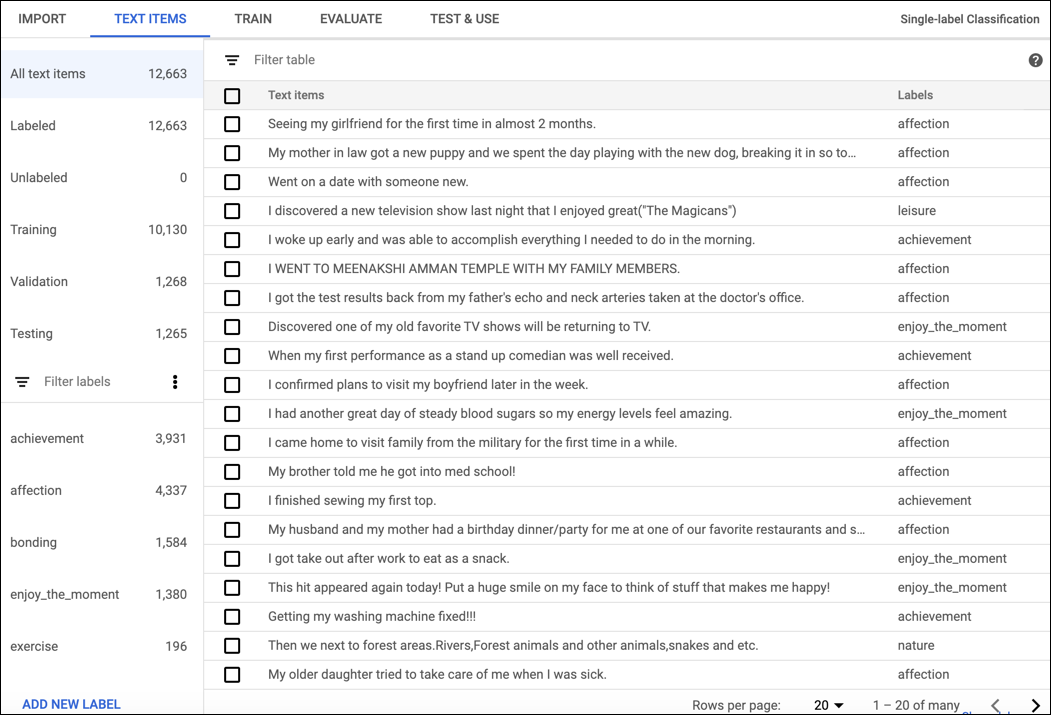
  3. 데이터 세트 검토가 끝났으면 제목 표시줄 바로 아래에 있는 학습 탭을 클릭합니다.

    이 데이터 세트에서 첫 번째 모델을 학습시키려는 경우 학습 페이지에는 데이터 세트에 대한 기본 분석이 제공되며 데이터 세트가 학습에 적합한지 여부를 알려줍니다. AutoML Natural Language에서 변경을 제안하면 텍스트 항목 페이지로 돌아가서 항목이나 라벨을 추가하는 것이 좋습니다.

    이 데이터 세트에서 다른 모델을 학습시킨 경우 학습 페이지에는 해당 모델의 기본 평가 측정항목이 표시됩니다.

  4. 학습 시작을 클릭합니다.

  5. 모델의 이름을 입력합니다.

    모델 이름은 최대 32자(영문 기준)여야 하며 문자, 숫자, 밑줄만 포함할 수 있습니다. 첫 번째 글자는 문자여야 합니다.

  6. (선택사항): 의료 용어의 항목 추출 모델을 학습시키려면 Healthcare 항목 추출 사용 설정(베타)을 선택합니다. 이 옵션을 사용하면 의료 데이터 처리에 최적화된 의료 조정 모델로 시작할 수 있습니다. 자세한 내용은 Healthcare용 AutoML Entity Extraction을 참조하세요.

  7. 모델을 자동으로 배포하려면 학습 완료 후 모델 배포 체크박스를 선택합니다.

  8. 학습 시작을 클릭합니다.

코드 샘플

분류

REST

요청 데이터를 사용하기 전에 다음을 바꿉니다.

  • project-id: 프로젝트 ID입니다.
  • location-id: 리소스의 위치로, 전역 위치의 경우 us-central1, 유럽 연합의 경우 eu
  • dataset-id: 데이터 세트 ID

HTTP 메서드 및 URL:

POST https://automl.googleapis.com/v1/projects/project-id/locations/location-id/models

JSON 요청 본문:

{
  "displayName": "test_model",
  "dataset_id": "dataset-id",
  "textClassificationModelMetadata": {
   }
}

요청을 보내려면 다음 옵션 중 하나를 펼칩니다.

다음과 비슷한 출력이 표시됩니다. 작업 ID를 사용하여 작업 상태를 가져올 수 있습니다. 예제를 보려면 작업 상태 가져오기를 참조하세요.

{
  "name": "projects/434039606874/locations/us-central1/operations/1979469554520652445",
  "metadata": {
    "@type": "type.googleapis.com/google.cloud.automl.v1beta1.OperationMetadata",
    "createTime": "2018-04-27T01:28:41.338120Z",
    "updateTime": "2018-04-27T01:28:41.338120Z",
    "cancellable": true
  }
}

Python

AutoML Natural Language용 클라이언트 라이브러리를 설치하고 사용하는 방법은 AutoML Natural Language 클라이언트 라이브러리를 참조하세요. 자세한 내용은 AutoML Natural Language Python API 참조 문서를 참조하세요.

AutoML Natural Language에 인증하려면 애플리케이션 기본 사용자 인증 정보를 설정합니다. 자세한 내용은 로컬 개발 환경의 인증 설정을 참조하세요.

from google.cloud import automl

# TODO(developer): Uncomment and set the following variables
# project_id = "YOUR_PROJECT_ID"
# dataset_id = "YOUR_DATASET_ID"
# display_name = "YOUR_MODEL_NAME"

client = automl.AutoMlClient()

# A resource that represents Google Cloud Platform location.
project_location = f"projects/{project_id}/locations/us-central1"
# Leave model unset to use the default base model provided by Google
metadata = automl.TextClassificationModelMetadata()
model = automl.Model(
    display_name=display_name,
    dataset_id=dataset_id,
    text_classification_model_metadata=metadata,
)

# Create a model with the model metadata in the region.
response = client.create_model(parent=project_location, model=model)

print(f"Training operation name: {response.operation.name}")
print("Training started...")

Java

AutoML Natural Language용 클라이언트 라이브러리를 설치하고 사용하는 방법은 AutoML Natural Language 클라이언트 라이브러리를 참조하세요. 자세한 내용은 AutoML Natural Language Java API 참조 문서를 참조하세요.

AutoML Natural Language에 인증하려면 애플리케이션 기본 사용자 인증 정보를 설정합니다. 자세한 내용은 로컬 개발 환경의 인증 설정을 참조하세요.

import com.google.api.gax.longrunning.OperationFuture;
import com.google.cloud.automl.v1.AutoMlClient;
import com.google.cloud.automl.v1.LocationName;
import com.google.cloud.automl.v1.Model;
import com.google.cloud.automl.v1.OperationMetadata;
import com.google.cloud.automl.v1.TextClassificationModelMetadata;
import java.io.IOException;
import java.util.concurrent.ExecutionException;

class LanguageTextClassificationCreateModel {

  public static void main(String[] args)
      throws IOException, ExecutionException, InterruptedException {
    // TODO(developer): Replace these variables before running the sample.
    String projectId = "YOUR_PROJECT_ID";
    String datasetId = "YOUR_DATASET_ID";
    String displayName = "YOUR_DATASET_NAME";
    createModel(projectId, datasetId, displayName);
  }

  // Create a model
  static void createModel(String projectId, String datasetId, String displayName)
      throws IOException, ExecutionException, InterruptedException {
    // Initialize client that will be used to send requests. This client only needs to be created
    // once, and can be reused for multiple requests. After completing all of your requests, call
    // the "close" method on the client to safely clean up any remaining background resources.
    try (AutoMlClient client = AutoMlClient.create()) {
      // A resource that represents Google Cloud Platform location.
      LocationName projectLocation = LocationName.of(projectId, "us-central1");
      // Set model metadata.
      TextClassificationModelMetadata metadata =
          TextClassificationModelMetadata.newBuilder().build();
      Model model =
          Model.newBuilder()
              .setDisplayName(displayName)
              .setDatasetId(datasetId)
              .setTextClassificationModelMetadata(metadata)
              .build();

      // Create a model with the model metadata in the region.
      OperationFuture<Model, OperationMetadata> future =
          client.createModelAsync(projectLocation, model);
      // OperationFuture.get() will block until the model is created, which may take several hours.
      // You can use OperationFuture.getInitialFuture to get a future representing the initial
      // response to the request, which contains information while the operation is in progress.
      System.out.format("Training operation name: %s\n", future.getInitialFuture().get().getName());
      System.out.println("Training started...");
    }
  }
}

Node.js

AutoML Natural Language용 클라이언트 라이브러리를 설치하고 사용하는 방법은 AutoML Natural Language 클라이언트 라이브러리를 참조하세요. 자세한 내용은 AutoML Natural Language Node.js API 참조 문서를 참조하세요.

AutoML Natural Language에 인증하려면 애플리케이션 기본 사용자 인증 정보를 설정합니다. 자세한 내용은 로컬 개발 환경의 인증 설정을 참조하세요.

/**
 * TODO(developer): Uncomment these variables before running the sample.
 */
// const projectId = 'YOUR_PROJECT_ID';
// const location = 'us-central1';
// const dataset_id = 'YOUR_DATASET_ID';
// const displayName = 'YOUR_DISPLAY_NAME';

// Imports the Google Cloud AutoML library
const {AutoMlClient} = require('@google-cloud/automl').v1;

// Instantiates a client
const client = new AutoMlClient();

async function createModel() {
  // Construct request
  const request = {
    parent: client.locationPath(projectId, location),
    model: {
      displayName: displayName,
      datasetId: datasetId,
      textClassificationModelMetadata: {}, // Leave unset, to use the default base model
    },
  };

  // Don't wait for the LRO
  const [operation] = await client.createModel(request);
  console.log(`Training started... ${operation}`);
  console.log(`Training operation name: ${operation.name}`);
}

createModel();

Go

AutoML Natural Language용 클라이언트 라이브러리를 설치하고 사용하는 방법은 AutoML Natural Language 클라이언트 라이브러리를 참조하세요. 자세한 내용은 AutoML Natural Language Go API 참조 문서를 참조하세요.

AutoML Natural Language에 인증하려면 애플리케이션 기본 사용자 인증 정보를 설정합니다. 자세한 내용은 로컬 개발 환경의 인증 설정을 참조하세요.

import (
	"context"
	"fmt"
	"io"

	automl "cloud.google.com/go/automl/apiv1"
	"cloud.google.com/go/automl/apiv1/automlpb"
)

// languageTextClassificationCreateModel creates a model for text classification.
func languageTextClassificationCreateModel(w io.Writer, projectID string, location string, datasetID string, modelName string) error {
	// projectID := "my-project-id"
	// location := "us-central1"
	// datasetID := "TCN123456789..."
	// modelName := "model_display_name"

	ctx := context.Background()
	client, err := automl.NewClient(ctx)
	if err != nil {
		return fmt.Errorf("NewClient: %w", err)
	}
	defer client.Close()

	req := &automlpb.CreateModelRequest{
		Parent: fmt.Sprintf("projects/%s/locations/%s", projectID, location),
		Model: &automlpb.Model{
			DisplayName: modelName,
			DatasetId:   datasetID,
			ModelMetadata: &automlpb.Model_TextClassificationModelMetadata{
				TextClassificationModelMetadata: &automlpb.TextClassificationModelMetadata{},
			},
		},
	}

	op, err := client.CreateModel(ctx, req)
	if err != nil {
		return fmt.Errorf("CreateModel: %w", err)
	}
	fmt.Fprintf(w, "Processing operation name: %q\n", op.Name())
	fmt.Fprintf(w, "Training started...\n")

	return nil
}

추가 언어

C#: 클라이언트 라이브러리 페이지의 C# 설정 안내를 따른 후 .NET용 AutoML 자연 언어 참조 문서를 참조하세요.

PHP: 클라이언트 라이브러리 페이지의 PHP 설정 안내를 따른 후 PHP용 AutoML 자연 언어 참조 문서를 참조하세요.

Ruby: 클라이언트 라이브러리 페이지의 Ruby 설정 안내를 따른 후 Ruby용 AutoML 자연 언어 참조 문서를 참조하세요.

항목 추출

REST

요청 데이터를 사용하기 전에 다음을 바꿉니다.

  • project-id: 프로젝트 ID입니다.
  • location-id: 리소스의 위치로, 전역 위치의 경우 us-central1, 유럽 연합의 경우 eu
  • dataset-id: 데이터 세트 ID
  • model-hint: 사용할 기준 모델(예: default 또는 healthcare)(베타)

HTTP 메서드 및 URL:

POST https://automl.googleapis.com/v1/projects/project-id/locations/location-id/models

JSON 요청 본문:

{
  "displayName": "test_model",
  "dataset_id": "dataset-id",
  "textExtractionModelMetadata": {
    "model_hint": "model-hint"
  }
}

요청을 보내려면 다음 옵션 중 하나를 펼칩니다.

다음과 비슷한 출력이 표시됩니다. 작업 ID를 사용하여 작업 상태를 가져올 수 있습니다. 예제를 보려면 작업 상태 가져오기를 참조하세요.

{
  "name": "projects/434039606874/locations/us-central1/operations/1979469554520652445",
  "metadata": {
    "@type": "type.googleapis.com/google.cloud.automl.v1beta1.OperationMetadata",
    "createTime": "2018-04-27T01:28:41.338120Z",
    "updateTime": "2018-04-27T01:28:41.338120Z",
    "cancellable": true
  }
}

Python

AutoML Natural Language용 클라이언트 라이브러리를 설치하고 사용하는 방법은 AutoML Natural Language 클라이언트 라이브러리를 참조하세요. 자세한 내용은 AutoML Natural Language Python API 참조 문서를 참조하세요.

AutoML Natural Language에 인증하려면 애플리케이션 기본 사용자 인증 정보를 설정합니다. 자세한 내용은 로컬 개발 환경의 인증 설정을 참조하세요.

from google.cloud import automl

# TODO(developer): Uncomment and set the following variables
# project_id = "YOUR_PROJECT_ID"
# dataset_id = "YOUR_DATASET_ID"
# display_name = "YOUR_MODEL_NAME"

client = automl.AutoMlClient()

# A resource that represents Google Cloud Platform location.
project_location = f"projects/{project_id}/locations/us-central1"
# Leave model unset to use the default base model provided by Google
metadata = automl.TextExtractionModelMetadata()
model = automl.Model(
    display_name=display_name,
    dataset_id=dataset_id,
    text_extraction_model_metadata=metadata,
)

# Create a model with the model metadata in the region.
response = client.create_model(parent=project_location, model=model)

print(f"Training operation name: {response.operation.name}")
print("Training started...")

Java

AutoML Natural Language용 클라이언트 라이브러리를 설치하고 사용하는 방법은 AutoML Natural Language 클라이언트 라이브러리를 참조하세요. 자세한 내용은 AutoML Natural Language Java API 참조 문서를 참조하세요.

AutoML Natural Language에 인증하려면 애플리케이션 기본 사용자 인증 정보를 설정합니다. 자세한 내용은 로컬 개발 환경의 인증 설정을 참조하세요.

import com.google.api.gax.longrunning.OperationFuture;
import com.google.cloud.automl.v1.AutoMlClient;
import com.google.cloud.automl.v1.LocationName;
import com.google.cloud.automl.v1.Model;
import com.google.cloud.automl.v1.OperationMetadata;
import com.google.cloud.automl.v1.TextExtractionModelMetadata;
import java.io.IOException;
import java.util.concurrent.ExecutionException;

class LanguageEntityExtractionCreateModel {

  static void createModel() throws IOException, ExecutionException, InterruptedException {
    // TODO(developer): Replace these variables before running the sample.
    String projectId = "YOUR_PROJECT_ID";
    String datasetId = "YOUR_DATASET_ID";
    String displayName = "YOUR_DATASET_NAME";
    createModel(projectId, datasetId, displayName);
  }

  // Create a model
  static void createModel(String projectId, String datasetId, String displayName)
      throws IOException, ExecutionException, InterruptedException {
    // Initialize client that will be used to send requests. This client only needs to be created
    // once, and can be reused for multiple requests. After completing all of your requests, call
    // the "close" method on the client to safely clean up any remaining background resources.
    try (AutoMlClient client = AutoMlClient.create()) {
      // A resource that represents Google Cloud Platform location.
      LocationName projectLocation = LocationName.of(projectId, "us-central1");
      // Set model metadata.
      TextExtractionModelMetadata metadata = TextExtractionModelMetadata.newBuilder().build();
      Model model =
          Model.newBuilder()
              .setDisplayName(displayName)
              .setDatasetId(datasetId)
              .setTextExtractionModelMetadata(metadata)
              .build();

      // Create a model with the model metadata in the region.
      OperationFuture<Model, OperationMetadata> future =
          client.createModelAsync(projectLocation, model);
      // OperationFuture.get() will block until the model is created, which may take several hours.
      // You can use OperationFuture.getInitialFuture to get a future representing the initial
      // response to the request, which contains information while the operation is in progress.
      System.out.format("Training operation name: %s\n", future.getInitialFuture().get().getName());
      System.out.println("Training started...");
    }
  }
}

Node.js

AutoML Natural Language용 클라이언트 라이브러리를 설치하고 사용하는 방법은 AutoML Natural Language 클라이언트 라이브러리를 참조하세요. 자세한 내용은 AutoML Natural Language Node.js API 참조 문서를 참조하세요.

AutoML Natural Language에 인증하려면 애플리케이션 기본 사용자 인증 정보를 설정합니다. 자세한 내용은 로컬 개발 환경의 인증 설정을 참조하세요.

/**
 * TODO(developer): Uncomment these variables before running the sample.
 */
// const projectId = 'YOUR_PROJECT_ID';
// const location = 'us-central1';
// const dataset_id = 'YOUR_DATASET_ID';
// const displayName = 'YOUR_DISPLAY_NAME';

// Imports the Google Cloud AutoML library
const {AutoMlClient} = require('@google-cloud/automl').v1;

// Instantiates a client
const client = new AutoMlClient();

async function createModel() {
  // Construct request
  const request = {
    parent: client.locationPath(projectId, location),
    model: {
      displayName: displayName,
      datasetId: datasetId,
      textExtractionModelMetadata: {}, // Leave unset, to use the default base model
    },
  };

  // Don't wait for the LRO
  const [operation] = await client.createModel(request);
  console.log(`Training started... ${operation}`);
  console.log(`Training operation name: ${operation.name}`);
}

createModel();

Go

AutoML Natural Language용 클라이언트 라이브러리를 설치하고 사용하는 방법은 AutoML Natural Language 클라이언트 라이브러리를 참조하세요. 자세한 내용은 AutoML Natural Language Go API 참조 문서를 참조하세요.

AutoML Natural Language에 인증하려면 애플리케이션 기본 사용자 인증 정보를 설정합니다. 자세한 내용은 로컬 개발 환경의 인증 설정을 참조하세요.

import (
	"context"
	"fmt"
	"io"

	automl "cloud.google.com/go/automl/apiv1"
	"cloud.google.com/go/automl/apiv1/automlpb"
)

// languageEntityExtractionCreateModel creates a model for text entity extraction.
func languageEntityExtractionCreateModel(w io.Writer, projectID string, location string, datasetID string, modelName string) error {
	// projectID := "my-project-id"
	// location := "us-central1"
	// datasetID := "TEN123456789..."
	// modelName := "model_display_name"

	ctx := context.Background()
	client, err := automl.NewClient(ctx)
	if err != nil {
		return fmt.Errorf("NewClient: %w", err)
	}
	defer client.Close()

	req := &automlpb.CreateModelRequest{
		Parent: fmt.Sprintf("projects/%s/locations/%s", projectID, location),
		Model: &automlpb.Model{
			DisplayName: modelName,
			DatasetId:   datasetID,
			ModelMetadata: &automlpb.Model_TextExtractionModelMetadata{
				TextExtractionModelMetadata: &automlpb.TextExtractionModelMetadata{},
			},
		},
	}

	op, err := client.CreateModel(ctx, req)
	if err != nil {
		return fmt.Errorf("CreateModel: %w", err)
	}
	fmt.Fprintf(w, "Processing operation name: %q\n", op.Name())
	fmt.Fprintf(w, "Training started...\n")

	return nil
}

추가 언어

C#: 클라이언트 라이브러리 페이지의 C# 설정 안내를 따른 후 .NET용 AutoML 자연 언어 참조 문서를 참조하세요.

PHP: 클라이언트 라이브러리 페이지의 PHP 설정 안내를 따른 후 PHP용 AutoML 자연 언어 참조 문서를 참조하세요.

Ruby: 클라이언트 라이브러리 페이지의 Ruby 설정 안내를 따른 후 Ruby용 AutoML 자연 언어 참조 문서를 참조하세요.

감정 분석

REST

요청 데이터를 사용하기 전에 다음을 바꿉니다.

  • project-id: 프로젝트 ID입니다.
  • location-id: 리소스의 위치로, 전역 위치의 경우 us-central1, 유럽 연합의 경우 eu
  • dataset-id: 데이터 세트 ID

HTTP 메서드 및 URL:

POST https://automl.googleapis.com/v1/projects/project-id/locations/location-id/models

JSON 요청 본문:

{
  "displayName": "test_model",
  "dataset_id": "dataset-id",
  "textSentimentModelMetadata": {
  }
}

요청을 보내려면 다음 옵션 중 하나를 펼칩니다.

다음과 비슷한 출력이 표시됩니다. 작업 ID를 사용하여 작업 상태를 가져올 수 있습니다. 예제를 보려면 작업 상태 가져오기를 참조하세요.

{
  "name": "projects/434039606874/locations/us-central1/operations/1979469554520652445",
  "metadata": {
    "@type": "type.googleapis.com/google.cloud.automl.v1beta1.OperationMetadata",
    "createTime": "2018-04-27T01:28:41.338120Z",
    "updateTime": "2018-04-27T01:28:41.338120Z",
    "cancellable": true
  }
}

Python

AutoML Natural Language용 클라이언트 라이브러리를 설치하고 사용하는 방법은 AutoML Natural Language 클라이언트 라이브러리를 참조하세요. 자세한 내용은 AutoML Natural Language Python API 참조 문서를 참조하세요.

AutoML Natural Language에 인증하려면 애플리케이션 기본 사용자 인증 정보를 설정합니다. 자세한 내용은 로컬 개발 환경의 인증 설정을 참조하세요.

from google.cloud import automl

# TODO(developer): Uncomment and set the following variables
# project_id = "YOUR_PROJECT_ID"
# dataset_id = "YOUR_DATASET_ID"
# display_name = "YOUR_MODEL_NAME"

client = automl.AutoMlClient()

# A resource that represents Google Cloud Platform location.
project_location = f"projects/{project_id}/locations/us-central1"
# Leave model unset to use the default base model provided by Google
metadata = automl.TextSentimentModelMetadata()
model = automl.Model(
    display_name=display_name,
    dataset_id=dataset_id,
    text_sentiment_model_metadata=metadata,
)

# Create a model with the model metadata in the region.
response = client.create_model(parent=project_location, model=model)

print(f"Training operation name: {response.operation.name}")
print("Training started...")

Java

AutoML Natural Language용 클라이언트 라이브러리를 설치하고 사용하는 방법은 AutoML Natural Language 클라이언트 라이브러리를 참조하세요. 자세한 내용은 AutoML Natural Language Java API 참조 문서를 참조하세요.

AutoML Natural Language에 인증하려면 애플리케이션 기본 사용자 인증 정보를 설정합니다. 자세한 내용은 로컬 개발 환경의 인증 설정을 참조하세요.

import com.google.api.gax.longrunning.OperationFuture;
import com.google.cloud.automl.v1.AutoMlClient;
import com.google.cloud.automl.v1.LocationName;
import com.google.cloud.automl.v1.Model;
import com.google.cloud.automl.v1.OperationMetadata;
import com.google.cloud.automl.v1.TextSentimentModelMetadata;
import java.io.IOException;
import java.util.concurrent.ExecutionException;

class LanguageSentimentAnalysisCreateModel {

  static void createModel() throws IOException, ExecutionException, InterruptedException {
    // TODO(developer): Replace these variables before running the sample.
    String projectId = "YOUR_PROJECT_ID";
    String datasetId = "YOUR_DATASET_ID";
    String displayName = "YOUR_DATASET_NAME";
    createModel(projectId, datasetId, displayName);
  }

  // Create a model
  static void createModel(String projectId, String datasetId, String displayName)
      throws IOException, ExecutionException, InterruptedException {
    // Initialize client that will be used to send requests. This client only needs to be created
    // once, and can be reused for multiple requests. After completing all of your requests, call
    // the "close" method on the client to safely clean up any remaining background resources.
    try (AutoMlClient client = AutoMlClient.create()) {
      // A resource that represents Google Cloud Platform location.
      LocationName projectLocation = LocationName.of(projectId, "us-central1");
      // Set model metadata.
      System.out.println(datasetId);
      TextSentimentModelMetadata metadata = TextSentimentModelMetadata.newBuilder().build();
      Model model =
          Model.newBuilder()
              .setDisplayName(displayName)
              .setDatasetId(datasetId)
              .setTextSentimentModelMetadata(metadata)
              .build();

      // Create a model with the model metadata in the region.
      OperationFuture<Model, OperationMetadata> future =
          client.createModelAsync(projectLocation, model);
      // OperationFuture.get() will block until the model is created, which may take several hours.
      // You can use OperationFuture.getInitialFuture to get a future representing the initial
      // response to the request, which contains information while the operation is in progress.
      System.out.format("Training operation name: %s\n", future.getInitialFuture().get().getName());
      System.out.println("Training started...");
    }
  }
}

Node.js

AutoML Natural Language용 클라이언트 라이브러리를 설치하고 사용하는 방법은 AutoML Natural Language 클라이언트 라이브러리를 참조하세요. 자세한 내용은 AutoML Natural Language Node.js API 참조 문서를 참조하세요.

AutoML Natural Language에 인증하려면 애플리케이션 기본 사용자 인증 정보를 설정합니다. 자세한 내용은 로컬 개발 환경의 인증 설정을 참조하세요.

/**
 * TODO(developer): Uncomment these variables before running the sample.
 */
// const projectId = 'YOUR_PROJECT_ID';
// const location = 'us-central1';
// const dataset_id = 'YOUR_DATASET_ID';
// const displayName = 'YOUR_DISPLAY_NAME';

// Imports the Google Cloud AutoML library
const {AutoMlClient} = require('@google-cloud/automl').v1;

// Instantiates a client
const client = new AutoMlClient();

async function createModel() {
  // Construct request
  const request = {
    parent: client.locationPath(projectId, location),
    model: {
      displayName: displayName,
      datasetId: datasetId,
      textSentimentModelMetadata: {}, // Leave unset, to use the default base model
    },
  };

  // Don't wait for the LRO
  const [operation] = await client.createModel(request);
  console.log(`Training started... ${operation}`);
  console.log(`Training operation name: ${operation.name}`);
}

createModel();

Go

AutoML Natural Language용 클라이언트 라이브러리를 설치하고 사용하는 방법은 AutoML Natural Language 클라이언트 라이브러리를 참조하세요. 자세한 내용은 AutoML Natural Language Go API 참조 문서를 참조하세요.

AutoML Natural Language에 인증하려면 애플리케이션 기본 사용자 인증 정보를 설정합니다. 자세한 내용은 로컬 개발 환경의 인증 설정을 참조하세요.

import (
	"context"
	"fmt"
	"io"

	automl "cloud.google.com/go/automl/apiv1"
	"cloud.google.com/go/automl/apiv1/automlpb"
)

// languageSentimentAnalysisCreateModel creates a model for text sentiment analysis.
func languageSentimentAnalysisCreateModel(w io.Writer, projectID string, location string, datasetID string, modelName string) error {
	// projectID := "my-project-id"
	// location := "us-central1"
	// datasetID := "TST123456789..."
	// modelName := "model_display_name"

	ctx := context.Background()
	client, err := automl.NewClient(ctx)
	if err != nil {
		return fmt.Errorf("NewClient: %w", err)
	}
	defer client.Close()

	req := &automlpb.CreateModelRequest{
		Parent: fmt.Sprintf("projects/%s/locations/%s", projectID, location),
		Model: &automlpb.Model{
			DisplayName: modelName,
			DatasetId:   datasetID,
			ModelMetadata: &automlpb.Model_TextSentimentModelMetadata{
				TextSentimentModelMetadata: &automlpb.TextSentimentModelMetadata{},
			},
		},
	}

	op, err := client.CreateModel(ctx, req)
	if err != nil {
		return fmt.Errorf("CreateModel: %w", err)
	}
	fmt.Fprintf(w, "Processing operation name: %q\n", op.Name())
	fmt.Fprintf(w, "Training started...\n")

	return nil
}

추가 언어

C#: 클라이언트 라이브러리 페이지의 C# 설정 안내를 따른 후 .NET용 AutoML 자연 언어 참조 문서를 참조하세요.

PHP: 클라이언트 라이브러리 페이지의 PHP 설정 안내를 따른 후 PHP용 AutoML 자연 언어 참조 문서를 참조하세요.

Ruby: 클라이언트 라이브러리 페이지의 Ruby 설정 안내를 따른 후 Ruby용 AutoML 자연 언어 참조 문서를 참조하세요.