Transcoding data locally on a mainframe is a CPU-intensive process that results in high million instructions per second (MIPS) consumption. To avoid this, you can use Cloud Run to move and transcode mainframe data remotely on Google Cloud to optimized row columnar (ORC) format and then move the data to Cloud Storage. This frees up your mainframe for business critical tasks and also reduces MIPS consumption.
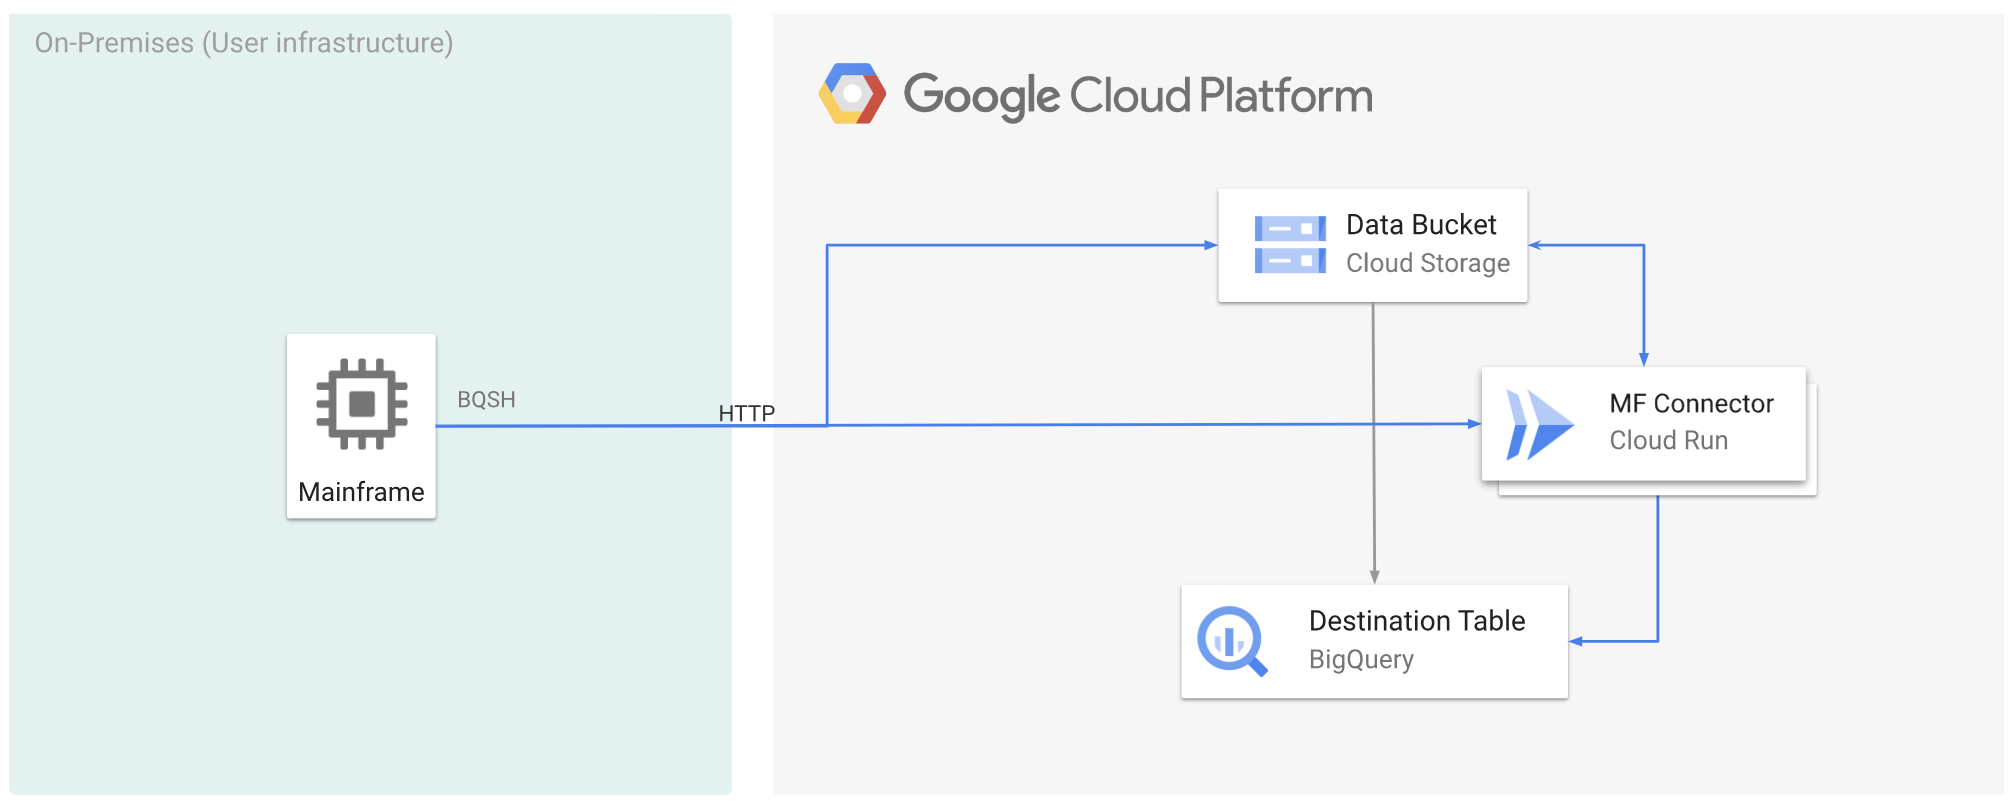
The following figure describes how you can move your mainframe data to Google Cloud and transcode it remotely to ORC format using Cloud Run, and then move the content to BigQuery.
Before you begin
- Deploy Mainframe Connector on Cloud Run.
- Create a service account or identify an existing service account to use with Mainframe Connector. This service account must have permissions to access Cloud Storage buckets, BigQuery datasets, and any other Google Cloud resource that you want to use.
- Verify that the service account you created is assigned the Cloud Run Invoker role.
Move mainframe data to Google Cloud and transcode it remotely using Cloud Run
To move your mainframe data to Google Cloud and transcode it remotely using Cloud Run, you must perform the following tasks:
- Read and transcode a dataset on a mainframe, and upload it to Cloud Storage
in ORC format. Transcoding is done during the
gsutil cpoperation, where a mainframe extended binary coded decimal interchange code (EBCDIC) dataset is converted to the ORC format in UTF-8 during the copy to a Cloud Storage bucket. - Load the dataset to a BigQuery table.
- (Optional) Execute a SQL query on the BigQuery table.
- (Optional) Export data from BigQuery into a binary file in Cloud Storage.
To perform these tasks, follow these steps:
On your mainframe, create a job to read the dataset on your mainframe and transcode it to ORC format, as follows. Read the data from the INFILE dataset, and the record layout from the COPYBOOK DD. The input dataset must be a queued sequential access method (QSAM) file with fixed or variable record length.
For the complete list of environment variables supported by Mainframe Connector, see Environment variables.
//STEP01 EXEC BQSH
//INFILE DD DSN=<HLQ>.DATA.FILENAME,DISP=SHR
//COPYBOOK DD DISP=SHR,DSN=<HLQ>.COPYBOOK.FILENAME
//STDIN DD *
gsutil cp --replace gs://mybucket/tablename.orc --remote \
  --remoteHost <mainframe-connector-url>.a.run.app \
  --remotePort 443
/*
If you want to log the commands executed during this process, you can enable load statistics.
(Optional) Create and submit a BigQuery query job that executes a SQL read from the QUERY DD file. Typically the query will be a
MERGEorSELECT INTO DMLstatement that results in transformation of a BigQuery table. Note that Mainframe Connector logs in job metrics but doesn't write query results to a file.You can query BigQuery in various ways-inline, with a separate dataset using DD, or with a separate dataset using DSN.
Example JCL
//STEP03 EXEC BQSH
//QUERY DD DSN=<HLQ>.QUERY.FILENAME,DISP=SHR
//STDIN DD *
PROJECT=PROJECT_NAME
LOCATION=LOCATION
bq query --project_id=$PROJECT \
  --location=$LOCATION \
  --remoteHost <mainframe-connector-url>.a.run.app \
  --remotePort 443/*
/*
Additionally, you must set the environment variable
BQ_QUERY_REMOTE_EXECUTION=true.Replace the following:
PROJECT_NAME: The name of the project in which you want to execute the query.LOCATION: The location for where the query will be executed. We recommended that you execute the query in a location close to the data.
(Optional) Create and submit an export job that executes a SQL read from the QUERY DD file, and exports the resulting dataset to Cloud Storage as a binary file.
Example JCL
//STEP04 EXEC BQSH
//OUTFILE DD DSN=<HLQ>.DATA.FILENAME,DISP=SHR
//COPYBOOK DD DISP=SHR,DSN=<HLQ>.COPYBOOK.FILENAME
//QUERY DD DSN=<HLQ>.QUERY.FILENAME,DISP=SHR
//STDIN DD *
PROJECT=PROJECT_NAME
DATASET_ID=DATASET_ID
DESTINATION_TABLE=DESTINATION_TABLE
BUCKET=BUCKET
bq export --project_id=$PROJECT \
  --dataset_id=$DATASET_ID \
  --destination_table=$DESTINATION_TABLE \
  --location="US" \
  --bucket=$BUCKET \
  --remoteHost <mainframe-connector-url>.a.run.app \
  --remotePort 443
/*
Replace the following:
PROJECT_NAME: The name of the project in which you want to execute the query.DATASET_ID: The BigQuery dataset ID that contains the table that you want to export.DESTINATION_TABLE: The BigQuery table that you want to export.BUCKET: The Cloud Storage bucket that will contain the output binary file.
What's next
- Move locally transcoded mainframe data to Google Cloud
- Transcode mainframe data remotely on Google Cloud
- Transcode mainframe data moved to Google Cloud using a virtual tape library