本頁說明如何在直播畫面上方產生靜態疊加圖片。整場直播期間都會顯示靜態疊加圖片。您可以設定靜態重疊圖片的解析度和位置。
設定 Google Cloud 專案和驗證
如果您尚未建立 Google Cloud 專案和憑證,請參閱「開始前」一節。將圖片上傳至 Cloud Storage 值區
- 前往 Google Cloud 控制台的「Cloud Storage 瀏覽器」頁面。
前往 Cloud Storage 瀏覽器頁面 - 按一下值區名稱即可開啟。
- 按一下「上傳檔案」。
- 從本機電腦選取要上傳的圖片檔案 (JPEG 或 PNG)。您可以使用這個範例疊加圖片。
圖片現在已儲存至 Cloud Storage 值區。
建立素材資源
素材資源是可與 Live Stream API 搭配使用的影片或圖片。建立圖片素材資源,做為靜態重疊圖片使用。
如要建立資產,請使用 projects.locations.assets.create 方法。
使用任何要求資料之前,請先替換以下項目:
PROJECT_NUMBER:您的 Google Cloud 專案編號,位於 IAM 設定頁面上的「專案編號」欄位LOCATION:建立素材資源的位置;請使用其中一個支援的區域顯示地區us-central1us-east1us-east4us-west1us-west2northamerica-northeast1southamerica-east1asia-east1asia-east2asia-south1asia-northeast1asia-southeast1australia-southeast1europe-north1europe-west1europe-west2europe-west3europe-west4
ASSET_ID:新資產的使用者定義 ID。這個值的長度必須介於 1 至 63 個半形字元之間,開頭和結尾須為[a-z0-9],字元之間可以包含破折號 (-)。例如:my-asset。ASSET_URI:要使用的 Cloud Storage 值區中圖片的 URI,例如gs://my-bucket/my-image.png
JSON 要求主體:
{
  "image": {
    "uri": "ASSET_URI"
  }
}
如要傳送要求,請展開以下其中一個選項:
您應該會收到如下的 JSON 回應:
{
  "name": "projects/PROJECT_NUMBER/locations/LOCATION/operations/OPERATION_ID",
  "metadata": {
    "@type": "type.googleapis.com/google.cloud.video.livestream.v1.OperationMetadata",
    "createTime": CREATE_TIME,
    "target": "projects/PROJECT_NUMBER/locations/LOCATION/assets/ASSET_ID",
    "verb": "create",
    "requestedCancellation": false,
    "apiVersion": "v1"
  },
  "done": false
}
複製傳回的 OPERATION_ID,以便在下一節中使用。
查看結果
使用 projects.locations.operations.get 方法檢查是否已建立資產。如果回應中包含 "done: false",請重複執行指令,直到回應中包含 "done: true" 為止。
使用任何要求資料之前,請先替換以下項目:
PROJECT_NUMBER:您的 Google Cloud 專案編號,位於 IAM 設定頁面上的「專案編號」欄位LOCATION:素材資源所在位置;請使用支援的地區之一顯示地區us-central1us-east1us-east4us-west1us-west2northamerica-northeast1southamerica-east1asia-east1asia-east2asia-south1asia-northeast1asia-southeast1australia-southeast1europe-north1europe-west1europe-west2europe-west3europe-west4
OPERATION_ID:作業的 ID
如要傳送要求,請展開以下其中一個選項:
您應該會收到如下的 JSON 回應:
{
  "name": "projects/PROJECT_NUMBER/locations/LOCATION/operations/OPERATION_ID",
  "metadata": {
    "@type": "type.googleapis.com/google.cloud.video.livestream.v1.OperationMetadata",
    "createTime": CREATE_TIME,
    "endTime": END_TIME,
    "target": "projects/PROJECT_NUMBER/locations/LOCATION/assets/ASSET_ID",
    "verb": "create",
    "requestedCancellation": false,
    "apiVersion": "v1"
  },
  "done": true,
  "response": {
    "@type": "type.googleapis.com/google.cloud.video.livestream.v1.Asset",
    "name": "projects/PROJECT_NUMBER/locations/LOCATION/assets/ASSET_ID",
    "createTime": CREATE_TIME,
    "updateTime": UPDATE_TIME,
    "image": {
      "uri": "ASSET_URI"
    },
    "crc32c": "ae1EJg==",
    "state": "ACTIVE"
  }
}
建立輸入端點
如要建立輸入端點,請使用 projects.locations.inputs.create 方法。
使用任何要求資料之前,請先替換以下項目:
PROJECT_NUMBER:您的 Google Cloud 專案編號,位於 IAM 設定頁面上的「專案編號」欄位LOCATION:建立輸入端點的位置;請使用支援的地區之一顯示地區us-central1us-east1us-east4us-west1us-west2northamerica-northeast1southamerica-east1asia-east1asia-east2asia-south1asia-northeast1asia-southeast1australia-southeast1europe-north1europe-west1europe-west2europe-west3europe-west4
INPUT_ID:使用者定義的識別碼,用於建立新的輸入端點 (您會將輸入串流傳送至此)。這個值的長度必須介於 1 至 63 個半形字元之間,開頭和結尾須為[a-z0-9],字元之間可以包含破折號 (-)。例如:my-input。
JSON 要求主體:
{
  "type": "RTMP_PUSH"
}
如要傳送要求,請展開以下其中一個選項:
您應該會收到如下的 JSON 回應:
{
  "name": "projects/PROJECT_NUMBER/locations/LOCATION/operations/OPERATION_ID",
  "metadata": {
    "@type": "type.googleapis.com/google.cloud.video.livestream.v1.OperationMetadata",
    "createTime": CREATE_TIME,
    "target": "projects/PROJECT_NUMBER/locations/LOCATION/inputs/INPUT_ID",
    "verb": "create",
    "requestedCancellation": false,
    "apiVersion": "v1"
  },
  "done": false
}
您可以使用新作業 ID 檢查輸入建立作業的結果。
取得輸入端點詳細資料
如要取得輸入端點的詳細資料,請使用 projects.locations.inputs.get 方法。
使用任何要求資料之前,請先替換以下項目:
PROJECT_NUMBER:您的 Google Cloud 專案編號,位於 IAM 設定頁面上的「專案編號」欄位LOCATION:輸入端點的位置;請使用其中一個支援的地區顯示地區us-central1us-east1us-east4us-west1us-west2northamerica-northeast1southamerica-east1asia-east1asia-east2asia-south1asia-northeast1asia-southeast1australia-southeast1europe-north1europe-west1europe-west2europe-west3europe-west4
INPUT_ID:輸入端點的使用者定義 ID
如要傳送要求,請展開以下其中一個選項:
您應該會收到如下的 JSON 回應:
{
  "name": "projects/PROJECT_NUMBER/locations/LOCATION/inputs/INPUT_ID",
  "createTime": CREATE_TIME,
  "updateTime": UPDATE_TIME,
  "type": "RTMP_PUSH",
  "uri":  "INPUT_STREAM_URI", # For example, "rtmp://1.2.3.4/live/b8ebdd94-c8d9-4d88-a16e-b963c43a953b",
  "tier": "HD"
}
找出 uri 欄位,並複製傳回的 INPUT_STREAM_URI,以便稍後在「傳送輸入串流」一節中使用。
建立管道
如要建立管道,請使用 projects.locations.channels.create 方法。
請注意管道設定中的 staticOverlays 陣列:
"staticOverlays": [
  {
    "asset": "projects/PROJECT_NUMBER/locations/LOCATION/assets/ASSET_ID",
    "position": {
      "x": 0.5,
      "y": 0.5
    },
    "resolution": {
      "w": 0.1
    },
    "opacity": 0.8
  }
],
使用任何要求資料之前,請先替換以下項目:
PROJECT_NUMBER:您的 Google Cloud 專案編號,位於 IAM 設定頁面上的「專案編號」欄位LOCATION:建立管道的所在位置;請使用支援的區域之一顯示地區us-central1us-east1us-east4us-west1us-west2northamerica-northeast1southamerica-east1asia-east1asia-east2asia-south1asia-northeast1asia-southeast1australia-southeast1europe-north1europe-west1europe-west2europe-west3europe-west4
CHANNEL_ID:要建立的管道使用者定義的 ID,這個值必須介於 1 至 63 個半形字元之間,開頭和結尾須為[a-z0-9],字元之間可包含破折號 (-)INPUT_ID:輸入端點的使用者定義 IDBUCKET_NAME:您建立的 Cloud Storage 值區名稱,用於保存即時串流資訊清單和區段檔案ASSET_ID:資產的使用者定義 ID
JSON 要求主體:
{
  "inputAttachments": [
    {
      "key": "my-input",
      "input": "projects/PROJECT_NUMBER/locations/LOCATION/inputs/INPUT_ID"
    }
  ],
  "output": {
    "uri": "gs://BUCKET_NAME"
  },
  "staticOverlays": [
    {
      "asset": "projects/PROJECT_NUMBER/locations/LOCATION/assets/ASSET_ID",
      "position": {
        "x": 0.5,
        "y": 0.5
      },
      "resolution": {
        "w": 0.1
      },
      "opacity": 0.8
    },
  ],
  "elementaryStreams": [
    {
      "key": "es_video",
      "videoStream": {
        "h264": {
          "profile": "high",
          "widthPixels": 1280,
          "heightPixels": 720,
          "bitrateBps": 3000000,
          "frameRate": 30
        }
      }
    },
    {
      "key": "es_audio",
      "audioStream": {
        "codec": "aac",
        "channelCount": 2,
        "bitrateBps": 160000
      }
    }
  ],
  "muxStreams": [
    {
      "key": "mux_video_ts",
      "container": "ts",
      "elementaryStreams": ["es_video", "es_audio"],
      "segmentSettings": { "segmentDuration": "2s" }
    }
  ],
  "manifests": [
    {
      "key": "manifest_hls",
      "fileName": "main.m3u8",
      "type": "HLS",
      "muxStreams": [
        "mux_video_ts"
      ],
      "maxSegmentCount": 5
    }
  ]
}
如要傳送要求,請展開以下其中一個選項:
您應該會收到如下的 JSON 回應:
{
  "name": "projects/PROJECT_NUMBER/locations/LOCATION/operations/OPERATION_ID",
  "metadata": {
    "@type": "type.googleapis.com/google.cloud.video.livestream.v1.OperationMetadata",
    "createTime": CREATE_TIME,
    "target": "projects/PROJECT_NUMBER/locations/LOCATION/channels/CHANNEL_ID",
    "verb": "create",
    "requestedCancellation": false,
    "apiVersion": "v1"
  },
  "done": false
}
您可以使用新的作業 ID 檢查頻道建立作業的結果。
啟動管道
如要啟動管道,請使用 projects.locations.channels.start 方法。
使用任何要求資料之前,請先替換以下項目:
PROJECT_NUMBER:您的 Google Cloud 專案編號,位於 IAM 設定頁面上的「專案編號」欄位LOCATION:頻道所在位置;請使用支援的區域之一顯示地區us-central1us-east1us-east4us-west1us-west2northamerica-northeast1southamerica-east1asia-east1asia-east2asia-south1asia-northeast1asia-southeast1australia-southeast1europe-north1europe-west1europe-west2europe-west3europe-west4
CHANNEL_ID:管道的使用者定義 ID
如要傳送要求,請展開以下其中一個選項:
您應該會收到如下的 JSON 回應:
{
  "name": "projects/PROJECT_NUMBER/locations/LOCATION/operations/OPERATION_ID",
  "metadata": {
    "@type": "type.googleapis.com/google.cloud.video.livestream.v1.OperationMetadata",
    "createTime": CREATE_TIME,
    "target": "projects/PROJECT_NUMBER/locations/LOCATION/channels/CHANNEL_ID",
    "verb": "start",
    "requestedCancellation": false,
    "apiVersion": "v1"
  },
  "done": false
}
您可以使用新的作業 ID 檢查頻道啟動作業的結果。
傳送輸入串流
開啟新的終端機視窗。使用「取得輸入端點詳細資料」一節中的 INPUT_STREAM_URI 執行下列指令:
ffmpeg -re -f lavfi -i "testsrc=size=1280x720 [out0]; sine=frequency=500 [out1]" \
  -acodec aac -vcodec h264 -f flv INPUT_STREAM_URI
播放系統產生的即時串流內容
如要在 Shaka Player 中播放產生的媒體檔案,請完成下列步驟:
- 將您建立的 Cloud Storage bucket 設為可公開讀取。
- 如要在 Cloud Storage 值區中啟用跨來源資源共享 (CORS),請按照下列步驟操作:
- 建立包含下列內容的 JSON 檔案:
[ { "origin": ["https://shaka-player-demo.appspot.com/"], "responseHeader": ["Content-Type", "Range"], "method": ["GET", "HEAD"], "maxAgeSeconds": 3600 } ] -
將
JSON_FILE_NAME替換為您在前一個步驟建立的 JSON 檔案名稱後,執行下列指令:gcloud storage buckets update gs://BUCKET_NAME --cors-file=JSON_FILE_NAME.json
- 建立包含下列內容的 JSON 檔案:
- 在 Cloud Storage 值區中,找出系統產生的
main.m3u8檔案。在該檔案的「Public access」(公開存取權) 資料欄中,按一下「Copy URL」(複製網址)。 - 前往 Shaka Player (這是一個線上即時串流播放器)。
- 按一下頂端導覽列中的「Custom Content」(自訂內容)。
- 按一下「+」按鈕。
將檔案的公開網址貼到「Manifest URL」(資訊清單網址) 方塊中。
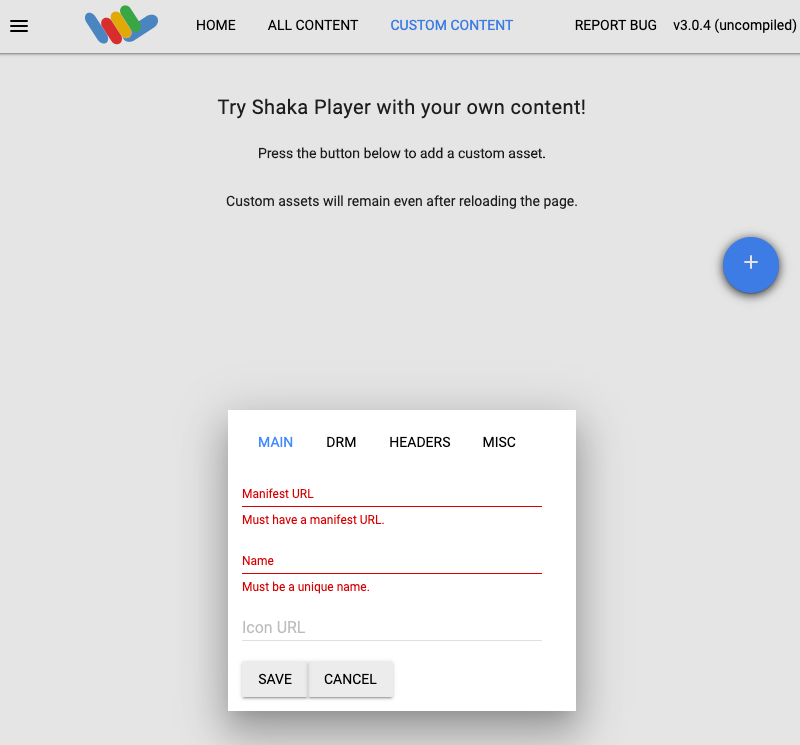
在「Name」(名稱) 方塊中輸入名稱。
按一下「Save」(儲存)。
按一下「Play」(播放)。
你應該會看到疊加層在直播畫面上顯示。
