本教學課程說明如何使用 Google Distributed Cloud 的手動負載平衡模式與 Google Distributed Cloud 整合 時,設定 F5 BIG-IP。
F5 BIG-IP 平台提供各種服務,可協助您提升應用程式的安全性、可用性和效能。這些服務包括第 7 層負載平衡、網路防火牆、網頁應用程式防火牆 (WAF)、DNS 服務等。對於 Google Distributed Cloud,BIG-IP 提供外部存取權和 L3/4 負載平衡服務。
額外設定
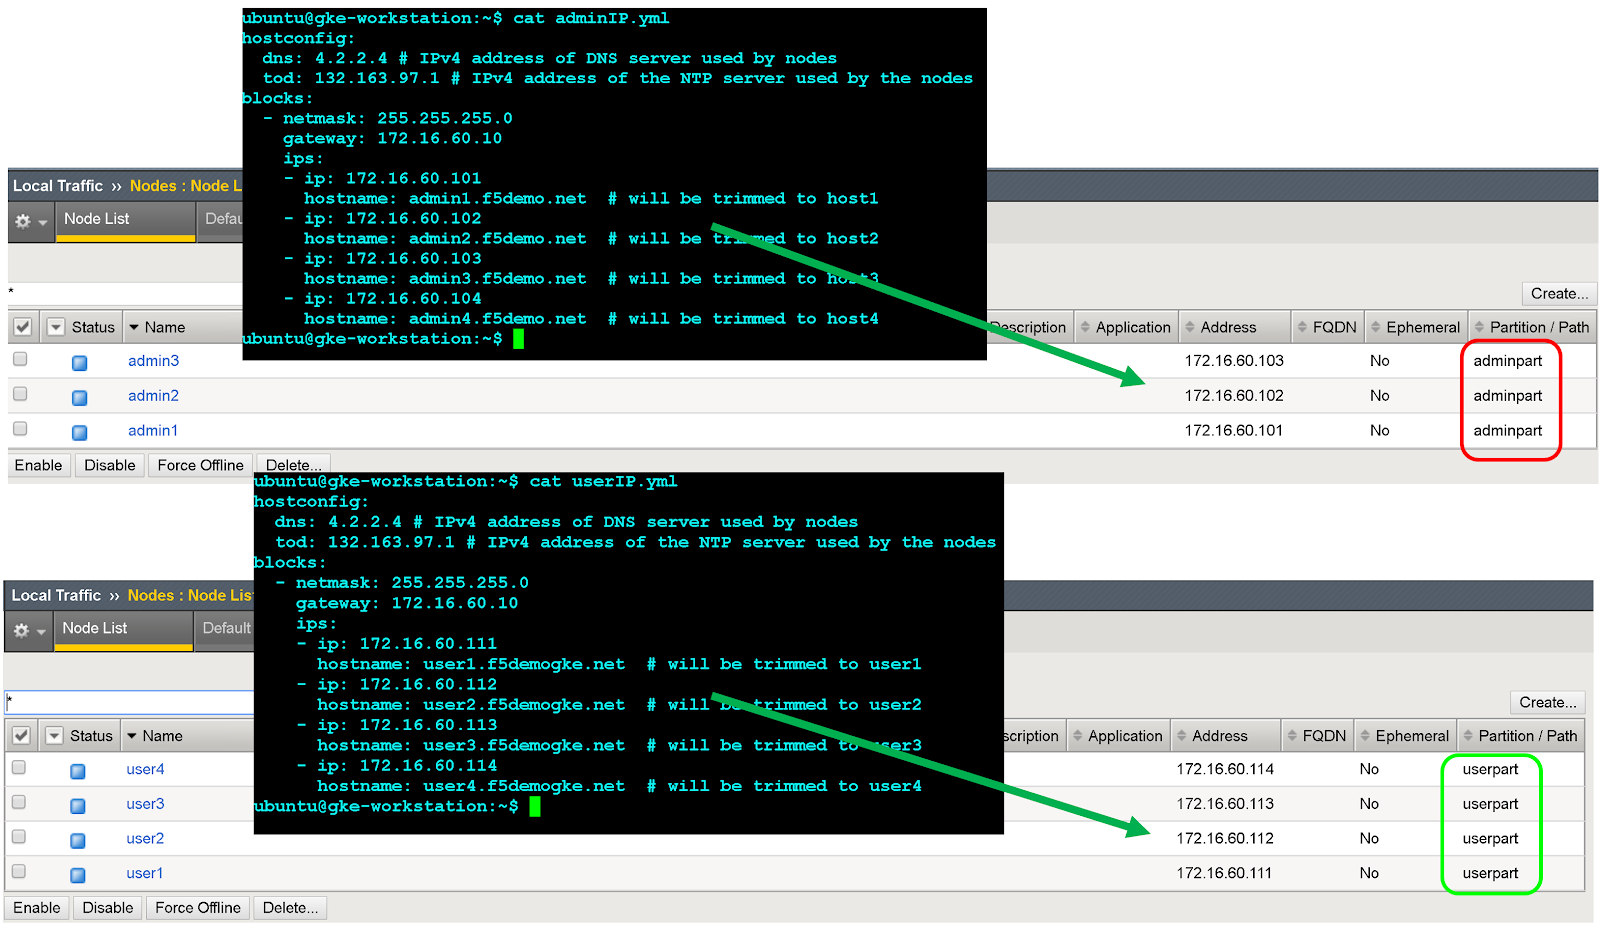
設定公用程式完成後,您需要為要公開及存取的每個使用者叢集建立管理分割區。
一開始,您會為第一個使用者叢集定義分割區。請勿將叢集分區用於其他用途。 每個叢集都必須有專屬的分區。
為 Google Distributed Cloud 外部端點設定 BIG-IP
如果您沒有停用隨附的 Ingress,就必須使用虛擬伺服器 (VIP) 設定 BIG-IP,對應下列 Google Distributed Cloud 端點:
使用者分割區
- 使用者叢集 Ingress 控制器的 VIP (公開的通訊埠:
443) - 使用者叢集 Ingress 控制器的 VIP (公開的通訊埠:
80)
- 使用者叢集 Ingress 控制器的 VIP (公開的通訊埠:
建立節點物件
叢集節點外部 IP 位址隨後會用於設定 BIG-IP 系統上的節點物件。您將為每個 Google Distributed Cloud 叢集節點建立節點物件。節點會新增至後端集區,然後與虛擬伺服器建立關聯。
- 如要登入 BIG-IP 管理控制台,請前往 IP 位址。安裝期間會提供地址。
- 按一下先前建立的「使用者分割區」。
- 依序前往「Local Traffic」 >「Nodes」 >「Node List」。
- 點選「建立」。
輸入每個叢集主機的名稱和 IP 位址,然後按一下「完成」。
建立後端集區
您會為每個節點埠建立後端集區。
- 在 BIG-IP 管理控制台中,按一下先前建立的使用者分割區的「使用者分割區」。
- 依序前往「Local Traffic」 >「Pools」 >「Pool List」。
- 點選「建立」。
- 在「設定」下拉式清單中,按一下「進階」。
- 在「Name」(名稱) 欄位中輸入
Istio-80-pool。 - 如要驗證集區成員的可存取性,請在「健康狀態監控器」下方,按一下「tcp」。選用:由於這是手動設定,您也可以視部署作業情況,使用更多進階監控器。
在「Action on Service Down」(服務中斷時執行的動作) 部分,按一下「Reject」(拒絕)。
在本教學課程中,請在「負載平衡方法」下拉式清單中,按一下「循環式」。
在「新成員」部分中,按一下「節點清單」,然後選取先前建立的節點。
在「Service Port」(服務通訊埠) 欄位中,輸入設定檔中的適當
nodePort,或執行階段 istio ingress Kubernetes Service 中的spec.ports[?].nodePort(名稱:istio-ingress,命名空間:gke-system)。按一下「新增」。
重複步驟 8-9,新增每個叢集節點執行個體。
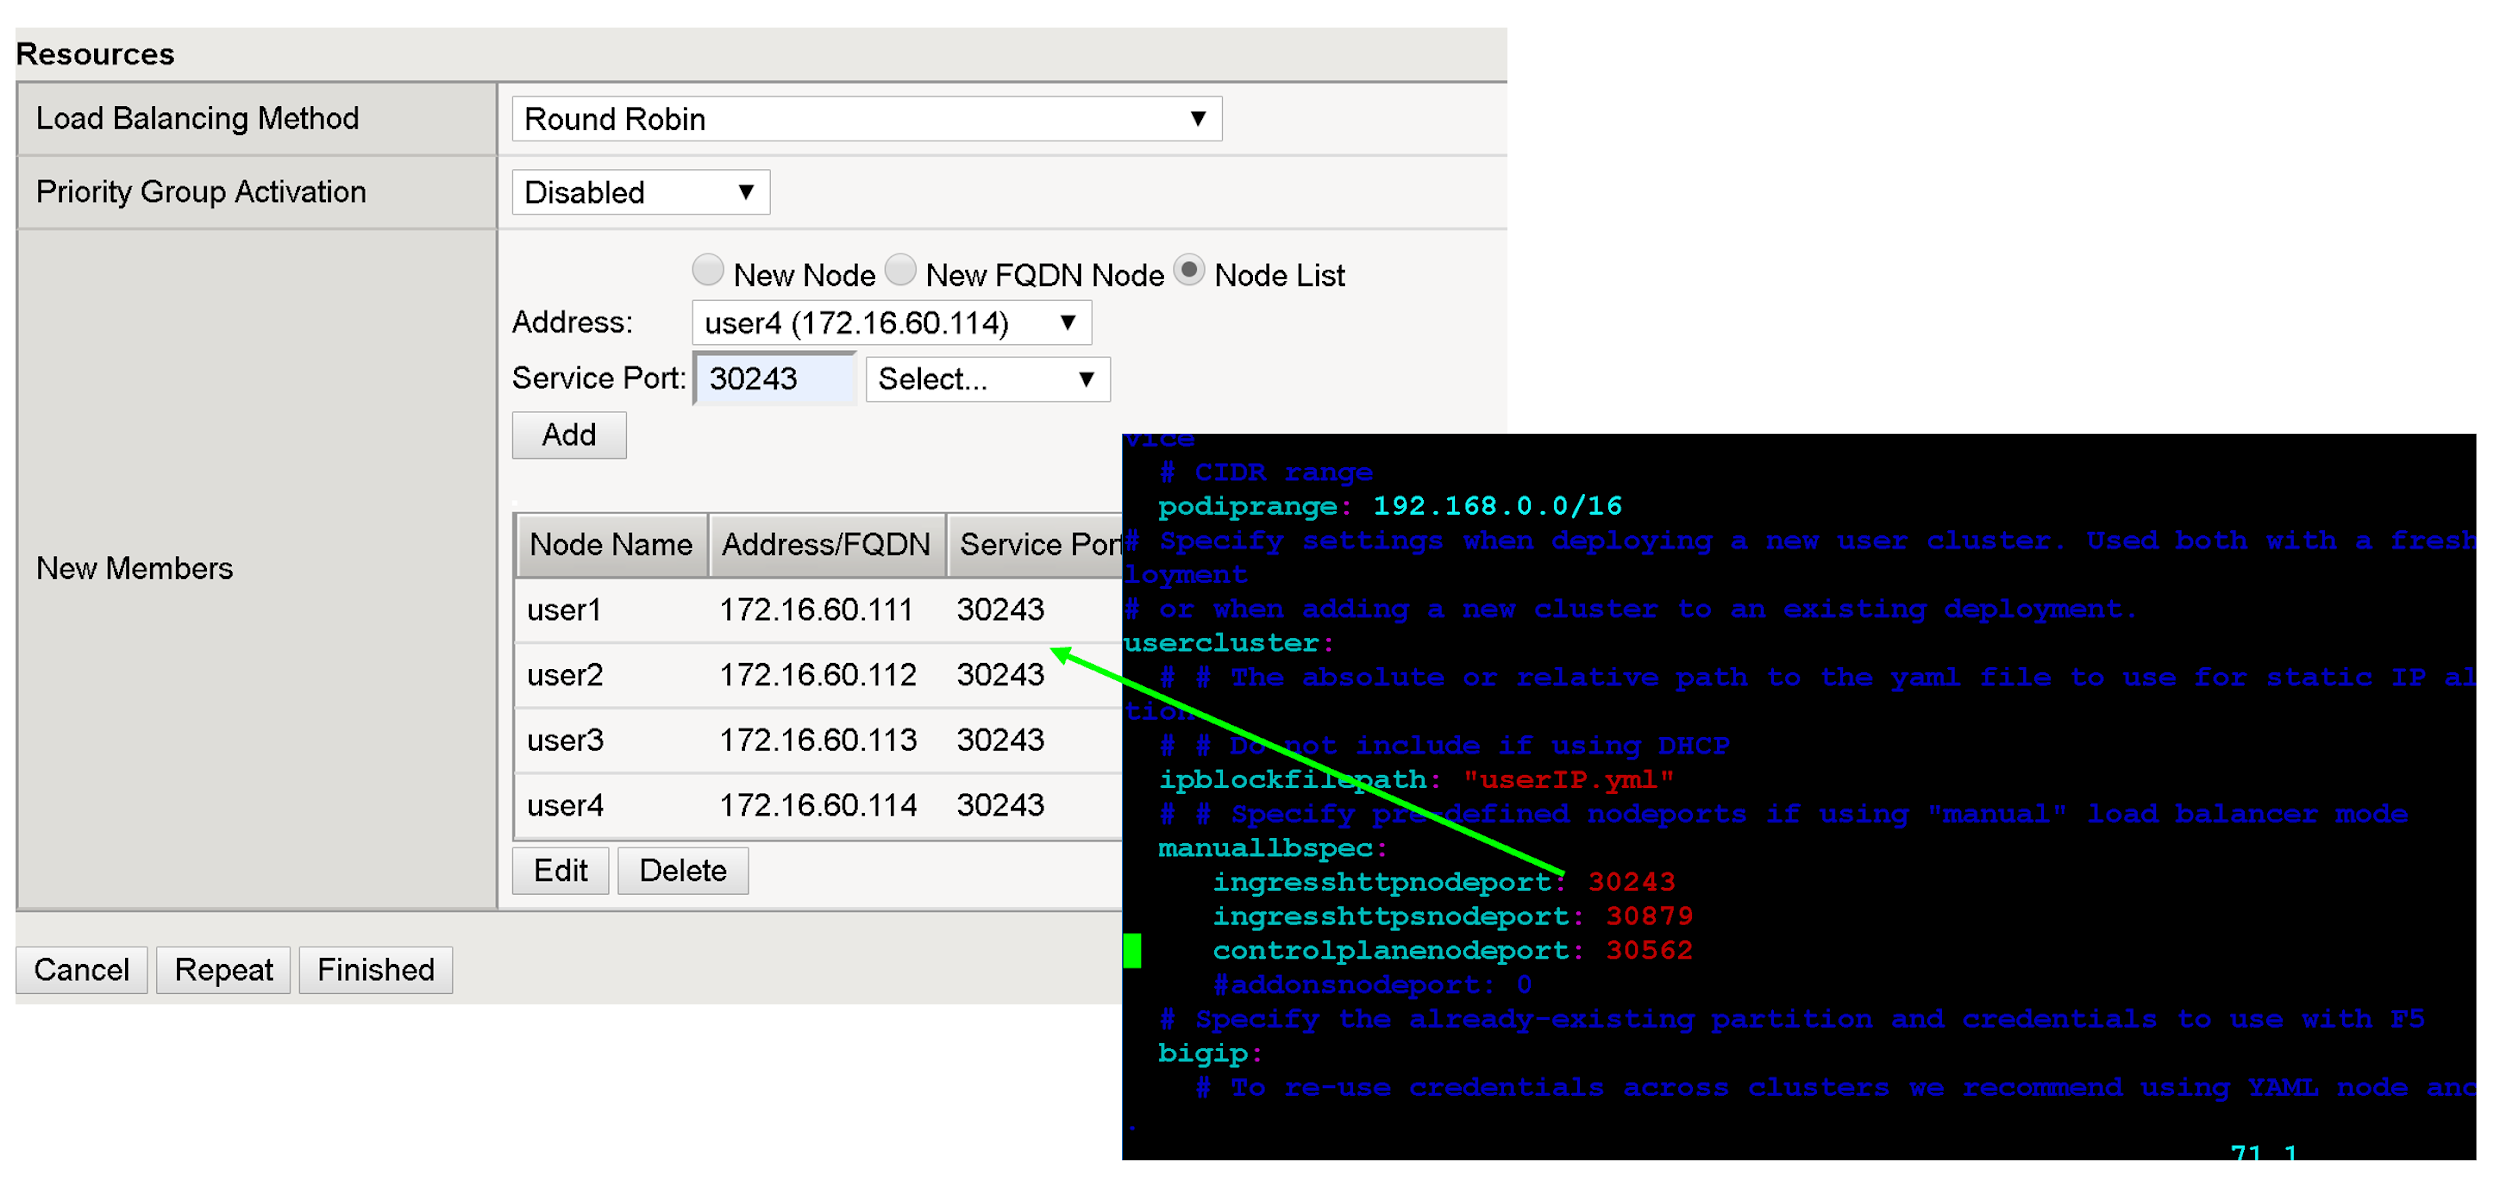
按一下「完成」。
針對其餘使用者叢集 nodePort,重複本節中的所有步驟。
建立虛擬伺服器
您會在 BIG-IP 上為第一個使用者叢集建立兩個虛擬伺服器。虛擬伺服器對應於「VIP + 通訊埠」組合。
- 在 BIG-IP 管理控制台中,按一下先前建立的「使用者分割區」。
- 依序前往「Local Traffic」(本機流量) >「Virtual Servers」(虛擬伺服器) >「Virtual Server List」(虛擬伺服器清單)。
- 點選「建立」。
- 在「Name」(名稱) 欄位中輸入
istio-ingress-80。 在「Destination Address/Mask」(目的地地址/遮罩) 欄位中,輸入 VIP 的 IP 位址。在本教學課程中,請使用
configuration file或spec.loadBalancerIP執行階段 Istio Ingress Kubernetes 服務 (名稱:istio-ingress,命名空間:gke-system) 中的 HTTP Ingress VIP。在「Service Port」(服務通訊埠) 欄位中,輸入 VIP 的適當接聽埠。在本教學課程中,請在執行階段 Istio Ingress Kubernetes Service (名稱:
istio-ingress,命名空間:gke-system) 中使用通訊埠80或spec.ports[?].port。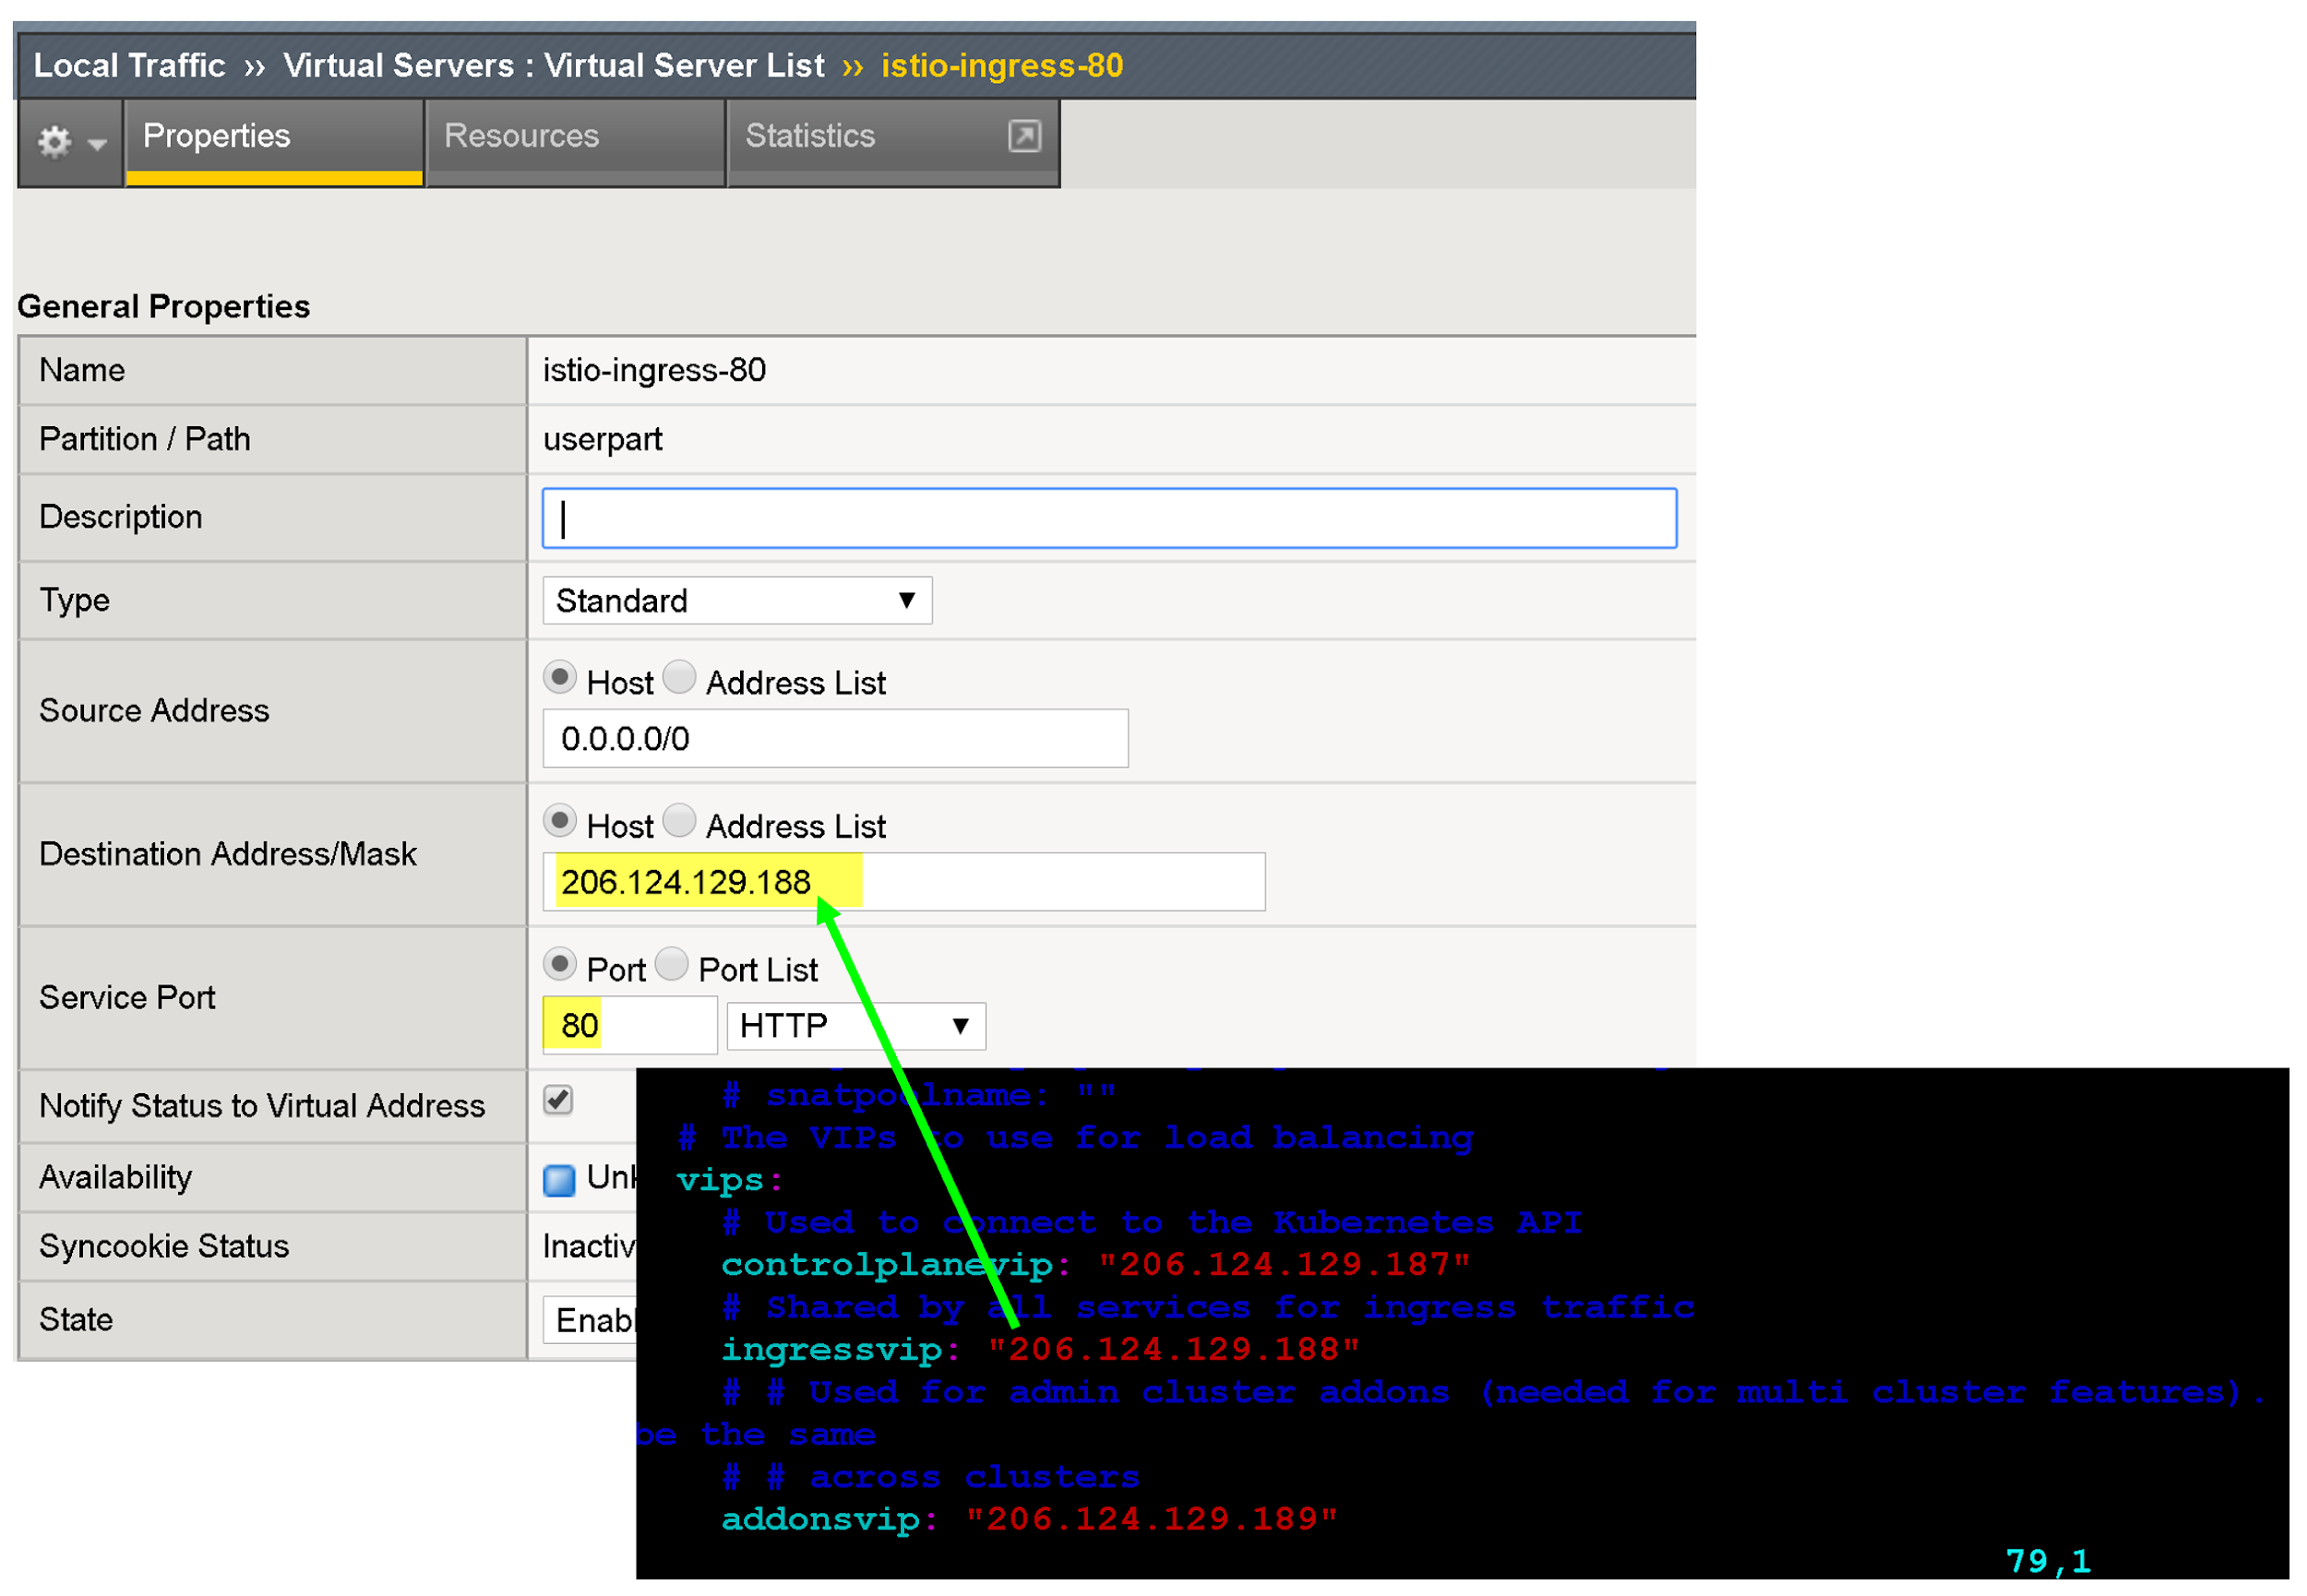
在「Source Address Translation」(來源地址翻譯) 部分,按一下「Auto Map」(自動對應)。
在「Default Pool」(預設集區) 中,選取先前建立的適當集區。
按一下「完成」。
後續步驟
如要進一步提升對外 VIP 的安全性和效能,請考慮下列事項:
進一步瞭解 F5 BIG-IP 應用程式服務。
進一步瞭解 BIG-IP 設定和功能: