Tutorial ini menunjukkan cara menyiapkan F5 BIG-IP saat Anda berintegrasi dengan Google Distributed Cloud menggunakan mode load balancing manual di Google Distributed Cloud.
Platform F5 BIG-IP menyediakan berbagai layanan untuk membantu Anda meningkatkan keamanan, ketersediaan, dan performa aplikasi Anda. Layanan ini mencakup load balancing L7, firewall jaringan, firewall aplikasi web (WAF), layanan DNS, dan lainnya. Untuk Google Distributed Cloud, BIG-IP menyediakan layanan load balancing L3/4 dan akses eksternal.
Konfigurasi tambahan
Setelah utilitas Penyiapan selesai, Anda perlu Membuat partisi administratif untuk setiap cluster pengguna yang ingin Anda ekspos dan akses.
Awalnya, Anda menentukan partisi untuk cluster pengguna pertama. Jangan gunakan partisi cluster untuk hal lain. Setiap cluster harus memiliki partisi yang hanya digunakan oleh cluster tersebut.
Mengonfigurasi BIG-IP untuk endpoint eksternal Google Distributed Cloud
Jika Anda tidak menonaktifkan ingress gabungan, Anda harus mengonfigurasi BIG-IP dengan server virtual (VIP), yang sesuai dengan endpoint Google Distributed Cloud berikut:
Partisi pengguna
- VIP untuk pengontrol ingress cluster pengguna (port yang diekspos:
443) - VIP untuk pengontrol ingress cluster pengguna (port yang diekspos:
80)
- VIP untuk pengontrol ingress cluster pengguna (port yang diekspos:
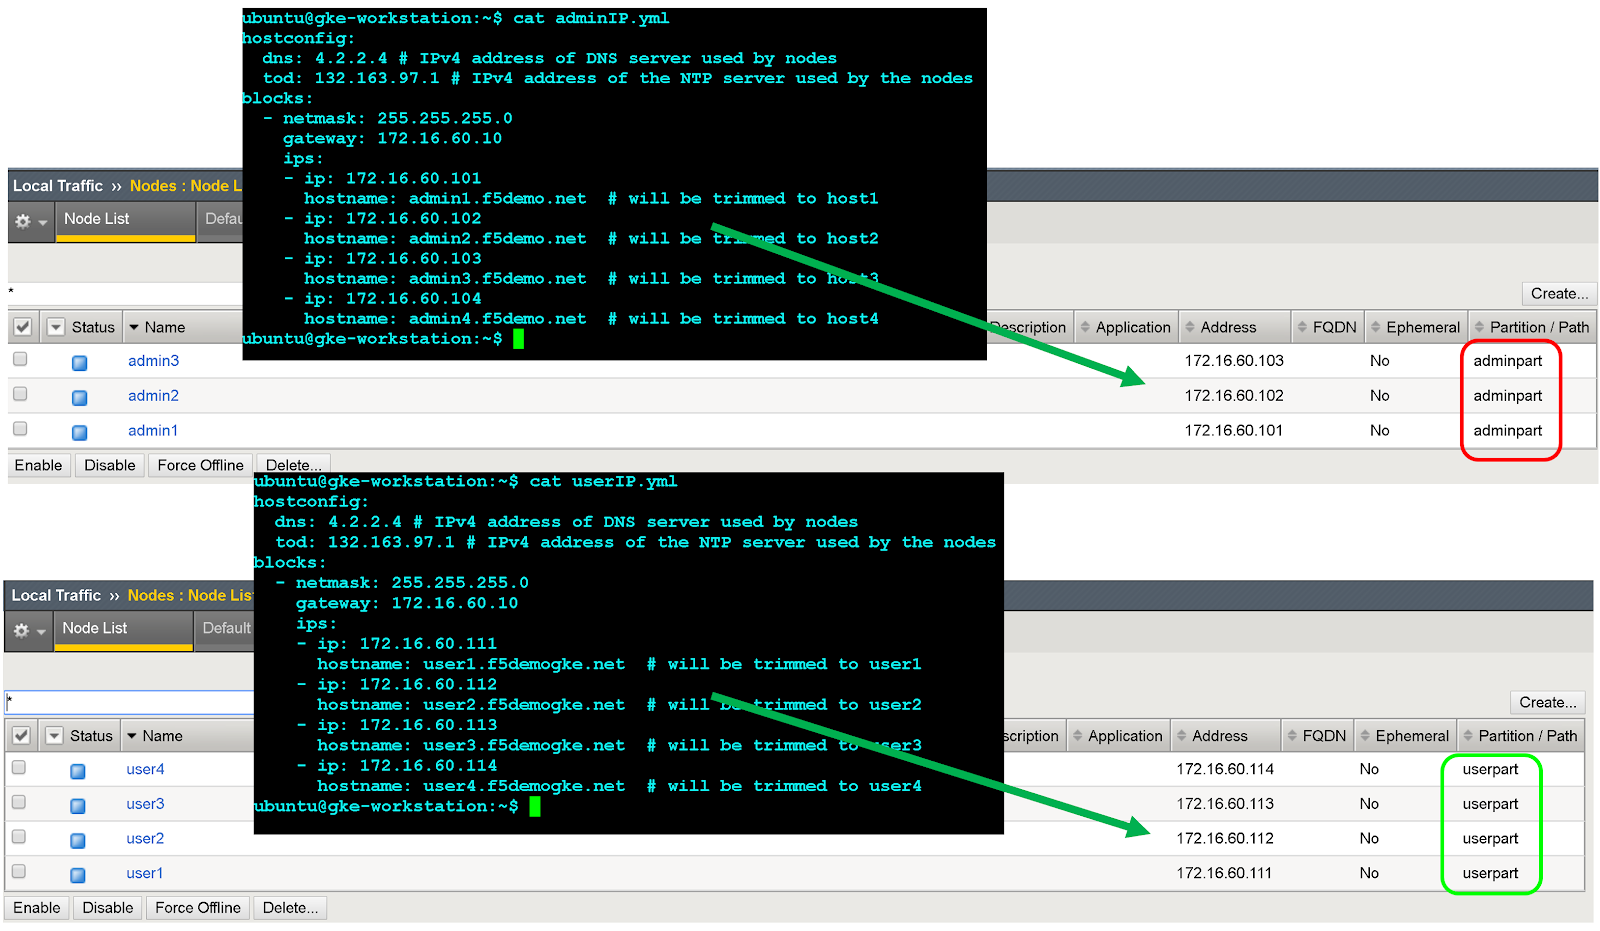
Membuat objek node
Alamat IP eksternal node cluster pada gilirannya digunakan untuk mengonfigurasi objek node di sistem BIG-IP. Anda akan membuat objek node untuk setiap node cluster Google Distributed Cloud. Node ditambahkan ke kumpulan backend yang kemudian dikaitkan dengan server virtual.
- Untuk login ke konsol pengelolaan BIG-IP, buka alamat IP. Alamat diberikan selama penginstalan.
- Klik Partisi pengguna yang telah Anda buat sebelumnya.
- Buka Local Traffic > Nodes > Node List.
- Klik Buat.
Masukkan nama dan alamat IP untuk setiap host cluster, lalu klik Selesai.
Membuat kumpulan backend
Anda membuat kumpulan backend untuk setiap Port node.
- Di konsol pengelolaan BIG-IP, klik Partisi pengguna untuk partisi pengguna yang Anda buat sebelumnya.
- Buka Local Traffic > Pools > Pool List.
- Klik Buat.
- Di menu drop-down Konfigurasi, klik Lanjutan.
- Di kolom Name, masukkan
Istio-80-pool. - Untuk memverifikasi aksesibilitas anggota pool, di bagian Health Monitor, klik tcp. Opsional: Karena ini adalah konfigurasi manual, Anda juga dapat memanfaatkan pemantauan lanjutan sebagaimana mestinya untuk deployment Anda.
Untuk Tindakan jika Layanan Tidak Tersedia, klik Tolak.
Untuk tutorial ini, di menu drop-down Load Balancing Method, klik Round Robin.
Di bagian New Members, klik Node List, lalu pilih node yang dibuat sebelumnya.
Di kolom Service Port, masukkan
nodePortyang sesuai dari file konfigurasi atauspec.ports[?].nodePortdi runtime Istio Ingress Kubernetes Service (nama:istio-ingress, namespace:gke-system).Klik Tambahkan.
Ulangi langkah 8-9 dan tambahkan setiap instance node cluster.
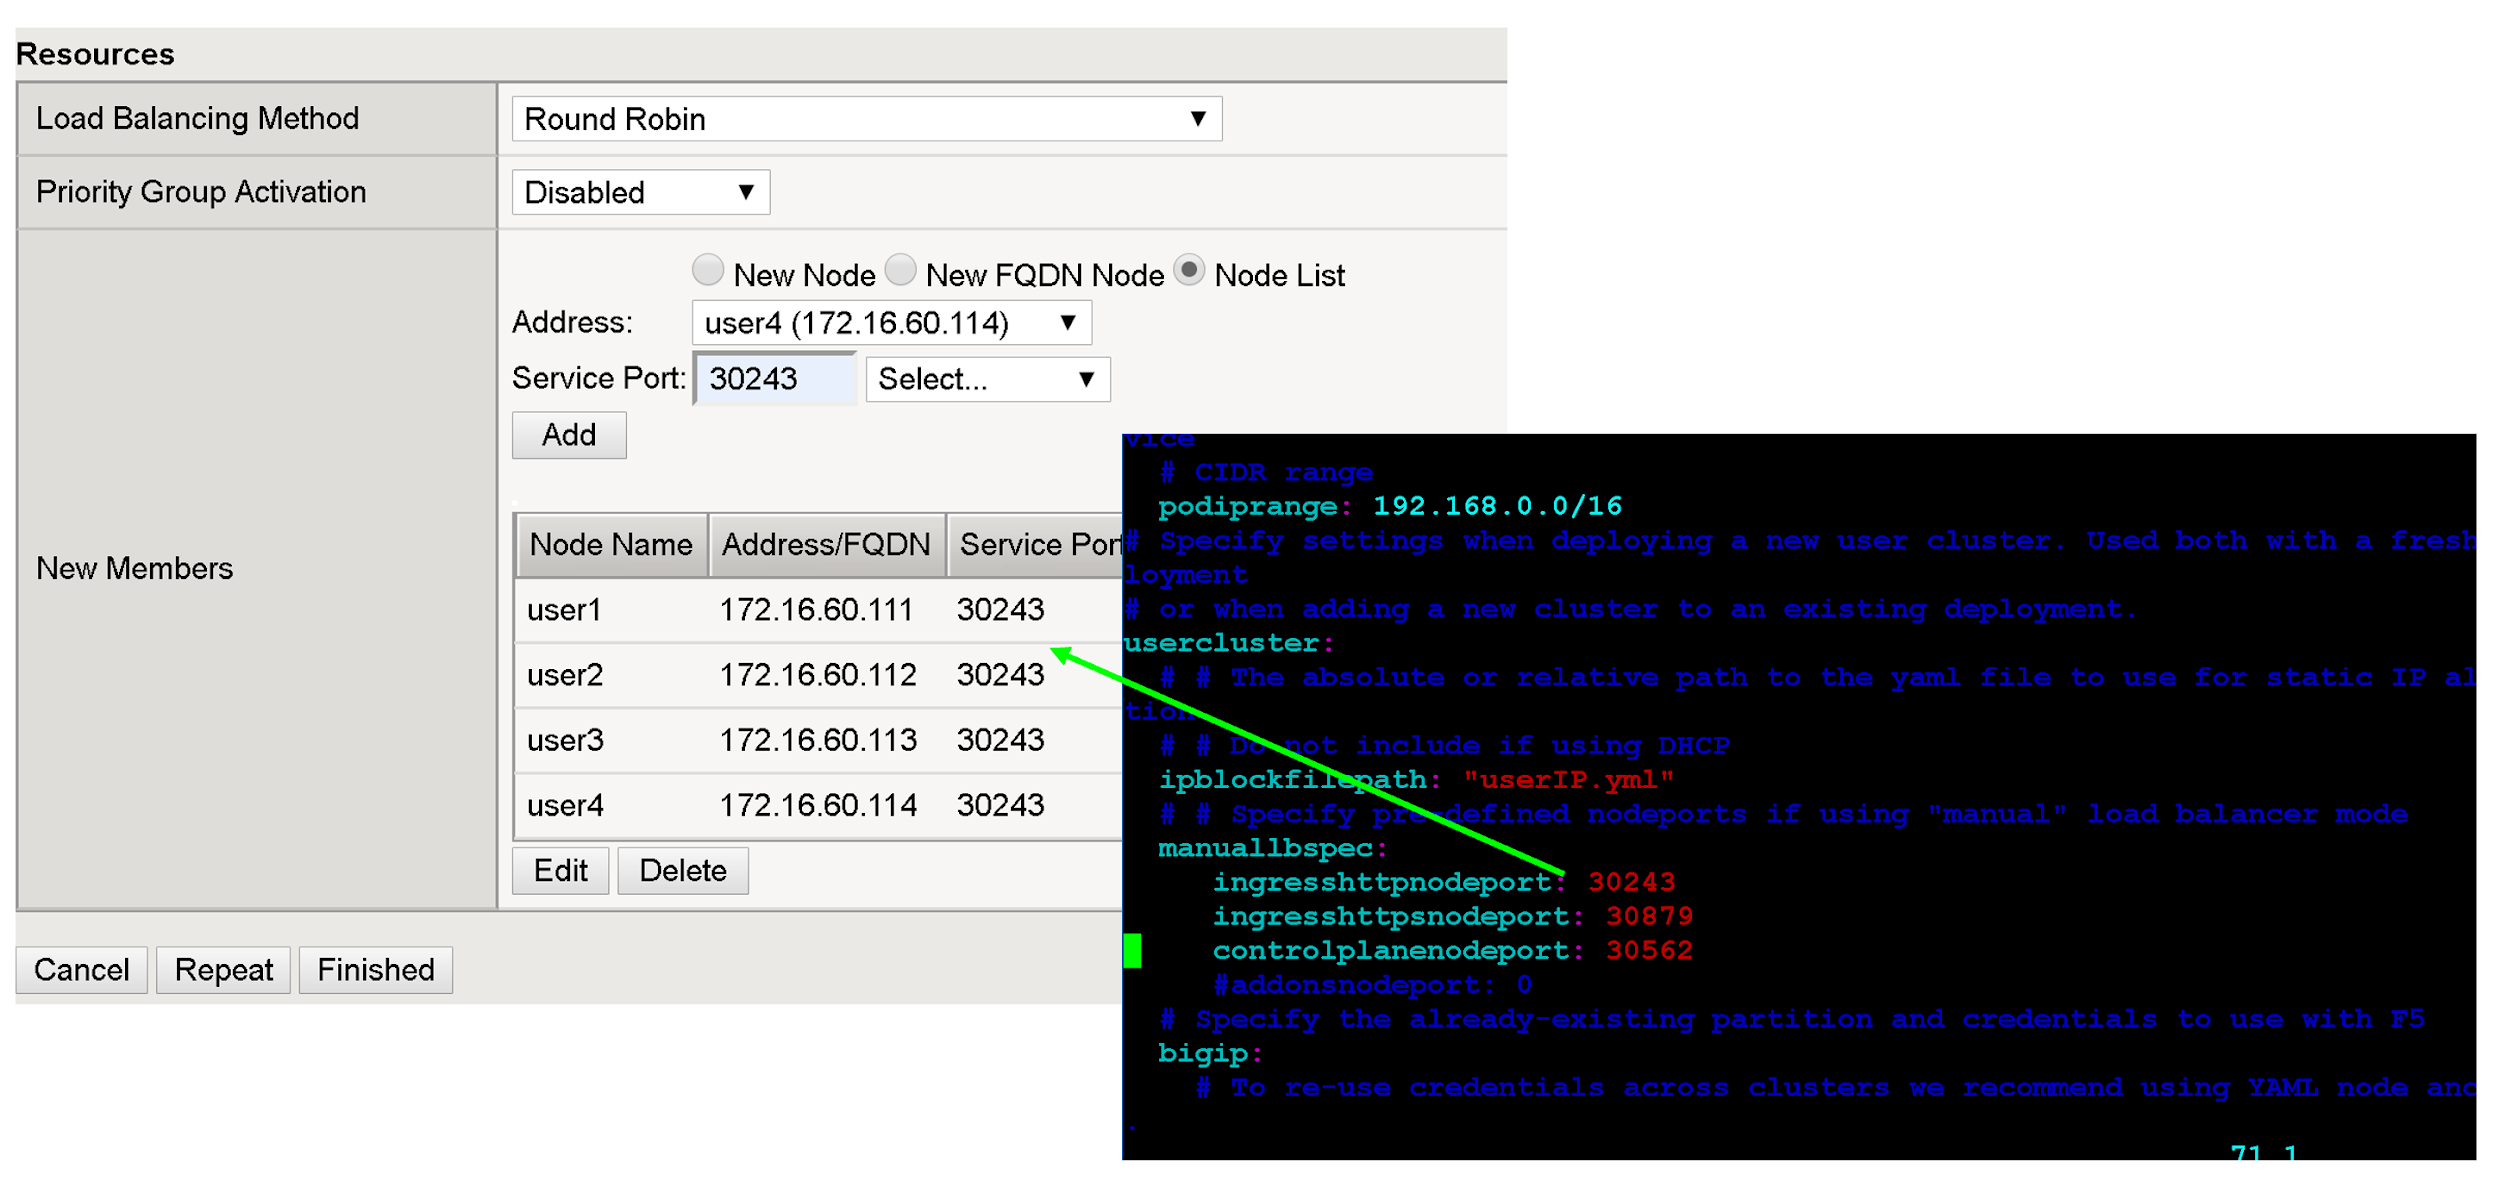
Klik Selesai.
Ulangi semua langkah di bagian ini untuk nodePort cluster pengguna yang tersisa.
Membuat server virtual
Anda membuat total dua server virtual di BIG-IP untuk cluster pengguna pertama. Server virtual sesuai dengan kombinasi "VIP + port".
- Di konsol pengelolaan BIG-IP, klik Partisi pengguna yang sebelumnya Anda buat.
- Buka Local Traffic > Virtual Servers > Virtual Server List.
- Klik Buat.
- Di kolom Name, masukkan
istio-ingress-80. Di kolom Destination Address/Mask, masukkan alamat IP untuk VIP. Untuk tutorial ini, gunakan VIP ingress HTTP di
configuration fileatauspec.loadBalancerIPdi runtime Istio Ingress Kubernetes Service (nama:istio-ingress, namespace:gke-system).Di kolom Service Port, masukkan port pemroses yang sesuai untuk VIP. Untuk tutorial ini, gunakan port
80atauspec.ports[?].portdi runtime Istio Ingress Kubernetes Service (nama:istio-ingress, namespace:gke-system).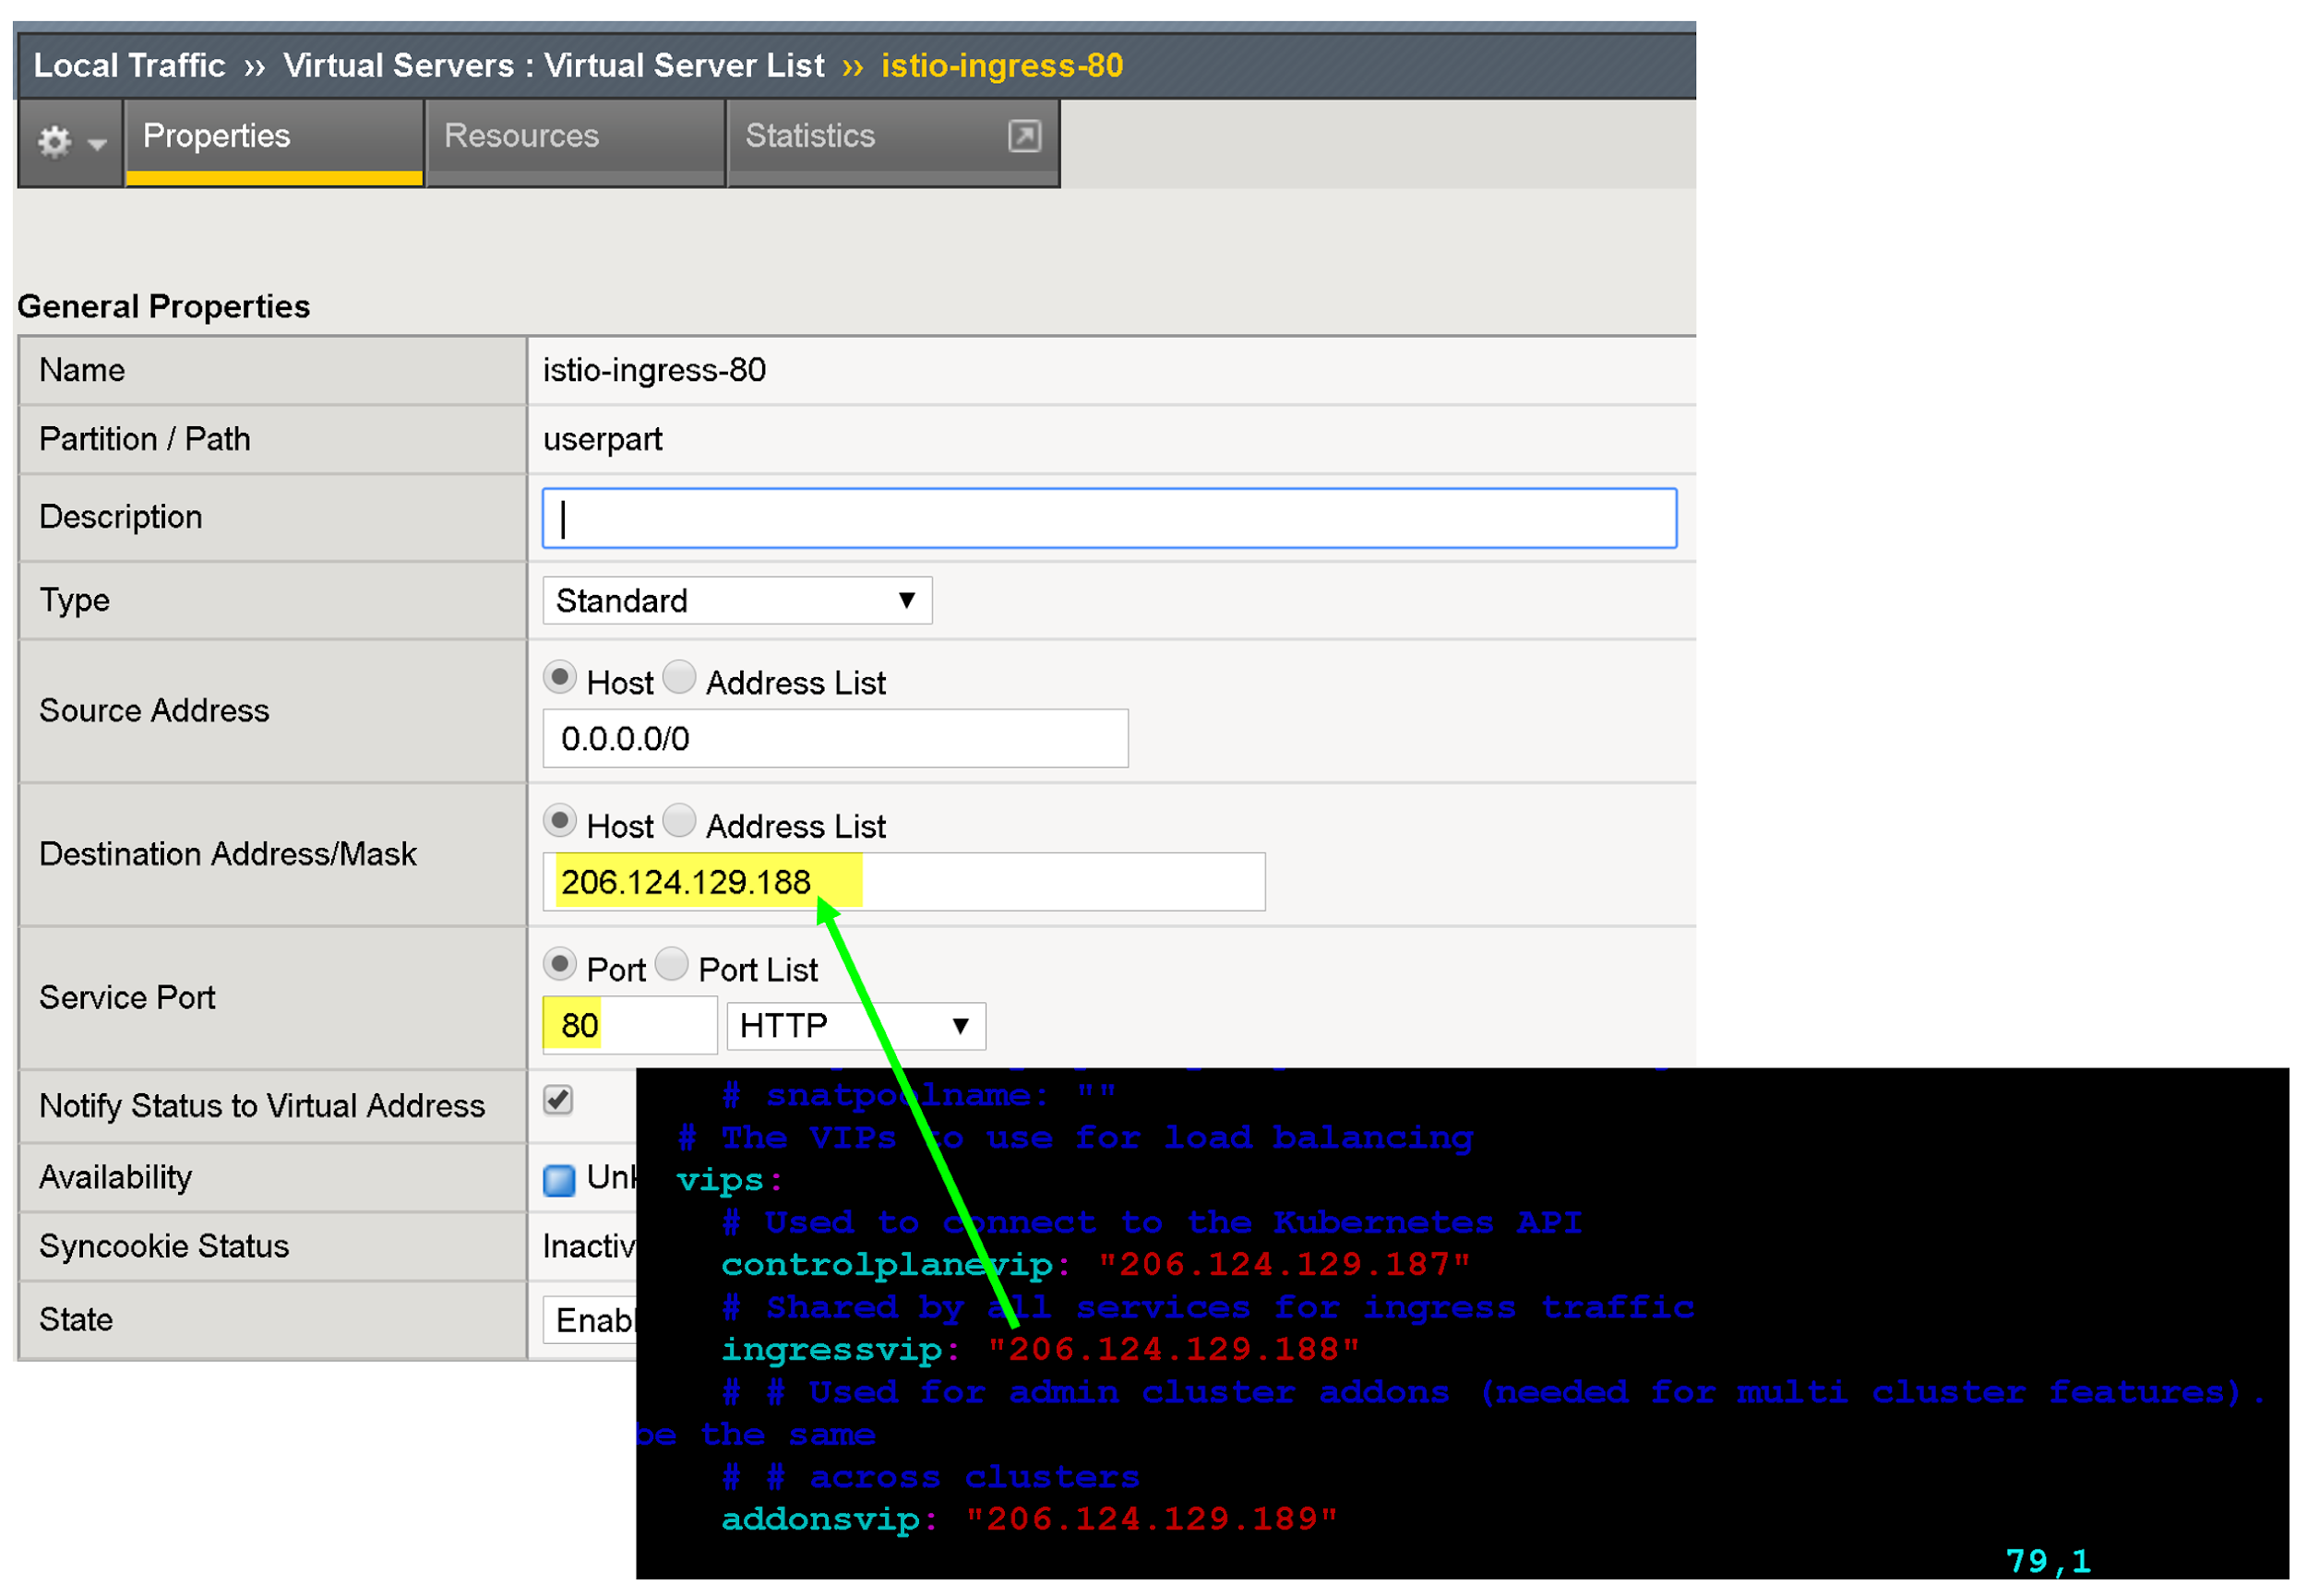
Ada beberapa opsi konfigurasi untuk meningkatkan kualitas endpoint aplikasi Anda, seperti mengaitkan profil khusus protokol, profil sertifikat, dan kebijakan WAF.
Untuk Source Address Translation, klik Auto Map.
Untuk Default Pool, pilih kumpulan yang sesuai yang sebelumnya Anda buat.
Klik Selesai.
Langkah berikutnya
Untuk lebih meningkatkan keamanan dan performa VIP yang menghadap eksternal, pertimbangkan hal berikut:
Pelajari lebih lanjut F5 BIG-IP Application Services.
Pelajari lebih lanjut konfigurasi dan kemampuan BIG-IP: