Benutzerdefinierten Klassifikator für die Dokumentklassifizierung erstellen, verwenden und verwalten
Verwenden Sie einen benutzerdefinierten Klassifikator, um Dokumente zu klassifizieren. Er wird von Grund auf neu aufgebaut mithilfe Ihrer eigenen Dokumente und benutzerdefinierten Klassen. Der generative KI-Aspekt ermöglicht Few-Shot-Learning und Feinabstimmung. Dies steigert die Genauigkeit mit weniger Stichproben und Korrekturen durch iteratives automatisches Labeling.
Der benutzerdefinierte Klassifikator deckt diese drei allgemeinen Anwendungsfälle ab.
- Vortrainiertes Modell:Verwenden Sie das vortrainierte generative KI-Basismodell, um Dokumente schnell mit den von Ihnen angegebenen Labels zu klassifizieren.
- Feinabstimmung: Die Genauigkeit wird verbessert, indem das generative KI-Foundation Model mit Ihren eigenen Daten und Labels trainiert wird.
- Benutzerdefiniertes Modell trainieren: Trainieren Sie einen benutzerdefinierten Extraktor ohne generative KI mit Ihren eigenen Daten und Labels.
Versionen benutzerdefinierter Klassifikatormodelle
| Modellversion | Beschreibung | Release-Version | ML-Verarbeitung in den USA/EU | Feinabstimmung in den USA/EU | Erscheinungsdatum |
|---|---|---|---|---|---|
pretrained-foundation-model-v1.4-2025-05-16 |
Release-Kandidat, der auf dem Gemini 2.0 Flash-LLM basiert. Enthält auch erweiterte OCR-Funktionen. | Releasekandidat | Ja | USA, EU (Vorschau) | 16. Mai 2025 |
pretrained-classifier-v1.5-2025-08-05 |
Release-Kandidat, der auf dem LLM Gemini 2.5 Flash basiert. Enthält auch erweiterte OCR-Funktionen. | Releasekandidat | Ja | USA, EU (Vorschau) | 5. August 2025 |
Konfidenzwerte werden für benutzerdefinierte Klassifikatormodelle nicht unterstützt.
Benutzerdefinierten Klassifikator in der Google Cloud -Console erstellen
Sie können benutzerdefinierte Klassifikatoren erstellen, die speziell auf Ihre Dokumente zugeschnitten sind und mit Ihren Daten trainiert und ausgewertet werden. Dieser Prozessor identifiziert Dokumentklassen aus einer benutzerdefinierten Gruppe von Klassen. Sie können diesen trainierten Prozessor dann für zusätzliche Dokumente verwenden. In der Regel verwenden Sie einen benutzerdefinierten Klassifikator für Dokumente verschiedener Typen und übergeben die Dokumente dann mithilfe der Identifizierung an einen Extraktionsprozessor, um die Entitäten zu extrahieren.
Eine allgemeine Anleitung zum Erstellen und Verwenden eines Prozessors finden Sie im Abschnitt Anleitung.
Sie können eigene Konfigurationsentscheidungen treffen, die zu Ihrem Workflow passen.
Eine detaillierte Anleitung dazu finden Sie direkt in der Google Cloud Console. Klicken Sie dazu einfach auf Anleitung:
Hinweise
- Sign in to your Google Cloud account. If you're new to Google Cloud, create an account to evaluate how our products perform in real-world scenarios. New customers also get $300 in free credits to run, test, and deploy workloads.
-
In the Google Cloud console, on the project selector page, select or create a Google Cloud project.
-
Verify that billing is enabled for your Google Cloud project.
-
Enable the Document AI, Cloud Storage APIs.
-
In the Google Cloud console, on the project selector page, select or create a Google Cloud project.
-
Verify that billing is enabled for your Google Cloud project.
-
Enable the Document AI, Cloud Storage APIs.
Wählen Sie unter für einen benutzerdefinierter Dokument-Klassifikator die Option
Prozessor erstellen .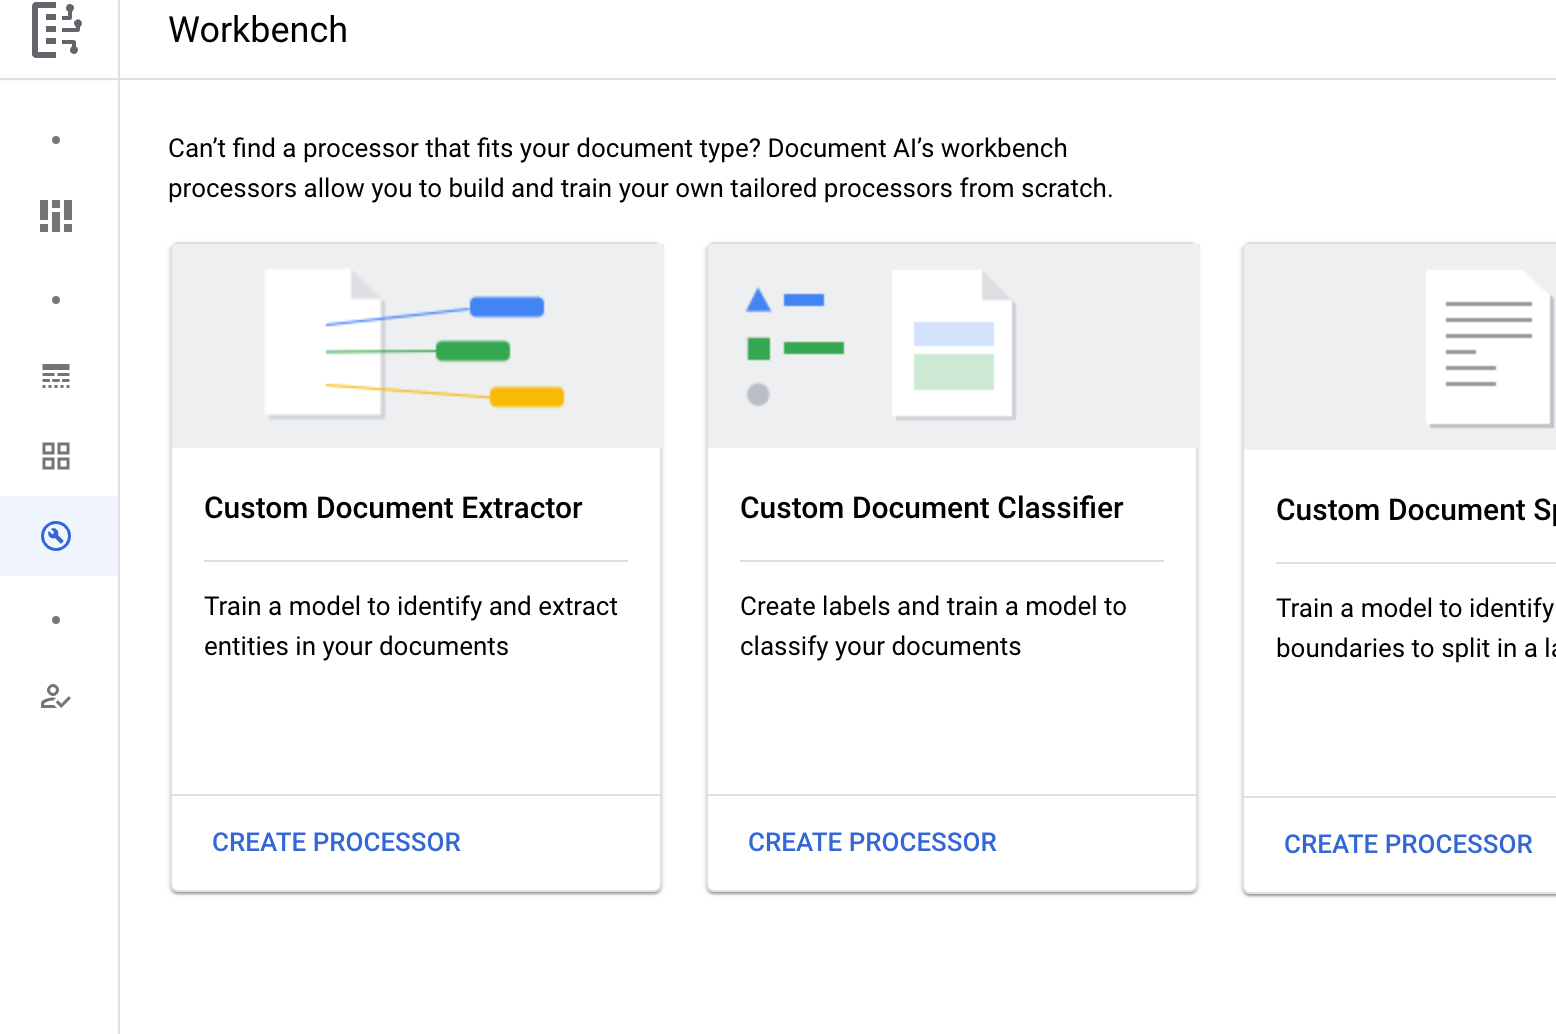
Geben Sie im Menü Prozessor erstellen einen Namen für den Prozessor ein, z. B.
my-custom-document-classifier.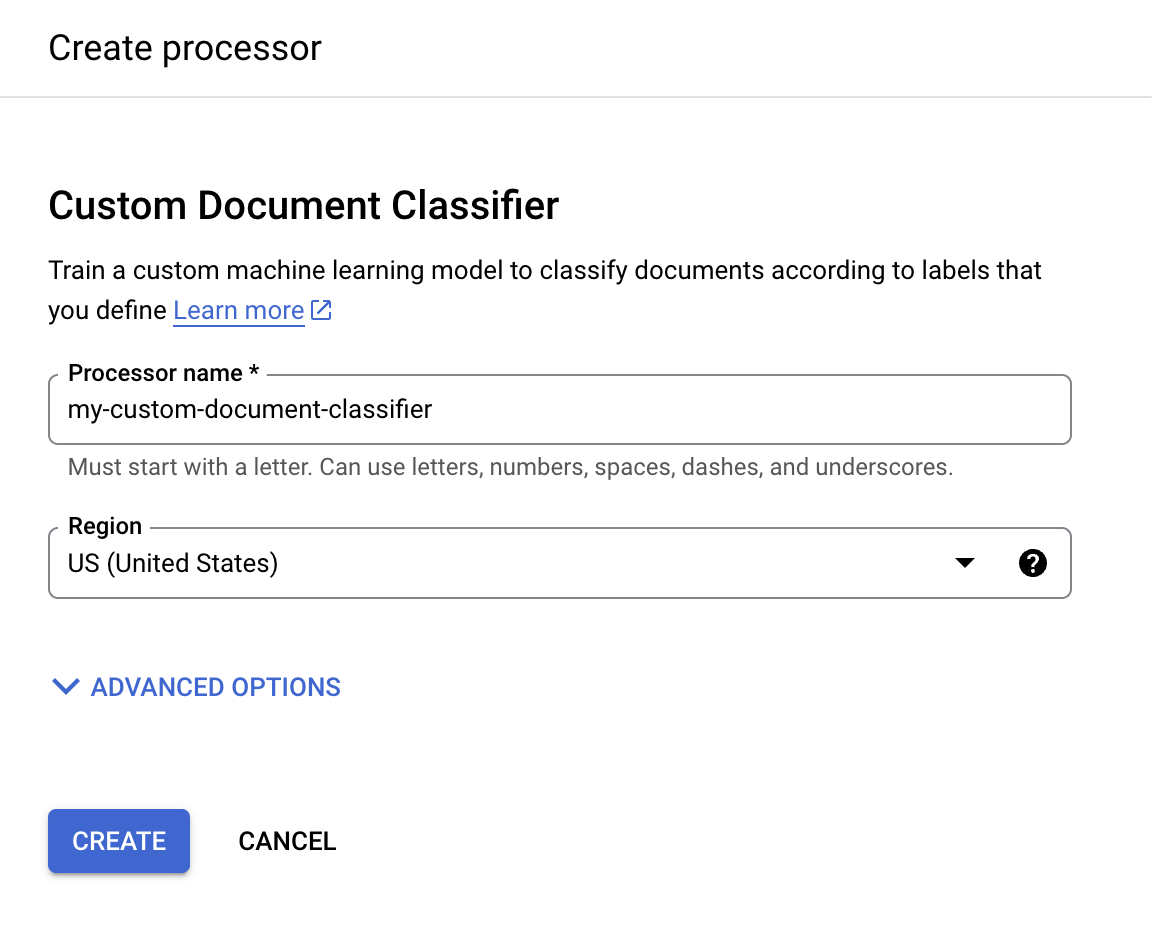
Wählen Sie die Region aus, die Ihnen am nächsten ist.
Wählen Sie Erstellen aus. Der Tab Details zum Prozessor wird angezeigt.
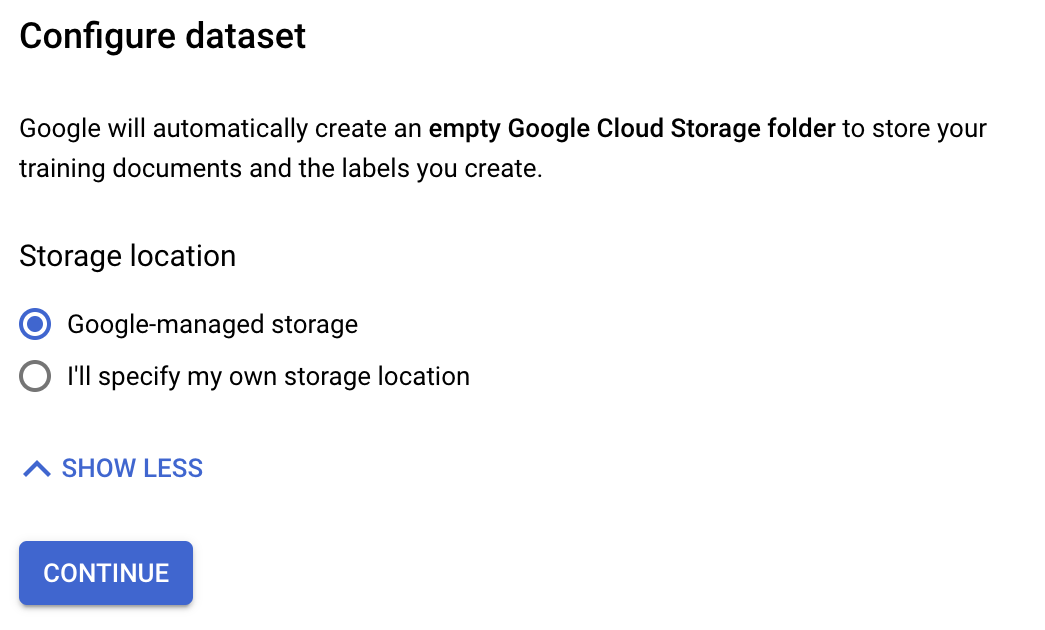
- Wählen Sie Von Google verwalteter Speicher aus, wenn Sie Cloud Storage verwenden möchten.
- Wählen Sie Ich gebe meinen eigenen Speicherort an aus, wenn Sie Ihren eigenen Speicher und kundenverwaltete Verschlüsselungsschlüssel (CMEKs) verwenden möchten. Folgen Sie dann der Anleitung unter Dataset erstellen.
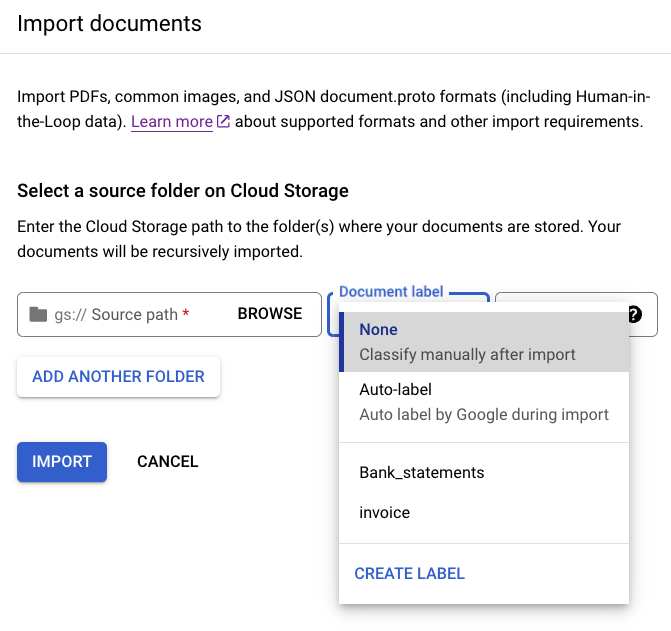
Wählen Sie im Tab Erstellen die Option
Dokumente importieren aus.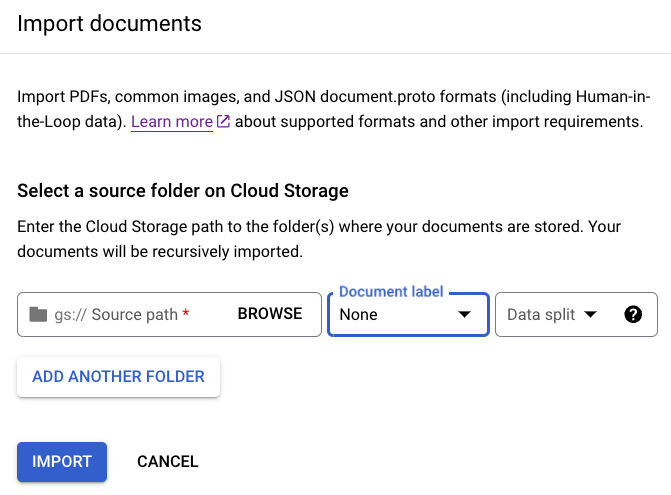
Um einen Speicher-Bucket zu verwenden, müssen Sie den Quellpfad für den Bucket eingeben. In diesem Trainings-Beispiel geben Sie diesen Bucket-Namen unter
Quellpfad ein. Dadurch wird direkt auf ein Dokument verwiesen.cloud-samples-data/documentai/Custom/Patents/PDF/computer_vision_20.pdfWählen Sie für Datenaufteilung die Option Nicht zugewiesen. Das Dokument in diesem Ordner ist nicht dem Test- oder Trainings-Dataset zugewiesen. Das Häkchen bei Mit automatischem Labeling importieren darf nicht gesetzt sein.
Wählen Sie Importieren aus. Document AI liest die Dokumente aus dem Bucket in das Dataset. Der Import-Bucket wird nicht geändert und es wird nicht aus dem Bucket gelesen, nachdem der Import abgeschlossen ist.
Optional: Wenn Sie importierte Dokumente löschen möchten, gehen Sie auf dem Tab Erstellen zu Dataset verwalten > Dokumente auswählen > und klicken Sie auf Löschen.
Wählen Sie auf dem Tab Erstellen die Option Dataset verwalten > Schema bearbeiten aus. Die Seite Schema bearbeiten wird geöffnet.
Label erstellen auswählen:Geben Sie einen Namen für das Label ein.
Wählen Sie Erstellen aus. Eine ausführliche Anleitung zum Erstellen und Bearbeiten eines Schemas finden Sie in Prozessorschema definieren.
Erstellen Sie folgende Labels für das Prozessorschema.
computer_visioncryptomed_techother
Wählen Sie abschließend die Option
Speichern aus.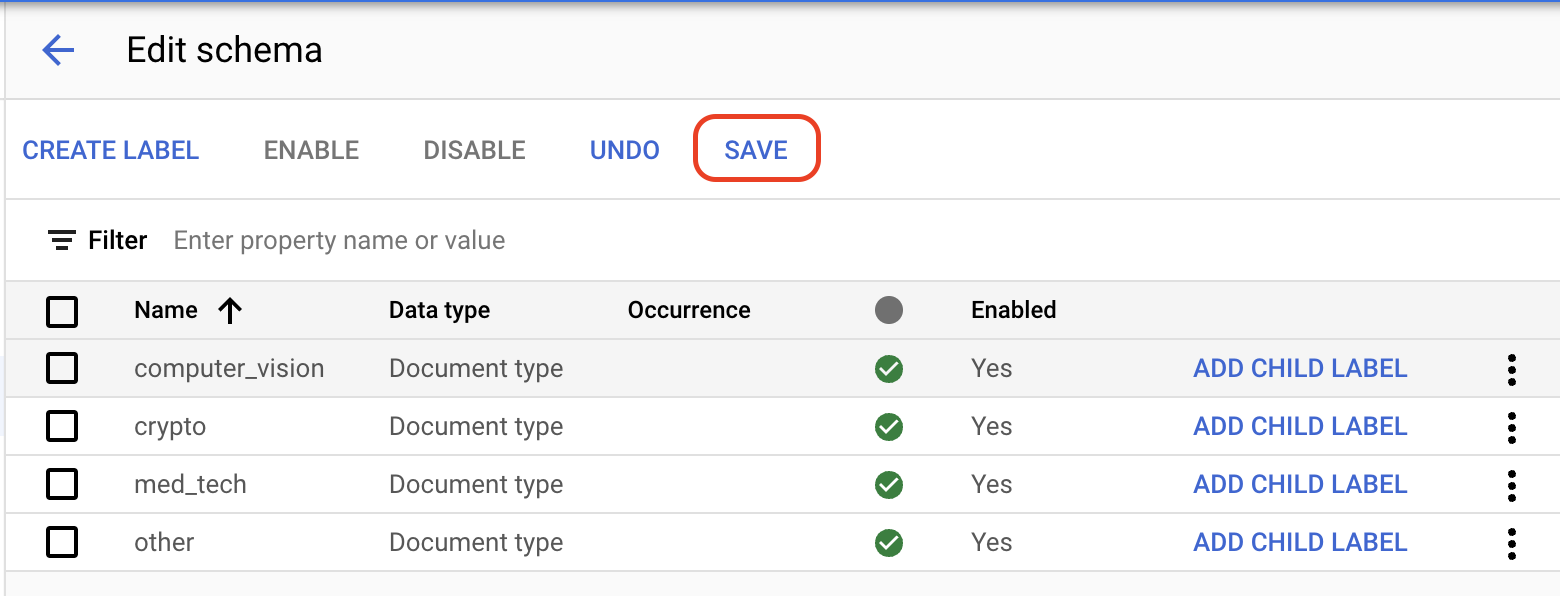
Kehren Sie zum Tab Erstellen zurück und wählen Sie
ein Dokument aus, um die Konsole Dataset verwalten zu öffnen.Wählen Sie aus den
Optionen das entsprechende Label für das Dokument aus. Wenn Sie das bereitgestellte Beispieldokument verwenden, wählen Siecomputer_visionaus.Das mit einem Label versehene Dokument sollte so aussehen:
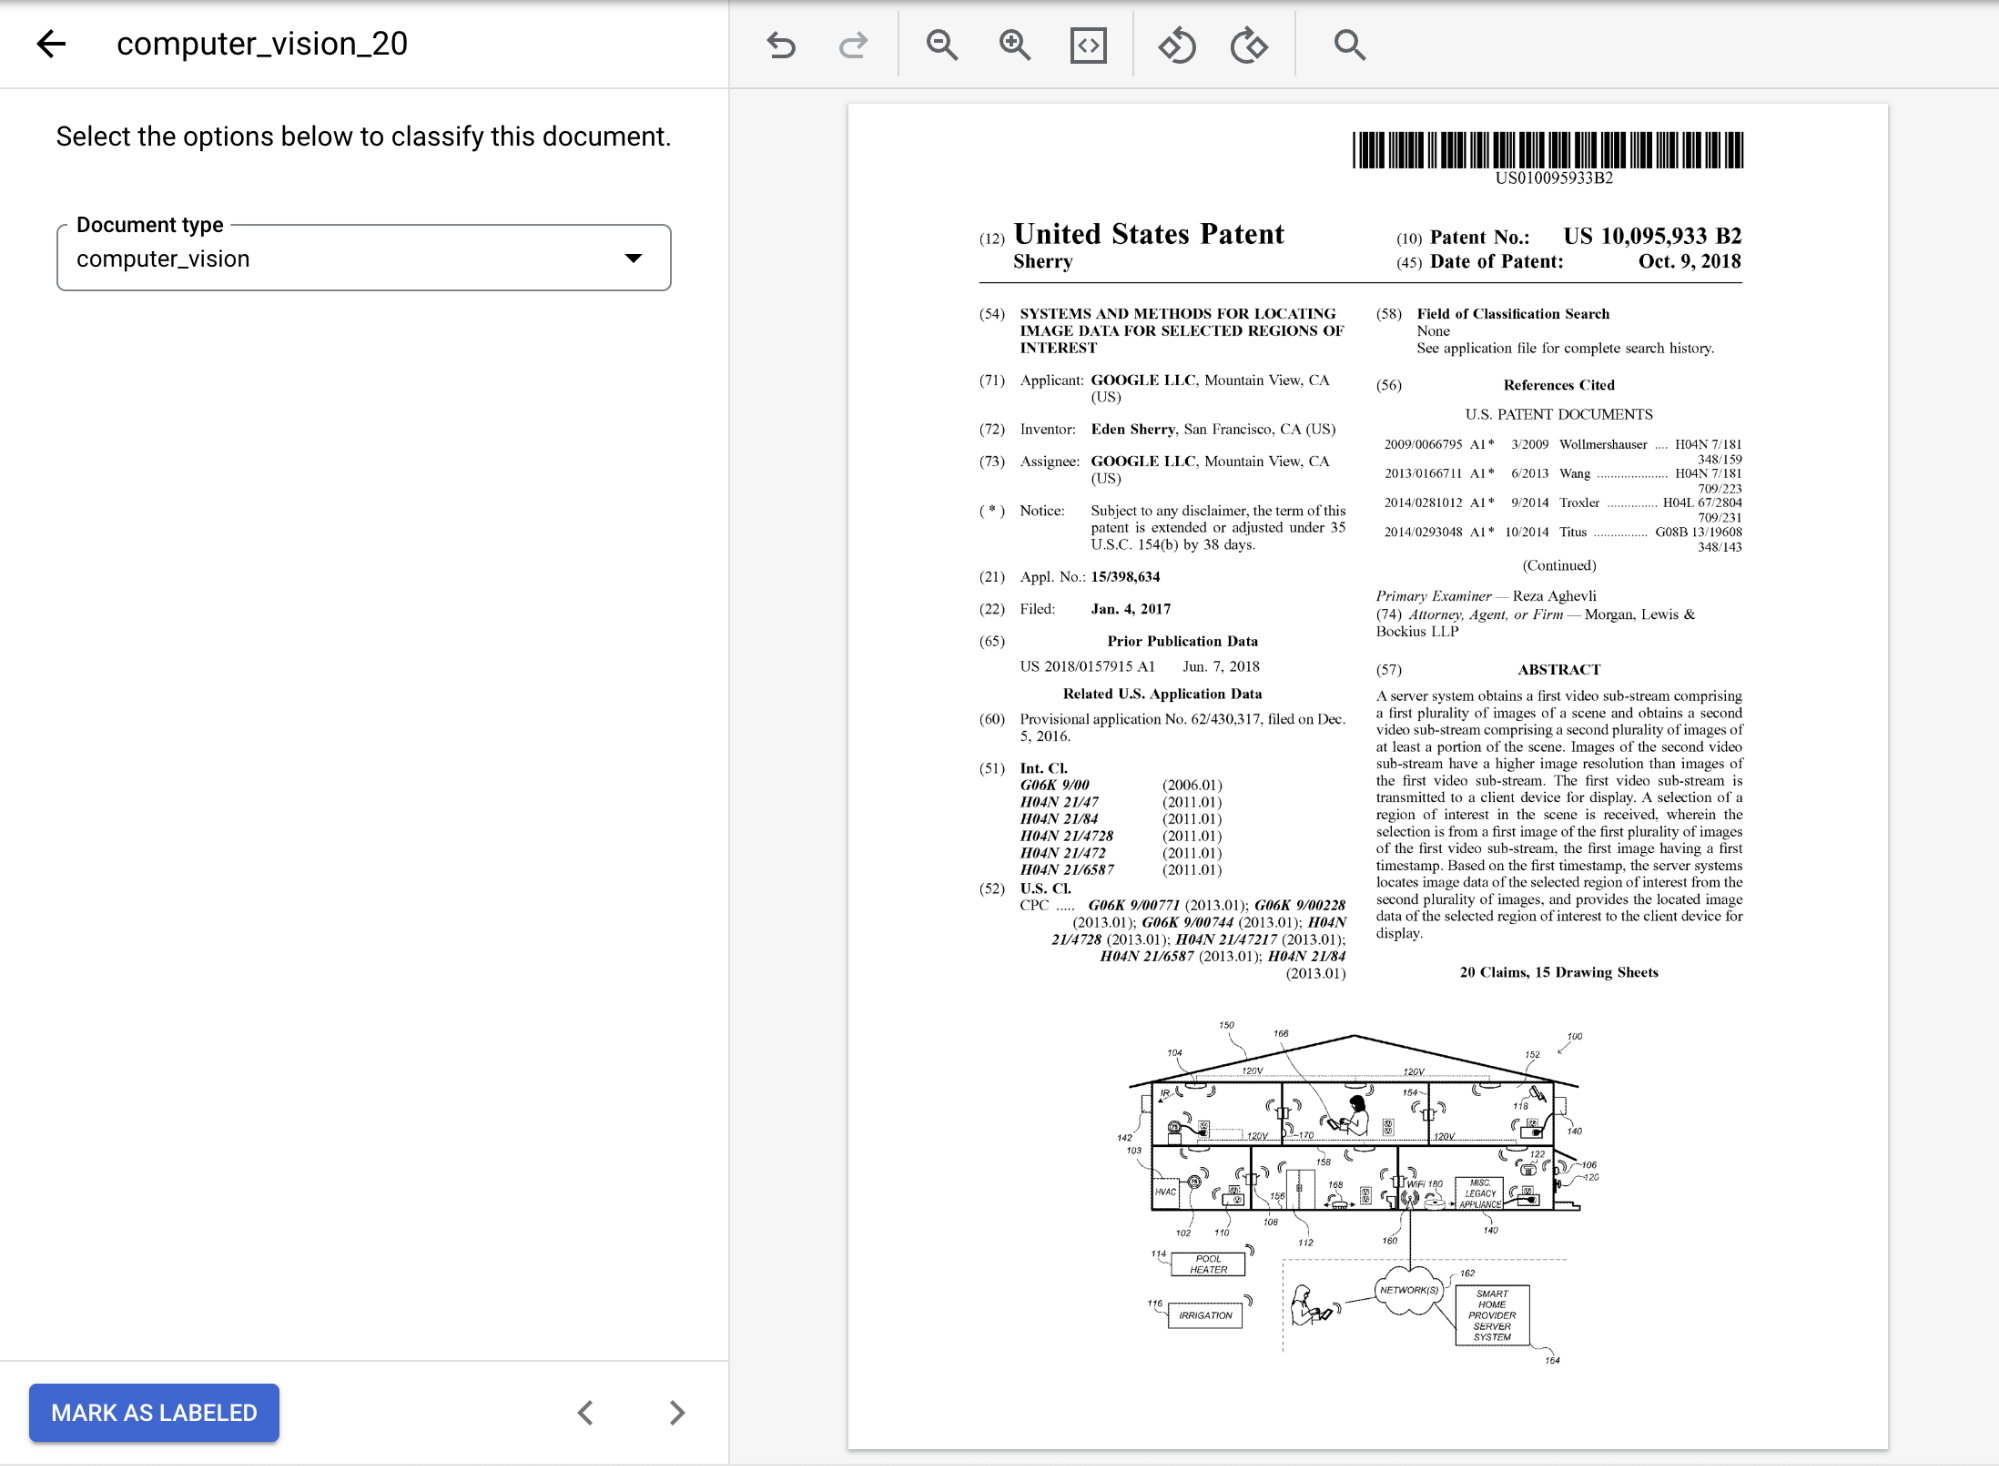
Wählen Sie
Als „Mit Label versehen“ markieren aus, wenn Sie das Dokument fertig annotiert haben.Auf dem Tab Dataset verwalten wird im Bereich Dokument angezeigt, dass ein Dokument mit einem Label versehen wurde.
Markieren Sie auf dem Tab Dataset verwalten das Kästchen
Alle auswählen .Wählen Sie in der Drop-down-Liste
Zu Set zuweisen Training aus.Dokumente importieren auswählen.Geben Sie unter
Quellpfad den folgenden Pfad ein. Dieser Bucket enthält Dokumente mit Labels im Document JSON-Format.cloud-samples-data/documentai/Custom/Patents/JSON/Classification-InventionTypeWählen Sie in der Drop-down-Liste Datenaufteilung die Option Automatisch aufteilen. Dadurch werden die Dokumente automatisch so aufgeteilt, dass 80 % im Trainingsset und 20 % im Testset enthalten sind. Ignorieren Sie den Abschnitt Labels anwenden.
Wählen Sie Importieren aus. Der Import kann mehrere Minuten dauern.
Dokumente importieren auswählen.Geben Sie unter
Quellpfad den folgenden Pfad ein. Dieser Bucket enthält Dokumente ohne Label im PDF-Format.cloud-samples-data/documentai/Custom/Patents/PDF-CDC-BatchLabelWählen Sie in der Drop-down-Liste Datenaufteilung die Option Automatisch aufteilen. Dadurch werden die Dokumente automatisch so aufgeteilt, dass 80 % im Trainingsset und 20 % im Testset enthalten sind.
Wählen Sie im Bereich Labels anwenden die Option Label auswählen aus.
Wählen Sie für diese Beispieldokumente
otheraus.Wählen Sie Importieren aus und warten Sie, bis der Vorgang abgeschlossen ist. Sie können diese Seite in der Zwischenzeit verlassen und später wieder zurückkehren. Anschließend finden Sie die Dokumente mit dem angewendeten Label auf dem Tab Dataset verwalten.
- Wählen Sie
Neue Version trainieren aus. Geben Sie im Feld
Versionsname einen Namen für diese Prozessorversion ein, z. B.my-cdc-version-1.Optional: Wählen Sie Labelstatistiken anzeigen, um Informationen zu den Dokumentlabels aufzurufen, die Ihnen bei der Bestimmung der Abdeckung helfen können. Wählen Sie Schließen, um zur Trainingseinrichtung zurückzukehren.
Wählen Sie
Training starten aus. Sie können den Status in der Seitenleiste prüfen.Wechseln Sie nach Abschluss des Trainings zum Tab
Versionen verwalten . Sie können sich Details zur gerade trainierten Version ansehen.Wählen Sie neben der Version, die Sie bereitstellen möchten, das
aus und wählen Sie Version bereitstellen. Wählen Sie im Dialogfeld
Bereitstellen aus.Die Bereitstellung kann mehrere Minuten dauern.
Wechseln Sie nach Abschluss der Bereitstellung zum Tab
Bewerten und Testen .Auf dieser Seite sehen Sie Bewertungsmesswerte wie den F1-Wert, die Genauigkeit und die Trefferquote für das gesamte Dokument sowie einzelne Labels. Weitere Informationen zu Auswertungen und Statistiken finden Sie in Prozessor auswerten.
Laden Sie ein Dokument herunter, das nicht an vorherigen Trainings oder Tests beteiligt war, damit Sie es zur Bewertung der Prozessorversion verwenden können. Wenn Sie eigene Daten nutzen, verwenden Sie ein speziell dafür gedachtes Dokument.
Wählen Sie
Testdokument hochladen und wählen Sie das Dokument aus, das Sie gerade heruntergeladen haben.Die Seite Analyse des benutzerdefinierten Dokumentklassifikators wird geöffnet. Die Ausgabe zeigt, wie gut das Dokument klassifiziert wurde.
Sie können die Bewertung auch noch einmal mit einem anderen Testset oder einer anderen Prozessorversion ausführen.
Klicken Sie auf der Seite Dataset verwalten auf
Dokumente importieren .Kopieren Sie den folgenden Cloud Storage-Pfad und fügen Sie ihn ein. Dieses Verzeichnis enthält fünf Rechnungs-PDFs ohne Labels. Wählen Sie in der Drop-down-Liste Datenaufteilung die Option Training aus.
cloud-samples-data/documentai/Custom/Patents/PDF-CDC-AutoLabelWählen Sie im Bereich Labels anwenden die Option Automatisches Labeling aus.
Wählen Sie eine vorhandene Prozessorversion aus, um den Dokumenten Labels hinzuzufügen.
- Beispiel:
2af620b2fd4d1fcf
- Beispiel:
Wählen Sie Importieren aus und warten Sie, bis der Vorgang abgeschlossen ist. Sie können diese Seite in der Zwischenzeit verlassen und später wieder zurückkehren. Anschließend werden die Dokumente auf der Seite Dataset verwalten im Bereich Automatisch mit Labels versehen angezeigt.
Automatisch mit Labels versehene Dokumente können nicht für Trainings- oder Testzwecke verwendet werden, ohne sie als „Mit Label versehen“ zu markieren. Rufen Sie den Bereich
Automatisch mit Label versehen auf, um die automatisch gekennzeichneten Dokumente anzusehen.Wählen Sie das erste Dokument aus, um die Labeling-Konsole aufzurufen.
Prüfen Sie, ob das Label korrekt ist. Korrigieren Sie es, falls ein Fehler vorliegt.
Wenn Sie fertig sind, wählen Sie
Als „Mit Label versehen“ markieren aus.Wiederholen Sie die Labelprüfung für jedes Dokument mit automatisch hinzugefügten Labels und kehren Sie dann zur Seite Dataset verwalten zurück, um die Daten für das Training zuzuweisen.
Wählen Sie im Google Cloud Navigationsmenü der Console Document AI und dann Meine Prozessoren aus.
Wählen Sie in der Zeile, in der sich der zu löschende Prozessor befindet,
Weitere Aktionen aus.Wählen Sie Prozessor löschen aus, geben Sie den Namen des Prozessors ein und wählen Sie zur Bestätigung noch einmal Löschen aus.
- Weitere Informationen finden Sie unter Leitfäden.
- Sehen Sie sich die Liste der Prozessoren an.
- Mit dem Layout-Parser können Sie Dokumente in lesbare Blöcke unterteilen.
- Verwenden Sie Enterprise Document OCR, um Text zu erkennen und zu extrahieren.
Prozessor erstellen
Gehen Sie folgendermaßen vor:
Dataset konfigurieren
Zum Trainieren dieses neuen Prozessors müssen Sie ein Dataset mit Trainings- und Testdaten erstellen, damit der Prozessor die zu klassifizierenden und aufzuteilenden Dokumente leichter identifizieren kann. Für dieses Dataset ist ein neuer Speicherort erforderlich. Dies kann ein leerer Cloud Storage-Bucket oder -Ordner sein oder Sie können einen intern verwalteten Standort zulassen.
Wenn der Tab Prozessordetails angezeigt wird, können Sie Folgendes tun:
Dokumente in ein Dataset importieren
Als Nächstes importieren Sie Ihre Dokumente in Ihr Dataset.
Wenn Sie Dokumente importieren, können Sie die Dokumente entweder dem beim Importieren festgelegten Training oder Test zuweisen oder die Zuweisungen später vornehmen.
Weitere Informationen zur Vorbereitung Ihrer Daten für den Import finden Sie im Leitfaden zur Datenvorbereitung.
Prozessorschema definieren
Sie können das Prozessorschema entweder vor oder nach dem Importieren von Dokumenten in Ihr Dataset erstellen. Das Schema enthält Labels, mit denen Sie Dokumente mit Anmerkungen versehen können.
Dokument mit Label versehen
Das Auswählen von Text in einem Dokument und das Anwenden von Labels wird als Annotation bezeichnet.
Dem Trainingsset ein kommentiertes Dokument zuweisen
Nachdem Sie dieses Beispieldokument mit einem Label versehen haben, können Sie es dem Trainingsset zuweisen.
Im Bereich Dokumente ist zu sehen, dass dem Trainingsset ein Dokument zugewiesen wurde.
Mit Labels versehene Daten in Trainings- und Testsets importieren
In diesem Leitfaden finden Sie vorab mit Label versehene Daten. Wenn Sie an Ihrem eigenen Projekt arbeiten, müssen Sie festlegen, wie Ihre Daten mit Labels versehen werden sollen. Weitere Informationen zu Labeling-Optionen.
Benutzerdefinierte Document AI-Prozessoren benötigen sowohl im Trainings- als auch im Testset mindestens ein Dokument pro zu labelndem Dokumenttyp. Für eine optimale Leistung empfehlen wir, mindestens 10 Dokumente pro Label zu nutzen. Bei 5 Labels benötigen Sie 50 Dokumente für das Training und 50 für das Testen. Mehr Trainingsdaten führen in der Regel zu einer höheren Genauigkeit.
Sobald der Import abgeschlossen ist, finden Sie die Dokumente auf dem Tab Dataset verwalten.
Dokumente beim Import im Batch mit Labels versehen
Nachdem Sie das Schema konfiguriert haben, können Sie alle Dokumente, die sich in einem bestimmten Verzeichnis befinden, beim Import mit Labels versehen, um Zeit beim Labeling zu sparen.
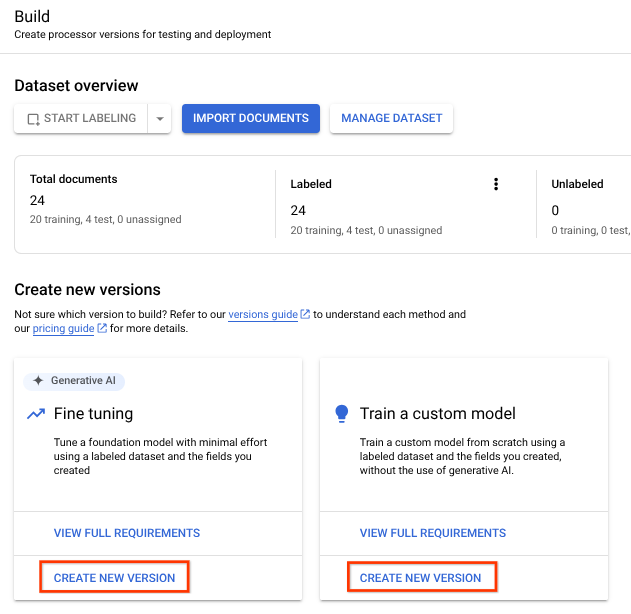
Prozessor trainieren
Nachdem Sie die Trainings- und Testdaten importiert haben, können Sie den Prozessor trainieren. Da das Training mehrere Stunden dauern kann, sollten Sie den Prozessor mit den entsprechenden Daten und Labels einrichten, bevor Sie mit dem Training beginnen.
Sie können feinabgestimmte und benutzerdefinierte Modelle mit den mit Labels versehenen Daten trainieren. Für die Feinabstimmung von Modellen wird generative KI verwendet. Bei benutzerdefinierten Modellen wird ein einzigartiges Large Language Model mit Ihren mit Labels versehenen Daten trainiert. Sie benötigen mindestens zwei Labels im Schema, wobei zehn Trainingsdokumente und zehn Testdokumente (mindestens eins) empfohlen werden.
Prozessorversion bereitstellen
Prozessor bewerten und testen
Neu importierte Dokumente automatisch mit Labels versehen
Nachdem Sie eine trainierte Prozessorversion bereitgestellt haben, können Sie mithilfe der automatischen Labelerstellung beim Importieren neuer Dokumente Zeit bei der Labelerstellung sparen.
Prozessor verwenden
Sie können Ihre benutzerdefiniert trainierten Prozessorversionen wie jede andere Prozessorversion verwalten. Weitere Informationen finden Sie in Prozessorversionen verwalten.
Sie können eine Verarbeitungsanfrage an Ihren benutzerdefinierten Prozessor senden. Die Antwort wird wie die anderer Klassifikatorprozessoren verarbeitet.
Bereinigen
Mit den folgenden Schritten vermeiden Sie, dass Ihrem Google Cloud -Konto die auf dieser Seite verwendeten Ressourcen in Rechnung gestellt werden: