This page describes how to estimate the cost of profiling BigQuery data in an organization or folder. If you want to create an estimate for a project, see Estimate data profiling cost for a single project.
For more information about profiling BigQuery data, see Data profiles for BigQuery data.
Overview
Before you start generating data profiles, you can run an estimation to understand how much BigQuery data you have and how much it might cost to profile that data. To run an estimation, you create an estimate.
When creating an estimate, you specify the resource (organization, folder, or project) containing the data that you want to profile. You can set filters to fine-tune the data selection. You can also set conditions that must be met before Sensitive Data Protection profiles a table. Sensitive Data Protection bases the estimation on the shape, size, and type of the data at the time you create the estimate.
Each estimate includes details like the number of matching tables found in the resource, the total size of all those tables, and the estimated cost of profiling the resource once and on a monthly basis.
For more information about how pricing is calculated, see Data profiling pricing.
Estimation pricing
Creating an estimate is free of charge.
Retention
Each estimate is automatically deleted after 28 days.
Limitations
If your organization or folder has a project that is protected by a VPC Service Controls service perimeter, Sensitive Data Protection might undercount the amount of BigQuery data in your resource. If you have service perimeters, create an estimate for each service perimeter independently.
Before you begin
To get the permissions that
you need to create and manage data profiling cost estimates,
ask your administrator to grant you the
DLP Administrator (roles/dlp.admin)
IAM role on the organization or folder.
For more information about granting roles, see Manage access to projects, folders, and organizations.
You might also be able to get the required permissions through custom roles or other predefined roles.
Create an estimate
Go to the Create data profile estimate page.
Select your organization.
The following sections provide more information about the steps on the Create data profile estimate page. At the end of each section, click Continue.
Select resource to scan
Do one of the following:- To create an estimate for an organization, select Scan entire organization.
- To create an estimate for a folder, select Scan selected folder. Then, click Browse and select the folder.
Input filters and conditions
You can skip this section if you want to include all BigQuery tables in the organization or folder in your estimate.In this section, you create filters to specify certain subsets of your data that you want to include in, or exclude from, the estimate. For subsets that you include in the estimate, you also specify any conditions that a table in the subset must meet to be included in the estimate.
To set filters and conditions, follow these steps:
- Click Add filters and conditions.
In the Filters section, you define one or more filters that specify which tables are in the scope of the estimate.
Specify at least one of the following:
- A project ID or a regular expression that specifies one or more projects.
- A dataset ID or a regular expression that specifies one or more datasets.
- A table ID or a regular expression that specifies one or more tables.
Regular expressions must follow RE2 syntax.
For example, if you want all tables in a project to be included in the filter, specify that project's ID and leave the two other fields blank.
If you want to add more filters, click Add filter and repeat this step.
If the subsets of data that are defined by your filters should be excluded from the estimate, turn off Include the matching tables in my estimate. If you turn off this option, the conditions described in the rest of this section are hidden.
Optional: In the Conditions section, specify any conditions that the matching tables must meet to be included in the estimate. If you skip this step, Sensitive Data Protection includes all supported tables that match your filters regardless of their sizes and ages.
Configure the following options:
Minimum conditions: To exclude small or new tables from the estimate, set a minimum row count or table age.
Time condition: To exclude old tables, turn on the time condition. Then, pick a date and time. Any table created on or before that date is excluded from the estimate.
For example, if you set the time condition to 5/4/22, 11:59 PM, Sensitive Data Protection excludes any tables created on or before May 4, 2022, 11:59 PM from the estimate.
Tables to profile: To specify the types of tables to be included in the estimate, select Only include tables of a specified type or types. Then, select the types of tables you want to include.
If you don't turn on this condition, or if you don't select any table types, Sensitive Data Protection includes all supported tables in the estimate.
Suppose you have the following configuration:
Minimum conditions
- Minimum row count: 10 rows
- Minimum duration: 24 hours
Time condition
- Timestamp: 5/4/22, 11:59 PM
Tables to profile
The Only include tables of a specified type or types option is selected. In the list of table types, only Profile BigLake tables is selected.
In this case, Sensitive Data Protection excludes any tables created on or before May 4, 2022, 11:59 PM. Among the tables created after this date and time, Sensitive Data Protection profiles only the BigLake tables that either have 10 rows or are at least 24 hours old.
Click Done.
If you want to add more filters and conditions, click Add filters and conditions and repeat the previous steps.
The last item in the list of filters and conditions is always the one labeled Default filters and conditions. This default setting is applied to the tables in your selected resource (organization or folder) that don't match any of the filters and conditions that you created.
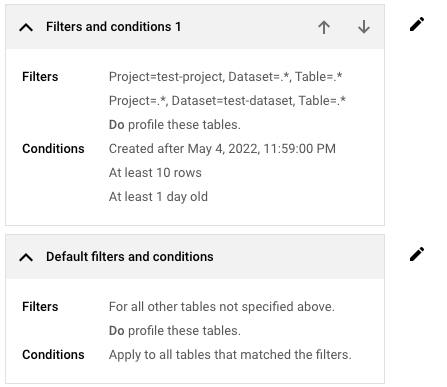
If you want to adjust the default filters and conditions, click Edit filters and conditions, and adjust the settings as needed.
Manage service agent container and billing
In this section, you specify the project to use as a service agent container. You can have Sensitive Data Protection automatically create a new project, or you can choose an existing project.
Regardless of whether you're using a newly created service agent or reusing an existing one, make sure it has read access to the data to be profiled.
Automatically create a project
If you don't have the permissions needed to create a project in the organization, you need to select an existing project instead or obtain the required permissions. For information about the required permissions, see Roles required to work with data profiles at the organization or folder level.
To automatically create a project to use as your service agent container, follow these steps:
- In the Service agent container field, review the suggested project ID and edit it as needed.
- Click Create.
- Optional: Update the default project name.
Select the account to bill for all billable operations related to this new project, including operations that aren't related to discovery.
Click Create.
Sensitive Data Protection creates the new project. The service agent within this project will be used to authenticate to Sensitive Data Protection and other APIs.
Select an existing project
To select an existing project as your service agent container, click the Service agent container field and select the project.
Set location to store estimate
In the Resource location list, select the region where you want to store this estimate.
Where you choose to store your estimate doesn't affect the data to be scanned. Also, it doesn't affect where the data profiles are later stored. Your data is scanned in the same region where that data is stored (as set in BigQuery). For more information, see Data residency considerations.
Review your settings and click Create.
Sensitive Data Protection creates the estimate and adds it to the estimates list. Then, it runs the estimation.
Depending on how much data is in the resource, an estimation can take up to 24 hours to complete. In the meantime, you can close the Sensitive Data Protection page and check back later. A notification appears in the Google Cloud console when the estimate is ready.
View an estimate
Go to the estimates list.
Click the estimate that you want to view. The estimate contains the following:
- The number of tables in the resource, minus any tables that you excluded through filters and conditions.
- The total amount of data the tables equate to.
- The number of subscription units required to profile this amount of data every month.
- The cost of initial discovery, which is the approximate cost of profiling the tables that were found. This estimate is based only on a snapshot of the current data and doesn't consider how much your data grows within a given time period.
- Additional cost estimates for profiling only tables that are less than 6, 12, or 24 months old. These additional estimates are provided to show you how further limiting your data coverage can help you control your data profiling cost.
- The estimated monthly cost of profiling your data, assuming that your BigQuery usage every month is the same as your usage this month.
- A graph that shows the growth of your BigQuery over time.
- The configuration details that you set.
Estimate graph
Each estimate includes a graph that shows the historical growth of your BigQuery data. You can use this information to estimate your monthly data profiling cost.

What's next
- Learn about data profiling pricing.
- Learn more about data profiles for BigQuery data.
- Learn how to profile data in an organization or folder.
- Learn how to profile data in a single project.