本主题详细介绍如何创建新的检查模板。如需快速浏览如何使用 Google Cloud 控制台创建新的检查模板,请参阅快速入门:创建 Sensitive Data Protection 检查模板。
模板简介
您可以使用模板创建和保留配置信息以在 Sensitive Data Protection 中使用。模板可用于分离配置信息(如检查的内容和对内容进行去标识化的方式)与请求的实现。模板提供了一种方法,让您能够重复使用配置并在用户和数据集之间实现一致性。此外,每次您更新模板时,系统都会为使用该模板的任何作业触发器更新该模板。
Sensitive Data Protection 支持检查模板,我们会在 以及去标识化模板(我们将在本课程中 创建敏感数据保护去标识化 模板。
如需了解敏感数据保护中模板的相关概念,请参阅 模板。
创建新的检查模板
控制台
在 Google Cloud 控制台中,前往创建模板页面。
创建模板页面包含以下部分:
定义模板
在定义模板下,输入检查模板的标识符。在运行作业及创建作业触发器等操作时您可以借此引用模板。标识符可使用字母、数字和连字符。如果需要,您还可以输入更便于理解的显示名以及说明,以便更好地记住模板的用途。
在资源位置字段中,选择要检查的数据的存储区域。您创建的检查模板也会存储在此区域。如果您希望能够在任何区域使用新检查模板,请选择全球(任何区域)。
配置检测
接下来,您可以配置 Sensitive Data Protection 在内容中检测的内容,方法是通过以下方式 选择 infoType 和其他选项。
InfoType 检测器会查找特定类型的敏感数据。例如,敏感数据保护 US_SOCIAL_SECURITY_NUMBER infoType 检测器会查找美国社会保障号。除了内置的 infoType 检测器之外,您还可以自行创建自定义 infoType 检测器。
在 InfoTypes 部分中,选择与数据对应的 infoType 检测器 您要扫描的类型。我们不建议您将此部分留空。这样一来,敏感数据保护就会使用一组默认的 infoType 扫描您的数据,其中可能包含您不需要的 infoType。如需详细了解每种检测器,请参阅 InfoType 检测器参考文档。
如需详细了解如何在 Google Cloud 控制台中管理内置和自定义 infoType,请访问 本部分请参阅通过 Google Cloud 控制台管理 infoType。
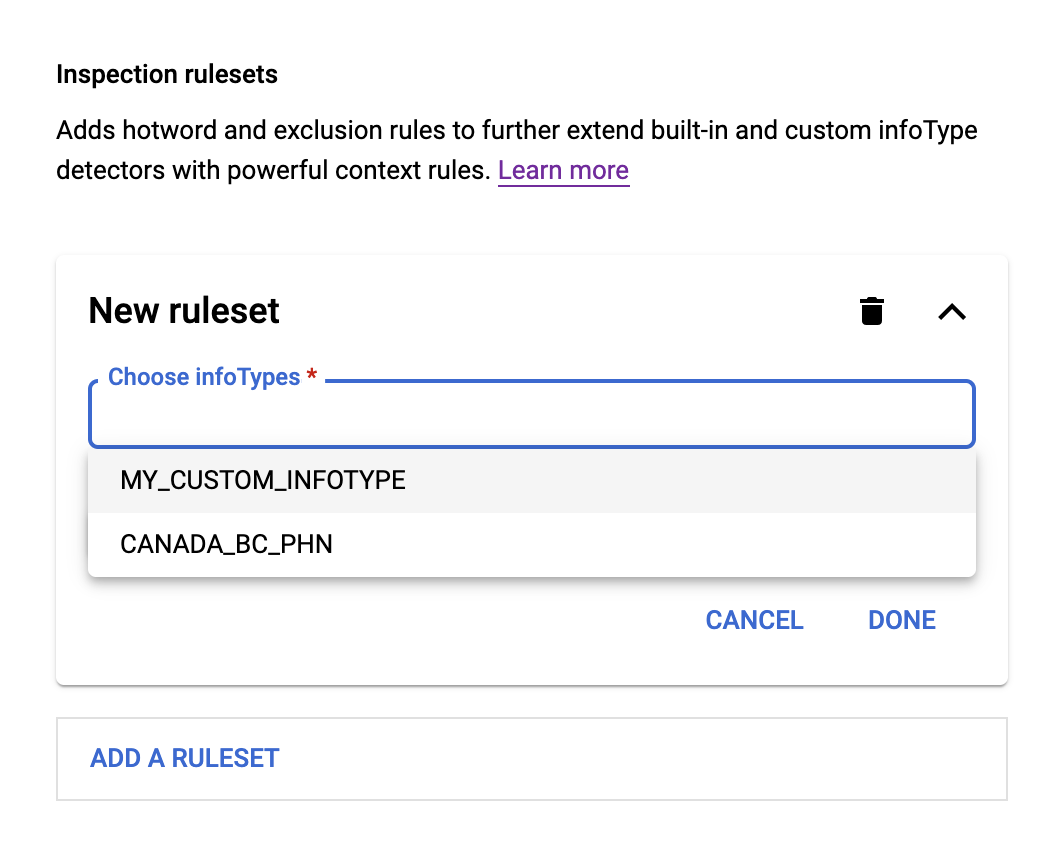
检查规则集
通过检查规则集,您可以使用 上下文规则。检查规则分为两种:
- 排除规则:有助于排除误报或不需要的发现结果。
- 热词规则 以帮助检测其他发现结果。
如需添加新规则集,请先在 InfoTypes 部分。这些是规则集将修改的 infoType 检测器。然后,执行以下操作:
- 点击 Choose infoTypes 字段。您之前指定的 infoType 会显示在该字段下方的菜单中,如下所示:
- 从菜单中选择一个 infoType,然后点击添加规则。系统会显示一个菜单 热词规则和排除规则两个选项。
对于热词规则,请选择热词规则。然后,执行以下操作:
- 在热词字段中,输入表明 Sensitive Data Protection 的正则表达式 。
- 在热词接近度菜单中,选择是在所选 infoType 之前还是之后找到您输入的热词。
- 在热词与 infoType 的距离中,输入大致的字符数 。
- 在置信度调整中,选择是否将与固定的 可能性级别,也可以提高或降低 指定一定的概率水平。
对于排除规则,请选择排除规则。然后,执行以下操作:
- 在排除字段中,输入敏感数据保护功能应查找的正则表达式 (regex)。
- 从匹配类型菜单中,选择以下选项之一:
- 完全匹配:发现内容必须与正则表达式完全匹配。
- 部分匹配:相应发现结果的子字符串可以与正则表达式匹配。
- 反向匹配:发现结果与正则表达式不匹配。
您可以添加其他热词或排除规则和规则集,以进一步优化扫描结果。
置信度阈值
每当 Sensitive Data Protection 检测到敏感数据的潜在匹配项时, 会为其分配一个可能性值,范围为“非常不可能” 设置为“很有可能”。在此处设置可能性值时,您将指示 Sensitive Data Protection,以便仅匹配与相应可能性对应的数据 值或更高值。
默认值“可能”(Possible) 足以满足大多数情况。如果您经常获得太过宽泛的匹配项,请调高滑块的值。如果匹配项太少,请调低滑块的值。
完成后,请点击创建以创建模板。您将看到模板的汇总信息页面。
如需返回“敏感数据保护”主页面,请点击以下位置中的返回箭头: Google Cloud 控制台
C#
如需了解如何安装和使用敏感数据保护客户端库,请参阅 敏感数据保护客户端库。
如需向 Sensitive Data Protection 进行身份验证,请设置应用默认凭据。 如需了解详情,请参阅为本地开发环境设置身份验证。
Go
如需了解如何安装和使用敏感数据保护客户端库,请参阅 敏感数据保护客户端库。
如需向 Sensitive Data Protection 进行身份验证,请设置应用默认凭据。 如需了解详情,请参阅为本地开发环境设置身份验证。
Java
如需了解如何安装和使用用于 Sensitive Data Protection 的客户端库,请参阅 Sensitive Data Protection 客户端库。
如需向 Sensitive Data Protection 进行身份验证,请设置应用默认凭据。 如需了解详情,请参阅为本地开发环境设置身份验证。
Node.js
如需了解如何安装和使用用于 Sensitive Data Protection 的客户端库,请参阅 Sensitive Data Protection 客户端库。
如需向 Sensitive Data Protection 进行身份验证,请设置应用默认凭据。 如需了解详情,请参阅为本地开发环境设置身份验证。
PHP
如需了解如何安装和使用用于 Sensitive Data Protection 的客户端库,请参阅 Sensitive Data Protection 客户端库。
如需向 Sensitive Data Protection 进行身份验证,请设置应用默认凭据。 如需了解详情,请参阅为本地开发环境设置身份验证。
Python
如需了解如何安装和使用用于 Sensitive Data Protection 的客户端库,请参阅 Sensitive Data Protection 客户端库。
如需向 Sensitive Data Protection 进行身份验证,请设置应用默认凭据。 如需了解详情,请参阅为本地开发环境设置身份验证。
REST
检查模板是一种可重复使用的检查配置,外加一些元数据。在 API 术语中,InspectTemplate 对象其实相当于另外包含几个元数据字段(如显示名和说明)的 InspectConfig 对象。因此,如需创建新的检查模板,可执行下列基础步骤:
- 从
InspectConfig对象开始。 - 调用或通过 POST 发布
projects.inspectTemplates或organizations.inspectTemplates资源的create方法,在请求中包含一个带显示名、说明和该InspectConfig对象的InspectTemplate对象。
返回的 InspectTemplate 立即可供使用。您可以通过其 name 在其他调用或作业中引用它。您可以通过调用 *.inspectTemplates.list 方法列出现有模板。如需查看特定模板,请调用 *.inspectTemplates.get 方法。请注意,可创建的模板数量上限为 1000。
如果您曾使用 Sensitive Data Protection 检查文本、图片或结构化内容是否包含敏感内容,则表示您已创建 InspectConfig 对象。再执行一步,即可将其转换为 InspectTemplate 对象。
下面的 JSON 示例展示了您可以向 projects.inspectTemplates.create 方法发送哪些内容。此 JSON 会创建一个具有给定显示名和说明的新模板,并依据 infoType PHONE_NUMBER 和 US_TOLLFREE_PHONE_NUMBER 扫描匹配项。其结果中将包含最多 100 个可能性至少为 POSSIBLE 的匹配项,以及每个匹配项的一小段上下文。
JSON 输入:
POST https://dlp.googleapis.com/v2/projects/[PROJECT_ID]/inspectTemplates?key={YOUR_API_KEY}

{
  "inspectTemplate":{
    "displayName":"Phone number inspection",
    "description":"Scans for phone numbers",
    "inspectConfig":{
      "infoTypes":[
        {
          "name":"PHONE_NUMBER"
        },
        {
          "name":"US_TOLLFREE_PHONE_NUMBER"
        }
      ],
      "minLikelihood":"POSSIBLE",
      "limits":{
        "maxFindingsPerRequest":100
      },
      "includeQuote":true
    }
  }
}
JSON 输出:
响应 JSON 如下所示:
{
  "name":"projects/[PROJECT_ID]/inspectTemplates/[JOB_ID]",
  "displayName":"Phone number inspection",
  "description":"Scans for phone numbers",
  "createTime":"2018-11-30T07:26:28.164136Z",
  "updateTime":"2018-11-30T07:26:28.164136Z",
  "inspectConfig":{
    "infoTypes":[
      {
        "name":"PHONE_NUMBER"
      },
      {
        "name":"US_TOLLFREE_PHONE_NUMBER"
      }
    ],
    "minLikelihood":"POSSIBLE",
    "limits":{
      "maxFindingsPerRequest":100
    },
    "includeQuote":true
  }
}
如需快速尝试此操作,您可以使用下面嵌入的 APIs Explorer。 如需了解有关如何使用 JSON 将请求发送到 DLP API 的常规信息,请参阅 JSON 快速入门。
使用检查模板
创建新的检查模板后,您可以在创建新的检查作业或作业触发器时使用模板。每次您更新模板时,系统都会为使用该模板的任何作业触发器更新该模板。如需了解详情(包括代码示例),请参阅:
控制台
如需快速开始使用新模板,请按照快速入门:创建 Sensitive Data Protection 检查模板中的说明操作,但下面这个步骤有所不同:
- 在配置检测 > 模板部分中,点击模板名称字段,然后选择刚创建的模板。
如需详细了解如何扫描内容,请参阅创建和安排敏感数据保护检查作业并特别注意“配置检测”这一节。
REST
您可以在任何接受 inspectTemplateName 的位置使用您在创建模板时指定的模板标识符,例如:
projects.content.inspect:使用模板作为其配置,查找内容中可能的敏感数据。projects.content.deidentify:使用模板作为其配置,查找内容中可能的敏感数据并对其进行去标识化。请注意,此方法会同时使用检查模板和去标识化模板。InspectJobConfig对象中的projects.dlpJobs.create:创建一个将模板作为其配置的检查作业。
列出检查模板
如需列出已在当前项目或组织中创建的所有检查模板,请执行以下操作:
控制台
在 Google Cloud 控制台中,前往配置页面 Sensitive Data Protection。
选择包含检查模板的项目。
点击模板标签页。
Console 中显示当前项目的所有检查模板的列表。
C#
如需了解如何安装和使用用于 Sensitive Data Protection 的客户端库,请参阅 Sensitive Data Protection 客户端库。
如需向 Sensitive Data Protection 进行身份验证,请设置应用默认凭据。 如需了解详情,请参阅为本地开发环境设置身份验证。
Go
如需了解如何安装和使用敏感数据保护客户端库,请参阅 敏感数据保护客户端库。
如需向 Sensitive Data Protection 进行身份验证,请设置应用默认凭据。 如需了解详情,请参阅为本地开发环境设置身份验证。
Java
如需了解如何安装和使用敏感数据保护客户端库,请参阅 敏感数据保护客户端库。
如需向 Sensitive Data Protection 进行身份验证,请设置应用默认凭据。 如需了解详情,请参阅为本地开发环境设置身份验证。
Node.js
如需了解如何安装和使用敏感数据保护客户端库,请参阅 敏感数据保护客户端库。
如需向 Sensitive Data Protection 进行身份验证,请设置应用默认凭据。 如需了解详情,请参阅为本地开发环境设置身份验证。
PHP
如需了解如何安装和使用敏感数据保护客户端库,请参阅 敏感数据保护客户端库。
如需向 Sensitive Data Protection 进行身份验证,请设置应用默认凭据。 如需了解详情,请参阅为本地开发环境设置身份验证。
Python
如需了解如何安装和使用敏感数据保护客户端库,请参阅 敏感数据保护客户端库。
如需向 Sensitive Data Protection 进行身份验证,请设置应用默认凭据。 如需了解详情,请参阅为本地开发环境设置身份验证。
REST
使用其中一种 *.*.list 方法:
将检查模板复制到 global 区域
在 Google Cloud 控制台中,前往“Sensitive Data Protection” 配置页面。
在工具栏上,点击项目选择器,然后选择包含您要使用的检查模板的项目。
点击模板标签页,然后点击检查子标签页。
点击要使用的模板的 ID。
在检查模板详情页面上,点击复制。
在创建模板页面的资源位置列表中,选择 Global (any region)。
点击创建。
该模板会复制到 global 区域。
将检查模板复制到其他项目
在 Google Cloud 控制台中,前往“Sensitive Data Protection” 配置页面。
在工具栏中,点击项目选择器,然后选择需要 包含您要使用的检查模板。
点击模板标签页,然后点击检查子标签页。
点击要使用的模板的 ID。
在检查模板详情页面上,点击复制。
选择您要创建的项目 您要将检查模板复制到哪个目标文件夹
创建模板页面会在您选择的项目中重新加载。
点击创建。
模板会在您选择的项目中创建。
删除检查模板
如需删除检查模板,请执行以下操作:
控制台
在 Google Cloud 控制台中,前往“敏感数据保护”的配置页面。
选择包含您要删除的检查模板的项目。
点击模板标签页。Console 会显示当前项目的所有模板的列表。
在要删除的模板的操作列中,点击更多操作菜单(显示为纵向排列的三个点),然后点击删除。
或者,从模板列表中,点击要删除的模板的名称。在模板的详细信息页面上,点击删除。
C#
如需了解如何安装和使用用于 Sensitive Data Protection 的客户端库,请参阅 Sensitive Data Protection 客户端库。
如需向 Sensitive Data Protection 进行身份验证,请设置应用默认凭据。 如需了解详情,请参阅为本地开发环境设置身份验证。
Go
如需了解如何安装和使用敏感数据保护客户端库,请参阅 敏感数据保护客户端库。
如需向 Sensitive Data Protection 进行身份验证,请设置应用默认凭据。 如需了解详情,请参阅为本地开发环境设置身份验证。
Java
如需了解如何安装和使用用于 Sensitive Data Protection 的客户端库,请参阅 Sensitive Data Protection 客户端库。
如需向 Sensitive Data Protection 进行身份验证,请设置应用默认凭据。 如需了解详情,请参阅为本地开发环境设置身份验证。
Node.js
如需了解如何安装和使用用于 Sensitive Data Protection 的客户端库,请参阅 Sensitive Data Protection 客户端库。
如需向 Sensitive Data Protection 进行身份验证,请设置应用默认凭据。 如需了解详情,请参阅为本地开发环境设置身份验证。
PHP
如需了解如何安装和使用敏感数据保护客户端库,请参阅 敏感数据保护客户端库。
如需向 Sensitive Data Protection 进行身份验证,请设置应用默认凭据。 如需了解详情,请参阅为本地开发环境设置身份验证。
Python
如需了解如何安装和使用用于 Sensitive Data Protection 的客户端库,请参阅 Sensitive Data Protection 客户端库。
如需向 Sensitive Data Protection 进行身份验证,请设置应用默认凭据。 如需了解详情,请参阅为本地开发环境设置身份验证。
REST
使用其中一种 *.*.delete 方法:
无论使用哪种 *.*.delete 方法,均需添加要删除的模板的资源名称。