Conversion workspaces let you fix conversion issues, modify your objects with the interactive editor, and apply converted schema to your destination database. This page provides an overview of all actions you can perform with conversion workspaces.
Remove objects from the source schema
Remove objects from the source schema to exclude them from conversion. You can later add removed objects if needed.
- In the Google Cloud console, go to Conversion workspaces and select your workspace.
- In the Oracle tab, next to the object you want to remove, select More > Remove.
- In the Remove object confirmation dialog, click Remove.
- Refresh your converted schema. Click
Convert source.
Database Migration Service now analyzes your changes and generates the updated
PostgreSQL schema.
You can inspect the converted schema in the Cloud SQL for PostgreSQL draft tab.
Add objects to the source schema
You can add objects previously removed from the source schema to add them to the conversion.
- In the Google Cloud console, go to Conversion workspaces and select your workspace.
- In the Oracle tab, click Add objects.
- In the Add objects section, use the source list to select
all entities you want add to the source schema.
You can use the Filter objects button to reduce the number of displayed objects. See Filter objects in the source schema view
- Click Add objects.
- Refresh your converted schema. Click
Convert source.
Database Migration Service now analyzes your changes and generates the updated
PostgreSQL schema.
You can inspect the converted schema in the Cloud SQL for PostgreSQL draft tab.
Pull source schema and code snapshot
You can pull schema and code from your source database into the conversion workspace at any moment. Pulling the source gives you an opportunity to add new, or update existing objects in the conversion.
Pulling updated database schema and code doesn't reset any custom mappings that exist in the conversion workspace unless you explicitly choose to remove custom mappings.
Additionally, pulling the source doesn't override SQL changes on your code objects. You can reset these changes directly at the object level.
- In the Google Cloud console, go to Conversion workspaces and select your workspace.
- Click Edit configuration > Pull source schema snapshot again.
- In the dialog box:
- (Optional) Select the Reset custom mapping to remove existing custom mappings and DDL modifications.
- Click Pull schema snapshot.
Database Migration Service pulls the new snapshot from your source database.
- Refresh your converted schema. Click
Convert source.
Database Migration Service now analyzes your changes and generates the updated
PostgreSQL schema.
You can inspect the converted schema in the Cloud SQL for PostgreSQL draft tab.
Use custom conversion mappings
You can customize the conversion logic with a conversion mapping file. The conversion mapping file is a text file contains precise instructions (referred to as conversion directives) for how your Oracle objects should be converted into PostgreSQL objects.
Write a custom mapping file
To write your custom mapping files:
Use the example configuration file as a point of reference.
Write your custom conversion mappings in a text editor and upload it to the conversion workspace.
Add custom mapping files
To add a custom conversion mapping file to your workspace, do the following:
- In the Google Cloud console, go to Conversion workspaces and select your workspace.
- On the conversion editor page, select Edit configuration > Customize mapping with a configuration file.
- In the Configuration file box, click Browse and use the system file picker to select your configuration file.
- Click Add file > Create mapping.
Remove custom mapping files
To remove a custom conversion mapping file from your workspace, do the following:
- In the Google Cloud console, go to Conversion workspaces and select your workspace.
- On the conversion editor page, select Edit configuration > Remove custom mapping.
Review conversion results
After you perform the source conversion, you can review the conversion results and possible issues for every individual converted object in the workspace editor area. You can also use Google Cloud CLI to save all results and issues in bulk to a text file.
In the Google Cloud console, go to Conversion workspaces.
Click the display name of the conversion workspace that you want to work with.
Conversion workspace editor opens.
Select the Oracle tab, and locate the object for which you want to review conversion results in the tree view table.
Select the object. Use the SQL and Conversion issues tabs to review the conversion.
With Google Cloud CLI you can print all conversion results or issues to the terminal. Redirect the output to a file for more convenient bulk object reviews.
Get a list of conversion results
gcloud CLI displays conversion results in the terminal in the form of Data Definition Language (DDL) statements. To save conversion results to a file, execute the following command:
  gcloud database-migration conversion-workspaces describe-ddls \
  CONVERSION_WORKSPACE_ID \
  --region=REGION_ID \
  > OUTPUT_FILE_PATH
Replace:
CONVERSION_WORKSPACE_IDwith the conversion workspace identifier. For information on how to retrieve conversion workspace identifiers, see View conversion workspace details.REGION_IDwith the name of the region where the conversion workspace is located.OUTPUT_FILE_PATHwith the path where to the text file where you want to save the output.Example:
gcloud database-migration conversion-workspaces describe-issues \
my-conversion-workspace \
--region=us-central1 \
> ./my-conversion-issues.txt
Result:
Your schema conversion results are saved in a text format where the first line says
DDLsand subsequent lines are occupied by SQL statements:DDLs CREATE SCHEMA IF NOT EXISTS "SCHEMA1"; ALTER TABLE "SCHEMA1"."EMPLOYEES" ADD CONSTRAINT PK_ID PRIMARY KEY ("ID"); CREATE OR REPLACE FUNCTION mockschema.func_test_datatype(str1 VARCHAR(65000)) RETURNS DECIMAL LANGUAGE plpgsql AS $$ DECLARE str2 VARCHAR(100); BEGIN SELECT employees.first_name INTO STRICT STR2 FROM mockschema.employees WHERE employees.employee_id = CAST(FUNC_TEST_DATATYPE.str1 as DECIMAL) ; RAISE NOTICE '%', concat('Input : ', FUNC_TEST_DATATYPE.str1, ' Output : ', str2); RETURN 0; END; $$; CREATE OR REPLACE PROCEDURE greetings AS BEGIN dbms_output.put_line('Hello World!'); END; CREATE SYNONYM TABLE "SCHEMA1"."SYNONYM1" ON "SCHEMA1"."EMPLOYEES"; CREATE OR REPLACE VIEW "SCHEMA1"."VIEW1" AS SELECT * FROM JOBS;
Get a list of conversion issues
To save conversion issues to a file, execute the following command:
  gcloud database-migration conversion-workspaces describe-issues \
  CONVERSION_WORKSPACE_ID \
  --region=REGION_ID \
  > OUTPUT_FILE_PATH
Replace:
-
CONVERSION_WORKSPACE_IDwith the conversion workspace identifier. For information on how to retrieve conversion workspace identifiers, see View conversion workspace details. -
REGION_IDwith the name of the region where the conversion workspace is located. -
OUTPUT_FILE_PATHwith the path where to the text file where you want to save the output.
Example:
  gcloud database-migration conversion-workspaces describe-issues \
  my-conversion-workspace \
  --region=us-central1 \
  > ./my-conversion-issues.txt
Result:
All the conversion issues contained in your workspace are saved in a text format where the first line contains column headers and each subsequent line contains a separate conversion issue:
  PARENT   NAME               ENTITY_TYPE       ISSUE_TYPE  ISSUE_SEVERITY  ISSUE_CODE  ISSUE_MESSAGE
  SCHEMA1  EMPLOYEES          TABLE             DDL         ERROR           500         unable to parse DDL.
  SCHEMA1  EMPLOYEES          TABLE             CONVERT     WARNING         206         no conversion done.
  SCHEMA1  STORED_PROCEDURE1  STORED_PROCEDURE  DDL         ERROR           500         invalid DDL.
  SCHEMA1  SYNONYM1           SYNONYM           CONVERT     WARNING         206         synonym warning message.
Fix conversion issues
Database Migration Service might not be able to automatically convert your entire source. For most Oracle objects, you can use the conversion editor directly in Database Migration Service to adjust the generated SQL. For others, you might need to change the object directly in your source database and then pull the source snapshot again.
For a complete list of objects that Database Migration Service supports for editing directly in the conversion workspace, see Editable Oracle objects.
Fix issues with objects supported by the built-in editor
To fix issues encountered with objects that aren't supported in the workspace editor, perform one of the following:
-
Review the conversion results and identify possible issues.
You can use the Google Cloud console for reviewing individual objects or gcloud CLI for reviewing all objects in bulk.
- In the Cloud SQL for PostgreSQL tab, use the SQL editor to update the generated code.
- Test your schema to verify Database Migration Service can correctly apply your code to the destination database.
Fix issues with objects that aren't supported by the built-in editor
To fix issues encountered with objects that aren't supported in the workspace editor, perform one of the following:
- Update faulty objects in your source
- For some issues, you might need to change the Oracle statement
directly in your source database. Do the following:
- Update the schema and code directly in your source database.
- Pull the updated sources to Database Migration Service.
- Convert the sources again and check if the issues persist.
- Provide additional mappings with a conversion mapping file
-
You can use a conversion mapping file to provide precise definitions for how Database Migration Service should convert certain PostgreSQL objects. To use a conversion mapping file, do the following:
- Try removing the object from the sources tab
- Database Migration Service lets you convert . To unblock the conversion process, you can decide to look closer at the faulty object at a later time. Remove the object from the sources tab.
Test your schema in the destination
Before you apply the schema to the destination database, you can first perform a test run to proactively check for possible issues. To perform the test, Database Migration Service creates a temporary database. The test run doesn't impact your destination Cloud SQL instance.
Make sure your dedicated migration user has the
CREATEDBpermission. For more information, see Create and configure your destination Cloud SQL instance.In the Google Cloud console, go to Conversion workspaces.
Click the display name of the conversion workspace that you want to work with.
Conversion workspace editor opens.
Click Apply to destination > Test (recommended).
The wizard for applying schema to destination database appears.
In the Define destination section, select the connection profile that points to your destination database.
Click Define and continue.
In the Select objects and test application section, select the schemas of database entities you want to test for your destination database.
You can use the Filter objects button to reduce the number of displayed objects. See Filter objects in the source schema view.
Click Test application.
You can review the application status in the Cloud SQL for PostgreSQL tab.
Apply schema to destination
When the schema you would like to use in the destination database is converted according to your requirements and mappings, you can apply the results to the destination database. Applying schema in the destination doesn't alter any data on the source database.
In the Google Cloud console, go to Conversion workspaces.
Click the display name of the conversion workspace that you want to work with.
Conversion workspace editor opens.
Click Apply to destination > Apply.
The wizard for applying schema to destination database appears.
In the Define destination section, select the connection profile that points to your destination database.
Click Define and continue.
In the Review objects and apply conversion to destination section, select the schemas of database entities you want to create in your destination database.
You can use the Filter objects button to reduce the number of displayed objects. See Filter objects in the source schema view.
Click Apply to destination.
You can review the application status in the Cloud SQL for PostgreSQL tab.
Create a migration job from the conversion editor
You can create a migration job that uses your conversion workspace directly from the conversion editor interface.
In the Google Cloud console, go to Conversion workspaces.
Click the display name of the conversion workspace that you want to work with.
Conversion workspace editor opens.
Click Create migration job.
Proceed with the standard migration job steps, as outlined in Create a migration job.
Filter objects in the source schema view
Database schemas often contain thousands of objects, making it challenging to partition conversion work. When you add objects from the schema snapshot to the source schema view, you can use filters to limit the number of displayed objects. Filters let you add objects in a more granular fashion and focus on converting a select subset of your schema.
Use the filtered view when you add objects to the source schema view:
- In the Filter field, use one of the following filtering methods:
- From the Properties list, select one of the following auto-suggested options:
- Object name to filter the objects by a name, for example,
ADMIN. - Object type to filter the objects by several types, such as Function or Table.
- Conversion status to filter the objects by the conversion status, such as Action required or No issues.
You can combine filter properties with logical operators.
- Object name to filter the objects by a name, for example,
- Enter your query. For example:
type=table.For more information on the filtering syntax, see Supported filtering syntax.
- Select the objects that you want to add to the source schema view.
Supported filtering syntax
You can filter objects by name with basic free text search, or use a dedicated type property.
Both approaches support the
Google API formal specification for filtering,
meaning you can use literals with wildcards, as well as logical and comparison
operators.
- Free text filtering
-
Use free text to filter the objects by name. This approach is case-sensitive and supports wildcards.
Example:
The
*JOB*query uses wildcards to search for entities that contain theJOBsubstring. The filtered view returns some tables and one stored procedure:
- Filter by using the
typeproperty -
You can filter objects by all standard types supported in Database Migration Service.
The
typeproperty supports the following literals with the equality (=) and inequality (!=) operators:database,schema,table,column,index,sequence,stored_procedure,function,view,synonym,materialized_view,udt,constraint,database_package,trigger, andevent_trigger.Example:
The
type=tablefilter returns only tables present in your schema: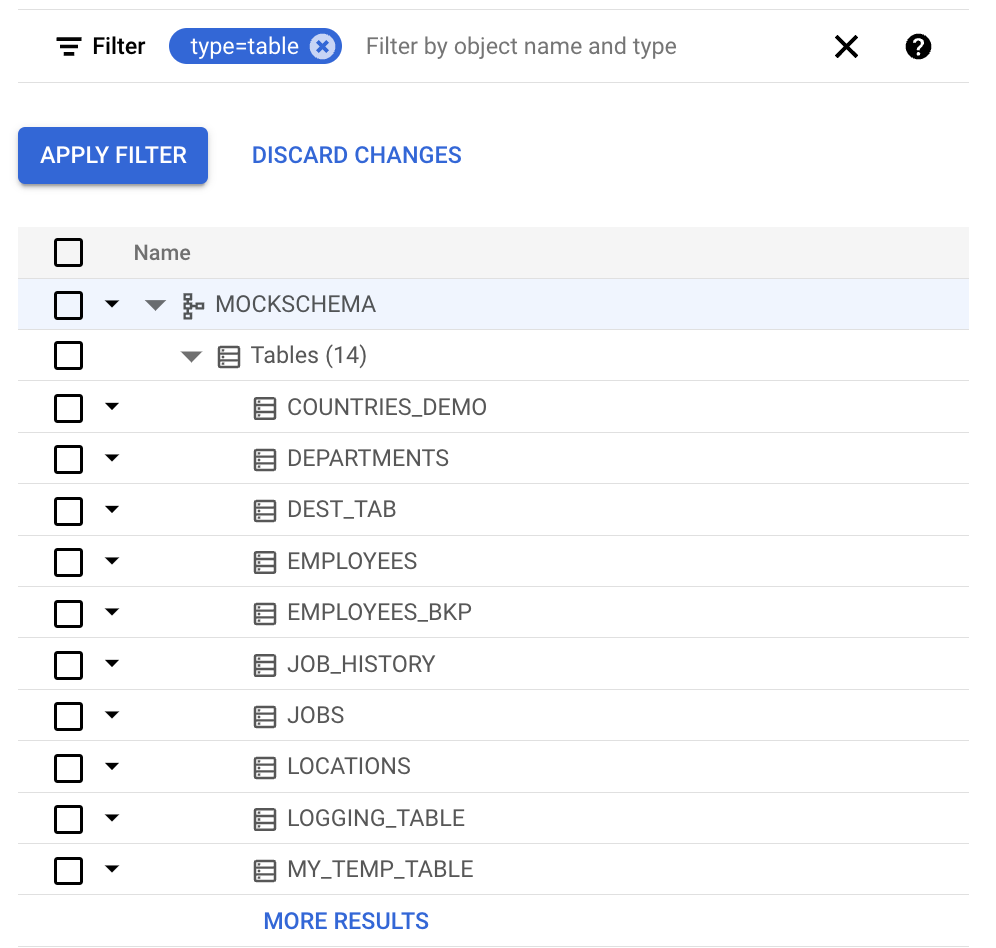
Combine filtering conditions
You can specify multiple conditions by combining them with logical operators.
For example, to search exclusively for tables whose names contain the
JOB or EMPLOYEE substrings, use this query:
type=table AND (*JOB* OR *EMPLOYEE*)
As a result, the filter displays all matching tables:
