In this document you will learn how to enable the Container Scanning API, push an image to Artifact Registry, and see the list of vulnerabilities found in the image.
Artifact Analysis provides vulnerability information for the container images in Artifact Registry. The metadata is stored as notes. An occurrence is created for each instance of a note associated with an image. See the overview and pricing documents for more information.
Before you begin
- Sign in to your Google Cloud account. If you're new to Google Cloud, create an account to evaluate how our products perform in real-world scenarios. New customers also get $300 in free credits to run, test, and deploy workloads.
-
In the Google Cloud console, on the project selector page, select or create a Google Cloud project.
Roles required to select or create a project
- Select a project: Selecting a project doesn't require a specific IAM role—you can select any project that you've been granted a role on.
-
Create a project: To create a project, you need the Project Creator
(
roles/resourcemanager.projectCreator), which contains theresourcemanager.projects.createpermission. Learn how to grant roles.
-
Verify that billing is enabled for your Google Cloud project.
-
Enable the Artifact Registry and Container Scanning APIs.
Roles required to enable APIs
To enable APIs, you need the Service Usage Admin IAM role (
roles/serviceusage.serviceUsageAdmin), which contains theserviceusage.services.enablepermission. Learn how to grant roles. -
Install the Google Cloud CLI.
-
If you're using an external identity provider (IdP), you must first sign in to the gcloud CLI with your federated identity.
-
To initialize the gcloud CLI, run the following command:
gcloud init -
In the Google Cloud console, on the project selector page, select or create a Google Cloud project.
Roles required to select or create a project
- Select a project: Selecting a project doesn't require a specific IAM role—you can select any project that you've been granted a role on.
-
Create a project: To create a project, you need the Project Creator
(
roles/resourcemanager.projectCreator), which contains theresourcemanager.projects.createpermission. Learn how to grant roles.
-
Verify that billing is enabled for your Google Cloud project.
-
Enable the Artifact Registry and Container Scanning APIs.
Roles required to enable APIs
To enable APIs, you need the Service Usage Admin IAM role (
roles/serviceusage.serviceUsageAdmin), which contains theserviceusage.services.enablepermission. Learn how to grant roles. -
Install the Google Cloud CLI.
-
If you're using an external identity provider (IdP), you must first sign in to the gcloud CLI with your federated identity.
-
To initialize the gcloud CLI, run the following command:
gcloud init - Create a Docker repository in Artifact Registry and push a container image to the repository. If you are not familiar with Artifact Registry, see the Docker quickstart.
Enabling this API also enables language package scanning in Artifact Registry. See supported package types.
View the image vulnerabilities
Artifact Analysis scans new images when they're uploaded to Artifact Registry. This scan extracts information about the system packages in the container.
You can view vulnerability occurrences for your images in the registry using Google Cloud console, Google Cloud CLI, or the Container Analysis API. If an image has vulnerabilities, you can then obtain the details.
Artifact Analysis only updates the metadata for images that were pushed or pulled in the last 30 days. After 30 days, the metadata will no longer be updated, and the results will be stale. Furthermore, Artifact Analysis archives metadata that is stale for more than 90 days, and the metadata won't be available in the Google Cloud console, gcloud, or by using the API. To re-scan an image with stale or archived metadata, pull that image. Refreshing metadata can take up to 24 hours.
View occurrences in Google Cloud console
To see the vulnerabilities in an image:
Get the list of repositories.
In the repositories list, click a repository.
In the images list, click an image name.
Vulnerability totals for each image digest are displayed in the Vulnerabilities column.

To view the list of vulnerabilities for an image, click the link in the Vulnerabilities column.
The Scan results section displays a summary of the package types scanned, total vulnerabilities, vulnerabilities with fixes available, vulnerabilities without fixes, and effective severity.

The table of vulnerabilities lists the Common Vulnerabilities and Exposures (CVE) name for each vulnerability found, the effective severity, Common Vulnerability Scoring System (CVSS) score, fixes (when available), the name of the package that contains the vulnerability, and the package type.
Google Cloud console displays up to 1200 vulnerabilities per page in this table. You can filter and sort these files to check a specific file, directory, layer, or type of file by file extension.
For details about a specific CVE, click the CVE name.
To view vulnerability occurrence details such as version number and affected location, in the row with the name of the vulnerability, click View or View Fixed. The link text is View for vulnerabilities without a fix, and View Fixed for vulnerabilities where a fix has been applied.
View vulnerabilities in a specific layer
Artifact Analysis provides layer-specific metadata to help you identify which package contains vulnerabilities, and which Docker build command introduced that layer.
To view layer-based vulnerability metadata in the Google Cloud console:
In Artifact Registry, open your list of repositories.
In the Repositories page, click a repository.
In the Repository Details page, click an image.
In the image version list, click an image digest.
In the image digest details page, click the Vulnerabilities tab.
When layer-based metadata is available, Artifact Analysis shows a selectable list of layers in the Layer bar:

To see the list of layers, click the layer drop-down menu.
A drop-down list opens, showing a numbered list of layers. Layer 0 represents the bottom layer, with each following layer building on the previous layer. Only layers where vulnerabilities have been found are shown.
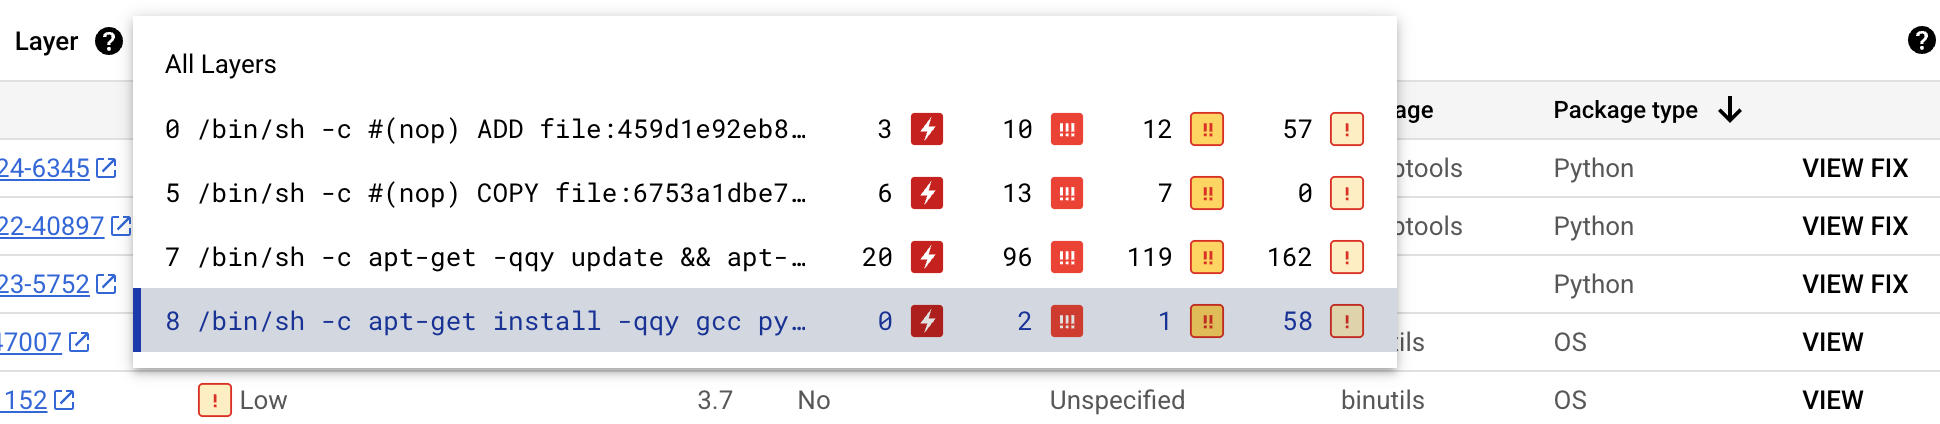
For each layer, Artifact Analysis shows the Docker command used to build the layer and the number of vulnerabilities found in that layer.
To learn more about the vulnerabilities in a specific layer, select a layer from the layer list.
The table of vulnerabilities updates to show only the vulnerabilities found in the selected layer. You can apply more filters or investigate specific vulnerabilities.
Click VIEW or VIEW FIX beside a vulnerability to see more detailed vulnerability information.
The Vulnerability details side panel shows file locations where packages have vulnerabilities.
In the File location(s) table, hover over the question mark to open additional layer metadata.
A dialog displays the layer index, layer build command, layer digest, and base image where you can remediate the vulnerability.
View occurrences using gcloud
To view occurrences for an image in Artifact Registry, run the
gcloud artifacts docker images list
command:
gcloud artifacts docker images list --show-occurrences \
    LOCATION-docker.pkg.dev/PROJECT_ID/REPOSITORY/IMAGE_ID
Where:
- LOCATION is the regional or multi-regional location of the repository.
- PROJECT_ID is your Google Cloud console project ID.
- REPOSITORY is the name of the repository where the image is stored.
- IMAGE_ID is the name of the image in the repository. You cannot specify an image tag with this command.
By default, the command returns the 10 most recent images. To show a
different number of images, use the --show-occurrences-from flag.
For example, the following command returns the 25 most recent images:
gcloud artifacts docker images list --show-occurrences-from=25 \
    us-central1-docker.pkg.dev/my-project/my-repo/my-image
The output looks similar to:
Sample image output
  {
      "name": "projects/my-project/locations/us-central1/occurrences/22d3edfb-34f2-4d3f-be08-fd90c549f010",
      "resource": {
        "uri": "https://us-central1-docker.pkg.dev/my-project/my-repo/golang-nginx@sha256:5b54ef20748417ccdb0b87afedf98c44e699e2f59bd6cv48cbdc1ca2e72c80e3"
      },
      "noteName": "projects/my-project/locations/us-central1/notes/CVE-2005-2541",
      "kind": "VULNERABILITY",
      "createTime": "2025-01-21T15:57:01.238832Z",
      "updateTime": "2025-01-21T15:57:01.238832Z",
      "vulnerability": {
        "severity": "CRITICAL",
        "cvssScore": 10,
        "packageIssue": [
          {
            "affectedLocation": {
              "cpeUri": "cpe:/o:debian:debian_linux:12",
              "package": "tar",
              "version": {
                "name": "1.34+dfsg",
                "revision": "1.2+deb12u1",
                "kind": "NORMAL"
              }
            },
            "fixedLocation": {
              "cpeUri": "cpe:/o:debian:debian_linux:12",
              "package": "tar",
              "version": {
                "kind": "MAXIMUM"
              }
            },
            "packageType": "OS",
            "effectiveSeverity": "LOW",
            "file_location": [
                {
                "file_path": "/var/lib/dpkg/status",
                "layerDetails": {
                  "index": 0,
                  "diffID": "sha256:123",
                  "buildCommand": "FROM golang:example_sha256",
                  "BaseImages": [
                    {
                      "name": "library/golang",
                    },
                  ],
                },
              },
            ],
          }
        ],
        "shortDescription": "CVE-2005-2541",
        "longDescription": "NIST vectors: AV:N/AC:L/Au:N/C:C/I:C/A:C",
        "relatedUrls": [
          {
            "url": "https://security-tracker.debian.org/tracker/CVE-2005-2541",
            "label": "More Info"
          }
        ],
        "effectiveSeverity": "LOW",
        "cvssVersion": "CVSS_VERSION_2",
        "cvssV2": {
          "baseScore": 10,
          "attackVector": "ATTACK_VECTOR_NETWORK",
          "attackComplexity": "ATTACK_COMPLEXITY_LOW",
          "authentication": "AUTHENTICATION_NONE",
          "confidentialityImpact": "IMPACT_COMPLETE",
          "integrityImpact": "IMPACT_COMPLETE",
          "availabilityImpact": "IMPACT_COMPLETE"
        }
      }
    }
View vulnerabilities for an image tag
To view vulnerabilities for an image tag, enter one of the following commands:
gcloud artifacts docker images describe \
    LOCATION-docker.pkg.dev/PROJECT_ID/REPOSITORY/IMAGE_ID:TAG \
    --show-package-vulnerability
or
gcloud artifacts docker images describe \
    LOCATION-docker.pkg.dev/PROJECT_ID/REPOSITORY/IMAGE_ID@sha256:HASH \
    --show-package-vulnerability
Where:
- LOCATION is the regional or multi-regional location of the repository.
- PROJECT_ID is your Google Cloud console project ID.
- REPOSITORY is the name of the repository where the image is stored.
- IMAGE_ID is the name of the image in the repository.
- TAG is the image tag about which you want to get information.
- HASH is the image digest.
Artifact Analysis returns results including the packageType.
Filter vulnerability occurrences
To filter vulnerability occurrences, use --occurrence-filter parameter:
gcloud artifacts docker images list --show-occurrences \
    LOCATION-docker.pkg.dev/PROJECT_ID/REPOSITORY/IMAGE_ID \
    --occurrence-filter=FILTER_EXPRESSION
Where:
- LOCATION is the regional or multi-regional location of the repository.
- PROJECT_ID is your Google Cloud console project ID.
- REPOSITORY is the name of the repository where the image is stored.
- IMAGE_ID is the name of the image in the repository.
- FILTER_EXPRESSION is a sample filter expression in the format explained in Filtering vulnerability occurrences.
View vulnerabilities for a specific layer
You can use the layerDetails field to determine which specific layer
introduced a vulnerable package, and to view additional information
about that layer. For example, consider
the following layerDetails output for an image:
  "layerDetails": {
    "index": 0,
    "diffID": "sha256:123",
    "buildCommand": "FROM golang:example_sha256",
    "BaseImages": [
      {
        "name": "library/golang",
      },
    ],
  }
The output shows that the layer index is 0 in the container image,
with a layer hash of sha256:123.
The Docker build command used to build this layer is
FROM golang:example_sha256, and the layer is also found in the
library/golang base image.
View occurrences using the API or code
To view occurrences for an image, specify images with a URL in the following format:
LOCATION-docker.pkg.dev/PROJECT_ID/REPOSITORY/IMAGE_ID
API
Using cURL
To get a list of occurrences in your project:
 curl -X GET -H "Content-Type: application/json" -H \
    "Authorization: Bearer $(gcloud auth print-access-token)" \
    https://containeranalysis.googleapis.com/v1/projects/PROJECT_ID/occurrences
To get a summary of vulnerabilities in your project:
 curl -X GET -H "Content-Type: application/json" -H \
    "Authorization: Bearer $(gcloud auth print-access-token)" \
    https://containeranalysis.googleapis.com/v1/projects/PROJECT_ID/occurrences:vulnerabilitySummary
To get details on a specific occurrence:
 curl -X GET -H "Content-Type: application/json" -H \
    "Authorization: Bearer $(gcloud auth print-access-token)" \
    https://containeranalysis.googleapis.com/v1/projects/PROJECT_ID/occurrences/OCCURRENCE_ID
Java
To learn how to install and use the client library for Artifact Analysis, see Artifact Analysis client libraries. For more information, see the Artifact Analysis Java API reference documentation.
To authenticate to Artifact Analysis, set up Application Default Credentials. For more information, see Set up authentication for a local development environment.
Go
To learn how to install and use the client library for Artifact Analysis, see Artifact Analysis client libraries. For more information, see the Artifact Analysis Go API reference documentation.
To authenticate to Artifact Analysis, set up Application Default Credentials. For more information, see Set up authentication for a local development environment.
Node.js
To learn how to install and use the client library for Artifact Analysis, see Artifact Analysis client libraries. For more information, see the Artifact Analysis Node.js API reference documentation.
To authenticate to Artifact Analysis, set up Application Default Credentials. For more information, see Set up authentication for a local development environment.
Ruby
To learn how to install and use the client library for Artifact Analysis, see Artifact Analysis client libraries. For more information, see the Artifact Analysis Ruby API reference documentation.
To authenticate to Artifact Analysis, set up Application Default Credentials. For more information, see Set up authentication for a local development environment.
Python
To learn how to install and use the client library for Artifact Analysis, see Artifact Analysis client libraries. For more information, see the Artifact Analysis Python API reference documentation.
To authenticate to Artifact Analysis, set up Application Default Credentials. For more information, see Set up authentication for a local development environment.
View occurrences in Cloud Build
If you're using Cloud Build, you can also view image vulnerabilities in the Security insights side panel within the Google Cloud console.
The Security insights side panel provides a high-level overview of build security information for artifacts stored in Artifact Registry. To learn more about the side panel and how you can use Cloud Build to help protect your software supply chain, see View build security insights.
Filter occurrences
You can use filter strings in the gcloud commands and the
Artifact Analysis API to filter occurrences before viewing them. The
following sections describe the supported search filters.
View discovery occurrences
When an image is initially pushed to Artifact Registry, Artifact Registry creates a discovery occurrence, which contains information about the initial scan of the container image.
To retrieve the discovery occurrence for an image, use the following filter expression:
kind="DISCOVERY" AND resourceUrl="RESOURCE_URL"
Where RESOURCE_URL has the following format:
LOCATION-docker.pkg.dev/PROJECT_ID/REPOSITORY/IMAGE_ID
gcloud
View discovery occurrences for an image:
In this case, the expression is not used directly in the command, but the same information is passed as arguments:
Artifact Registry:
gcloud artifacts docker images list --show-occurrences \
--occurrence-filter='kind="DISCOVERY"' --format=json \
LOCATION-docker.pkg.dev/PROJECT_ID/REPOSITORY/IMAGE_ID
API
To retrieve the discovery occurrence, your filter expression must be URL
encoded and embedded in a GET request as follows:
GET https://containeranalysis.googleapis.com/v1/projects/PROJECT_ID/occurrences?filter=kind%3D%22DISCOVERY%22%20AND%20resourceUrl%3D%22ENCODED_RESOURCE_URL%22
See
projects.occurrences.get
API endpoint for more details.
Java
To learn how to install and use the client library for Artifact Analysis, see Artifact Analysis client libraries. For more information, see the Artifact Analysis Java API reference documentation.
To authenticate to Artifact Analysis, set up Application Default Credentials. For more information, see Set up authentication for a local development environment.
Go
To learn how to install and use the client library for Artifact Analysis, see Artifact Analysis client libraries. For more information, see the Artifact Analysis Go API reference documentation.
To authenticate to Artifact Analysis, set up Application Default Credentials. For more information, see Set up authentication for a local development environment.
Node.js
To learn how to install and use the client library for Artifact Analysis, see Artifact Analysis client libraries. For more information, see the Artifact Analysis Node.js API reference documentation.
To authenticate to Artifact Analysis, set up Application Default Credentials. For more information, see Set up authentication for a local development environment.
Ruby
To learn how to install and use the client library for Artifact Analysis, see Artifact Analysis client libraries. For more information, see the Artifact Analysis Ruby API reference documentation.
To authenticate to Artifact Analysis, set up Application Default Credentials. For more information, see Set up authentication for a local development environment.
Python
To learn how to install and use the client library for Artifact Analysis, see Artifact Analysis client libraries. For more information, see the Artifact Analysis Python API reference documentation.
To authenticate to Artifact Analysis, set up Application Default Credentials. For more information, see Set up authentication for a local development environment.
View vulnerability occurrences
To view vulnerability occurrences for a specific image, create a query with a filter expression:
kind="VULNERABILITY" AND resourceUrl="RESOURCE_URL"
Where RESOURCE_URL has the following format:
LOCATION-docker.pkg.dev/PROJECT_ID/REPOSITORY/IMAGE_ID
gcloud
In this case, the expression is not used directly in the command, but the same information is passed as arguments:
Artifact Registry
gcloud artifacts docker images list --show-occurrences \
--occurrence-filter='kind="VULNERABILITY"' --format=json \
LOCATION-docker.pkg.dev/PROJECT_ID/REPOSITORY/IMAGE_ID
API
The resource URL must be URL encoded, and embedded in a GET request as follows:
GET https://containeranalysis.googleapis.com/v1/projects/PROJECT_ID/occurrences?filter=kind%3D%22VULNERABILITY%22%20AND%20resourceUrl%3D%22ENCODED_RESOURCE_URL%22
See
projects.occurrences.get
API endpoint for more details.
Java
To learn how to install and use the client library for Artifact Analysis, see Artifact Analysis client libraries. For more information, see the Artifact Analysis Java API reference documentation.
To authenticate to Artifact Analysis, set up Application Default Credentials. For more information, see Set up authentication for a local development environment.
Go
To learn how to install and use the client library for Artifact Analysis, see Artifact Analysis client libraries. For more information, see the Artifact Analysis Go API reference documentation.
To authenticate to Artifact Analysis, set up Application Default Credentials. For more information, see Set up authentication for a local development environment.
Node.js
To learn how to install and use the client library for Artifact Analysis, see Artifact Analysis client libraries. For more information, see the Artifact Analysis Node.js API reference documentation.
To authenticate to Artifact Analysis, set up Application Default Credentials. For more information, see Set up authentication for a local development environment.
Ruby
To learn how to install and use the client library for Artifact Analysis, see Artifact Analysis client libraries. For more information, see the Artifact Analysis Ruby API reference documentation.
To authenticate to Artifact Analysis, set up Application Default Credentials. For more information, see Set up authentication for a local development environment.
Python
To learn how to install and use the client library for Artifact Analysis, see Artifact Analysis client libraries. For more information, see the Artifact Analysis Python API reference documentation.
To authenticate to Artifact Analysis, set up Application Default Credentials. For more information, see Set up authentication for a local development environment.
View occurrences of a specific type
In the two previous examples, the only difference between the filter expressions
is the value of kind, which identifies the type of occurrence. Use
this field to limit the list of occurrences to a particular type, such as a
vulnerability or deployment.
To retrieve occurrences for a specific image, use this filter expression:
kind="NOTE_KIND" AND resourceUrl="RESOURCE_URL"
Where:
- NOTE_KIND is the
kind of note.
- For example, use the kind
DISCOVERYto list discovery occurrences. Discovery occurrences are created for images when they are initially pushed to Artifact Registry. - To list vulnerability occurrences, use the kind
VULNERABILITY.
- For example, use the kind
-
RESOURCE_URL is the complete URL of the image
https://HOSTNAME/PROJECT_ID/IMAGE_ID@sha256:HASH
The filter expression to retrieve occurrences of a specific kind across many images is:
kind="NOTE_KIND" AND has_prefix(resourceUrl, "RESOURCE_URL_PREFIX")
Where:
- RESOURCE_URL_PREFIX is the URL prefix for some images
- To list for all version of an image:
https://HOSTNAME/PROJECT_ID/IMAGE_ID@ - To list for all images in a project:
https://HOSTNAME/PROJECT_ID/
- To list for all version of an image:
View images associated with a specific note
You can retrieve a list of resources that are associated with a specific note ID. For example, you can list images with a specific CVE vulnerability.
To list all images within a project that are associated with a particular note, use the following filter expression:
noteProjectId="PROVIDER_PROJECT_ID" AND noteId="NOTE_ID"
To check a specific image for a specific note, use the following filter expression:
resourceUrl="RESOURCE_URL" AND noteProjectId="PROVIDER_PROJECT_ID" \
    AND noteId="NOTE_ID"
Where:
- PROVIDER_PROJECT_ID is the ID of the provider project. For
example,
goog-vulnzprovides the default vulnerability analysis. - NOTE_ID is the ID of the note. Security related notes are often
formatted as
CVE-2019-12345. -
RESOURCE_URL is the complete URL of the image
https://HOSTNAME/PROJECT_ID/IMAGE_ID@sha256:HASH
For example, to check for all images that have an occurrence of CVE-2017-16231 as analyzed by Google, use the following filter expression:
noteProjectId="goog-vulnz" AND noteId="CVE-2017-16231"
What's next
Use Pub/Sub notifications to get notifications about vulnerabilities and other metadata.
Kritis Signer and Voucher allow you create Binary Authorization attestations as part of your build pipeline. These tools can create Binary Authorization attestations based on vulnerability scanning results. For more information, see Creating attestations with Kritis Signer or Creating attestations with Voucher.