永続ディスクは、仮想マシン(VM)インスタンスのブートディスクとして使用するか、VM にアタッチするデータディスクとして使用できます。永続ディスクを作成するときに、空の永続ディスクを作成することも、ソースからディスクを作成することもできます。後者の場合は、選択したソースのデータが新しいディスクに含まれます。
データソース
永続ディスクは、次のデータソースから作成できます。
既存のディスク: 既存の永続ディスクのクローンを作成します。既存のブートディスク以外の永続ディスクですぐにアタッチできるコピーが必要な場合は、このオプションを使用します。
スナップショット: 標準スナップショットから、または即時スナップショットから非ブートディスクを作成します。このオプションは、スナップショットを使用してバックアップした永続ディスクからデータを復元するために使用します。
イメージ: ソースイメージからブートディスクを作成します。このオプションは、新しい VM 用のブートディスクを作成するか、スタンドアロン ブート永続ディスクを作成するために使用します。
始める前に
-
まだ設定していない場合は、認証を設定します。認証とは、Google Cloud サービスと API にアクセスするために ID を確認するプロセスです。ローカル開発環境からコードまたはサンプルを実行するには、次のように Compute Engine に対する認証を行います。
Select the tab for how you plan to use the samples on this page:
Console
When you use the Google Cloud console to access Google Cloud services and APIs, you don't need to set up authentication.
gcloud
-
Install the Google Cloud CLI. After installation, initialize the Google Cloud CLI by running the following command:
gcloud initIf you're using an external identity provider (IdP), you must first sign in to the gcloud CLI with your federated identity.
- Set a default region and zone.
Terraform
ローカル開発環境でこのページの Terraform サンプルを使用するには、gcloud CLI をインストールして初期化し、ユーザー認証情報を使用してアプリケーションのデフォルト認証情報を設定します。
-
Install the Google Cloud CLI.
-
If you're using an external identity provider (IdP), you must first sign in to the gcloud CLI with your federated identity.
-
If you're using a local shell, then create local authentication credentials for your user account:
gcloud auth application-default login
You don't need to do this if you're using Cloud Shell.
If an authentication error is returned, and you are using an external identity provider (IdP), confirm that you have signed in to the gcloud CLI with your federated identity.
詳細については Set up authentication for a local development environment をご覧ください。
Go
ローカル開発環境でこのページの Go サンプルを使用するには、gcloud CLI をインストールして初期化し、ユーザー認証情報を使用してアプリケーションのデフォルト認証情報を設定します。
-
Install the Google Cloud CLI.
-
If you're using an external identity provider (IdP), you must first sign in to the gcloud CLI with your federated identity.
-
If you're using a local shell, then create local authentication credentials for your user account:
gcloud auth application-default login
You don't need to do this if you're using Cloud Shell.
If an authentication error is returned, and you are using an external identity provider (IdP), confirm that you have signed in to the gcloud CLI with your federated identity.
詳細については Set up authentication for a local development environment をご覧ください。
Java
ローカル開発環境でこのページの Java サンプルを使用するには、gcloud CLI をインストールして初期化し、ユーザー認証情報を使用してアプリケーションのデフォルト認証情報を設定します。
-
Install the Google Cloud CLI.
-
If you're using an external identity provider (IdP), you must first sign in to the gcloud CLI with your federated identity.
-
If you're using a local shell, then create local authentication credentials for your user account:
gcloud auth application-default login
You don't need to do this if you're using Cloud Shell.
If an authentication error is returned, and you are using an external identity provider (IdP), confirm that you have signed in to the gcloud CLI with your federated identity.
詳細については Set up authentication for a local development environment をご覧ください。
Python
ローカル開発環境でこのページの Python サンプルを使用するには、gcloud CLI をインストールして初期化し、ユーザー認証情報を使用してアプリケーションのデフォルト認証情報を設定します。
-
Install the Google Cloud CLI.
-
If you're using an external identity provider (IdP), you must first sign in to the gcloud CLI with your federated identity.
-
If you're using a local shell, then create local authentication credentials for your user account:
gcloud auth application-default login
You don't need to do this if you're using Cloud Shell.
If an authentication error is returned, and you are using an external identity provider (IdP), confirm that you have signed in to the gcloud CLI with your federated identity.
詳細については Set up authentication for a local development environment をご覧ください。
REST
このページの REST API サンプルをローカル開発環境で使用するには、gcloud CLI に指定した認証情報を使用します。
Install the Google Cloud CLI.
If you're using an external identity provider (IdP), you must first sign in to the gcloud CLI with your federated identity.
詳細については、 Google Cloud 認証ドキュメントの REST を使用して認証するをご覧ください。
既存のディスクからディスク クローンを作成する
既存の永続ディスクが VM インスタンスにアタッチされている場合でも、既存の永続ディスクから新しい永続ディスクのクローンを作成できます。ディスクのクローンを作成すると、ソースディスク内のすべてのデータを含む新しいディスクが作成されます。クローンのプロパティ(サイズなど)は変更できます。クローンを削除せずにソースディスクを削除することもできます。
ディスク クローンの作成は、本番環境に悪影響を与えることなくデバッグするために本番環境データを複製する場合や、VM をスケールアウトしながらディスクを複製する場合、データベース バックアップ検証用のレプリカを作成する場合に便利です。ディスクのクローンを作成して、非ブートディスク データを新しいプロジェクトに移動することもできます。バックアップや障害復旧などの復元力を高めるためにデータ保護が必要な場合は、ディスク クローンではなく標準スナップショットを使用することをおすすめします。
ディスクの状態をさまざまな間隔でキャプチャし、アタッチ可能なディスクを毎回必要としない場合は、即時スナップショットの使用を検討してください。
即時スナップショットは障害復旧には適していませんが、同じディスクのクローンを複数作成するよりもストレージ効率が高くなります。これは即時スナップショットが増分バックアップであるためです。
迅速なデバッグなどのためにディスクを早急に複製する必要がある場合は、ディスク クローンを使用します。
Compute Engine のその他のデータ バックアップ オプションについてご確認ください。
制限事項
- クローンのディスクタイプはソースディスクと同じにする必要があります。
- リージョン ディスクからゾーンディスクのクローンを作成することはできません。
- 別のゾーンにあるゾーンディスクのクローンを作成することはできません。
- クローンのサイズは、ソースディスクのサイズ以上にする必要があります。Google Cloud コンソールを使用してクローンを作成する場合、ディスクサイズを指定できません。また、クローンはソースディスクと同じサイズになります。
- 顧客指定の暗号鍵または顧客管理の暗号鍵を使用してソースディスクを暗号化する場合は、同じ鍵を使用してクローンを暗号化する必要があります。詳細については、暗号化されたソースディスクのクローンの作成をご覧ください。
- 特定のソースディスクのクローン(またはそのクローン)は 30 秒ごとに 1 つだけ作成できます。
- 特定のソースディスクまたはそのクローンのディスク クローンは 1,000 個まで持てます。この上限を超えると、
internalErrorが返されます。ただし、ディスク クローンを作成して後で削除する場合は、削除したディスク クローンはこの制限に含まれません。 - ディスクのクローンを作成すると、そのディスクの後続のクローン(またはそのクローン)は、元のソースディスクの同時ディスク クローン数の上限の 1,000 件に対してカウントされ、30 秒ごとに最大 1 つのクローンを作成するという制限に対してカウントされます。
エラー メッセージ
クローン作成頻度の上限を超えると、次のエラーが発生してリクエストが失敗します。
RATE LIMIT: ERROR: (gcloud.compute.disks.create) Could not fetch resource:
 - Operation rate exceeded for resource RESOURCE. Too frequent operations from the source resource.
ディスクのクローンを作成する
新しいディスクに既存のディスクのクローンを作成するには、Google Cloud コンソール、Google Cloud CLI、または Compute Engine API を使用します。コンソール
Google Cloud コンソールで、[ディスク] ページに移動します。
ゾーン永続ディスクのリストで、クローンを作成するディスクを探します。
[操作] のメニューボタンをクリックし、[ディスクのクローン作成] を選択します。
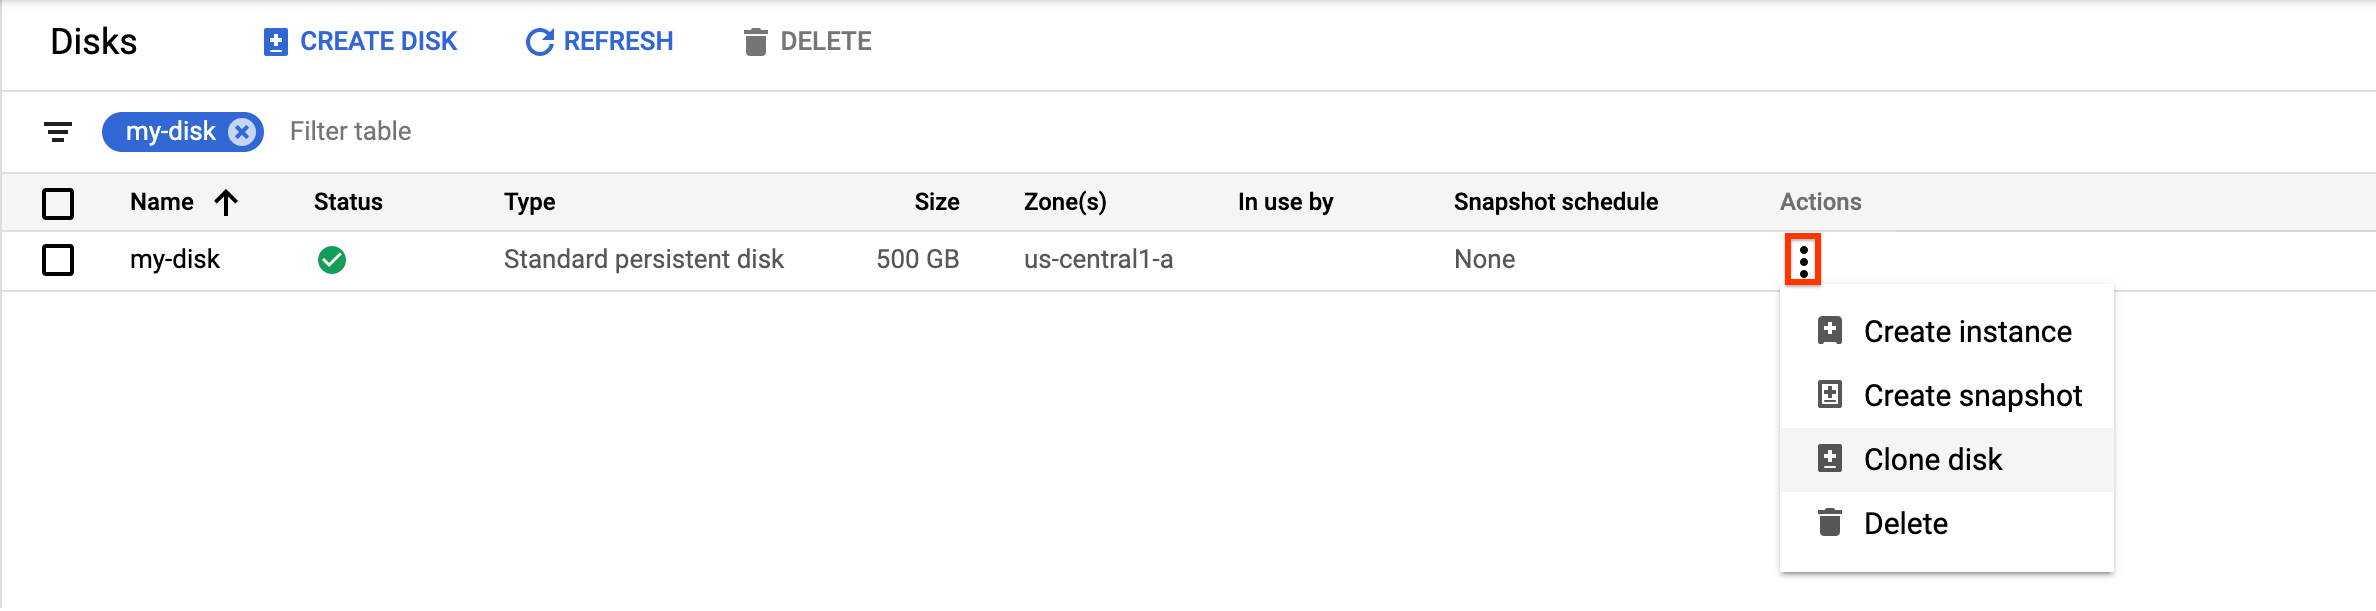
[ディスクのクローン作成] パネルで、新しいディスクの名前を指定します。
[プロパティ] で、新しいディスクのその他の詳細を確認します。
[保存] をクリックします。
gcloud
gcloud CLI で
disks createコマンドを使用し、--source-diskを指定します。次の例では、ソースディスクのクローンを作成して、別のプロジェクトの新しいディスクに保存します。gcloud compute disks create projects/TARGET_PROJECT_ID/zones/ZONE/disks/TARGET_DISK_NAME \ --description="cloned disk" \ --source-disk=projects/SOURCE_PROJECT_ID/zones/ZONE/disks/SOURCE_DISK_NAME次のように置き換えます。
Terraform
ディスクのクローンを作成するには、
google_compute_diskリソースを使用します。Terraform 構成を適用または削除する方法については、基本的な Terraform コマンドをご覧ください。
Go
Go
このサンプルを試す前に、Compute Engine クイックスタート: クライアント ライブラリの使用に記載されている Go の設定手順に沿って操作します。詳細については、Compute Engine Go API リファレンス ドキュメントをご覧ください。
Compute Engine に対して認証を行うには、アプリケーションのデフォルト認証情報を設定します。詳細については、ローカル開発環境の認証を設定するをご覧ください。
Java
Java
このサンプルを試す前に、Compute Engine クイックスタート: クライアント ライブラリの使用に記載されている Java の設定手順に沿って操作します。詳細については、Compute Engine Java API リファレンス ドキュメントをご覧ください。
Compute Engine に対して認証を行うには、アプリケーションのデフォルト認証情報を設定します。詳細については、ローカル開発環境の認証を設定するをご覧ください。
Python
Python
このサンプルを試す前に、Compute Engine クイックスタート: クライアント ライブラリの使用に記載されている Python の設定手順に沿って操作します。詳細については、Compute Engine Python API リファレンス ドキュメントをご覧ください。
Compute Engine に対して認証を行うには、アプリケーションのデフォルト認証情報を設定します。詳細については、ローカル開発環境の認証を設定するをご覧ください。
REST
API で、
compute.disks.insertメソッドに対してPOSTリクエストを作成します。リクエストの本文で、nameパラメータとsourceDiskパラメータを指定します。クローンは、ソースディスクから省略されたすべてのプロパティを継承します。次の例では、ソースディスクのクローンを作成して、別のプロジェクトの新しいディスクに保存します。POST https://compute.googleapis.com/compute/v1/projects/TARGET_PROJECT_ID/zones/ZONE/disks { "name": "TARGET_DISK_NAME" "sourceDisk": "projects/SOURCE_PROJECT_ID/zones/ZONE/disks/SOURCE_DISK_NAME" }次のように置き換えます。
ゾーンディスクからリージョン ディスクのクローンを作成する
既存のゾーンディスクのクローンを作成して、新しいリージョン ディスクを作成できます。ゾーンディスクをリージョン ディスクに移行する場合は、ゾーンディスクのスナップショットを作成して新しいリージョン ディスクに復元する代わりに、このオプションを使用することをおすすめします。
制限事項
ソースのゾーンディスクからリージョン ディスクのクローンを作成するには、クローンのレプリカゾーンのいずれかがソースディスクのゾーンと一致している必要があります。
作成後、リージョン ディスクのクローンは平均で 3 分以内に使用できるようになります。ただし、ディスクが完全に複製され、リカバリ ポイント目標(RPO)がゼロに近い状態になるまでに、数分かかる場合があります。
ディスク容量のクローン作成のレートは制限されています。15 分ごとに最大 1 TB のクローン ディスクを作成できますが、バースト リクエストは 257 TB に制限されています。
コンソール
Google Cloud コンソールで、[ディスク] ページに移動します。
ゾーン永続ディスクのリストで、クローンを作成するディスクを探します。
[操作] のメニューボタンをクリックし、[ディスクのクローン作成] を選択します。
[ディスクのクローン作成] パネルで、新しいディスクの名前を指定します。
[ロケーション] で [リージョン] を選択し、新しいリージョン ディスクに 2 つのレプリカゾーンを選択します。
[プロパティ] で、新しいディスクのその他の詳細を確認します。
[保存] をクリックします。
gcloud
次の
gcloud compute disks createコマンドを使用して、ゾーンディスクからリージョン ディスクのクローンを作成し、新しいディスクにソースディスクと 2 つのレプリカゾーンを設定します。次の例では、ソースディスクとターゲット ディスクが同じプロジェクトにあることを前提としています。gcloud compute disks create TARGET_DISK_NAME \ --description="zonal to regional cloned disk" \ --region=REGION_1 \ --source-disk=SOURCE_DISK_NAME \ --source-disk-zone=REGION_1_ZONE_1 \ --replica-zones=REGION_1_ZONE_1,REGION_1_ZONE_2 \ --project=PROJECT_ID
次のように置き換えます。
TARGET_DISK_NAME: 新しいリージョン ディスクの名前REGION_1: 新しいリージョン ディスクのリージョンSOURCE_DISK_NAME: クローンを作成するゾーンディスクの名前REGION_1_ZONE_1: 新しいリージョン ディスクの 2 つのレプリカゾーンのいずれかREGION_1_ZONE_2: 新しいリージョン ディスクのもう一方のレプリカゾーンPROJECT_ID: プロジェクト ID
Terraform
ゾーンディスクからリージョン ディスクのクローンを作成するには、必要に応じてゾーンディスクのスナップショットを作成してから、そのスナップショットのクローンを作成します。これを行うには、次のリソースを使用します。
Terraform 構成を適用または削除する方法については、基本的な Terraform コマンドをご覧ください。
Go
Go
このサンプルを試す前に、Compute Engine クイックスタート: クライアント ライブラリの使用に記載されている Go の設定手順に沿って操作します。詳細については、Compute Engine Go API リファレンス ドキュメントをご覧ください。
Compute Engine に対して認証を行うには、アプリケーションのデフォルト認証情報を設定します。詳細については、ローカル開発環境の認証を設定するをご覧ください。
Java
Java
このサンプルを試す前に、Compute Engine クイックスタート: クライアント ライブラリの使用に記載されている Java の設定手順に沿って操作します。詳細については、Compute Engine Java API リファレンス ドキュメントをご覧ください。
Compute Engine に対して認証を行うには、アプリケーションのデフォルト認証情報を設定します。詳細については、ローカル開発環境の認証を設定するをご覧ください。
Python
Python
このサンプルを試す前に、Compute Engine クイックスタート: クライアント ライブラリの使用に記載されている Python の設定手順に沿って操作します。詳細については、Compute Engine Python API リファレンス ドキュメントをご覧ください。
Compute Engine に対して認証を行うには、アプリケーションのデフォルト認証情報を設定します。詳細については、ローカル開発環境の認証を設定するをご覧ください。
REST
新しいリージョン ディスクにソースディスクと 2 つのレプリカゾーンを指定します。次の例では、ソースディスクとターゲット ディスクが同じプロジェクトにあることを前提としています。
POST https://compute.googleapis.com/compute/v1/projects/PROJECT_ID/regions/REGION_1/disks

{
  "name": "TARGET_DISK_NAME"
  "sourceDisk": "projects/PROJECT_ID/zones/REGION_1_ZONE_1/disks/SOURCE_DISK_NAME"
  "replicaZone": "REGION_1_ZONE_1,REGION_1_ZONE_2"
}
次のように置き換えます。
PROJECT_ID: プロジェクト IDREGION_1: 新しいリージョン ディスクのリージョンTARGET_DISK_NAME: 新しいリージョン ディスクの名前REGION_1_ZONE_1: 新しいリージョン ディスクの 2 つのレプリカゾーンのいずれかSOURCE_DISK_NAME: クローンを作成するゾーンディスクの名前REGION_1_ZONE_2: 新しいリージョン ディスクのもう一方のレプリカゾーン
暗号化されたソースディスクのクローンを作成する
顧客指定の暗号鍵を使用してソースディスクを暗号化する場合は、同じ鍵を使用してクローンを暗号化する必要があります。
コンソール
Google Cloud コンソールで、[ディスク] ページに移動します。
ゾーン永続ディスクのリストで、クローンを作成するディスクを探します。
[操作] のメニューボタンをクリックし、[ディスクのクローン作成] を選択します。
[ディスクのクローン作成] パネルで、新しいディスクの名前を指定します。
[復号と暗号化] でソースディスクの暗号鍵を指定します。
[プロパティ] で、新しいディスクのその他の詳細を確認します。
[保存] をクリックします。
gcloud
ディスク クローンを作成するときに、
--csek-key-fileフラグを使用してソースディスクの暗号鍵を指定します。RSA でラップされた鍵を使用している場合は、gcloud betaコンポーネントを使用します。gcloud beta compute disks create projects/TARGET_PROJECT_ID/zones/ZONE/disks/TARGET_DISK_NAME \ --description="cloned disk" \ --source-disk=projects/SOURCE_PROJECT_ID/zones/ZONE/disks/SOURCE_DISK_NAME \ --csek-key-file example-key-file.json
次のように置き換えます。
Go
Go
このサンプルを試す前に、Compute Engine クイックスタート: クライアント ライブラリの使用に記載されている Go の設定手順に沿って操作します。詳細については、Compute Engine Go API リファレンス ドキュメントをご覧ください。
Compute Engine に対して認証を行うには、アプリケーションのデフォルト認証情報を設定します。詳細については、ローカル開発環境の認証を設定するをご覧ください。
Java
Java
このサンプルを試す前に、Compute Engine クイックスタート: クライアント ライブラリの使用に記載されている Java の設定手順に沿って操作します。詳細については、Compute Engine Java API リファレンス ドキュメントをご覧ください。
Compute Engine に対して認証を行うには、アプリケーションのデフォルト認証情報を設定します。詳細については、ローカル開発環境の認証を設定するをご覧ください。
Python
Python
このサンプルを試す前に、Compute Engine クイックスタート: クライアント ライブラリの使用に記載されている Python の設定手順に沿って操作します。詳細については、Compute Engine Python API リファレンス ドキュメントをご覧ください。
Compute Engine に対して認証を行うには、アプリケーションのデフォルト認証情報を設定します。詳細については、ローカル開発環境の認証を設定するをご覧ください。
REST
diskEncryptionKeyプロパティを使用してソースディスクの暗号鍵を指定します。POST https://compute.googleapis.com/compute/beta/projects/TARGET_PROJECT_ID/zones/ZONE/disks { "name": "TARGET_DISK_NAME" "sourceDisk": "projects/SOURCE_PROJECT_ID/zones/ZONE/disks/SOURCE_DISK_NAME" "diskEncryptionKey": { "rsaEncryptedKey": "ieCx/NcW06PcT7Ep1X6LUTc/hLvUDYyzSZPPVCVPTVEohpeHASqC8uw5TzyO9U+Fka9JFHz0mBibXUInrC/jEk014kCK/NPjYgEMOyssZ4ZINPKxlUh2zn1bV+MCaTICrdmuSBTWlUUiFoDD6PYznLwh8ZNdaheCeZ8ewEXgFQ8V+sDroLaN3Xs3MDTXQEMMoNUXMCZEIpg9Vtp9x2oeQ5lAbtt7bYAAHf5l+gJWw3sUfs0/Glw5fpdjT8Uggrr+RMZezGrltJEF293rvTIjWOEB3z5OHyHwQkvdrPDFcTqsLfh+8Hr8g+mf+7zVPEC8nEbqpdl3GPv3A7AwpFp7MA==" }, }次のように置き換えます。
顧客管理の暗号鍵を使用してソースディスクを暗号化する場合は、同じ鍵を使用してクローンを暗号化する必要があります。
コンソール
Compute Engine では、ソースディスク暗号鍵を使用してクローンが自動的に暗号化されます。
gcloud
ディスク クローンを作成するときに、
--kms-keyフラグを使用してソースディスクの鍵を指定します。RSA でラップされた鍵を使用している場合は、gcloud betaコンポーネントを使用します。gcloud beta compute disks create projects/TARGET_PROJECT_ID/zones/ZONE/disks/TARGET_DISK_NAME \ --description="cloned disk" \ --source-disk=projects/SOURCE_PROJECT_ID/zones/ZONE/disks/SOURCE_DISK_NAME \ --kms-key projects/KMS_PROJECT_ID/locations/REGION/keyRings/KEY_RING/cryptoKeys/KEY
次のように置き換えます。
Go
Go
このサンプルを試す前に、Compute Engine クイックスタート: クライアント ライブラリの使用に記載されている Go の設定手順に沿って操作します。詳細については、Compute Engine Go API リファレンス ドキュメントをご覧ください。
Compute Engine に対して認証を行うには、アプリケーションのデフォルト認証情報を設定します。詳細については、ローカル開発環境の認証を設定するをご覧ください。
Java
Java
このサンプルを試す前に、Compute Engine クイックスタート: クライアント ライブラリの使用に記載されている Java の設定手順に沿って操作します。詳細については、Compute Engine Java API リファレンス ドキュメントをご覧ください。
Compute Engine に対して認証を行うには、アプリケーションのデフォルト認証情報を設定します。詳細については、ローカル開発環境の認証を設定するをご覧ください。
Python
Python
このサンプルを試す前に、Compute Engine クイックスタート: クライアント ライブラリの使用に記載されている Python の設定手順に沿って操作します。詳細については、Compute Engine Python API リファレンス ドキュメントをご覧ください。
Compute Engine に対して認証を行うには、アプリケーションのデフォルト認証情報を設定します。詳細については、ローカル開発環境の認証を設定するをご覧ください。
REST
ディスク クローンを作成するときに、
kmsKeyNameプロパティを使用してソースディスクの鍵を指定します。POST https://compute.googleapis.com/compute/beta/projects/TARGET_PROJECT_ID/zones/ZONE/disks { "name": "TARGET_DISK_NAME" "sourceDisk": "projects/SOURCE_PROJECT_ID/zones/ZONE/disks/SOURCE_DISK_NAME" "diskEncryptionKey": { "kmsKeyName": "projects/KMS_PROJECT_ID/locations/REGION/keyRings/KEY_RING/cryptoKeys/KEY" }, }次のように置き換えます。
次のステップ
- 永続ディスクの操作について学習する。
- 予期しないデータ損失を防ぐため、スナップショットを使用してディスクを定期的にバックアップする方法を学習する。
- 2 つのゾーン間の同期レプリケーションにリージョン永続ディスクを使用する方法を学習する。
特に記載のない限り、このページのコンテンツはクリエイティブ・コモンズの表示 4.0 ライセンスにより使用許諾されます。コードサンプルは Apache 2.0 ライセンスにより使用許諾されます。詳しくは、Google Developers サイトのポリシーをご覧ください。Java は Oracle および関連会社の登録商標です。
最終更新日 2025-09-18 UTC。
-