Con la integración de Secret Manager de Cloud Code, puedes crear, ver, actualizar y usar secretos en tu IDE sin tenerlos en tu base de código.
En esta página se describe cómo acceder a Secret Manager desde tu IDE y cómo puedes empezar a crear y gestionar secretos.
Habilitar Secret Manager
Cuando gestionas secretos con Cloud Code, estos se almacenan de forma segura en Secret Manager y se pueden obtener mediante programación cuando los necesites. Solo necesitas que la API Secret Manager esté habilitada y tener los permisos adecuados para gestionar los secretos:
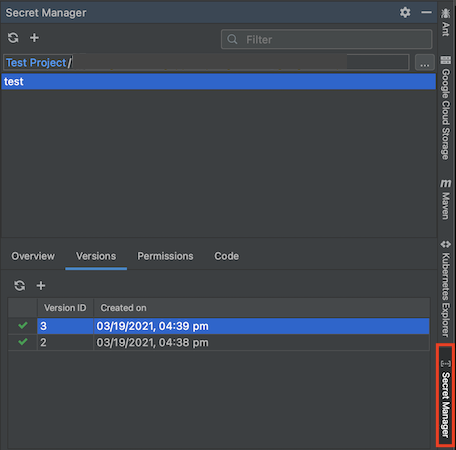
Para iniciar Secret Manager, haz clic en la pestaña Secret Manager de la barra lateral derecha de Cloud Code.
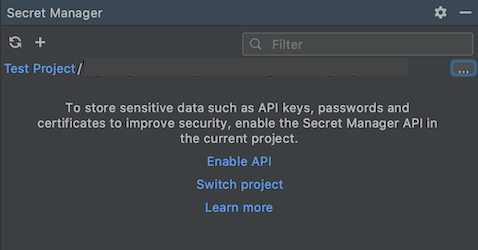
Si no has habilitado la API Secret Manager, Cloud Code te pedirá que la habilites en el panel Secret Manager haciendo clic en Habilitar API.
Tu secreto también debe estar en el mismo proyecto que el código de tu aplicación. Asegúrate de que has seleccionado el proyecto correcto o cambia de proyecto con el selector de proyectos del panel Secret Manager.
Crear y ver secretos
Crear secretos
Puedes crear un secreto con uno de los siguientes métodos:
Usar el panel de Secret Manager
Ve al panel Secret Manager.
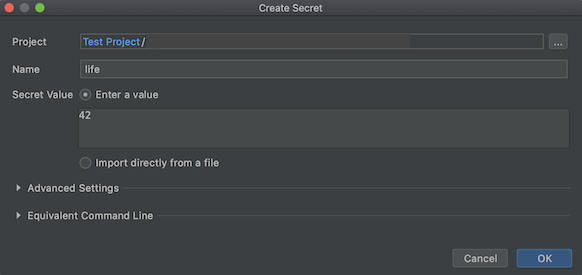
Haz clic en el icono Añadir.
Se abrirá el cuadro de diálogo Crear secreto, donde podrás definir el proyecto, el nombre y el valor del secreto, así como elegir una región para almacenarlo y etiquetas para organizarlos.
Usar el editor
- Abre un archivo que contenga el texto que quieras almacenar como secreto en el editor.
Selecciona este texto y haz clic con el botón derecho.
En el menú, selecciona la opción
Create Secret in Secret Manager.... Se abrirá el cuadro de diálogo Crear secreto con el valor del secreto rellenado con el texto destacado. Aquí puedes personalizar el proyecto, el nombre, el valor, la región y las etiquetas del secreto.
Usar el explorador de proyectos
- En el explorador de proyectos, sin resaltar ningún texto, haz clic con el botón derecho.
- En el menú, selecciona la opción
Create Secret in Secret Manager.... Se abrirá el cuadro de diálogo Crear secreto. Elige el proyecto, el nombre, el valor, la región y las etiquetas del secreto y, cuando termines, haz clic en Aceptar.
Crear versiones de secretos
Si tienes un secreto y quieres actualizarlo, puedes hacerlo en la pestaña Versiones del panel de Secret Manager:
En la pestaña Versiones, haz clic en el icono Añadir.
Se abrirá el cuadro de diálogo Añadir nueva versión, donde podrás definir el valor del secreto que ya tienes mediante el campo Valor del secreto o importando un archivo.
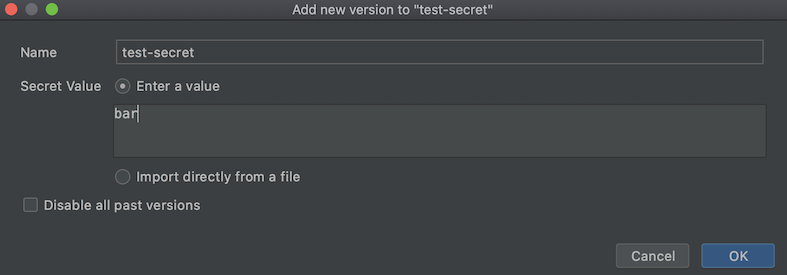
Si prefieres eliminar todas las versiones anteriores de tu secreto y conservar solo la nueva versión que se está creando, elige Inhabilitar todas las versiones anteriores.
Cuando hagas clic en Aceptar y se añada tu versión, podrás ver la versión más reciente de tu secreto y, si procede, todas las versiones de tu secreto en la pestaña Versiones.
Ver secretos
Para ver los secretos, en el panel Secret Manager, selecciona uno de la lista que se muestra en la sección Nombre del secreto. Sus detalles, como el nombre, la política de replicación, la marca de tiempo de creación y el ID de recurso, se muestran en la pestaña Resumen.
También puedes hacer clic con el botón derecho en el secreto y elegir Abrir en la consola de Cloud para ver y gestionar el secreto en tu navegador.
Ver versiones de secretos
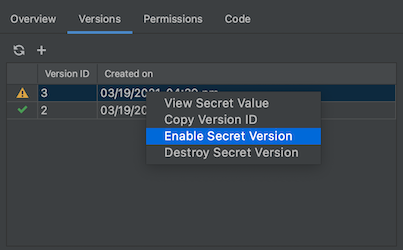
Para ver las versiones de un secreto, selecciona uno de la lista que se muestra en la sección Nombre del secreto y, a continuación, selecciona la pestaña Versiones.
Haz clic con el botón derecho en la versión del secreto en la que quieras realizar una acción y elige una de las opciones disponibles: ver el valor del secreto, copiar el ID de la versión, habilitar o inhabilitar la versión y eliminar la versión seleccionada.
Acceder a los secretos desde tu aplicación
Una vez que hayas creado tu secreto, podrás incluirlo en tu código y configurar la autenticación.
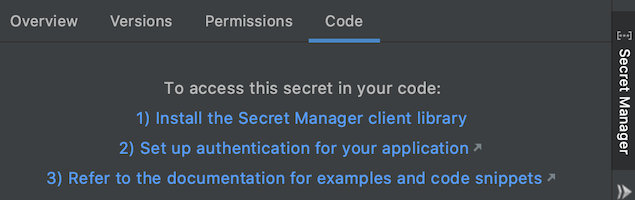
Para acceder al secreto que acabas de crear desde tu aplicación, sigue estos pasos:
Instala la biblioteca de cliente de Secret Manager.
Ve a Herramientas > Cloud Code > Añadir bibliotecas de Cloud y gestionar APIs de Cloud y selecciona Secret Manager > API Secret Manager en el árbol del explorador de APIs de Google Cloud. Sigue las instrucciones específicas del lenguaje que se indican en la sección Instalar la biblioteca de cliente.
Personaliza e incluye el fragmento de código pertinente en el código de tu aplicación.
Por último, para completar la configuración de la autenticación, debes seguir la guía de autenticación de bibliotecas cliente:
- Desarrollo local: si desarrollas en un clúster local (como minikube o Docker Desktop) o en un emulador local, debes completar los pasos que se indican en la sección Desarrollo local que corresponda a tu flujo de trabajo.
- Desarrollo remoto: si usas un clúster de GKE o un servicio de Cloud Run en tu aplicación, debes seguir los pasos que se indican en la sección Desarrollo remoto que corresponda a tu flujo de trabajo, incluidas las instrucciones específicas de Secret Manager para configurar los roles necesarios en tu cuenta de servicio.