Mit Sammlungen den Überblick behalten
Sie können Inhalte basierend auf Ihren Einstellungen speichern und kategorisieren.
In diesem Dokument wird beschrieben, wie Sie Ihr IntelliJ-basiertes App Engine-Projekt zu Cloud Code für IntelliJ migrieren.
Hinweise
Wenn Ihr Projekt auf Maven oder Gradle basiert und die älteren App Engine SDK-basierten Plug-ins verwendet (z.B. com.google.appengine.appengine-maven-plugin und com.google.appengine:gradle-appengine-plugin), müssen Sie zuerst zu den Maven- und Gradle-Plug-ins migrieren, denen die neue gcloud CLI zugrunde liegt.
Die Datanucleus-Erweiterung wird im neuen Plug-in nicht unterstützt. Wenn Sie dieses Feature benötigen, müssen Sie die DataNucleus-Erweiterung (JDO, JPA) manuell für Ihr Projekt konfigurieren, bevor Sie zu Cloud Code migrieren.
Verwenden Sie Objectify als ORM-Schicht, wenn Sie in Datastore lesen/schreiben.
Neues Plug-in installieren
Installieren Sie das Plug-in, falls noch nicht geschehen. Gehen Sie dafür so vor:
Achten Sie darauf, dass Sie im PATH Ihres Computers die unterstützte IDE-Version, JetBrains-IDE-Version 2022.3 oder höher (z. B. IntelliJ Ultimate/Community, PyCharm Professional/Community, WebStorm, GoLand) haben.
Öffnen Sie IntelliJ IDEA oder eine der unterstützten JetBrains-IDEs.
Öffnen Sie über Datei > Einstellungen > Plug-ins das Marketplace-Fenster des Plug-ins. Verwenden Sie unter Mac OS X IntelliJ IDEA > Einstellungen > Plug-ins.
Suchen Sie nach dem Plug-in "Cloud Code" und installieren Sie es.
Eventuell werden Sie aufgefordert, die IDE neu zu starten, um das Plug-in zu aktivieren.
IntelliJ und Projekt konfigurieren
Nachdem Sie das Plug-in installiert haben, konfigurieren Sie IntelliJ und Ihr Projekt wie folgt, damit das neue Plug-in verwendet wird:
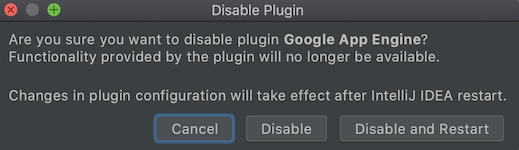
Wenn der Hinweis angezeigt wird, dass das neue Plug-in mit dem vorhandenen Plug-in für die App Engine-Integration in Konflikt steht, klicken Sie auf den Link in der Eingabeaufforderung.
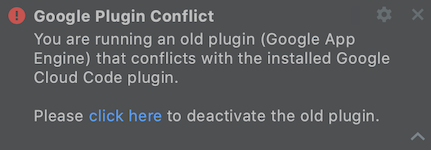
Wählen Sie in der folgenden Eingabeaufforderung "Disable Plugin" die Option "Disable and Restart" aus, um das App Engine-Plug-in zu deaktivieren und die IDE neu zu starten, damit die Plug-in-Konfigurationsänderungen wirksam werden.
Wenn Sie darauf hingewiesen werden, dass Ihr Projekt in einem alten Format vorliegt, klicken Sie auf Convert, um das Projekt in das neue Format zu konvertieren.
Löschen Sie die vorhandenen Server- und Cloudinstanzen von App Engine und erstellen Sie diese mithilfe der neuen gcloud CLI neu.
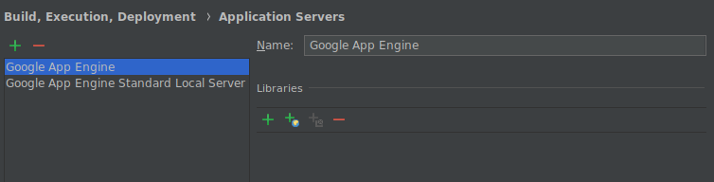
Gehen Sie zu Settings > Build, Execution, Deployment > Application Servers.
Wählen Sie Ihre App Engine-Entwicklungsinstanzen aus und klicken Sie auf Delete (-) (Löschen).
Klicken Sie auf Add (+) und wählen Sie Google App Engine Dev Server aus.
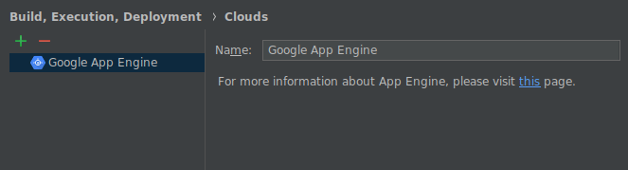
Gehen Sie zu Settings > Build, Execution, Deployment > Clouds.
Wählen Sie Ihre Google App Engine-Cloudinstanzen aus und klicken Sie auf Delete (-) (Löschen).
Klicken Sie auf Add (+), um ein App Engine-Cloud-Bereitstellungsziel zu konfigurieren.
Bei lokalen Serverausführungskonfigurationen für App Engine müssen Sie diese auf den neu konfigurierten Anwendungsserver aktualisieren.
Wechseln Sie zu Tools > Cloud Code > App Engine um die Liste der verfügbaren Aktionen zu sehen, die Ihnen zum Ausführen und Bereitstellen der Anwendung zur Verfügung stehen. Weitere Informationen finden Sie in der Dokumentation.
Prüfen Sie bei Maven- oder Gradle-basierten Projekten, ob Sie die neueste Version der Gradle- und Maven-Plug-ins von App Engine verwenden.
IntelliJ-spezifische Projekte konfigurieren
Die App Engine-Abhängigkeiten müssen nur bei IntelliJ-spezifischen Projekten aktualisiert werden. Dies gilt für Projekte, deren Projekteinstellungen mit dem alten App Engine-Facet manuell konfiguriert wurden und die nicht über Gradle oder Maven synchronisiert werden.
Ihre App Engine-Abhängigkeiten sind weiterhin als "External Libraries" (Externe Bibliotheken) konfiguriert und werden von der alten App Engine SDK-Installation bereitgestellt. Wenn Sie Ihre App Engine SDK-Installation löschen, kann die Anwendung nicht kompiliert werden.
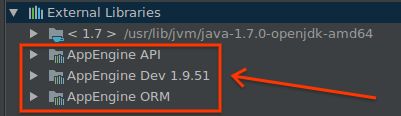
Zum Entfernen dieser Abhängigkeit vom alten App Engine SDK konfigurieren Sie Ihre App Engine API-Abhängigkeiten mit der Bibliotheksimportfunktion des App Engine-Attributs:
Nutzer der Datanucleus-JDO/JPA-Erweiterungsfunktion des alten Plug-ins müssen ihre Anwendungen zu Maven oder Gradle portieren, da die Datanucleus-Erweiterung nicht vom Plug-in "Cloud Tools for IntelliJ" unterstützt wird.
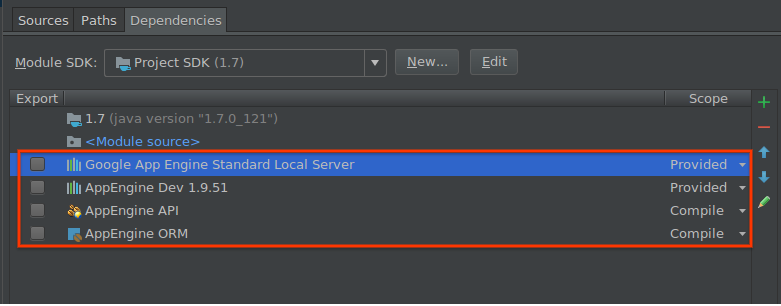
Wechseln Sie von der IntelliJ-Benutzeroberfläche der Projektstruktur zum Tab "Dependencies" (Abhängigkeiten) Ihres App Engine-Standardmoduls.
Entfernen Sie alle App Engine-bezogenen Bibliotheken.
Wechseln Sie in der gleichen Benutzeroberfläche der Projektstruktur zum Google App Engine-Attributs Ihres App Engine-Moduls.
Wählen Sie im Bereich für die Bibliotheken die verwendeten App Engine-Abhängigkeiten aus.
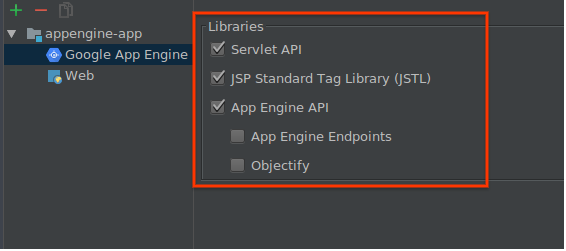
Damit werden diese Abhängigkeiten automatisch von Maven Central abgerufen und dem Classpath Ihres Moduls hinzugefügt.
Prüfen Sie anhand einer lokalen Ausführung und Bereitstellung, ob die neue Konfiguration funktioniert.
An diesem Punkt können Sie Ihr altes App Engine SDK bedenkenlos löschen.
Support anfordern
So senden Sie Feedback oder melden ein Problem in Ihrer IntelliJ-IDE: Tools > Cloud Code > Hilfe / Info > Feedback geben oder Problem melden, um ein Problem auf GitHub zu melden.
[[["Leicht verständlich","easyToUnderstand","thumb-up"],["Mein Problem wurde gelöst","solvedMyProblem","thumb-up"],["Sonstiges","otherUp","thumb-up"]],[["Schwer verständlich","hardToUnderstand","thumb-down"],["Informationen oder Beispielcode falsch","incorrectInformationOrSampleCode","thumb-down"],["Benötigte Informationen/Beispiele nicht gefunden","missingTheInformationSamplesINeed","thumb-down"],["Problem mit der Übersetzung","translationIssue","thumb-down"],["Sonstiges","otherDown","thumb-down"]],["Zuletzt aktualisiert: 2025-09-04 (UTC)."],[[["\u003cp\u003eThis guide explains the process of migrating App Engine projects from IntelliJ to Cloud Code for IntelliJ, focusing on necessary configurations and plugin installations.\u003c/p\u003e\n"],["\u003cp\u003eCloud Code supports Java 8 runtimes, but due to the impending deprecation of Java 8 support for App Engine, it is disabled by default and creating new App Engine projects is discouraged.\u003c/p\u003e\n"],["\u003cp\u003eBefore migrating, Maven or Gradle projects using older App Engine SDK plugins should switch to the new gcloud CLI-based plugins, as well as migrate from Datanucleus enhancement.\u003c/p\u003e\n"],["\u003cp\u003eUsers must install the Cloud Code plugin, disable the old App Engine plugin, convert their project format, delete old App Engine server and cloud instances, and ensure they use the latest version of Gradle and Maven App Engine plugins.\u003c/p\u003e\n"],["\u003cp\u003eIntelliJ-specific projects must remove old App Engine SDK dependencies and use the App Engine Facet library import feature to retrieve necessary dependencies from Maven Central, allowing for deletion of the old App Engine SDK.\u003c/p\u003e\n"]]],[],null,["# Migrate to Cloud Code for IntelliJ\n\nThis document describes how to migrate your IntelliJ-based App Engine project\nto Cloud Code for IntelliJ.\n| **Caution:** As of January 31, 2024, Java 8 support for App Engine has ended, and will be deprecated on January 31, 2026. As a result, Cloud Code disables App Engine by default. To enable App Engine in your IDE, navigate to **Settings** \\\u003e **Google\n| Cloud Code** \\\u003e **App Engine** . Due to the upcoming deprecation of App Engine, we don't recommend creating new App Engine projects. For more information about App Engine deprecations, see [Feature deprecations](/appengine/docs/standard/deprecations). For more information about the runtime support schedule for App Engine, see [Runtime support schedule](/appengine/docs/standard/lifecycle/support-schedule).\n\nBefore you begin\n----------------\n\n- If your project is Maven or Gradle based and uses the older\n App Engine SDK based plugins (e.g.\n `com.google.appengine.appengine-maven-plugin` and\n `com.google.appengine:gradle-appengine-plugin`), you should first migrate to\n the new gcloud CLI based\n [Maven](/appengine/docs/standard/java/tools/migrate-maven)\n and\n [Gradle](/appengine/docs/standard/java/tools/migrate-gradle)\n plugins.\n\n- The new plugin does not support Datanucleus enhancement. If you depend on\n this feature, you will have to manually configure Datanucleus\n ([JDO](/appengine/docs/standard/java/datastore/jdo/overview-dn2),\n [JPA](/appengine/docs/standard/java/datastore/jpa/overview-dn2))\n enhancement for your project to migrate to Cloud Code.\n You should use\n [Objectify](/appengine/docs/legacy/standard/java/datastore#using_objectify_with)\n as your ORM layer when reading/writing to Datastore.\n\nInstall the new plugin\n----------------------\n\nIf you haven't already, install the plugin by doing the following:\n\n- Ensure you have the supported IDE version, JetBrains IDE version 2022.3+ (such as IntelliJ Ultimate/Community, PyCharm Professional/Community, WebStorm, GoLand), on the `PATH` of your machine.\n- Open IntelliJ IDEA (or any supported JetBrains IDE).\n- Open the plugins marketplace window using **File** \\\u003e **Settings** \\\u003e **Plugins** . For Mac OS X, use **IntelliJ IDEA** \\\u003e **Preferences** \\\u003e **Plugins**.\n- Search for the 'Cloud Code' plugin and install it.\n\n You may be prompted to restart your IDE to activate the plugin.\n\nConfigure IntelliJ and your project\n-----------------------------------\n\nAfter installing the plugin, configure IntelliJ and your project to use the new\nplugin as follows:\n\n1. When notified that the new plugin conflicts with the existing\n App Engine integration, click the link in the prompt.\n\n2. In the following Disable Plugin prompt, select 'Disable and Restart' to\n disable the App Engine plugin and restart the IDE for the plugin\n configuration changes to take effect.\n\n3. When notified that your project is in an old format, click the option to\n **Convert** your project to the new format.\n\n4. You should delete your existing App Engine Server and Cloud\n instances and recreate them using the new gcloud CLI.\n\n 1. Navigate to **Settings** \\\u003e **Build, Execution, Deployment** \\\u003e\n **Application Servers**.\n\n 2. Select your **App Engine Dev** instances and click\n **Delete** (-).\n\n 3. Click **Add** (+) and select **Google App Engine Dev Server**.\n\n 4. Navigate to **Settings** \\\u003e **Build, Execution, Deployment** \\\u003e\n **Clouds**.\n\n 5. Select your **Google App Engine** cloud instances and click\n **Delete** (-).\n\n 6. Click **Add** (+) to configure an App Engine cloud deployment\n target.\n\n5. If you have any App Engine local server run configurations, then\n you must update them to use the newly configured Application Server.\n\n6. Navigate to **Tools** \\\u003e **Cloud Code** \\\u003e **App Engine** to see the list of actions\n available to you for running and deploying your application, or view\n [the documentation](/code/docs/intellij/how-to) for more information.\n\n7. For Maven or Gradle-based projects, ensure that you are using the latest\n version of the Gradle and Maven App Engine plugins.\n\nConfiguring IntelliJ-specific projects\n--------------------------------------\n\nFor IntelliJ-specific projects only (i.e., projects that have manually configured\nproject settings with the old App Engine facet and are not synced from\nGradle or Maven), update your App Engine dependencies.\n\nYour App Engine dependencies are still configured as\n'External Libraries' and provided by your old App Engine SDK\ninstallation. If you delete your App EngineSDK installation, your\napplication will not compile.\n\nTo remove this dependency on the old App Engine SDK, configure your\nApp Engine API dependencies using the App Engine Facet\nlibrary import feature as follows:\n\n1. Users of the old plugin's Datanucleus JDO/JPA enhancement feature need to\n port their applications to Maven or Gradle as Datanucleus enhancement is not\n supported by the Cloud Code plugin.\n\n2. From the IntelliJ Project Structure UI, navigate to your App Engine\n Standard module's dependencies tab.\n\n3. Remove all App Engine related libraries.\n\n4. In the same Project Structure UI, navigate to your App Engine\n module's **Google App Engine** facet.\n\n5. In the **Libraries** panel, select the App Engine dependencies you\n are using.\n\n This action will automatically retrieve these dependencies from Maven\n Central and add them to your module classpath.\n6. Run locally and deploy to verify your new configuration is working.\n\n7. At this point, you can safely delete your old App Engine SDK.\n\nGet support\n-----------\n\nTo submit feedback or report an issue in your IntelliJ IDE, go to **Tools** \\\u003e **Cloud Code** \\\u003e **Help / About** \\\u003e **Submit\nfeedback or report an issue** to report an issue on [GitHub](https://github.com/GoogleCloudPlatform/cloud-code-intellij/issues)."]]