本文档介绍如何从 IntelliJ IDEA 中将 App Engine 应用部署到 App Engine 柔性环境。
准备工作
按照创建应用指南安装和设置 Cloud Code,并创建适用于柔性环境的 App Engine 应用。请务必添加 App Engine 柔性框架支持。
如果您没有应用,但仍想尝试这些部署程序,请下载示例应用:
将 Spring Boot 示例应用克隆到本地计算机:
git clone https://github.com/spring-guides/gs-spring-boot在 IntelliJ 中,选择 File > Open 以打开文件选择器。
导航到
/gs-spring-boot/。选择
/complete/目录。点击确定。
创建部署配置
选择工具 > Cloud Code > App Engine > 部署至 App Engine。
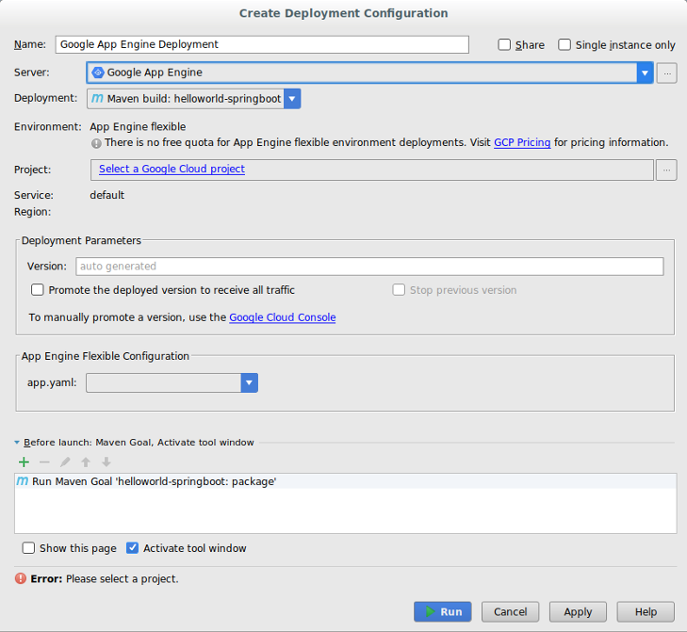
确认服务器配置:
点击服务器字段旁边的省略号 (...)。
在对话框中,验证名称字段是否显示 Google App Engine。
点击确定。
选择部署源。
Cloud Code for IntelliJ 支持从 Maven 工件、特定于 IntelliJ 的工件或文件系统 JAR 或 WAR 文件进行部署。
- 如果选择文件系统 JAR 或 WAR 文件作为部署源,请点击部署归档 (Deployment archive) 字段旁边的省略号 (...) 以转到部署归档。
在项目字段中选择一个项目。
首次配置部署时,系统将提示您登录与要部署的 Google Cloud 控制台项目关联的账号。
在 App Engine Flexible Configuration 部分中,选择有效的
app.yaml文件。- 如果在下拉菜单中没有看到有效的
app.yaml文件,请点击 Edit 以选择文件。如需了解详情,请参阅更新 App Engine 柔性配置部分。
- 如果在下拉菜单中没有看到有效的
根据需要填写其他字段以配置部署。
点击运行以构建和部署应用。
在“应用服务器”窗口中,点击项目名称以监控其部署进度。如果窗口未显示,请依次点击查看 > 工具窗口 > 应用服务器。
部署完成后,您可以在控制台输出中查看应用的网址。
部署到自定义运行时
您可以修改 app.yaml 文件,以使用 Docker 文件将应用部署到自定义运行时。
在
app.yaml文件中,将运行时设置为 custom。完成创建部署配置的步骤后,App Engine Flexible Configuration 部分将显示
app.yaml和 Docker 文件的路径。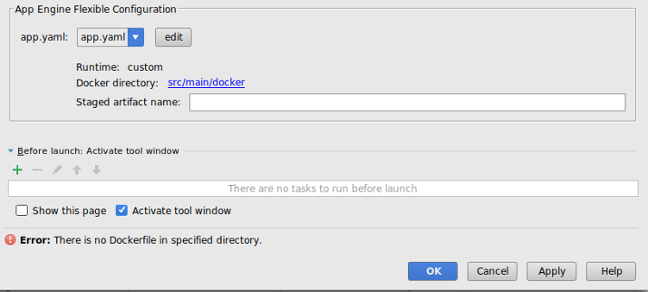
点击 Edit 以选择有效的
app.yaml和 Docker 文件。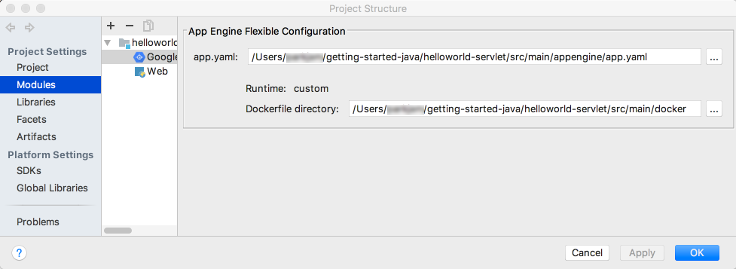
点击
app.yaml和 Dockerfile 目录字段旁边的省略号 (...) 以转到相应的文件。点击 OK。
更新 App Engine 柔性配置
创建初始部署配置后,您可以根据应用的需要更改这些配置。
选择文件 > 项目结构。
此时会显示项目结构对话框。
在项目设置下,选择构面 (Facets)。
选择 App Engine 柔性构面。
如需选择
app.yaml文件,请点击 app.yaml 字段旁边的省略号 (...) 以转到有效文件的位置。如果部署到自定义运行时,请点击 Dockerfile directory 字段旁边的省略号 (...) 以转到有效文件的位置。
点击 OK。
删除服务器
如果您想删除为项目配置的服务器,可以按以下步骤操作:
依次选择文件 > 设置 > 构建、执行、部署 > Clouds。
在 macOS 上,相应选项为 IntelliJ IDEA > 偏好设置 > 构建、执行、部署 > Clouds。
选择您的服务器 (App Engine),然后点击窗口顶部的减号 (-) 将其移除。
点击确定。
后续步骤
- 您可以将项目添加到 Cloud Source Repositories(如果尚未添加)。
获取支持
如需在 IntelliJ IDE 中提交反馈或报告问题,请依次前往工具 > Cloud Code > 帮助 / 简介 > 提交反馈或报告问题,在 GitHub 上报告问题。