Wählen Sie Tools > Cloud Code > App Engine > In App Engine bereitstellen aus.
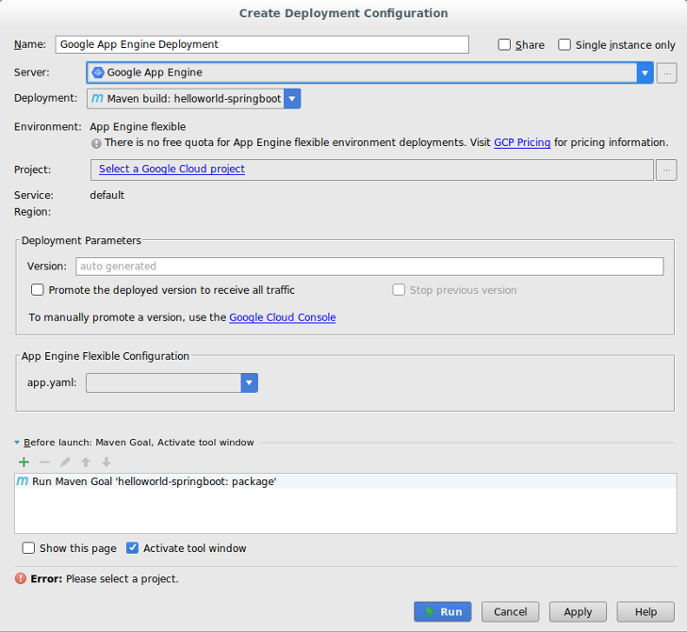
Bestätigen Sie die Serverkonfiguration:
Klicken Sie auf die drei Punkte (…) neben dem Feld Server.
Überprüfen Sie im Dialogfeld, ob im Feld Name der Name Google App Engine angezeigt wird.
Klicken Sie auf OK.
Wählen Sie die Bereitstellungsquelle aus.
Cloud Code für IntelliJ unterstützt die Bereitstellung aus einem Maven-Artefakt, einem IntelliJ-spezifischen Artefakt oder einer JAR- oder WAR-Datei des Dateisystems.
Wenn Sie eine JAR- oder WAR-Datei des Dateisystems als Bereitstellungsquelle auswählen, klicken Sie auf die drei Punkte (...) neben dem Feld Bereitstellungsarchiv, um zum Bereitstellungsarchiv zu gelangen.
Wählen Sie im Feld Projekt ein Projekt aus.
Wenn Sie die Bereitstellung zum ersten Mal konfigurieren, werden Sie aufgefordert, sich in dem Konto anzumelden, das mit dem bereitzustellenden Google Cloud -Konsolenprojekt verknüpft ist.
Wählen Sie im Abschnitt Flexible App Engine-Konfiguration eine gültige app.yaml-Datei aus.
Wenn im Drop-down-Menü keine gültige app.yaml-Datei angezeigt wird, klicken Sie auf Bearbeiten, um eine Datei auszuwählen. Weitere Informationen finden Sie im Abschnitt Flexible App Engine-Konfigurationen aktualisieren.
Füllen Sie gegebenenfalls andere Felder aus, um die Bereitstellung zu konfigurieren.
Klicken Sie auf Run (Ausführen), um Ihre Anwendung zu erstellen und bereitzustellen.
Klicken Sie im Anwendungsserver-Fenster auf den Namen Ihres Projekts, um den Bereitstellungsfortschritt zu überprüfen. Falls das Fenster nicht angezeigt wird, klicken Sie auf View > Tool Windows > Application Servers (Anzeigen > Toolfenster > Anwendungsserver).
Wenn die Bereitstellung abgeschlossen ist, können Sie die URL der Anwendung in der Konsolenausgabe sehen.
Für eine benutzerdefinierte Laufzeit bereitstellen
Sie können die Datei app.yaml ändern, um Ihre Anwendung mithilfe eines Dockerfiles in einer benutzerdefinierten Laufzeit bereitzustellen.
Legen Sie in der Datei app.yaml die Laufzeit auf custom fest.
Nachdem Sie die Konfiguration für die Bereitstellung abgeschlossen haben, wird im Abschnitt Flexible App Engine-Konfiguration der Pfad zu Ihrer app.yaml-Datei und zum Dockerfile angezeigt.
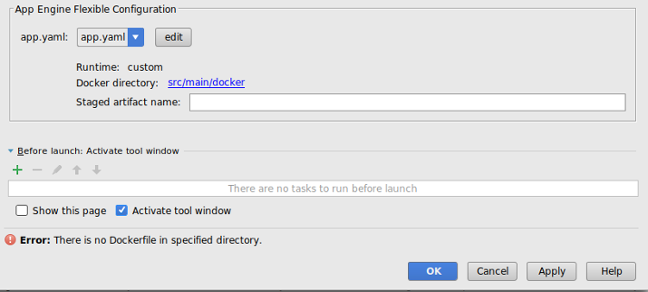
Klicken Sie auf Bearbeiten, um gültige app.yaml-Dateien und Dockerfiles auszuwählen.
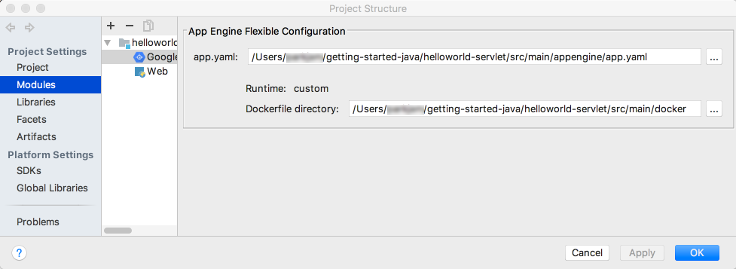
Klicken Sie auf die drei Punkte (...) neben den Feldern app.yaml und Dockerfile-Verzeichnis, um die Verzeichnisse der entsprechenden Dateien zu öffnen.
Klicken Sie auf OK.
Flexible App Engine-Konfigurationen aktualisieren
Nach dem Erstellen der anfänglichen Bereitstellungskonfiguration können Sie diese Konfigurationen nach Bedarf für Ihre Anwendung ändern.
Wählen Sie File > Project Structure (Datei > Projektstruktur).
Das Dialogfeld Project Structure (Projektstruktur) wird angezeigt.
Wählen Sie unter Projekteinstellungen die Option Attribute aus.
Wählen Sie die flexible App Engine-Facette aus.
Klicken Sie zum Auswählen einer app.yaml-Datei auf die drei Punkte (...) neben dem Feld app.yaml, um den Speicherort einer gültigen Datei aufzurufen.
Wenn Sie für eine benutzerdefinierte Laufzeit bereitstellen, klicken Sie auf die drei Punkte (...) neben dem Feld für das Dockerfile-Verzeichnis, um zum Speicherort einer gültigen Datei zu gelangen.
Klicken Sie auf OK.
Server löschen
Falls Sie den Server löschen möchten, den Sie für Ihr Projekt konfiguriert haben, müssen Sie folgendermaßen vorgehen:
So senden Sie Feedback oder melden ein Problem in Ihrer IntelliJ-IDE: Tools > Cloud Code > Hilfe / Info > Feedback geben oder Problem melden, um ein Problem auf GitHub zu melden.
[[["Leicht verständlich","easyToUnderstand","thumb-up"],["Mein Problem wurde gelöst","solvedMyProblem","thumb-up"],["Sonstiges","otherUp","thumb-up"]],[["Schwer verständlich","hardToUnderstand","thumb-down"],["Informationen oder Beispielcode falsch","incorrectInformationOrSampleCode","thumb-down"],["Benötigte Informationen/Beispiele nicht gefunden","missingTheInformationSamplesINeed","thumb-down"],["Problem mit der Übersetzung","translationIssue","thumb-down"],["Sonstiges","otherDown","thumb-down"]],["Zuletzt aktualisiert: 2025-09-04 (UTC)."],[[["\u003cp\u003eCloud Code in IntelliJ IDEA supports deploying Java applications to the App Engine flexible environment.\u003c/p\u003e\n"],["\u003cp\u003eApp Engine Java 8 support is ending soon, with deprecation scheduled for January 31, 2026, leading Cloud Code to disable App Engine by default.\u003c/p\u003e\n"],["\u003cp\u003eDeployment can be configured using a Maven artifact, IntelliJ-specific artifact, or a filesystem JAR/WAR file, with the process beginning with selection of your deployment source in the "Deploy to App Engine" configuration.\u003c/p\u003e\n"],["\u003cp\u003eYou can deploy to a custom runtime by modifying your \u003ccode\u003eapp.yaml\u003c/code\u003e file and referencing a Dockerfile in the App Engine flexible configuration section.\u003c/p\u003e\n"],["\u003cp\u003eThe server configuration for App Engine can be deleted from the "Clouds" settings within IntelliJ IDEA.\u003c/p\u003e\n"]]],[],null,["# Deploy to the App Engine Flexible Environment in Cloud Code for IntelliJ\n\n| **Caution:** As of January 31, 2024, Java 8 support for App Engine has ended, and will be deprecated on January 31, 2026. As a result, Cloud Code disables App Engine by default. To enable App Engine in your IDE, navigate to **Settings** \\\u003e **Google\n| Cloud Code** \\\u003e **App Engine** . Due to the upcoming deprecation of App Engine, we don't recommend creating new App Engine projects. For more information about App Engine deprecations, see [Feature deprecations](/appengine/docs/standard/deprecations). For more information about the runtime support schedule for App Engine, see [Runtime support schedule](/appengine/docs/standard/lifecycle/support-schedule).\n\nThis document describes how to deploy an App Engine application to the\n[App Engine flexible\nenvironment](/appengine/docs/flexible)\nfrom within IntelliJ IDEA.\n| **Note:** The following IDEs support this feature:\n|\n| - IntelliJ IDEA - Ultimate\n| - IntelliJ IDEA - Community\n| **Note:** Only Java applications are supported.\n\nBefore you begin\n----------------\n\n- Follow the [Create an App](/code/docs/intellij/create-flexible)\n guide to install and set up Cloud Code as well as\n create an App Engine app for the flexible\n environment. Be sure to add\n [App Engine flexible framework\n support](/code/docs/intellij/create-flexible#framework).\n\n If you don't have an application but still want to try these deployment\n procedures, download the sample app:\n 1. Clone the **Spring Boot** sample app to your local machine:\n\n git clone https://github.com/spring-guides/gs-spring-boot\n\n 2. In IntelliJ, choose **File** \\\u003e **Open** to open the file selector.\n\n 3. Navigate to `/gs-spring-boot/`.\n\n 4. Select the `/complete/` directory.\n\n 5. Click **OK**.\n\n 6. Add [App Engine flexible framework\n support](/code/docs/intellij/create-flexible#framework).\n\nCreating the deployment configuration\n-------------------------------------\n\n1. Choose **Tools** \\\u003e **Cloud Code** \\\u003e **App Engine** \\\u003e\n **Deploy to App Engine**.\n\n2. Confirm the server configuration:\n\n 1. Click the ellipsis (...) next to the **Server** field.\n\n 2. In the dialog, verify that the **Name** field displays\n **Google App Engine**.\n\n 3. Click **OK**.\n\n3. Select the **Deployment** source.\n\n Cloud Code for IntelliJ supports deploying from a Maven artifact, an\n IntelliJ-specific artifact, or a filesystem JAR or WAR file.\n 1. If you select a filesystem JAR or WAR file as your deployment source, click the ellipsis (...) next to the **Deployment archive** field to navigate to the deployment archive.\n4. Select a project in the **Project** field.\n\n The first time you configure the deployment, you will be prompted to sign in\n to the account associated with the Google Cloud console project that\n you want to deploy.\n5. In the **App Engine Flexible Configuration** section, select a\n valid `app.yaml` file.\n\n 1. If you don't see a valid `app.yaml` file in the drop-down menu, click **Edit** to select a file. See the [Update the App Engine\n flexible configurations](#config) section for more information.\n6. Fill in other fields as needed to configure the deployment.\n\n7. Click **Run** to build and deploy your app.\n\n8. In the Application Servers window, click the name of your project to monitor\n its deployment progress. If the window is not displaying, click\n **View** \\\u003e **Tool Windows** \\\u003e **Application Servers**.\n\n After deployment completes, you can view your app's URL in the console\n output.\n\nDeploying to a custom runtime\n-----------------------------\n\nYou can modify your `app.yaml` file to deploy your app to a custom runtime\nusing a Docker file.\n\n1. In your `app.yaml` file, set your runtime to **custom**.\n\n2. As you complete the [creating the deployment configuration](#deploy) steps,\n the **App Engine Flexible Configuration** section displays the path\n to your `app.yaml` and Docker file.\n\n3. Click **Edit** to select valid `app.yaml` and Docker files.\n\n4. Click the ellipsis (...) next to the `app.yaml` and the **Dockerfile\n Directory** fields to navigate to the appropriate files.\n\n5. Click **OK**.\n\nUpdate the App Engine flexible configurations\n---------------------------------------------\n\nAfter creating the initial deployment configuration, you can make changes to\nthose configurations as needed by your application.\n\n1. Select **File** \\\u003e **Project Structure**.\n\n The **Project Structure** dialog displays.\n2. Under **Project Settings** , select **Facets**.\n\n3. Select the App Engine flexible facet.\n\n4. To select an `app.yaml` file, click the ellipsis (...) next to the\n **app.yaml** field to navigate to the location of a valid file.\n\n5. If you deploy to a custom runtime, click the ellipsis (...) next to the\n **Dockerfile directory** field to navigate to the location of a valid file.\n\n6. Click **OK**.\n\nDeleting the server\n-------------------\n\nIf you ever want to delete the server you configured for your\nproject, you can do so as follows:\n\n1. Choose **File** \\\u003e **Settings** \\\u003e **Build, Execution, Deployment** \\\u003e\n **Clouds**.\n\n On macOS, this is **IntelliJ IDEA** \\\u003e **Preferences** \\\u003e\n **Build, Execution, Deployment** \\\u003e **Clouds**.\n2. Select your server (App Engine) and click the minus sign (-) at the\n top of the window to remove it.\n\n3. Click **OK**.\n\nWhat's next\n-----------\n\n- You can add your project to [Cloud Source Repositories](/code/docs/intellij/vcs) if you haven't done so already.\n\nGet support\n-----------\n\nTo submit feedback or report an issue in your IntelliJ IDE, go to\n**Tools** \\\u003e **Cloud Code** \\\u003e **Help / About** \\\u003e **Submit\nfeedback or report an issue** to report an issue on [GitHub](https://github.com/GoogleCloudPlatform/cloud-code-intellij/issues)."]]