Scegli Strumenti > Cloud Code > App Engine >
Esegui il deployment su App Engine.
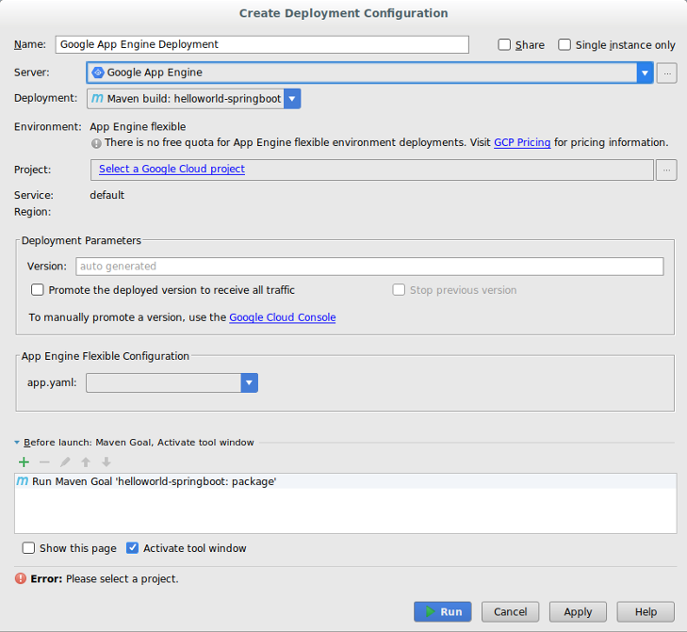
Conferma la configurazione del server:
Fai clic sui puntini di sospensione (…) accanto al campo Server.
Nella finestra di dialogo, verifica che nel campo Nome sia visualizzato
Google App Engine.
Fai clic su OK.
Seleziona l'origine Deployment.
Cloud Code for IntelliJ supporta il deployment da un artefatto Maven, un artefatto specifico di IntelliJ o un file JAR o WAR del file system.
Se selezioni un file JAR o WAR del file system come origine del deployment,
fai clic sui puntini di sospensione (...) accanto al campo Archivio di deployment per
andare all'archivio di deployment.
Seleziona un progetto nel campo Progetto.
La prima volta che configuri il deployment, ti verrà chiesto di accedere
all'account associato al progetto della console Google Cloud che
vuoi eseguire il deployment.
Nella sezione Configurazione flessibile di App Engine, seleziona un file app.yaml valido.
Compila gli altri campi in base alle necessità per configurare il deployment.
Fai clic su Esegui per creare ed eseguire il deployment della tua app.
Nella finestra Application Servers (Server delle applicazioni), fai clic sul nome del progetto per monitorare
l'avanzamento del deployment. Se la finestra non viene visualizzata, fai clic su
Visualizza > Finestre degli strumenti > Server delle applicazioni.
Al termine del deployment, puoi visualizzare l'URL della tua app nell'output della console.
Deployment in un runtime personalizzato
Puoi modificare il file app.yaml per eseguire il deployment dell'app in un runtime personalizzato
utilizzando un file Docker.
Nel file app.yaml, imposta il runtime su custom.
Man mano che completi i passaggi per creare la configurazione del deployment,
la sezione Configurazione flessibile di App Engine mostra il percorso
del file app.yaml e Docker.
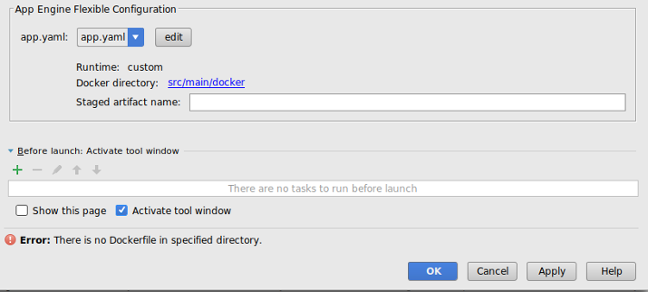
Fai clic su Modifica per selezionare i file app.yaml e Docker validi.
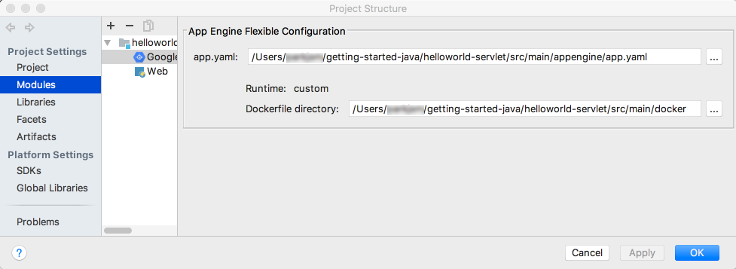
Fai clic sui tre puntini (...) accanto ai campi app.yaml e Directory Dockerfile per andare ai file appropriati.
Fai clic su OK.
Aggiorna le configurazioni dell'ambiente flessibile di App Engine
Dopo aver creato la configurazione di deployment iniziale, puoi apportare modifiche a queste configurazioni in base alle esigenze della tua applicazione.
Seleziona File > Struttura del progetto.
Viene visualizzata la finestra di dialogo Struttura del progetto.
In Impostazioni progetto, seleziona Filtri.
Seleziona il facet App Engine flessibile.
Per selezionare un file app.yaml, fai clic sui tre puntini (...) accanto al campo
app.yaml per andare alla posizione di un file valido.
Se esegui il deployment in un runtime personalizzato, fai clic sui tre puntini (...) accanto al campo
Directory Dockerfile per passare alla posizione di un file valido.
Fai clic su OK.
Eliminazione del server
Se vuoi eliminare il server che hai configurato per il tuo progetto, puoi farlo nel seguente modo:
Per inviare un feedback o segnalare un problema nel tuo IDE IntelliJ, vai a
Strumenti > Cloud Code > Guida / Informazioni > Invia
feedback o segnala un problema per segnalare un problema su GitHub.
[[["Facile da capire","easyToUnderstand","thumb-up"],["Il problema è stato risolto","solvedMyProblem","thumb-up"],["Altra","otherUp","thumb-up"]],[["Difficile da capire","hardToUnderstand","thumb-down"],["Informazioni o codice di esempio errati","incorrectInformationOrSampleCode","thumb-down"],["Mancano le informazioni o gli esempi di cui ho bisogno","missingTheInformationSamplesINeed","thumb-down"],["Problema di traduzione","translationIssue","thumb-down"],["Altra","otherDown","thumb-down"]],["Ultimo aggiornamento 2025-09-04 UTC."],[[["\u003cp\u003eCloud Code in IntelliJ IDEA supports deploying Java applications to the App Engine flexible environment.\u003c/p\u003e\n"],["\u003cp\u003eApp Engine Java 8 support is ending soon, with deprecation scheduled for January 31, 2026, leading Cloud Code to disable App Engine by default.\u003c/p\u003e\n"],["\u003cp\u003eDeployment can be configured using a Maven artifact, IntelliJ-specific artifact, or a filesystem JAR/WAR file, with the process beginning with selection of your deployment source in the "Deploy to App Engine" configuration.\u003c/p\u003e\n"],["\u003cp\u003eYou can deploy to a custom runtime by modifying your \u003ccode\u003eapp.yaml\u003c/code\u003e file and referencing a Dockerfile in the App Engine flexible configuration section.\u003c/p\u003e\n"],["\u003cp\u003eThe server configuration for App Engine can be deleted from the "Clouds" settings within IntelliJ IDEA.\u003c/p\u003e\n"]]],[],null,["# Deploy to the App Engine Flexible Environment in Cloud Code for IntelliJ\n\n| **Caution:** As of January 31, 2024, Java 8 support for App Engine has ended, and will be deprecated on January 31, 2026. As a result, Cloud Code disables App Engine by default. To enable App Engine in your IDE, navigate to **Settings** \\\u003e **Google\n| Cloud Code** \\\u003e **App Engine** . Due to the upcoming deprecation of App Engine, we don't recommend creating new App Engine projects. For more information about App Engine deprecations, see [Feature deprecations](/appengine/docs/standard/deprecations). For more information about the runtime support schedule for App Engine, see [Runtime support schedule](/appengine/docs/standard/lifecycle/support-schedule).\n\nThis document describes how to deploy an App Engine application to the\n[App Engine flexible\nenvironment](/appengine/docs/flexible)\nfrom within IntelliJ IDEA.\n| **Note:** The following IDEs support this feature:\n|\n| - IntelliJ IDEA - Ultimate\n| - IntelliJ IDEA - Community\n| **Note:** Only Java applications are supported.\n\nBefore you begin\n----------------\n\n- Follow the [Create an App](/code/docs/intellij/create-flexible)\n guide to install and set up Cloud Code as well as\n create an App Engine app for the flexible\n environment. Be sure to add\n [App Engine flexible framework\n support](/code/docs/intellij/create-flexible#framework).\n\n If you don't have an application but still want to try these deployment\n procedures, download the sample app:\n 1. Clone the **Spring Boot** sample app to your local machine:\n\n git clone https://github.com/spring-guides/gs-spring-boot\n\n 2. In IntelliJ, choose **File** \\\u003e **Open** to open the file selector.\n\n 3. Navigate to `/gs-spring-boot/`.\n\n 4. Select the `/complete/` directory.\n\n 5. Click **OK**.\n\n 6. Add [App Engine flexible framework\n support](/code/docs/intellij/create-flexible#framework).\n\nCreating the deployment configuration\n-------------------------------------\n\n1. Choose **Tools** \\\u003e **Cloud Code** \\\u003e **App Engine** \\\u003e\n **Deploy to App Engine**.\n\n2. Confirm the server configuration:\n\n 1. Click the ellipsis (...) next to the **Server** field.\n\n 2. In the dialog, verify that the **Name** field displays\n **Google App Engine**.\n\n 3. Click **OK**.\n\n3. Select the **Deployment** source.\n\n Cloud Code for IntelliJ supports deploying from a Maven artifact, an\n IntelliJ-specific artifact, or a filesystem JAR or WAR file.\n 1. If you select a filesystem JAR or WAR file as your deployment source, click the ellipsis (...) next to the **Deployment archive** field to navigate to the deployment archive.\n4. Select a project in the **Project** field.\n\n The first time you configure the deployment, you will be prompted to sign in\n to the account associated with the Google Cloud console project that\n you want to deploy.\n5. In the **App Engine Flexible Configuration** section, select a\n valid `app.yaml` file.\n\n 1. If you don't see a valid `app.yaml` file in the drop-down menu, click **Edit** to select a file. See the [Update the App Engine\n flexible configurations](#config) section for more information.\n6. Fill in other fields as needed to configure the deployment.\n\n7. Click **Run** to build and deploy your app.\n\n8. In the Application Servers window, click the name of your project to monitor\n its deployment progress. If the window is not displaying, click\n **View** \\\u003e **Tool Windows** \\\u003e **Application Servers**.\n\n After deployment completes, you can view your app's URL in the console\n output.\n\nDeploying to a custom runtime\n-----------------------------\n\nYou can modify your `app.yaml` file to deploy your app to a custom runtime\nusing a Docker file.\n\n1. In your `app.yaml` file, set your runtime to **custom**.\n\n2. As you complete the [creating the deployment configuration](#deploy) steps,\n the **App Engine Flexible Configuration** section displays the path\n to your `app.yaml` and Docker file.\n\n3. Click **Edit** to select valid `app.yaml` and Docker files.\n\n4. Click the ellipsis (...) next to the `app.yaml` and the **Dockerfile\n Directory** fields to navigate to the appropriate files.\n\n5. Click **OK**.\n\nUpdate the App Engine flexible configurations\n---------------------------------------------\n\nAfter creating the initial deployment configuration, you can make changes to\nthose configurations as needed by your application.\n\n1. Select **File** \\\u003e **Project Structure**.\n\n The **Project Structure** dialog displays.\n2. Under **Project Settings** , select **Facets**.\n\n3. Select the App Engine flexible facet.\n\n4. To select an `app.yaml` file, click the ellipsis (...) next to the\n **app.yaml** field to navigate to the location of a valid file.\n\n5. If you deploy to a custom runtime, click the ellipsis (...) next to the\n **Dockerfile directory** field to navigate to the location of a valid file.\n\n6. Click **OK**.\n\nDeleting the server\n-------------------\n\nIf you ever want to delete the server you configured for your\nproject, you can do so as follows:\n\n1. Choose **File** \\\u003e **Settings** \\\u003e **Build, Execution, Deployment** \\\u003e\n **Clouds**.\n\n On macOS, this is **IntelliJ IDEA** \\\u003e **Preferences** \\\u003e\n **Build, Execution, Deployment** \\\u003e **Clouds**.\n2. Select your server (App Engine) and click the minus sign (-) at the\n top of the window to remove it.\n\n3. Click **OK**.\n\nWhat's next\n-----------\n\n- You can add your project to [Cloud Source Repositories](/code/docs/intellij/vcs) if you haven't done so already.\n\nGet support\n-----------\n\nTo submit feedback or report an issue in your IntelliJ IDE, go to\n**Tools** \\\u003e **Cloud Code** \\\u003e **Help / About** \\\u003e **Submit\nfeedback or report an issue** to report an issue on [GitHub](https://github.com/GoogleCloudPlatform/cloud-code-intellij/issues)."]]