Verbindung zu einer Cloud SQL-Datenbank herstellen
Mit Sammlungen den Überblick behalten
Sie können Inhalte basierend auf Ihren Einstellungen speichern und kategorisieren.
Cloud Code unterstützt die Ausführung des Cloud SQL Auth-Proxy, um eine Verbindung zu einer Cloud SQL-Datenbank herzustellen, Cloud SQL-Instanzen aufzurufen und neue Datenquellen zu erstellen.
Hinweise
Installieren Sie Cloud Code, falls noch nicht geschehen.
Zum Erstellen einer neuen Datenquelle können Sie eine der folgenden Premium-IDEs von JetBrains verwenden:
DataGrip, die eigenständige Datenbankverwaltungsumgebung.
Sie können auch andere bevorzugte Datenbanktools wie DBeaver, MySQL Workbench und SQL Server Management Studio verwenden, um über den von Cloud Code bereitgestellten lokalen Port eine Verbindung zu den Cloud SQL-Instanzen herzustellen.
Verbindung zur Cloud SQL-Datenbank über den Cloud SQL Auth-Proxy herstellen
Mit Cloud Code können Sie in IntelliJ oder anderen unterstützten JetBrains-IDEs eine Verbindung zu einer Cloud SQL-Datenbank herstellen und eine Liste der Cloud SQL-Instanzen aufrufen.
So stellen Sie mit Cloud Code eine Verbindung zu einer Cloud SQL-Datenbank her:
Klicken Sie in Ihrer IDE in der Seitenleiste auf Google Cloud Databases oder auf View > Tool Windows > Google Cloud Databases.
Wenn noch kein Google Cloud Projekt ausgewählt ist, klicken Sie auf Google Cloud-Projekt auswählen und folgen Sie der Anleitung, um Ihr Google CloudProjekt zu laden.
Cloud SQL-Instanzen in Ihrem Google Cloud Projekt werden unter Cloud SQL angezeigt.
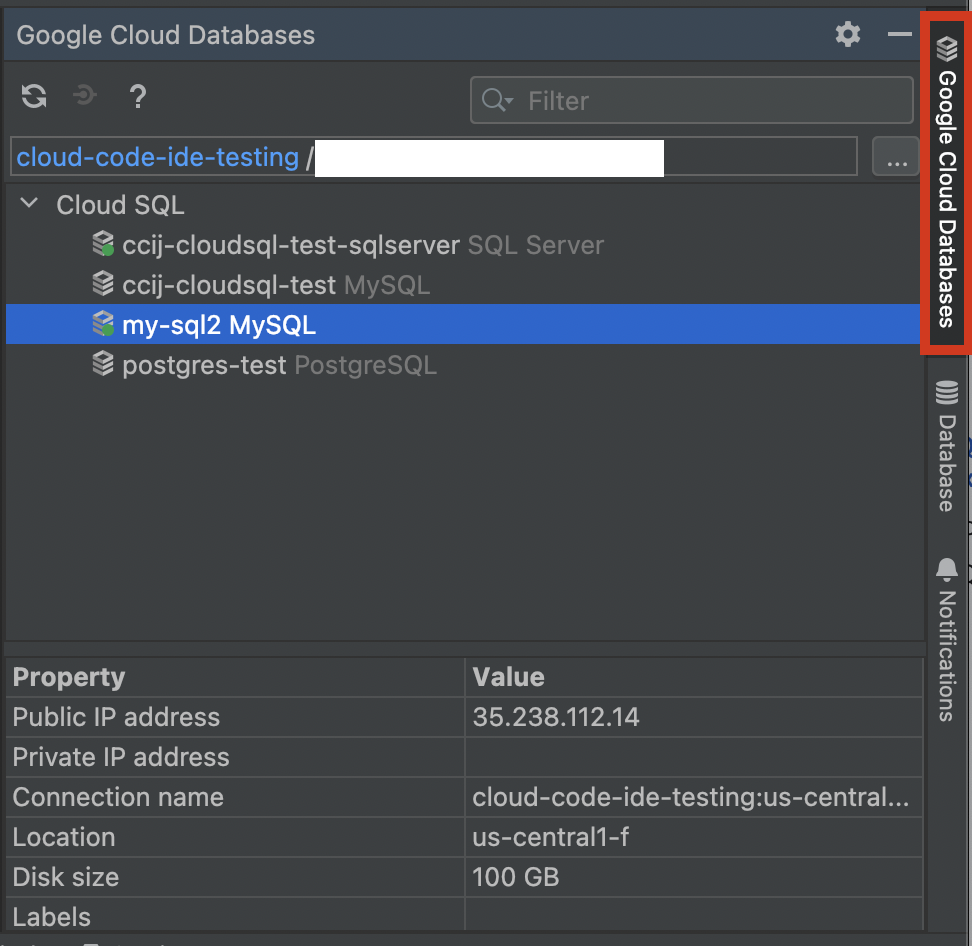
Wenn Sie eine Verbindung zu einer Cloud SQL-Instanz herstellen möchten, klicken Sie mit der rechten Maustaste auf eine Instanz und wählen Sie Über Cloud SQL Proxy verbinden aus. Sie können auch eine private IP-Adresse verwenden, indem Sie Über Cloud SQL Proxy verbinden (private IP) auswählen.
Nachdem eine Cloud SQL Auth-Proxy-Verbindung hergestellt wurde, wird das Dialogfeld Cloud SQL-Instanz verbunden angezeigt. Dort haben Sie die Möglichkeit, eine neue Datenquelle für die lokal verfügbare Datenbank zu erstellen oder vorhandene Datenquellen aufzurufen.
Wenn Sie eine neue Datenquelle erstellen möchten, wählen Sie Neue Datenquelle erstellen aus.
Alternativ können Sie mit der rechten Maustaste auf eine Instanz klicken und Neue Datenquelle erstellen auswählen.
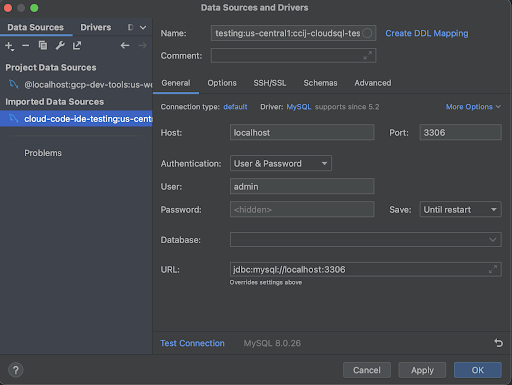
Wählen Sie im Feld Authentifizierung eine Methode aus (standardmäßig sind das Nutzername und Passwort).
Speichern Sie die Konfiguration.
Cloud Code erstellt eine neue Datenquellenverbindung mit einem Namen im folgenden Format:
gcp-project:location:db-instance-name.
Sie können über die Funktionen des JetBrains-Plug-ins „Database Tools and SQL“ oder DataGrip mit der Datenbankinstanz arbeiten.
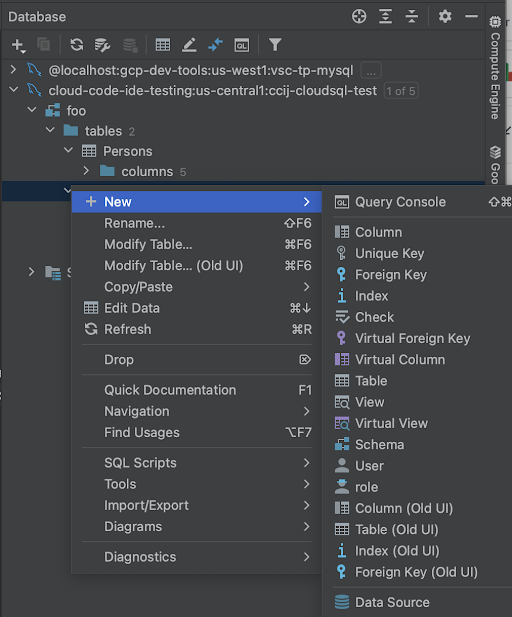
Optional: Wenn Sie die Liste der Datenquellen in Ihrer IDE aufrufen möchten, klicken Sie in der Seitenleiste auf Database (Datenbank) oder auf View > Tool Windows > Database (Anzeigen > Toolfenster > Datenbank). Wenn Sie mit der rechten Maustaste auf eine Datenquelle klicken, wird eine Liste mit Optionen angezeigt, z. B. zum Anzeigen von Schemas, Tabellen und anderen Datenbankvorgängen.
Weitere Informationen zur Arbeit mit Datenbanken in DataGrip finden Sie unter DataGrip-Kurzanleitung.
Verbindung zum Cloud SQL Auth-Proxy trennen
Wenn Sie den Proxyprozess beenden und den lokalen Datenbankport freigeben möchten, drücken Sie im Terminal Ctrl+C.
Bekannte Probleme
In diesem Abschnitt werden bekannte Probleme und ihre aktuellen Lösungen aufgeführt.
Anderen Port für die Verbindung zu mehreren Datenbanken festlegen
Der Cloud SQL Auth-Proxy wählt keine Ports automatisch aus, wenn sie belegt sind, und ist immer von einem Port abhängig. Dadurch ist nur eine verbundene Instanz eines bestimmten Datenbanktyps möglich.
Cloud Code führt den Cloud SQL Auth-Proxy im Terminal aus. Wenn ein Portkonflikt auftritt, können Sie einen anderen Port für die Verbindung zu einer Datenbank festlegen, indem Sie denselben Befehl im Terminal mit einem benutzerdefinierten --port-Flag ausführen. Beispiel:
--port=PORT_NUMBER
Sie können diesen Port dann in Ihrer Datenbankverbindung verwenden. Der Befehl wird automatisch generiert. Beispiel:
So senden Sie Feedback oder melden ein Problem in Ihrer IntelliJ-IDE: Tools > Cloud Code > Hilfe / Info > Feedback geben oder Problem melden, um ein Problem auf GitHub zu melden.
[[["Leicht verständlich","easyToUnderstand","thumb-up"],["Mein Problem wurde gelöst","solvedMyProblem","thumb-up"],["Sonstiges","otherUp","thumb-up"]],[["Schwer verständlich","hardToUnderstand","thumb-down"],["Informationen oder Beispielcode falsch","incorrectInformationOrSampleCode","thumb-down"],["Benötigte Informationen/Beispiele nicht gefunden","missingTheInformationSamplesINeed","thumb-down"],["Problem mit der Übersetzung","translationIssue","thumb-down"],["Sonstiges","otherDown","thumb-down"]],["Zuletzt aktualisiert: 2025-09-04 (UTC)."],[[["\u003cp\u003eCloud Code allows you to connect to a Cloud SQL database using the Cloud SQL Auth proxy, view Cloud SQL instances, and create new data sources within supported JetBrains IDEs.\u003c/p\u003e\n"],["\u003cp\u003eConnecting to a Cloud SQL database through Cloud Code involves selecting a Google Cloud project, choosing the desired instance, and initiating the connection via the Cloud SQL Proxy, with an option for private IP connections.\u003c/p\u003e\n"],["\u003cp\u003eCreating a new data source is possible after establishing a Cloud SQL Auth proxy connection, which can be done either through the Cloud SQL Instance Connected dialog or by right-clicking an instance, and it is dependent on using IntelliJ Ultimate or other premium JetBrains IDE editions with the database plugin enabled.\u003c/p\u003e\n"],["\u003cp\u003eTo disconnect from the Cloud SQL Auth proxy, you can simply stop the proxy process by pressing \u003ccode\u003eCtrl+C\u003c/code\u003e in the terminal.\u003c/p\u003e\n"],["\u003cp\u003eCloud Code runs the Cloud SQL Auth Proxy using a fixed port, however, if there is a conflict, a different port can be configured using the \u003ccode\u003e--port\u003c/code\u003e flag in the terminal.\u003c/p\u003e\n"]]],[],null,["# Connect to a Cloud SQL database\n\nCloud Code supports running [Cloud SQL Auth proxy](/sql/docs/mysql/sql-proxy)\nto connect to a [Cloud SQL](/sql/docs/introduction) database, viewing Cloud SQL\ninstances, and creating new data sources.\n\nBefore you begin\n----------------\n\n- Install [Cloud Code](/code/docs/intellij/install) if you haven't\n already.\n\n- To create a new data source, you can use one of the following premium\n JetBrains IDEs:\n\n - [IntelliJ Ultimate](https://www.jetbrains.com/idea/download) or another\n premium JetBrains IDE which contains the\n [Database Tools and SQL](https://www.jetbrains.com/help/idea/relational-databases.html)\n plugin (enabled by default).\n\n - [DataGrip](https://www.jetbrains.com/datagrip/), the standalone database\n management environment.\n\n- You can also use other preferred database tools (such as\n [DBeaver](https://dbeaver.com/download/),\n [MySQL Workbench](https://www.mysql.com/products/workbench/), and\n [SQL Server Management Studio](https://learn.microsoft.com/en-us/sql/ssms/download-sql-server-management-studio-ssms))\n to connect to the Cloud SQL instances using the local port provided by\n Cloud Code.\n\nConnect to Cloud SQL database using Cloud SQL Auth proxy\n--------------------------------------------------------\n\nYou can connect to a Cloud SQL database and view a list of Cloud SQL instances\nin IntelliJ or other [supported JetBrains IDEs](/code/docs/intellij/ides) with\nCloud Code.\n| **Note:** When performing these actions for the first time, Cloud Code installs Cloud SQL dependencies which include Cloud SQL Auth proxy.\n\nTo connect to a Cloud SQL database with Cloud Code, perform the\nfollowing:\n\n1. In your IDE, click **Google Cloud Databases** in the sidebar or click\n **View** \\\u003e **Tool Windows** \\\u003e **Google Cloud Databases**.\n\n2. If a Google Cloud project isn't already selected, click **Select a\n Google Cloud project** and follow the prompts to load your Google Cloud\n project.\n\n Cloud SQL instances in your Google Cloud project appear under **Cloud\n SQL**.\n\n3. To connect to a Cloud SQL instance, right-click an instance and select\n **Connect using Cloud SQL Proxy** . You can also choose to use a private IP by\n selecting **Connect using Cloud SQL Proxy (Private IP)**.\n\nTo learn more about connecting to SQL instances, see\n[About connection options](/sql/docs/mysql/connect-overview).\n\nCreate a new data source\n------------------------\n\n| **Note:** Creating a new data source requires IntelliJ Ultimate or other premium JetBrains IDEs editions with the Database Tools and SQL plugin enabled, the DataGrip IDE, or other preferred database tools like [DBeaver](https://dbeaver.com/download/), [MySQL Workbench](https://www.mysql.com/products/workbench/), and [SQL Server Management Studio](https://learn.microsoft.com/en-us/sql/ssms/download-sql-server-management-studio-ssms)).\n\nAfter a Cloud SQL Auth proxy connection is established, the **Cloud SQL Instance\nConnected** dialog appears, giving you the option to create a new data source\nfor the locally available database or view existing data sources.\n\n1. To create a new data source, select **Create new data source**.\n\n Alternatively, you can right-click an instance and select **Create New Data\n Source**.\n\n2. In the **Authentication** field, select a method (by default, this is a\n username and password).\n\n3. Save the configuration.\n\n Cloud Code creates a new data source connection with a name in\n the following format:\n\n `gcp-project:location:db-instance-name`.\n\n You can begin working with the database instance via JetBrains' Database\n Tools and SQL plugin capabilities, or DataGrip.\n4. (Optional) To view the list of data sources in your IDE, click **Database**\n in the Sidebar or **View** \\\u003e **Tool Windows** \\\u003e **Database**. Right-clicking a\n data source provides you with a list of options, such as viewing schemas,\n tables, and other database operations.\n\n To learn more about working with databases in DataGrip, see [Quick start with\n DataGrip](https://www.jetbrains.com/help/datagrip/quick-start-with-datagrip.html).\n\nDisconnect Cloud SQL Auth proxy\n-------------------------------\n\nTo stop the proxy process and free up the local database port, in the terminal,\npress `Ctrl+C`.\n\nKnown issues\n------------\n\nThis section lists any known issues and their current resolutions.\n\n### Set a different port to connect to several databases\n\nThe Cloud SQL Auth proxy doesn't auto-select ports if busy and always depends on\none, which limits you to a single connected instance of a certain type of\ndatabase.\n\nCloud Code runs Cloud SQL Auth proxy in the terminal, and if it\nruns into a port conflict, you can set a different port to connect to a database\nby running the same command in the terminal with a custom `--port` flag. For\nexample:\n\n`--port=`\u003cvar translate=\"no\"\u003ePORT_NUMBER\u003c/var\u003e\n\nYou can then use this port in your database connection. The command will be\nauto-generated. For example:\n\n`path_to_proxy/cloud-sql-proxy `\u003cvar translate=\"no\"\u003eINSTANCE_CONNECTION_STRING\u003c/var\u003e\n\nGet support\n-----------\n\nTo submit feedback or report an issue in your IntelliJ IDE, go to **Tools** \\\u003e **Cloud Code** \\\u003e **Help / About** \\\u003e **Submit\nfeedback or report an issue** to report an issue on [GitHub](https://github.com/GoogleCloudPlatform/cloud-code-intellij/issues)."]]