Uploading images directly to Cloud Storage using Signed URL

Kunpei Sakai
Cloud DevOps and Infrastructure Engineer
Subhasish Chakraborty
Product Manager, Cloud Storage
As cloud grows in popularity, it has become common to deploy applications in the cloud and provide them to end users. At the same time, the trend of using serverless architecture means that an unspecified number of end users can seamlessly access resources in the cloud. If you’re offering services to users and serving them content, you’ll want to use a cloud architecture that can solve traditional problems intelligently, and reduce the cost of developing and hosting servers by taking advantage of the cloud.
In this blog post, you’ll see how to implement a service hosted on Google Cloud Platform (GCP) that allows users to upload images into Cloud Storage using Signed URL, then serve that static content using managed services. This is particularly helpful if you’re running a social media company with constant image uploads, or hosting and managing consumer-generated media.
Without using the cloud, it can be difficult to develop and manage a server that lets users upload image files, especially at high scale. You have to queue requests to the process responsible for uploading the files to control the flow rate, and you have to prevent the system from going down due to request overload. You also need to set appropriate resource limits for finite resources (such as RAM) of each server that’s involved.
Furthermore, to allow uploading very large files to the server, it can be very costly to develop and host the server. And if the upload server is to be used by millions of users, it will require a lot of work to ensure its scalability and user experience.
Let’s get started building an image upload feature to use with Cloud Storage. You can access the full set of source files that we’ve used on Github, here.
Getting started building an image upload feature
Before diving into the GCP components needed to implement this service, let’s define our requirements:
- Use managed services as much as possible
- Enable only authenticated users to upload files
- Validate/filter the content uploaded by users
In order to satisfy the above requirements, we devised the following architecture with GCP services:
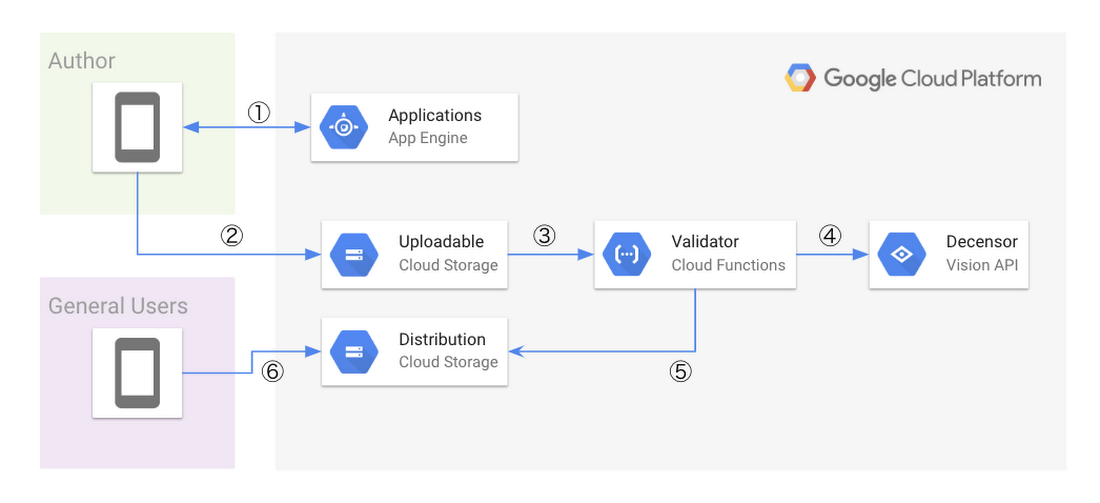
The key characteristic of this architecture is that it uses a serverless platform from file upload to delivery. This is the general workflow you’ll be setting up. Let’s detail each step shown in the diagram.
1. Once App Engine receives a request from the user, App Engine generates a Signed URL that allows PUT requests to be executed only for a specific Cloud Storage bucket and object for authenticated users, using application domain logic.
2. Next, the user can upload a file for a specific bucket and object accordingly.
3. Once the user uploads the file to Cloud Storage, it triggers Cloud Functions as finalize event. Then Cloud Functions validates the uploaded file.
4. After confirming that the file is in image format and appropriate size at step 3, annotate the image by posting to the Cloud Vision API to filter inappropriate content.
5. Once the validations in steps 3 and 4 are complete, copy the image file from the Uploadable Bucket to the Distribution Bucket.
6. The copied image file is now available to the public.
Next, we will devise an actual implementation for the above steps.
Generate Signed URL on App Engine standard runtime
Cloud Storage provides the Signed URL feature to let individual end users perform specific actions. Signed URL makes it possible to generate temporary credentials valid only for a specific end user to securely upload a file. The Google Cloud official client library makes it easy to generate a Signed URL. Using this feature, you’ll prepare an API server to generate a Signed URL dynamically for specific end users. For our purposes, we’re implementing the API using App Engine Standard.
Here’s how to generate a Signed URL:
1. Create a new service account or prepare the service account for signing bytes in App Engine.
2. Create a string necessary for the signature to generate a Signed URL (note that Content_MD5 and Canonicalized_Extension_Headers are omitted).
a. Choose PUT for Cloud Storage API that accepts file upload.
b. The value of Content-Type depends on the MIME type of the file being uploaded. This is determined by the API request from the end user.
c. Set Unix epoch time for expiration. After accepting the API request, set the shortest possible value of the future. We will set 15 minutes here.
d. Specify a bucket and an object as Canonicalized_Resource. The object key is dynamically generated so it doesn’t duplicate an existing one.
3. Sign the string generated in step 2 with the secret key of the service account prepared in step 1.
Check out the official documentation for more details on procedures. If you are using Golang to implement all of the above procedures, it will look like this:
As mentioned in the code, there are two ways to sign the generated bytes to create the Signed URL.
One way is to sign it yourself using the private key associated with the service account. This is suitable for use in environments such as Google Compute Engine and Google Kubernetes Engine (GKE). If you choose this option, you have to manage the private key yourself.
The second way is to use the serviceAccounts.signBlob API, which is one of the Cloud Identity and Access Management (IAM) Service Account APIs. This lets you sign the bytes without managing the private key on the application runtime. Here we’re using the signBlob to avoid managing the private key.
In addition, within Cloud Storage, you need to grant the following permissions to generate a Signed URL.
storage.buckets.getstorage.objects.createstorage.objects.delete
If you would like to use the signBlob API, you also have to grant your service account the Service Account Token Creator role.
Uploading files using Signed URL
Now, a user can upload files directly to Cloud Storage using Signed URLs dispatched in the above way. Here, we’ll use PUT Object, one of the Cloud Storage XML APIs, for the Signed URL that App Engine has generated.
You can run this from a mobile application or front-end code of a web application. Here’s the sample file upload code:
Using Bucket Lock with Signed URL
As you can see from the architecture diagram above, we’ve set up two Cloud Storage buckets: the upload destination (Uploadable Bucket) and the delivery source (Distribution Bucket).
Although all the files will be copied to the Distribution Bucket after validation, these files will still reside in the Uploadable Bucket as well. However, these files will no longer be referred by any processing module. So it’s meaningless to keep the files copied to the Distribution Bucket still lying around in the Uploadable Bucket.
In addition, end users can upload files any number of times in the Uploadable Bucket until the Signed URL is expired.
To solve these two problems, use Object Lifecycle Management and Retention Policy.
First, define the lifecycle to make sure there are no unnecessary objects left in the Uploadable Bucket. You only need to define the lifecycle conditions for the bucket and the behaviors that align with each condition. Here, let’s define the lifecycle of one day before deleting the object, which would look like this:
Next, let’s make sure users can’t upload the file over and over again within the prescribed period of time. You can do this by defining a retention policy.
A retention policy lets you specify the retention period for the bucket, and makes it impossible to overwrite or delete the object during that period. Use the same expiration date in the Signed URL and the retention policy period. You need to avoid conflict with the lifecycle setting, since the object will be deleted after one day. (Note that retention policies cannot be enabled for buckets with versioning enabled.)
In order to create a bucket with these settings, execute the following command:
Validate and copy the uploaded file
You’ve so far seen how to generate a Signed URL to upload files directly to Cloud Storage. However, before making this available to users, more validation is necessary. You’ll want to verify the validity of the file uploaded by the authenticated user, and Signed URL and Cloud Storage alone can’t validate the content.
To do this, we’ll implement the validation/copy process using Cloud Functions. To run Cloud Functions triggered by a specific event on GCP, use Background Functions, specifically to trigger the event of Cloud Storage. We use google.storage.object.finalize as the event of object creation.
Next, how should we validate the uploaded file? Here are the requirements in order.
1. Make sure that an object with the same object key as the uploaded file does not exist in Distribution Bucket.a. If the object already exists, stop further processing.
b. This is a conditional branch that may occur because the execution of Cloud Functions guarantees at-least-once execution.
2. Get
Content-Type and the size from the metadata of the target object in the Uploadable Bucket.a. Check that the size does not exceed the Cloud Storage size limit. If so, stop further processing.
b. The size limit should be determined based on the specification of your runtime (in this case, the Cloud Function is the runtime for validation).
3. Read the target object in the Uploadable Bucket, and validate based on the
Content-Type acquired in step 2.a. There’s no guarantee that the
Content-Type specified at the time of generating the Signed URL matches the content of the actually uploaded object, so verify that next.4. Post the target object in the Uploadable Bucket to the Vision API, and verify whether it contains violent content by using Safe Search Annotation.
a. If so, it will filter what may be violent, adult, medical and racy (
likelihood over POSSIBLE).5. If the object passed validation, copy the object from the Uploadable Bucket to the Distribution Bucket.
To create an implementation that meets the above requirements, use the Cloud Functions Go 1.11 runtime. The source code is as follows:
To deploy UploadImage in the above source code to Cloud Functions, execute the following command:
Don’t forget to turn on --retry. In case there’s a temporary error case, the background function should be made with retries taken into account. In addition, since Cloud Functions guarantees at-least-once execution, it is not idempotent in that the object in Distribution Bucket may be updated more than once. However, there are no side effects.
Upload a file!
Let’s actually upload a file using the system we’ve built, which uses managed services from uploading images to delivery. Testing is easy; just run the source code used to post the image in Signed URL earlier.
After the background function finishes running, make sure that the object in the Uploadable Bucket is copied to the Distribution Bucket. You can also introduce push notifications to let the user know when the distribution starts, since these processes are performed asynchronously. Or, you can update the database referred by the original application if necessary. You can also do such processes on Cloud Functions, or notify your application that it is loosely coupled.
You can also customize this system to create another file upload feature that fits your purpose. You may decide to use Signed Policy Document instead of Signed URL, such as if you want to set more detailed conditions or use a POST Object API. Furthermore, if you’re using Firebase, our mobile and web development tool, you can use Cloud Storage for Firebase instead of this feature because similar functionality can be easily implemented on Firebase.
If you’d like to connect with Google Cloud experts, get in touch and learn more here.