Scansione automatica dei pacchetti Go
Scopri come attivare la scansione automatica, eseguire il push di un'immagine container su Artifact Registry e visualizzare un elenco delle vulnerabilità rilevate nell'immagine.
Artifact Analysis esegue la scansione delle vulnerabilità ogni volta che viene eseguito il push di un'immagine su Artifact Registry. Gli amministratori della piattaforma e gli sviluppatori di applicazioni possono utilizzare questa funzionalità di scansione automatica per identificare i rischi nella pipeline di distribuzione del software.
Questa guida rapida utilizza un semplice pacchetto disponibile pubblicamente per mostrare un tipo di scansione dei pacchetti. Per impostazione predefinita, Artifact Analysis esegue la scansione delle vulnerabilità in più tipi di pacchetti dopo che hai abilitato l'API di analisi. I tipi di pacchetti supportati includono: OS, Go, Java (Maven), Python e Node.js (npm).
Prima di iniziare
- Sign in to your Google Cloud account. If you're new to Google Cloud, create an account to evaluate how our products perform in real-world scenarios. New customers also get $300 in free credits to run, test, and deploy workloads.
-
Install the Google Cloud CLI.
-
Se utilizzi un provider di identità (IdP) esterno, devi prima accedere a gcloud CLI con la tua identità federata.
-
Per inizializzare gcloud CLI, esegui questo comando:
gcloud init -
Create or select a Google Cloud project.
Roles required to select or create a project
- Select a project: Selecting a project doesn't require a specific IAM role—you can select any project that you've been granted a role on.
-
Create a project: To create a project, you need the Project Creator
(
roles/resourcemanager.projectCreator), which contains theresourcemanager.projects.createpermission. Learn how to grant roles.
-
Create a Google Cloud project:
gcloud projects create PROJECT_ID
Replace
PROJECT_IDwith a name for the Google Cloud project you are creating. -
Select the Google Cloud project that you created:
gcloud config set project PROJECT_ID
Replace
PROJECT_IDwith your Google Cloud project name.
-
Verify that billing is enabled for your Google Cloud project.
-
Enable the Artifact Registry and Container Scanning APIs:
Roles required to enable APIs
To enable APIs, you need the Service Usage Admin IAM role (
roles/serviceusage.serviceUsageAdmin), which contains theserviceusage.services.enablepermission. Learn how to grant roles.gcloud services enable containerscanning.googleapis.com
artifactregistry.googleapis.com -
Install the Google Cloud CLI.
-
Se utilizzi un provider di identità (IdP) esterno, devi prima accedere a gcloud CLI con la tua identità federata.
-
Per inizializzare gcloud CLI, esegui questo comando:
gcloud init -
Create or select a Google Cloud project.
Roles required to select or create a project
- Select a project: Selecting a project doesn't require a specific IAM role—you can select any project that you've been granted a role on.
-
Create a project: To create a project, you need the Project Creator
(
roles/resourcemanager.projectCreator), which contains theresourcemanager.projects.createpermission. Learn how to grant roles.
-
Create a Google Cloud project:
gcloud projects create PROJECT_ID
Replace
PROJECT_IDwith a name for the Google Cloud project you are creating. -
Select the Google Cloud project that you created:
gcloud config set project PROJECT_ID
Replace
PROJECT_IDwith your Google Cloud project name.
-
Verify that billing is enabled for your Google Cloud project.
-
Enable the Artifact Registry and Container Scanning APIs:
Roles required to enable APIs
To enable APIs, you need the Service Usage Admin IAM role (
roles/serviceusage.serviceUsageAdmin), which contains theserviceusage.services.enablepermission. Learn how to grant roles.gcloud services enable containerscanning.googleapis.com
artifactregistry.googleapis.com Apri la pagina Repository nella console Google Cloud .
Fai clic su Crea repository.
Nella pagina Crea repository, inserisci le seguenti impostazioni:
- Nome:
quickstart-docker-repo - Formato: Docker
- Modalità: standard
- Tipo di località: Regione
- Regione:
us-central1
- Nome:
Fai clic su Crea.
Passa a una directory in cui vuoi salvare l'immagine container.
Copia un'immagine nella directory locale. Ad esempio, puoi utilizzare Docker per eseguire il pull dell'ultima immagine Go da Docker Hub.
docker pull golang:1.17.6-alpine- PROJECT è il tuo Google Cloud
ID progetto.
Se l'ID progetto contiene due punti (
:), consulta Progetti basati sul dominio. us-central1è la regione del repository Artifact Registry.docker.pkg.devè il nome host per i repository Docker.quickstart-imageè il nome dell'immagine che vuoi utilizzare nel repository. Il nome dell'immagine può essere diverso dal nome dell'immagine locale.tag1è un tag che stai aggiungendo all'immagine Docker. Se non hai specificato un tag, Docker applicherà il tag predefinitolatest.Recupera l'elenco dei repository.
Nell'elenco dei repository, fai clic su un repository.
Nell'elenco delle immagini, fai clic sul nome di un'immagine.
I totali delle vulnerabilità per ogni digest dell'immagine vengono visualizzati nella colonna Vulnerabilità.

Per visualizzare l'elenco delle vulnerabilità di un'immagine, fai clic sul link nella colonna Vulnerabilità.
La sezione Risultati scansione mostra un riepilogo dei tipi di pacchetti scansionati, delle vulnerabilità totali, delle vulnerabilità con correzioni disponibili, delle vulnerabilità senza correzioni e della gravità effettiva.

La tabella delle vulnerabilità elenca il nome delle vulnerabilità ed esposizioni comuni (CVE) per ogni vulnerabilità trovata, la gravità effettiva, il punteggio del Common Vulnerability Scoring System (CVSS), le correzioni (se disponibili), il nome del pacchetto che contiene la vulnerabilità e il tipo di pacchetto.
La consoleGoogle Cloud mostra fino a 1200 vulnerabilità per pagina in questa tabella. Puoi filtrare e ordinare questi file per controllare un file, una directory, un livello o un tipo di file specifico in base all'estensione.
Per i dettagli di una CVE specifica, fai clic sul nome della CVE.
Per visualizzare i dettagli dell'occorrenza della vulnerabilità, come il numero di versione e la posizione interessata, nella riga con il nome della vulnerabilità, fai clic su Visualizza o Visualizza correzione. Il testo del link è Visualizza per le vulnerabilità senza correzione e Visualizza correzione per le vulnerabilità a cui è stata applicata una correzione.
In Artifact Registry, apri l'elenco dei repository.
Nella pagina Repository, fai clic su un repository.
Nella pagina Dettagli repository, fai clic su un'immagine.
Nell'elenco delle versioni dell'immagine, fai clic su un digest dell'immagine.
Nella pagina dei dettagli del digest dell'immagine, fai clic sulla scheda Vulnerabilità.
Quando sono disponibili metadati basati sui livelli, l'Artifact Analysis mostra un elenco selezionabile di livelli nella barra Livello:

Per visualizzare l'elenco dei livelli, fai clic sul menu a discesa dei livelli.
Si apre un elenco a discesa che mostra un elenco numerato di livelli. Il livello 0 rappresenta il livello inferiore e ogni livello successivo viene creato su quello precedente. Vengono mostrati solo i livelli in cui sono state rilevate vulnerabilità.
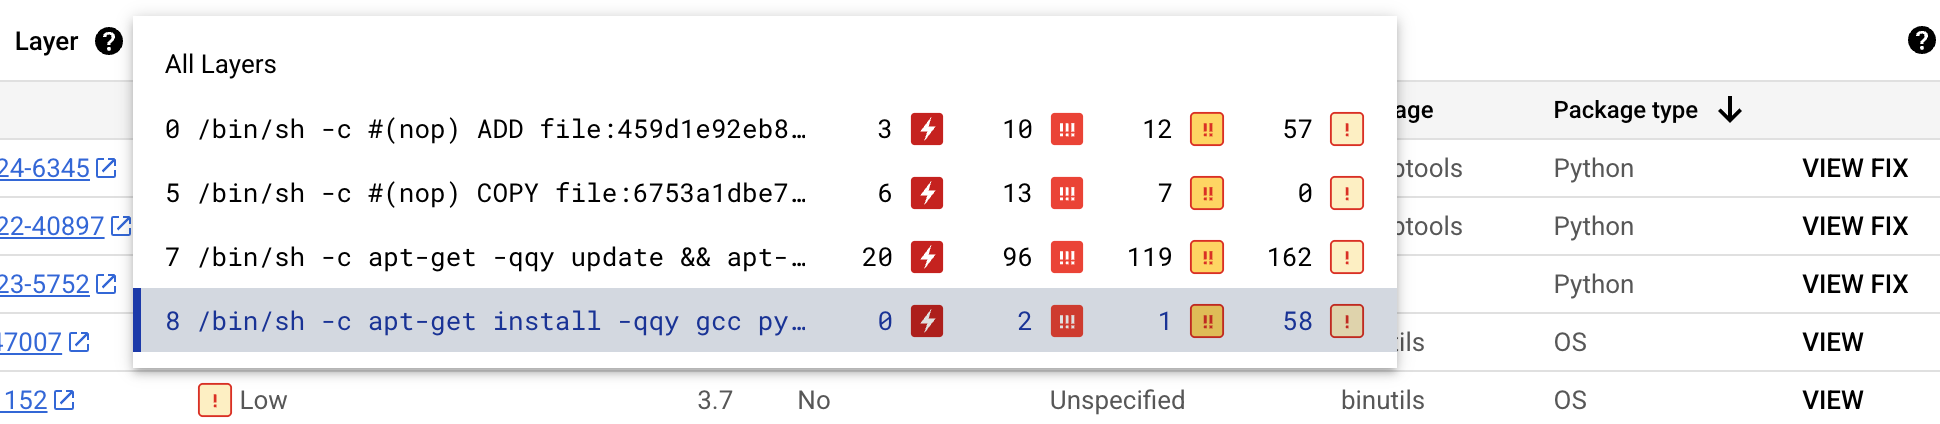
Per ogni livello, Artifact Analysis mostra il comando Docker utilizzato per creare il livello e il numero di vulnerabilità trovate in quel livello.
Per saperne di più sulle vulnerabilità in un livello specifico, seleziona un livello dall'elenco dei livelli.
La tabella delle vulnerabilità viene aggiornata per mostrare solo le vulnerabilità trovate nel livello selezionato. Puoi applicare altri filtri o esaminare vulnerabilità specifiche.
Fai clic su VISUALIZZA o VISUALIZZA CORREZIONE accanto a una vulnerabilità per visualizzare informazioni più dettagliate.
Il riquadro laterale Dettagli vulnerabilità mostra le posizioni dei file in cui i pacchetti presentano vulnerabilità.
Nella tabella Posizione/i file, passa il mouse sopra il punto interrogativo per aprire metadati aggiuntivi del livello.
Una finestra di dialogo mostra l'indice del livello, il comando di compilazione del livello, il digest del livello e l'immagine di base in cui puoi correggere la vulnerabilità.
Crea un repository Docker in Artifact Registry
Crea un repository Docker per archiviare l'immagine di esempio per questa guida rapida.
Viene visualizzata la pagina Repository. Il repository quickstart-docker-repo viene aggiunto all'elenco dei repository.
Configura autenticazione
Prima di eseguire il push o il pull delle immagini con Artifact Registry, devi configurare Docker in modo che utilizzi Google Cloud CLI per autenticare le richieste ad Artifact Registry.
In Cloud Shell o nella shell locale, configura l'autenticazione per i repository Docker nella regione us-central1:
gcloud auth configure-docker us-central1-docker.pkg.dev
Ottenere un pacchetto
Assegnare un tag al pacchetto con un nome di repository
Quando vuoi eseguire il push di un pacchetto in Artifact Registry, devi configurare il comando docker push in modo che esegua il push dell'immagine in una posizione specifica.
Esegui il comando seguente per taggare l'immagine come quickstart-image:tag1:
docker tag golang:1.17.6-alpine \
us-central1-docker.pkg.dev/PROJECT/quickstart-docker-repo/quickstart-image:tag1
Dove:
Esegui il push dell'immagine ad Artifact Registry
Artifact Analysis esegue automaticamente la scansione dei nuovi pacchetti Go quando vengono caricati in Artifact Registry.
Per eseguire il push dell'immagine nel repository Docker in Artifact Registry, esegui questo comando:
docker push us-central1-docker.pkg.dev/PROJECT/quickstart-docker-repo/quickstart-image:tag1
Sostituisci PROJECT con l' Google Cloud
ID progetto.
Se l'ID progetto contiene due punti (:), consulta
Progetti basati sul dominio.
Visualizzare i risultati dell'analisi delle vulnerabilità
Per visualizzare le vulnerabilità in un'immagine:
Visualizzare le vulnerabilità in un livello specifico
Artifact Analysis fornisce metadati specifici del livello per aiutarti a identificare quale pacchetto contiene vulnerabilità e quale comando di build Docker ha introdotto quel livello.
Per visualizzare i metadati delle vulnerabilità basati sui livelli nella console Google Cloud :
Esegui la pulizia
Per evitare che al tuo account Google Cloud vengano addebitati costi relativi alle risorse utilizzate in questa pagina, elimina il progetto Google Cloud con le risorse.
Se hai creato un nuovo progetto per questa guida, ora puoi eliminarlo.Delete a Google Cloud project:
gcloud projects delete PROJECT_ID