Application Integration에 지원되는 커넥터를 참조하세요.

지정된 색인에서 JSON 배열 업데이트

데이터 매핑 태스크를 사용하면 입력 변수를 사용하여 지정된 색인에서 JSON 배열 값을 업데이트합니다. 출력은 새 JSON 변수에 저장합니다.

코드 샘플

{
  "triggerConfigs": [{
    "label": "API Trigger",
    "startTasks": [{
      "taskId": "1"
    }],
    "properties": {
      "Trigger name": "tkApplicationIntegrationSample1_API_1"
    },
    "triggerType": "API",
    "triggerNumber": "1",
    "triggerId": "api_trigger/tkApplicationIntegrationSample1_API_1"
  }],
  "taskConfigs": [{
    "task": "FieldMappingTask",
    "taskId": "1",
    "parameters": {
      "FieldMappingConfigTaskParameterKey": {
        "key": "FieldMappingConfigTaskParameterKey",
        "value": {
          "jsonValue": "{\n  \"@type\": \"type.googleapis.com/enterprise.crm.eventbus.proto.FieldMappingConfig\",\n  \"mappedFields\": [{\n    \"inputField\": {\n      \"fieldType\": \"JSON_VALUE\",\n      \"transformExpression\": {\n        \"initialValue\": {\n          \"referenceValue\": \"$jsonArray$\"\n        },\n        \"transformationFunctions\": [{\n          \"functionType\": {\n            \"jsonFunction\": {\n              \"functionName\": \"TO_STRING_ARRAY\"\n            }\n          }\n        }, {\n          \"functionType\": {\n            \"stringArrayFunction\": {\n              \"functionName\": \"SET\"\n            }\n          },\n          \"parameters\": [{\n            \"initialValue\": {\n              \"literalValue\": {\n                \"intValue\": \"2\"\n              }\n            }\n          }, {\n            \"initialValue\": {\n              \"referenceValue\": \"$jsonVar$\"\n            },\n            \"transformationFunctions\": [{\n              \"functionType\": {\n                \"jsonFunction\": {\n                  \"functionName\": \"TO_STRING\"\n                }\n              }\n            }]\n          }]\n        }, {\n          \"functionType\": {\n            \"stringArrayFunction\": {\n              \"functionName\": \"TO_JSON\"\n            }\n          }\n        }]\n      }\n    },\n    \"outputField\": {\n      \"referenceKey\": \"$outputJsonArray$\",\n      \"fieldType\": \"JSON_VALUE\",\n      \"cardinality\": \"OPTIONAL\"\n    }\n  }]\n}"
        }
      }
    },
    "taskExecutionStrategy": "WHEN_ALL_SUCCEED",
    "displayName": "Data Mapping"
  }],
  "integrationParameters": [{
    "key": "outputJsonArray",
    "dataType": "JSON_VALUE",
    "displayName": "outputJsonArray",
    "inputOutputType": "OUT",
    "jsonSchema": "{\n  \"$schema\": \"http://json-schema.org/draft-04/schema#\",\n  \"type\": \"array\",\n  \"items\": {\n    \"type\": \"object\",\n    \"properties\": {\n      \"prop1\": {\n        \"type\": \"string\"\n      }\n    }\n  }\n}"
  }, {
    "key": "jsonArray",
    "dataType": "JSON_VALUE",
    "defaultValue": {
      "jsonValue": "[{\n  \"prop1\": \"val11\"\n}, {\n  \"prop1\": \"val21\"\n}, {\n  \"prop1\": \"val31\"\n}, {\n  \"prop1\": \"val41\"\n}]"
    },
    "displayName": "jsonArray",
    "jsonSchema": "{\n  \"$schema\": \"http://json-schema.org/draft-04/schema#\",\n  \"type\": \"array\",\n  \"items\": {\n    \"type\": \"object\",\n    \"properties\": {\n      \"prop1\": {\n        \"type\": \"string\"\n      }\n    }\n  }\n}"
  }, {
    "key": "jsonVar",
    "dataType": "JSON_VALUE",
    "defaultValue": {
      "jsonValue": "{\n  \"prop1\": \"valUserDefined\"\n}"
    },
    "displayName": "jsonVar",
    "jsonSchema": "{\n  \"$schema\": \"http://json-schema.org/draft-04/schema#\",\n  \"type\": \"object\",\n  \"properties\": {\n    \"prop1\": {\n      \"type\": \"string\"\n    }\n  }\n}"
  }]
}

샘플 통합 흐름

다음 이미지는 이 통합 코드 샘플에 대한 통합 편집기의 샘플 레이아웃을 보여줍니다.
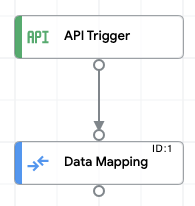
샘플 통합 흐름을 보여주는 이미지 샘플 통합 흐름을 보여주는 이미지

샘플 통합 업로드 및 실행

샘플 통합을 업로드하고 실행하려면 다음 단계를 수행합니다.

  1. 통합 샘플을 .json 파일로 시스템에 저장합니다.
  2. Google Cloud 콘솔에서 Application Integration 페이지로 이동합니다.

    Application Integration으로 이동

  3. 탐색 메뉴에서 통합을 클릭합니다. 통합 페이지가 표시됩니다.
  4. 기존 통합을 선택하거나 통합 만들기를 클릭하여 새 통합을 만듭니다.

    새 통합을 만드는 경우:

    1. 통합 만들기 대화상자에 이름과 설명을 입력합니다.
    2. 통합 리전을 선택합니다.
    3. 통합을 위한 서비스 계정을 선택합니다. 통합 툴바의 통합 요약 창에서 언제든지 통합에 대한 서비스 계정 세부정보를 변경하거나 업데이트할 수 있습니다.
    4. 만들기를 클릭합니다.

    통합 편집기 페이지에서 통합이 열립니다.

  5. 통합 편집기에서 업로드/다운로드 메뉴를 클릭한 후 통합 업로드를 선택합니다.
  6. 파일 브라우저 대화상자에서 1단계에서 저장한 파일을 선택한 후 열기를 클릭합니다.

    업로드된 파일을 통해 새 버전의 통합이 생성됩니다.

  7. 통합 편집기에서 테스트를 클릭합니다.
  8. 통합 테스트를 클릭합니다. 그러면 통합이 실행되고 통합 테스트 창에 실행 결과가 표시됩니다.