This document provides a step-by-step guide to deploy a virtual machine (VM) based workload into Google Distributed Cloud using VM Runtime on Google Distributed Cloud. The workload used in this guide is the sample point of sale application. This application represents a typical point of sale terminal that runs on on-premises hardware at a retail store.
In this document you migrate this application from a VM into an Google Distributed Cloud
cluster and access the application's web frontend. To migrate an existing VM
into the cluster, first a disk image of that VM must be created. Then, the image
must be hosted in a repository that the cluster can access. Finally, the URL of
that image can be used to create the VM. VM Runtime on Google Distributed Cloud expects
the images to be in qcow2 format. If you provide a different image type, it's
automatically converted into the qcow2 format. To avoid repetitive conversion
and to enable reuse, you can convert a virtual disk image
and host the qcow2 image.
This document uses a pre-prepared image of a Compute Engine VM instance where the workload runs as a systemd service. You may follow these same steps to deploy your own application.
Objectives
Before you begin
To complete this document you need the following resources:
- Access to an Google Distributed Cloud version 1.12.0 or higher cluster that was created by following the Running Google Distributed Cloud on Compute Engine VMs with Manual Load Balancer guide. This document sets up networking resources so that you can access the workload running inside the VM through a browser. If you don't need that behavior, you can follow this document using any Google Distributed Cloud.
- A workstation that meets the following requirements:
Enable VM Runtime on Google Distributed Cloud and install the virtctl plugin
The VM Runtime on Google Distributed Cloud custom resource definition (CRD) is part of all Google Distributed Cloud clusters since version 1.10. An instance of the VMRuntime
custom resource is already created upon installation. However, it is disabled by
default.
Enable VM Runtime on Google Distributed Cloud:
sudo bmctl enable vmruntime --kubeconfig KUBECONFIG_PATH- KUBECONFIG_PATH: Path to the Kubernetes configuration file of the GKE Enterprise user cluster
Validate that the
VMRuntimeis enabled:kubectl wait --for=jsonpath='{.status.ready}'=true vmruntime vmruntimeIt can take a few minutes for the
VMRuntimeto be ready. If it is not ready, then check a few times with short delays. The following example output shows theVMRuntimeis ready:vmruntime.vm.cluster.gke.io/vmruntime condition metInstall the virtctl plugin for
kubectl:sudo -E bmctl install virtctlThe following example output shows the
virtctlplugin installation process is complete:Please check the logs at bmctl-workspace/log/install-virtctl-20220831-182135/install-virtctl.log [2022-08-31 18:21:35+0000] Install virtctl succeededVerify installation of the
virtctlplugin:kubectl virtThe following example output shows that the
virtctlplugin is available for use withkubectl:Available Commands: addvolume add a volume to a running VM completion generate the autocompletion script for the specified shell config Config subcommands. console Connect to a console of a virtual machine instance. create Create subcommands. delete Delete subcommands. ...
Deploy the VM-based workload
When you deploy a VM into Google Distributed Cloud, VM Runtime on Google Distributed Cloud expects a VM image. This image serves as the boot disk for the deployed VM.
In this tutorial, you migrate a Compute Engine VM-based workload into an
Google Distributed Cloud cluster. This Compute Engine VM was created, and the sample
point of sale (PoS) application was configured to run as a systemd service. A
disk image of this VM along with the PoS application workload was created
in Google Cloud. This image was then
exported into a Cloud Storage bucket as a qcow2 image.
You use this pre-prepared qcow2 image in the following steps.
The source code in this document is available in the anthos-samples GitHub repository. You use resources from this repository to complete the steps that follow.
Deploy a MySQL
StatefulSet. The point of sale application expects to connect to a MySQL database to store inventory and payment information. The point of sale repository has a sample manifest that deploys a MySQLStatefulSet, configures an associatedConfigMap, and a KubernetesService. TheConfigMapdefines the credentials for the MySQL instance, which are the same credentials passed into the point of sale application.kubectl apply -f https://raw.githubusercontent.com/GoogleCloudPlatform/point-of-sale/main/k8-manifests/common/mysql-db.yamlDeploy the VM workload using the pre-prepared
qcow2image:kubectl virt create vm pos-vm \ --boot-disk-size=80Gi \ --memory=4Gi \ --vcpu=2 \ --image=https://storage.googleapis.com/pos-vm-images/pos-vm.qcow2This command creates a YAML file named after the VM (
google-virtctl/pos-vm.yaml). You can inspect the file to see the definition of theVirtualMachineandVirtualMachineDisk. Instead of using thevirtctlplugin, you could have deployed the VM workload using Kubernetes Resource Model (KRM) definitions, as seen in the created YAML file.When the command runs successfully, it produces an output like the following example that explains the different resources that were created:
Constructing manifest for vm "pos-vm":
Manifest for vm "pos-vm" is saved to /home/tfadmin/google-virtctl/pos-vm.yaml
Applying manifest for vm "pos-vm"
Created gvm "pos-vm"
Check the VM creation status.
The
VirtualMachineresource is identified by thevm.cluster.gke.io/v1.VirtualMachineresource in VM Runtime on Google Distributed Cloud. The short form for it isgvm.When you create a VM, the following two resources are created:
- A VirtualMachineDisk is the persistent disk where the contents of the VM image is imported into.
- A VirtualMachine is the VM instance itself. The DataVolume is mounted into the VirtualMachine before the VM is booted up.
Check the status of the VirtualMachineDisk. VirtualMachineDisk internally creates a
DataVolumeresource. The VM image is imported into the DataVolume which is mounted into the VM:kubectl get datavolumeThe following example output shows the start of the image import:
NAME              PHASE             PROGRESS   RESTARTS   AGE
pos-vm-boot-dv    ImportScheduled   N/A                   8s
Check the status of the
VirtualMachine. TheVirtualMachineis in theProvisioningstate until theDataVolumeis imported completely:kubectl get gvmThe following example output shows the
VirtualMachinebeing provisioned:NAME STATUS AGE IP pos-vm Provisioning 1mWait for the VM image to be fully imported into the
DataVolume. Continue to watch the progress while the image is imported:kubectl get datavolume -wThe following example output shows the disk image being imported:
NAME              PHASE              PROGRESS   RESTARTS   AGE
pos-vm-boot-dv   ImportInProgress   0.00%                 14s
...
...
pos-vm-boot-dv   ImportInProgress   0.00%                 31s
pos-vm-boot-dv   ImportInProgress   1.02%                 33s
pos-vm-boot-dv   ImportInProgress   1.02%                 35s
...
When the import is complete and the
DataVolumeis created, the following example output shows thePHASEofSucceeded:kubectl get datavolumeNAME PHASE PROGRESS RESTARTS AGE pos-vm-boot-dv Succeeded 100.0% 14m18sConfirm that the
VirtualMachinehas been created successfully:kubectl get gvmIf the creation was successful the
STATUSshowsRUNNING, as shown in the following example, along with the VM's IP address:NAME STATUS AGE IP pos-vm Running 40m 192.168.3.250
Connect to the VM and check the application status
The image used for the VM includes the point of sale sample application. The application is configured to automatically start on boot as a systemd service. You can see the systemd services' configuration files in the pos-systemd-services directory.
Connect to the VM console. Run the following command and press Enter⏎ after you see the
Successfully connected to pos-vm…message:kubectl virt console pos-vmThis command produces the following example output that prompts you to input the login details:
Successfully connected to pos-vm console. The escape sequence is ^]

pos-from-public-image login:
Use the following user account and password. This account was set up inside the original VM from which the image for the VM Runtime on Google Distributed Cloud VirtualMachine was created.
- Login Username:
abmuser - Password:
abmworks
- Login Username:
Check the status of the point of sale application services. The point of sale application includes three services: API, Inventory, and Payments. These services all run as system services.
The three services all connect to each other through localhost. However, the application connects to the MySQL database using a mysql-db Kubernetes Service that was created in the earlier step. This behavior means that the VM is automatically connected to the same network as the
PodsandServices, enabling seamless communication between VM workloads and other containerized applications. You don't have to do anything extra to make the KubernetesServicesreachable from the VMs deployed using Anthos VM Runtime.sudo systemctl status pos*The following example output shows the status of the three services and root system service,
pos.service:● pos_payments.service - Payments service of the Point of Sale Application Loaded: loaded (/etc/systemd/system/pos_payments.service; enabled; vendor > Active: active (running) since Tue 2022-06-21 18:55:30 UTC; 1h 10min ago Main PID: 750 (payments.sh) Tasks: 27 (limit: 4664) Memory: 295.1M CGroup: /system.slice/pos_payments.service ├─750 /bin/sh /pos/scripts/payments.sh └─760 java -jar /pos/jars/payments.jar --server.port=8083 ● pos_inventory.service - Inventory service of the Point of Sale Application Loaded: loaded (/etc/systemd/system/pos_inventory.service; enabled; vendor> Active: active (running) since Tue 2022-06-21 18:55:30 UTC; 1h 10min ago Main PID: 749 (inventory.sh) Tasks: 27 (limit: 4664) Memory: 272.6M CGroup: /system.slice/pos_inventory.service ├─749 /bin/sh /pos/scripts/inventory.sh └─759 java -jar /pos/jars/inventory.jar --server.port=8082 ● pos.service - Point of Sale Application Loaded: loaded (/etc/systemd/system/pos.service; enabled; vendor preset: e> Active: active (exited) since Tue 2022-06-21 18:55:30 UTC; 1h 10min ago Main PID: 743 (code=exited, status=0/SUCCESS) Tasks: 0 (limit: 4664) Memory: 0B CGroup: /system.slice/pos.service Jun 21 18:55:30 pos-vm systemd[1]: Starting Point of Sale Application... Jun 21 18:55:30 pos-vm systemd[1]: Finished Point of Sale Application. ● pos_apiserver.service - API Server of the Point of Sale Application Loaded: loaded (/etc/systemd/system/pos_apiserver.service; enabled; vendor> Active: active (running) since Tue 2022-06-21 18:55:31 UTC; 1h 10min ago Main PID: 751 (api-server.sh) Tasks: 26 (limit: 4664) Memory: 203.1M CGroup: /system.slice/pos_apiserver.service ├─751 /bin/sh /pos/scripts/api-server.sh └─755 java -jar /pos/jars/api-server.jar --server.port=8081Exit the VM. To exit the console connection, use escape sequence
^]by pressingCtrl + ].
Access the VM-based workload
If your cluster was set up by following the
Running Google Distributed Cloud on Compute Engine VMs with Manual Load Balancer
guide, it has an Ingress resource called pos-ingress already created. This
resource routes the traffic from the public IP address of the Ingress Load
Balancer to the API server service of the point of sale sample application.
If your cluster doesn't have this
Ingressresource, create it by applying the following manifest:kubectl apply -f https://raw.githubusercontent.com/GoogleCloudPlatform/anthos-samples/main/anthos-bm-gcp-terraform/resources/manifests/pos-ingress.yamlCreate a Kubernetes
Servicethat routes traffic to the VM. TheIngressresource routes traffic to thisService:kubectl apply -f https://raw.githubusercontent.com/GoogleCloudPlatform/anthos-samples/main/anthos-vmruntime/pos-service.yamlThe following example output confirms the creation of a Service:
service/api-server-svc createdGet the public IP address of the
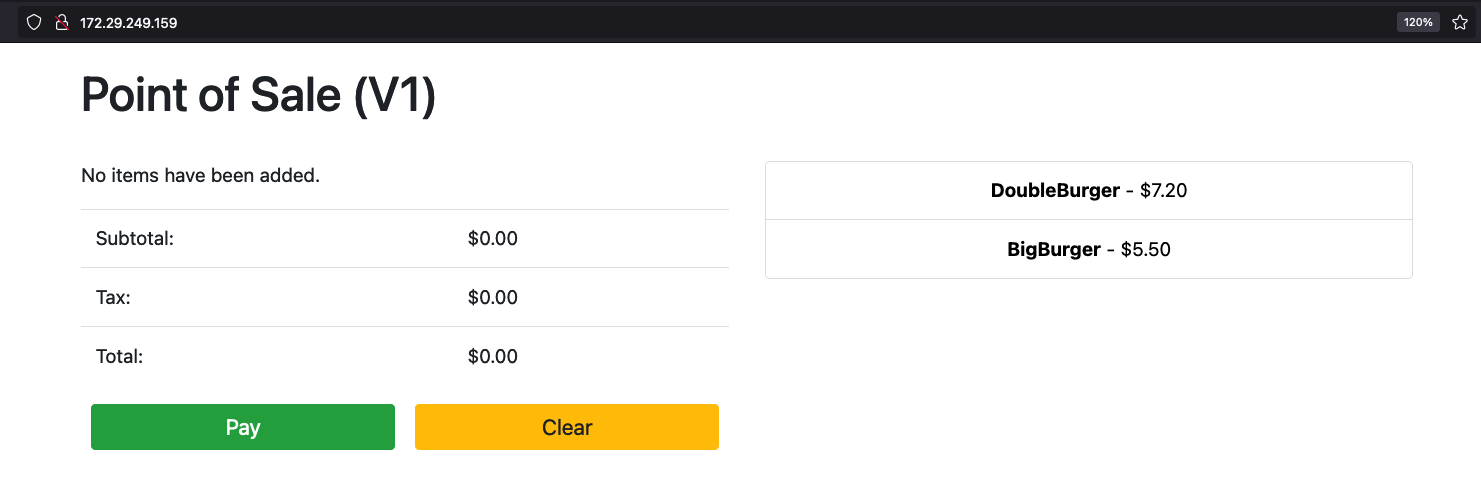
Ingressload balancer. TheIngressLoadbalancer routes traffic based on theIngressresource rules. You already have apos-ingressrule to forward requests to the API serverService. ThisServiceforwards the requests to the VM:INGRESS_IP=$(kubectl get ingress/pos-ingress -o jsonpath='{.status.loadBalancer.ingress[0].ip}') echo $INGRESS_IPThe following example output shows the IP address of the
Ingressload balancer:172.29.249.159 # you might have a different IP addressAccess the application by using the Ingress Loadbalancer IP address in a browser. The following example screenshots shows the simple point of sale kiosk with two items. You can click on the items, more than once if you want to order multiple of them, and place an order with the Pay button. This experience shows that you have successfully deployed a traditional VM-based workload into an Anthos cluster using VM Runtime on Google Distributed Cloud.
Clean up
You may delete all the resources created in this tutorial or delete only the VM and keep reusable resources. Delete a VM in Google Distributed Cloud explains the available options in detail.
Delete All
Delete the VM Runtime on Google Distributed Cloud
VirtualMachinealong with all the resources:kubectl virt delete vm pos-vm --allThe following example output confirms the deletion:
vm "pos-vm" used the following resources:
    gvm: pos-vm
    VirtualMachineDisk: pos-vm-boot-dv
Start deleting the resources:
    Deleted gvm "pos-vm".
    Deleted VirtualMachineDisk "pos-vm-boot-dv".
Delete only VM
Deleting only the VM preserves the
VirtualMachineDiskthat gets created. This enables reuse of this VM image and saves time spent on importing the image when creating a new VM.kubectl virt delete vm pos-vmThe following example output confirms the deletion:
vm "pos-vm" used the following resources:
    gvm: pos-vm
    VirtualMachineDisk: pos-vm-boot-dv
Start deleting the resources:
    Deleted gvm "pos-vm".
What's next
- The original VM used in this guide is a Compute Engine instance that runs Ubuntu 20.04 LTS. The image of this VM is publicly accessible through the pos-vm-images Cloud Storage bucket. For more information on how the VM was configured and its image was created, see the instructions in the point-of-sale repository.
- When you create a VM in an Anthos cluster using the
kubectl virt create vm pos-vmcommand, a YAML file named after the VM (google-virtctl/pos-vm.yaml) is created. You can inspect the file to see the definition of theVirtualMachineandVirtualMachineDisk. Instead of using thevirtctlplugin, you can deploy a VM using KRM definitions as seen in the created YAML file.