This page describes how to connect Confluence Cloud to Gemini Enterprise.
After you set up your data source and import data the first time, the data store syncs data from that source at a frequency that you select during setup.
Supported versions
The Confluence Cloud connector supports Confluence REST API versions v1 and v2.
Before you begin
Before you set up your connection:
Verify that you have administrator access to the Confluence instance and project.
(Optional) To retrieve user email addresses from Confluence Cloud, even when settings restrict email visibility, install the User Identity Accessor for Confluence Cloud app. You must be a
Confluence Site administratorto install and configure this app. After you install the app, configure it to securely retrieve user email addresses. You might not need to install this app if the email addresses are publicly accessible.Grant the Discovery Engine Editor role (
roles/discoveryengine.editor). This role is required for the user to create the data store. To grant this role, do the following:In the Google Cloud console, go to the IAM page.
Locate the user account and click the Edit icon .
Grant the Discovery Engine Editor role to the user.
To enforce data source access control and secure data in Gemini Enterprise, ensure that you have configured your identity provider.
Set up authentication and permissions in Confluence
You can authenticate to Confluence by using OAuth client credentials or API token based authentication. The following sections provide information about how to create OAuth client credentials and API token.
Create OAuth client credentials
Use the following instructions to create a client ID and client secret, configure the required OAuth 2.0 scopes, set up permissions for users, retrieve your instance URL and ID, configure roles, and authenticate to sync data between Confluence Cloud and Gemini Enterprise. To enable OAuth 2.0 and obtain the client ID and secret, see OAuth 2.0 (3LO) apps in the Atlassian Developer documentation.
Create an OAuth 2.0 integration in the Atlassian Developer Console:
- Sign in to Atlassian Developer Console.
Click the profile icon and select Developer console.

Select Developer console Click Create and select OAuth 2.0 Integration.
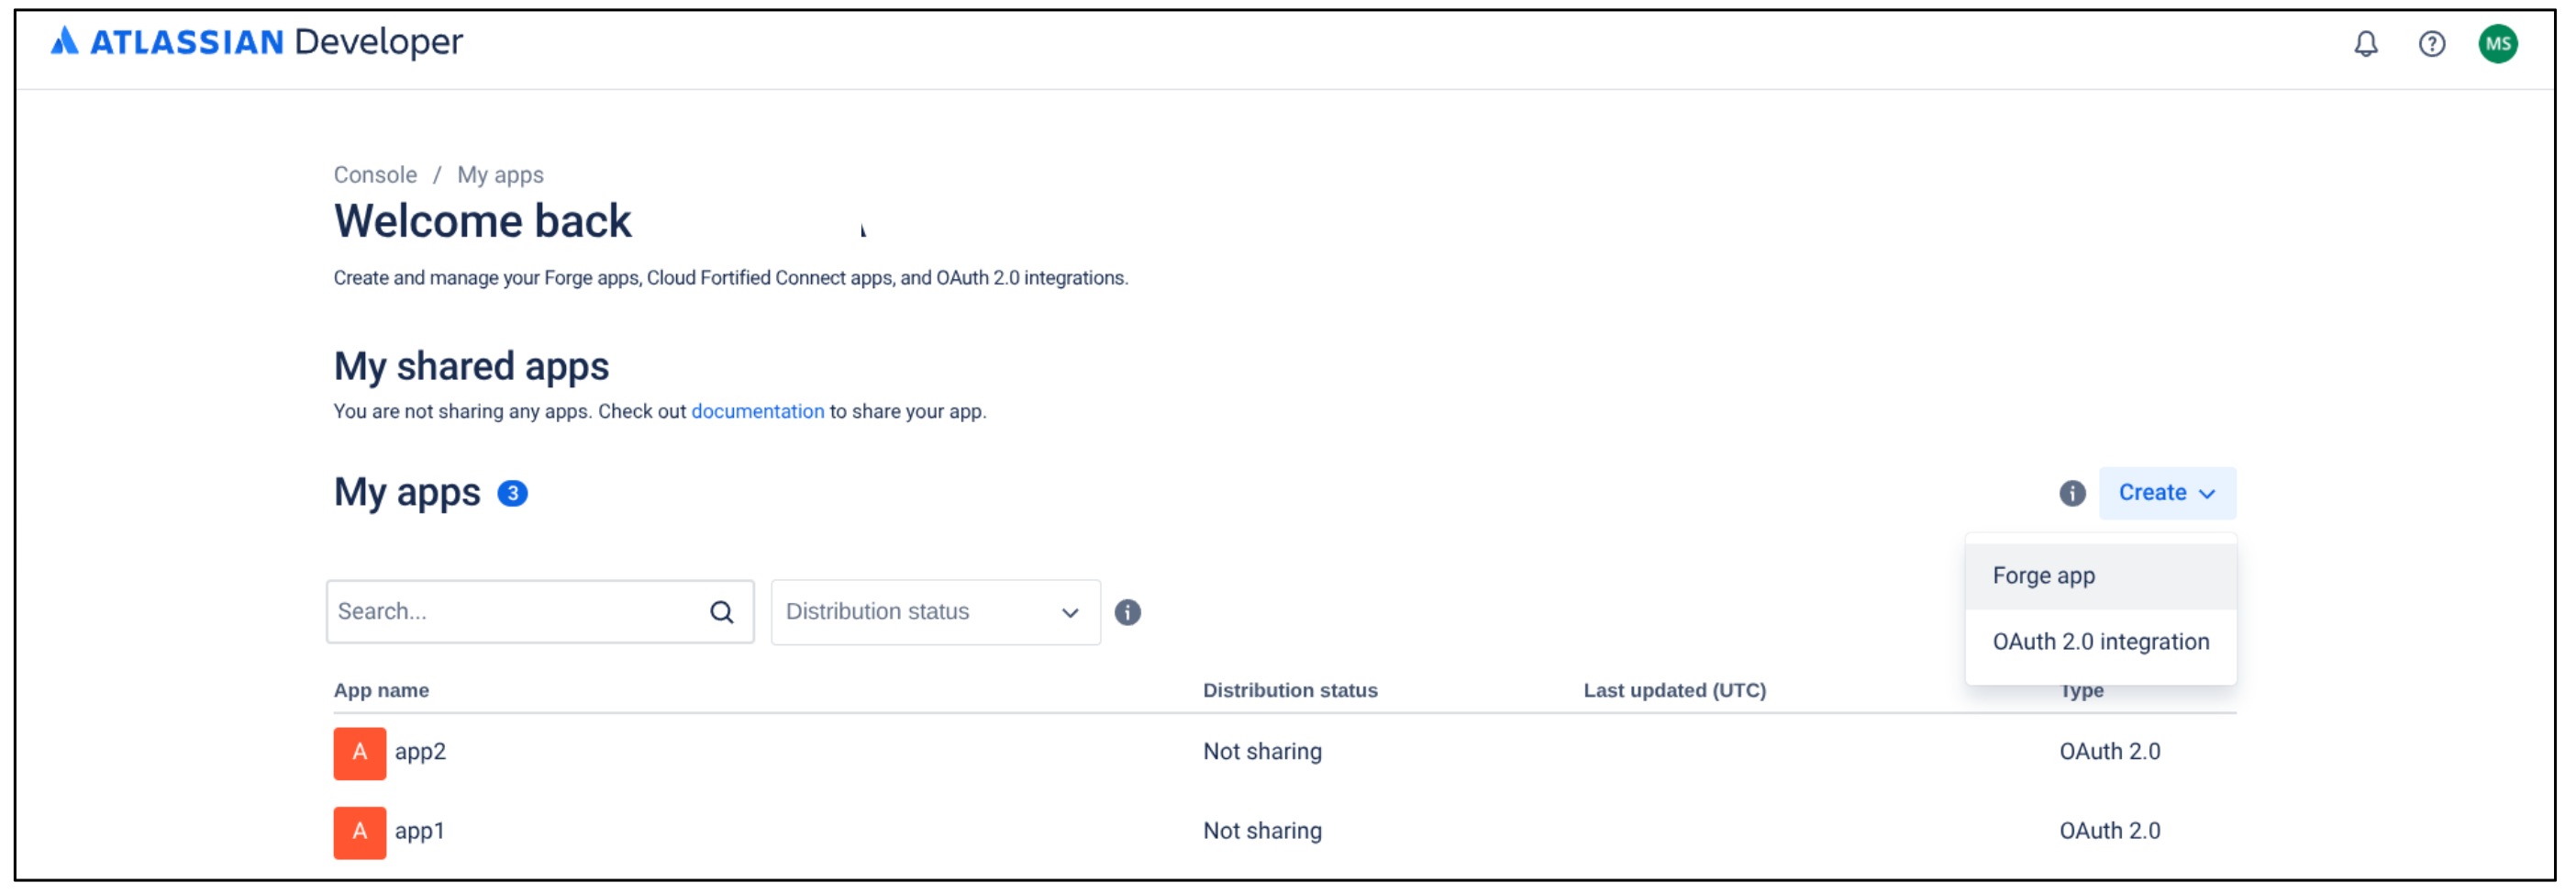
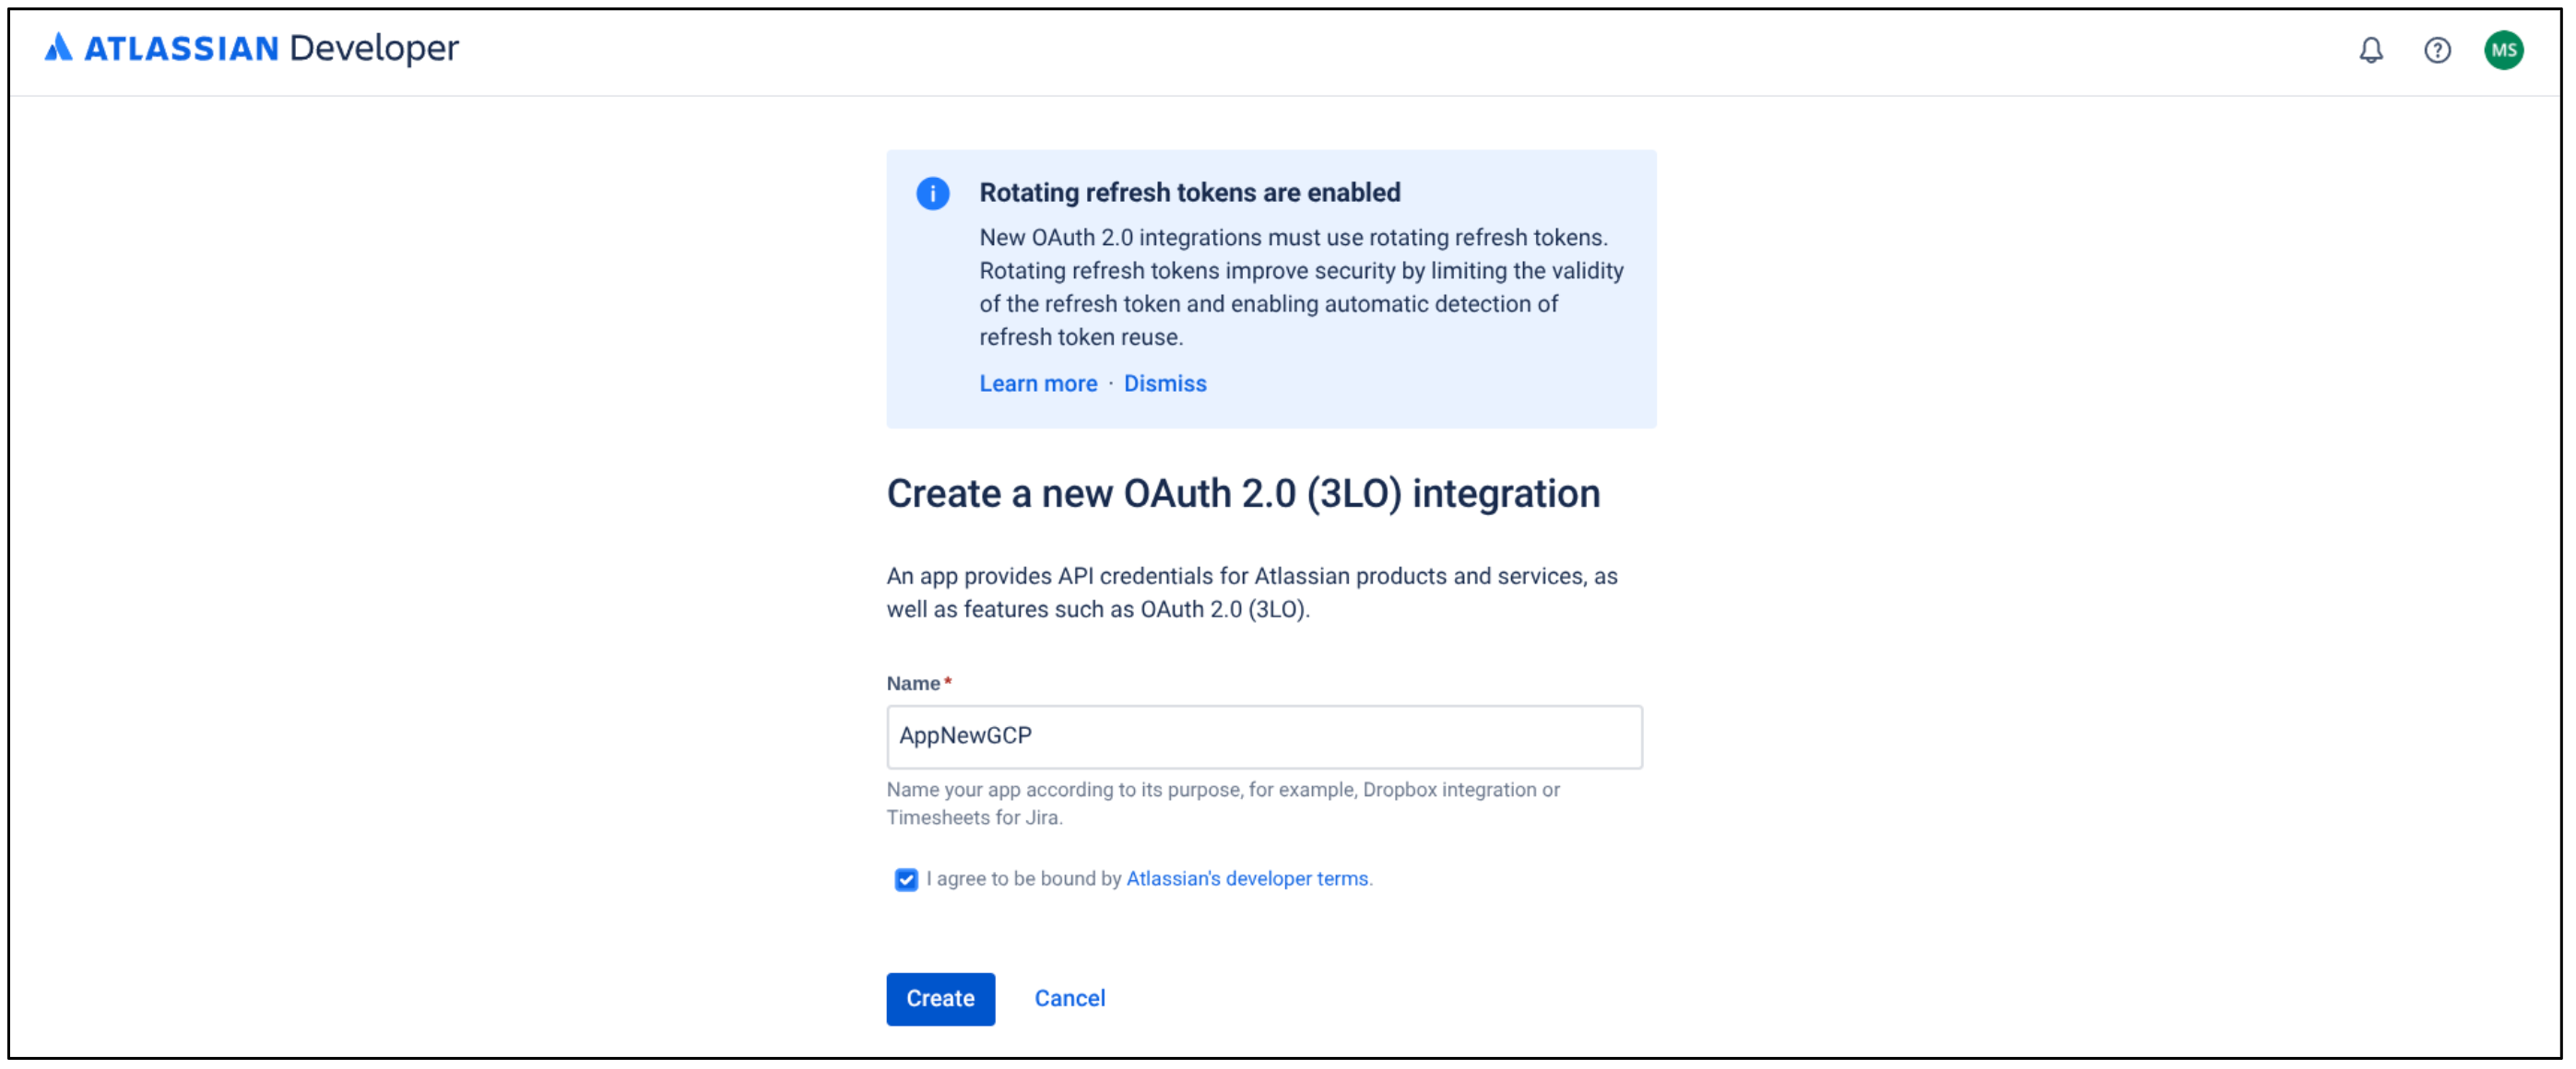
Select OAuth 2.0 Integration Enter a name for the app and do the following:
- Check the terms and conditions checkbox.
Click Create.
Create a new OAuth 2.0 Integration Click Authorization.
In the Authorization type table, click Add for OAuth 2.0 (3LO).
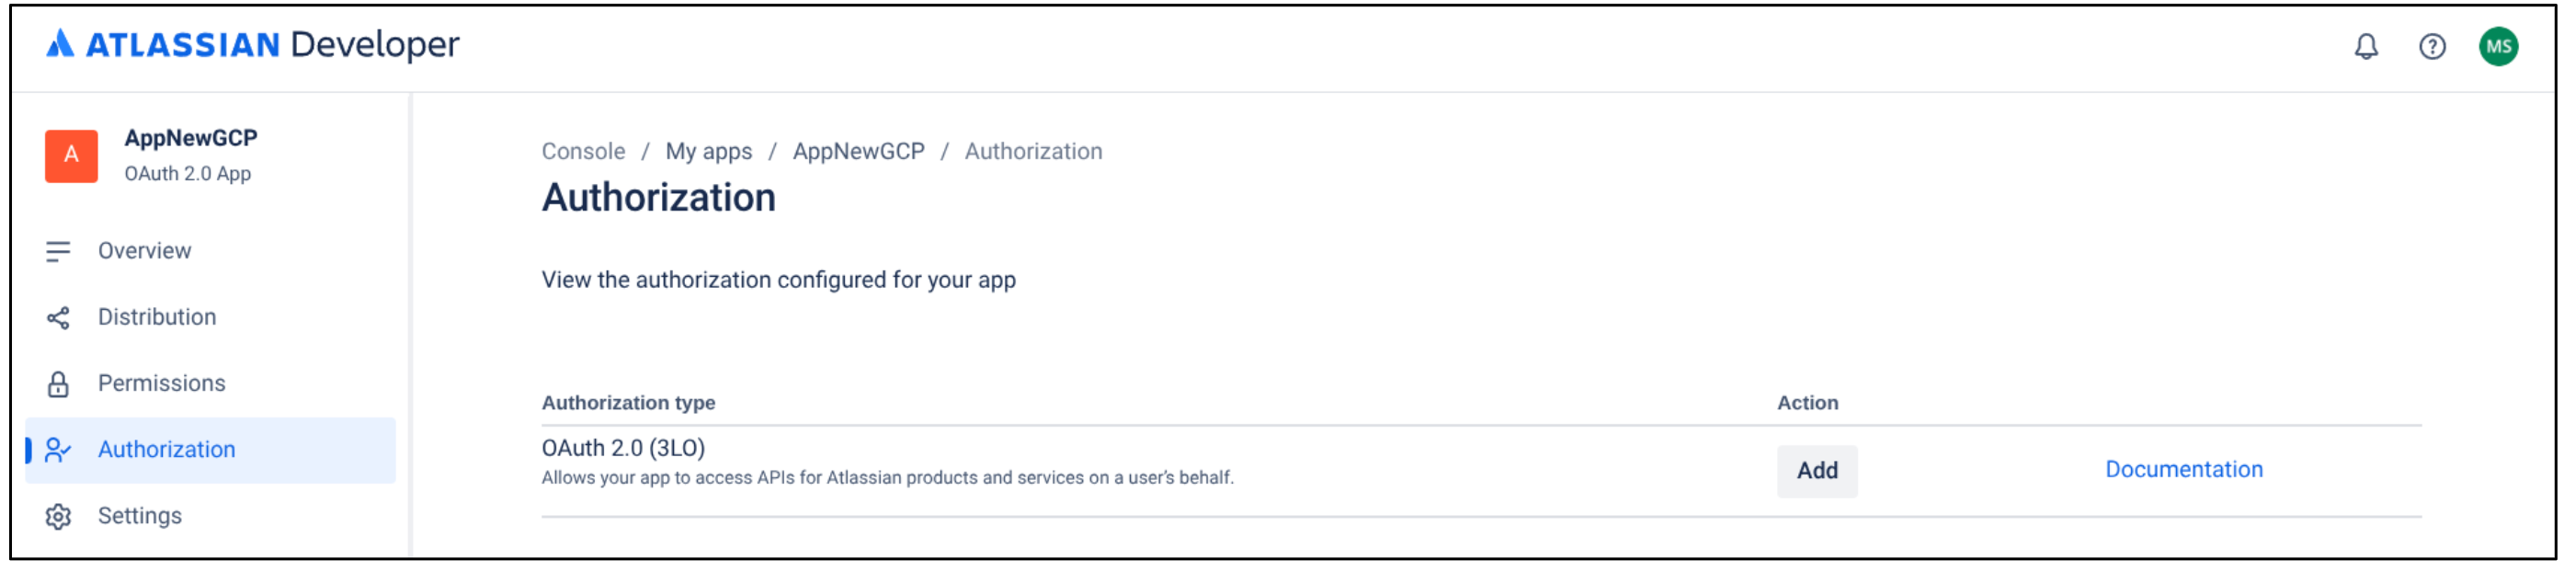
Add authorization type
In the Callback URL field, enter
https://vertexaisearch.cloud.google.com/console/oauth/confluence_oauth.htmlClick Save changes.
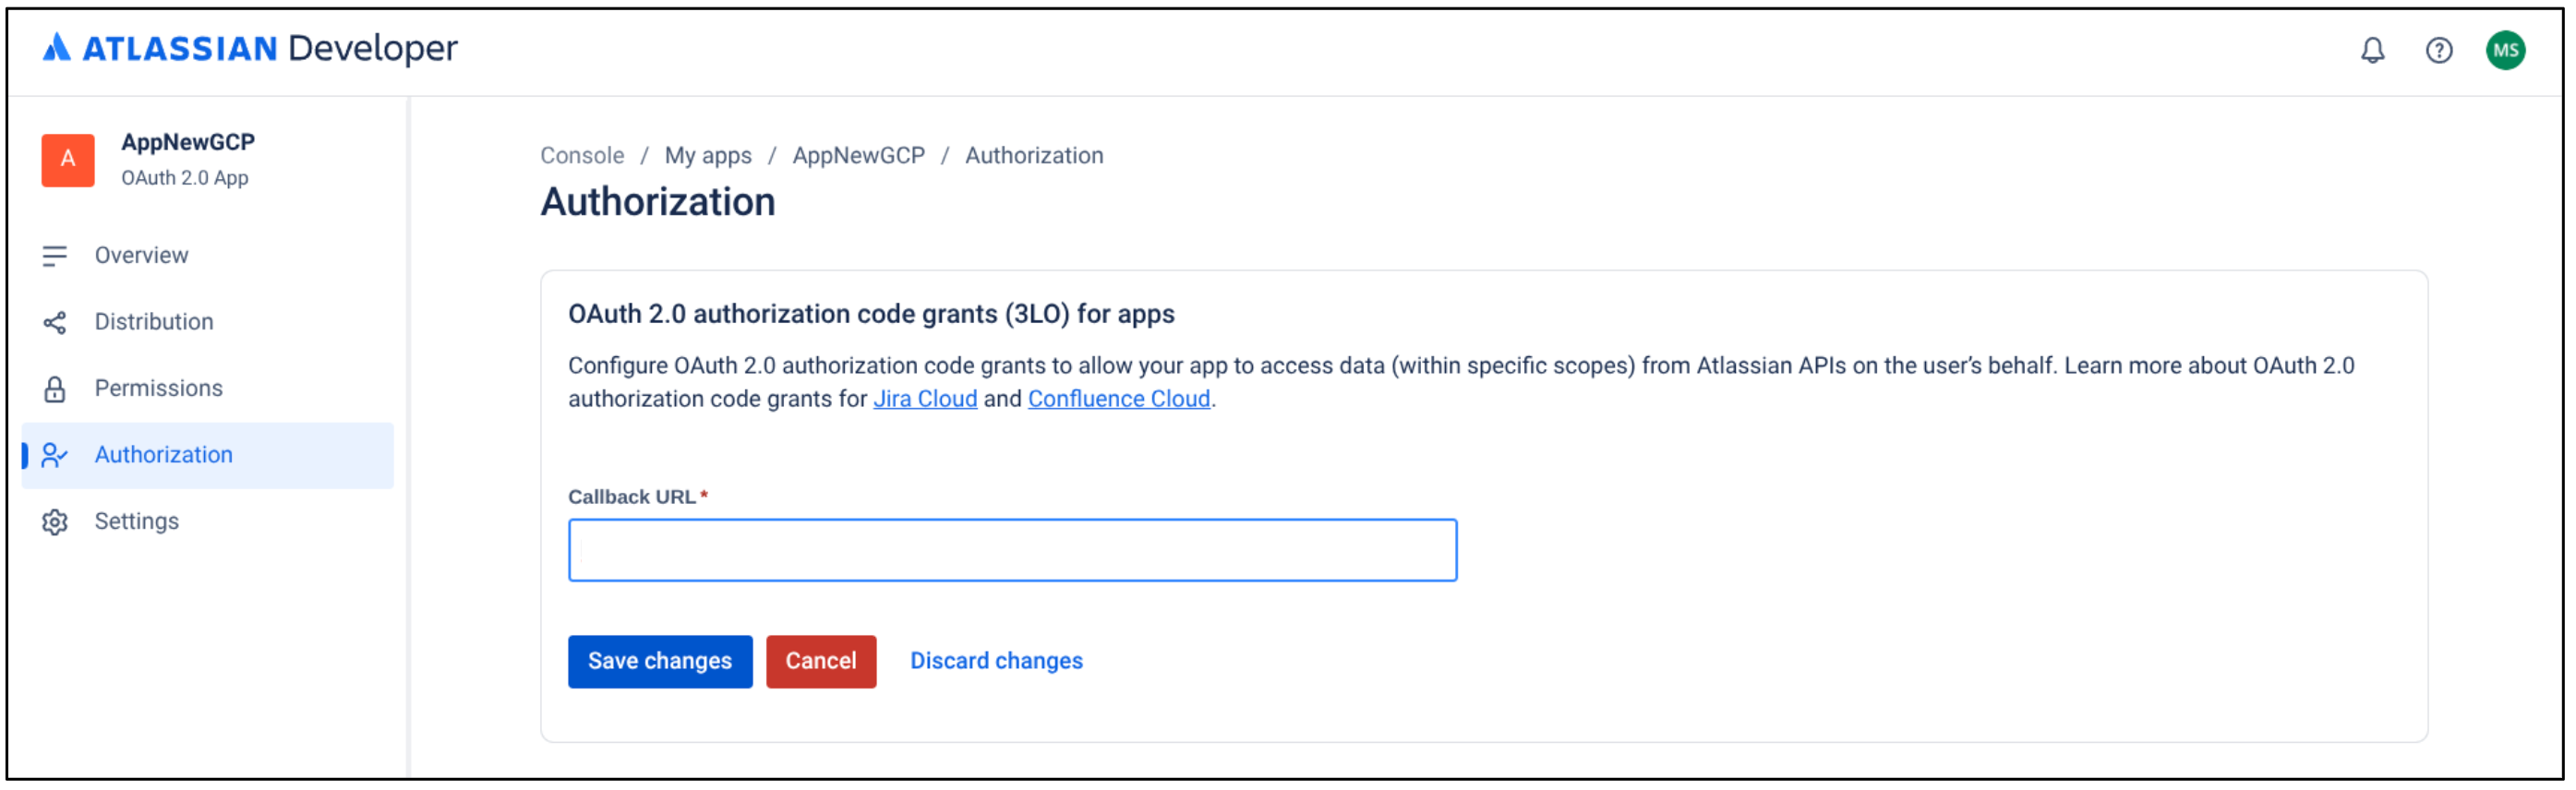
Save changes
If you see the warning: Your app doesn't have any APIs. Add APIs to your app, continue with the next procedure to configure OAuth 2.0. Otherwise, skip to step 4 in that procedure.
To configure OAuth 2.0 and retrieve the required credentials for your Confluence connector setup, do the following:
Enable OAuth 2.0:
Click Permissions.
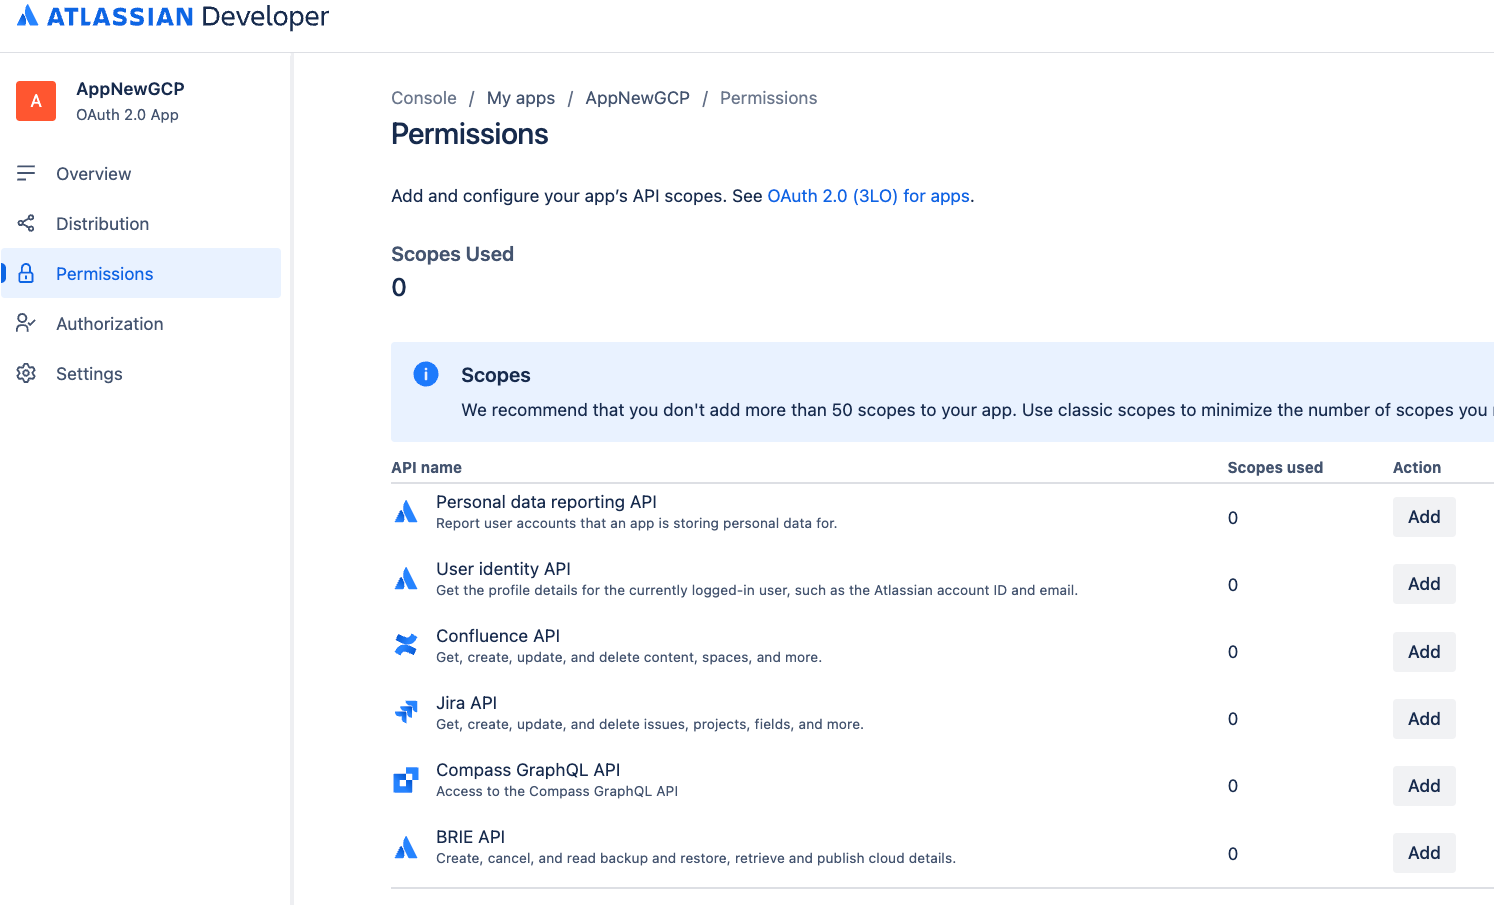
Select permissions Go to Confluence API.
Click Add.
Click Configure.
Go to the Granular scopes tab and click Edit scopes.
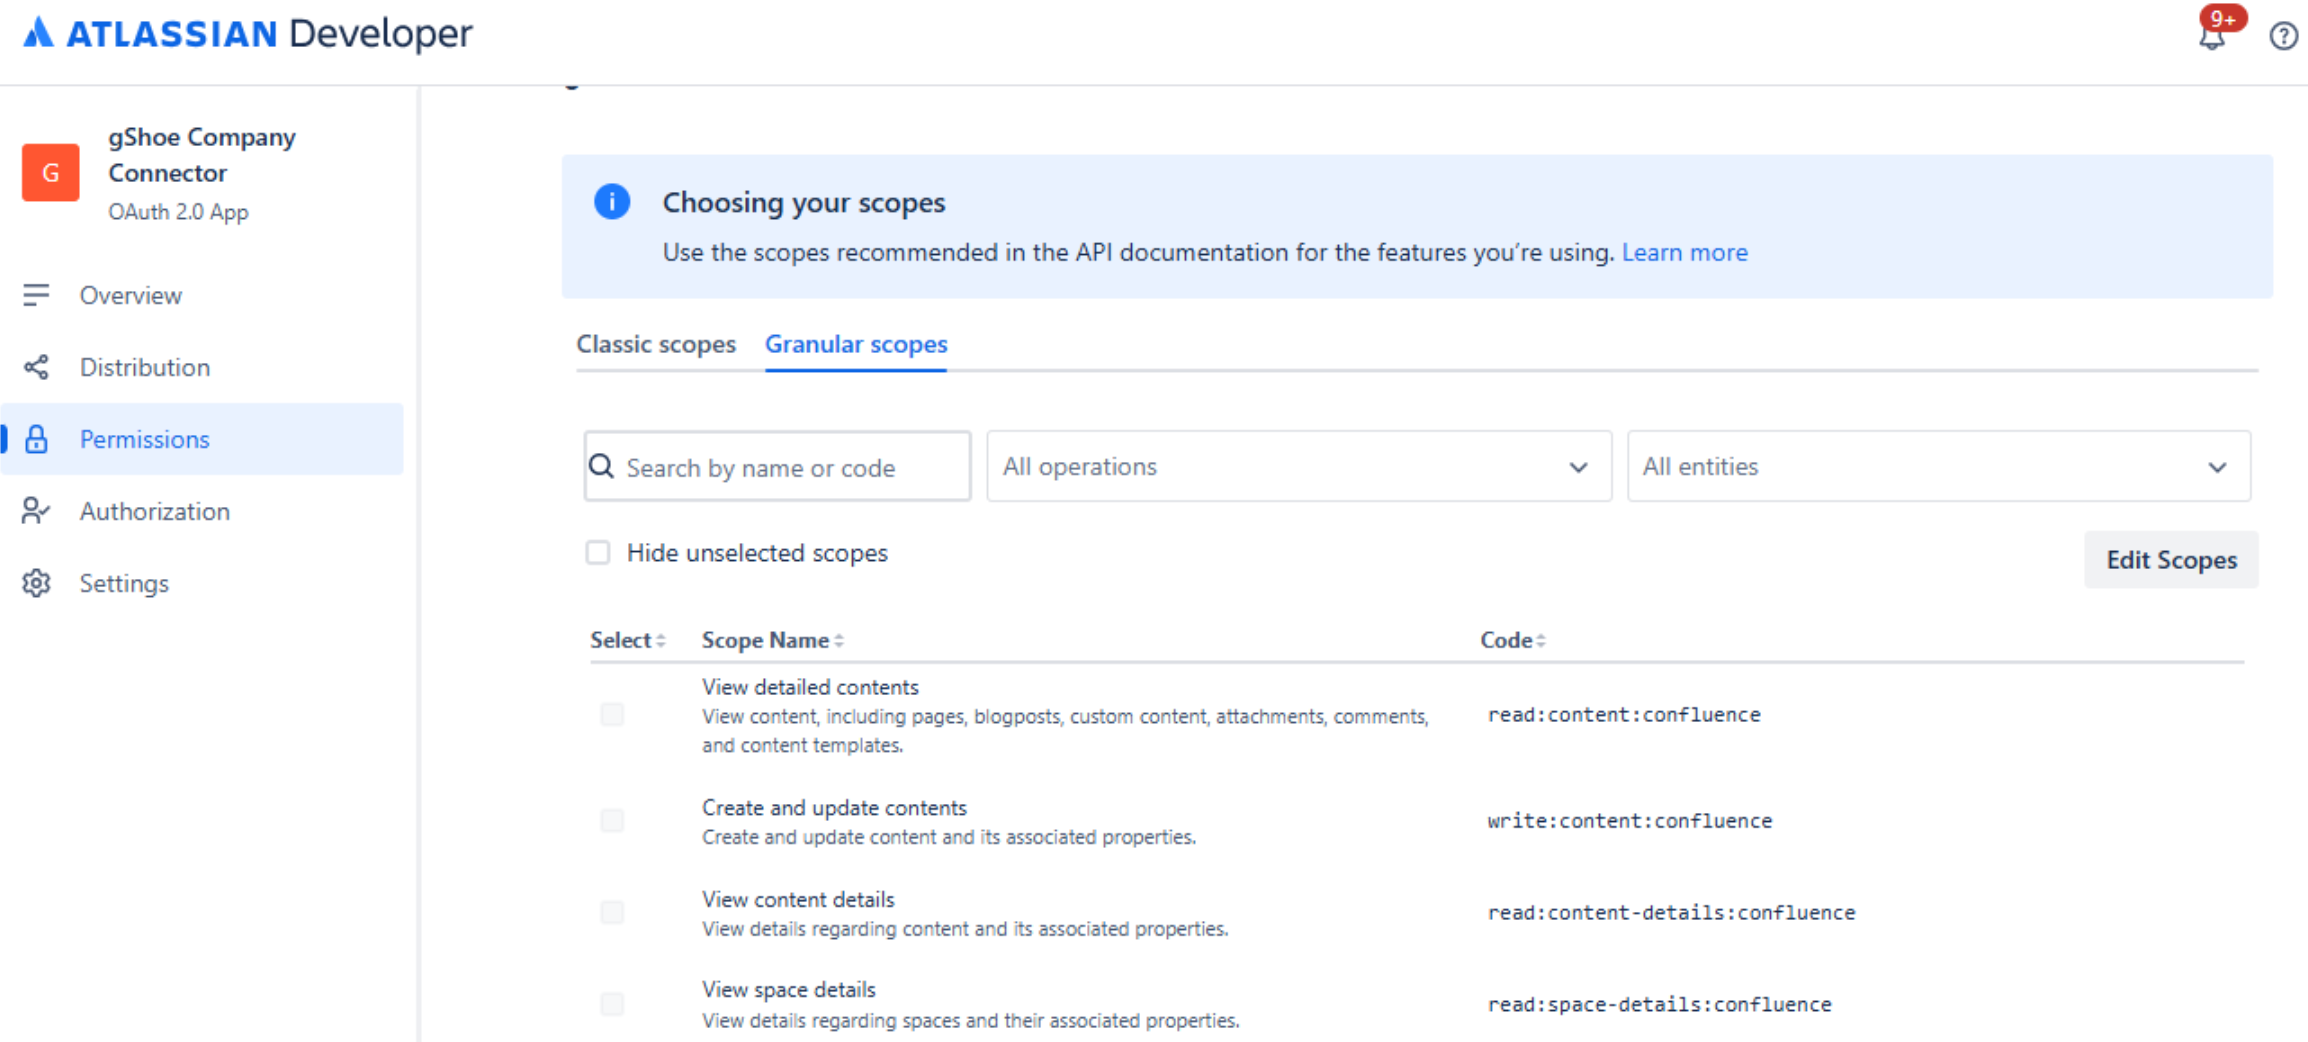
Edit scopes Select the following scopes.
read:attachment:confluenceread:configuration:confluenceread:content.metadata:confluenceread:content-details:confluenceread:whiteboard:confluenceread:group:confluenceread:space:confluenceread:user:confluence
Confirm that eight scopes are selected and save your changes.
Obtain the client ID and client secret:
- Click Distribution.
Select Edit.
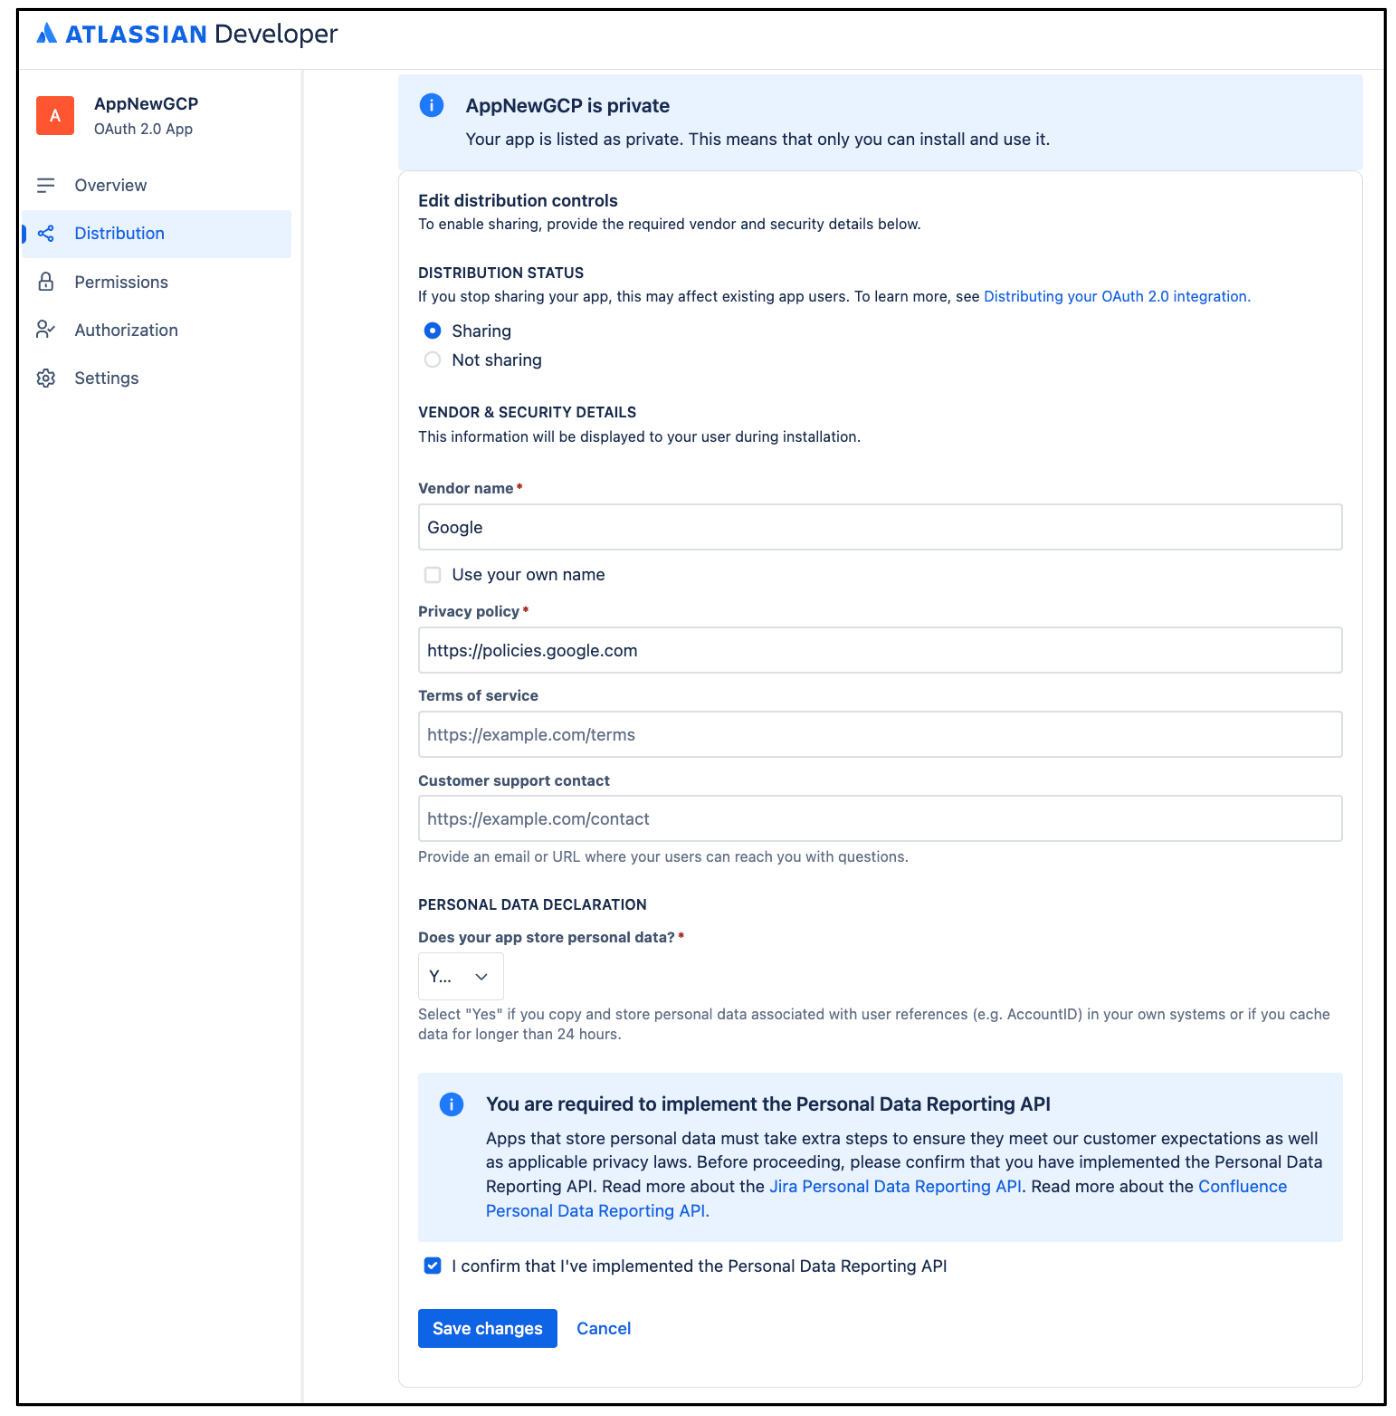
Edit distribution Select Sharing to enable editing other fields.
Fill out the remaining fields. Make sure to set Vendor name to Google and Privacy policy to
https://policies.google.com.In the Personal data declaration section, do the following:
- In the Does your app store personal data? list, select Yes.
To confirm that you have implemented Personal Data Reporting API, select the I confirm that I've implemented the Personal Data Reporting API checkbox.
Click Save changes.
Select Settings, and then copy the values from the Client ID and Client secret fields.
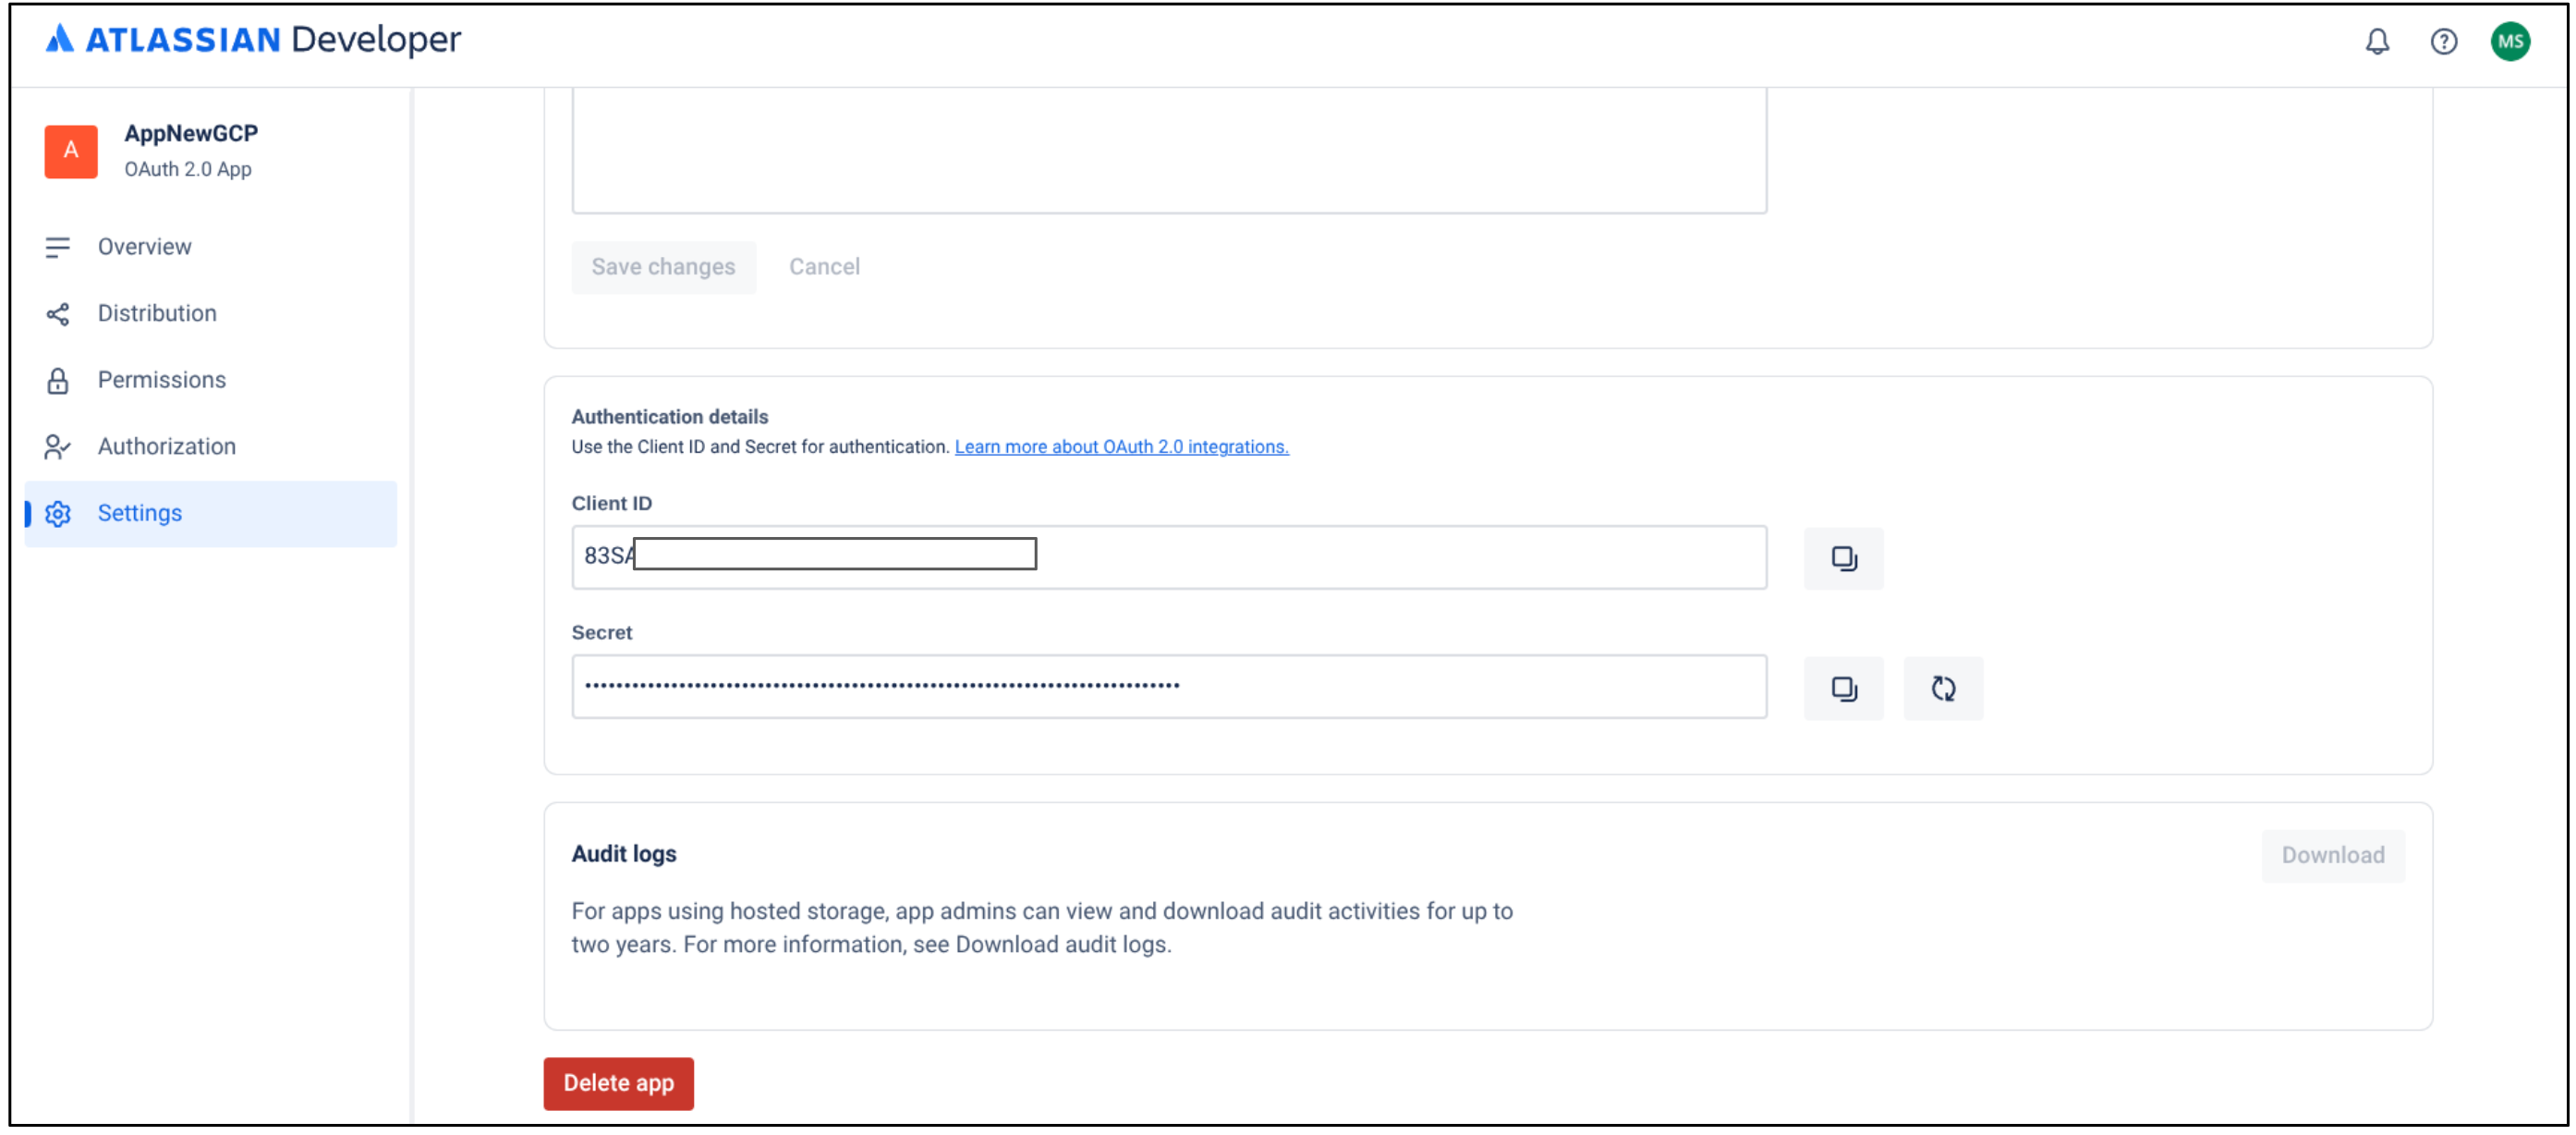
Copy your client ID and client secret
Obtain the instance URL:
- Go to atlassian.net and sign in with your administrator account.
- Select the app you want to sync. For example, sync the first app.
- Find the instance URL. It appears as the subdomain in the address bar.
Obtain the instance ID:
- Open a new tab, copy the instance URL, and append
/_edge/tenant_infoto the instance URL. For example,https://<var>YOUR-INSTANCE</var>.atlassian.net/_edge/tenant_info. Navigate to the link to find the
cloudIdvalue. ThecloudIdis your instance ID.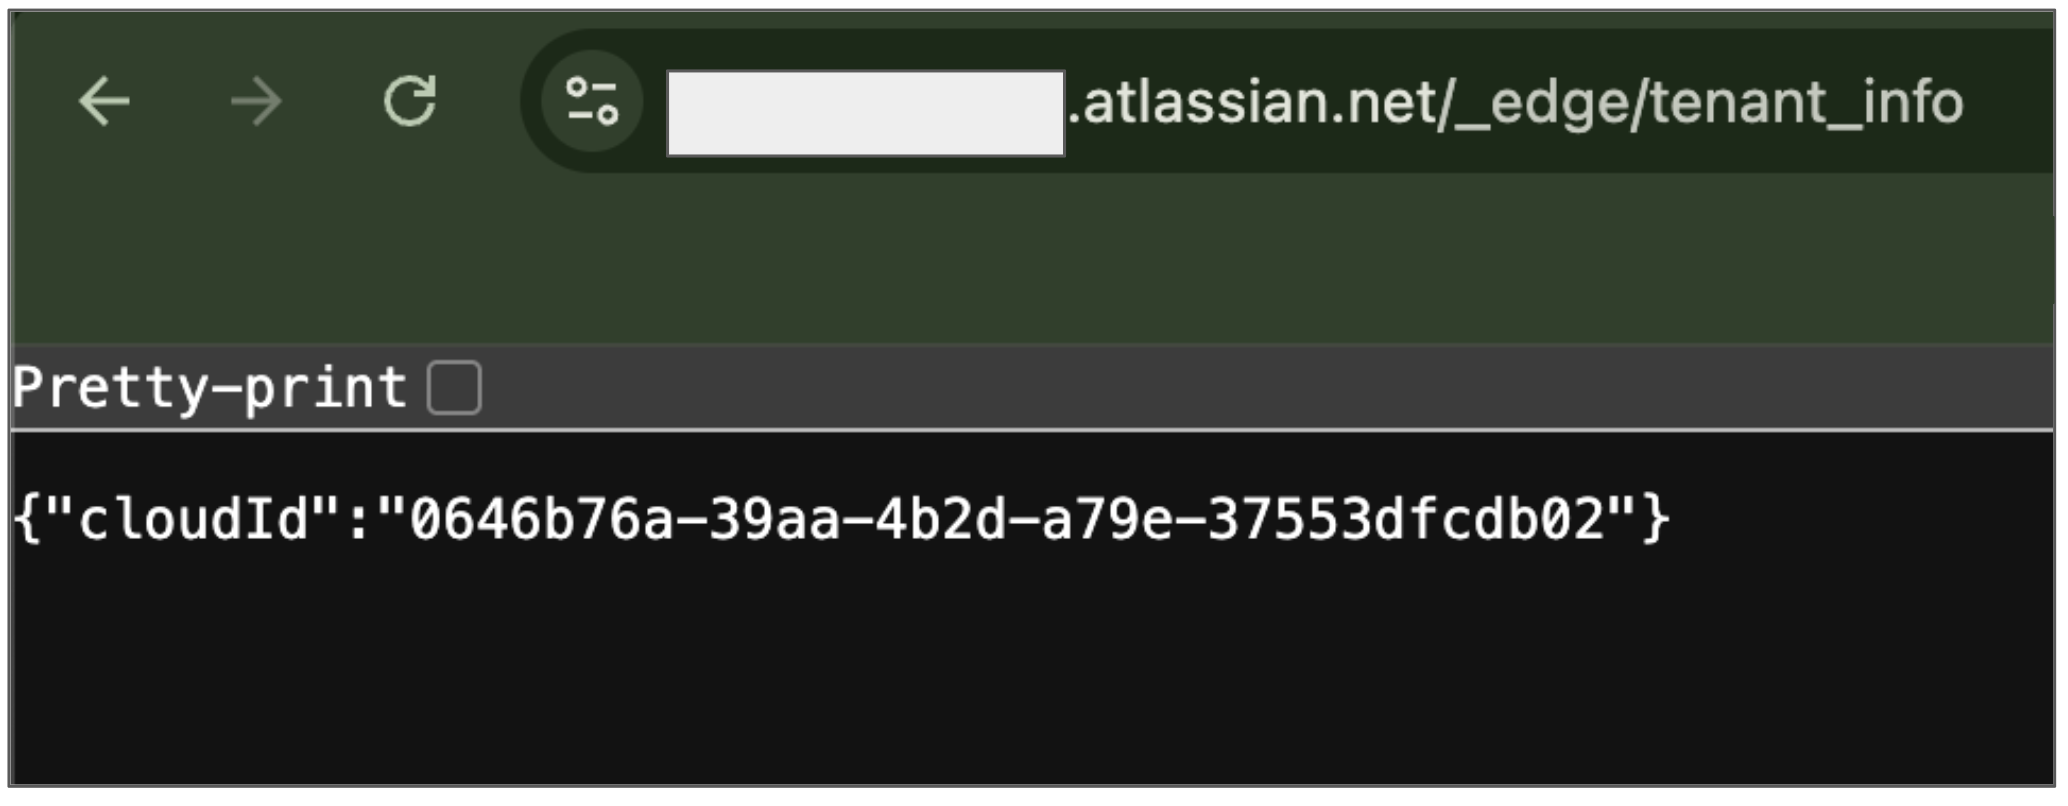
Obtain instance ID
- Open a new tab, copy the instance URL, and append
Minimum OAuth scopes
The following table lists the minimum OAuth scopes required to create a Confluence Cloud connector:
| Permission | Usage reason | Description |
|---|---|---|
| read:content-details:confluence | Data ingestion | Allows the connector to read content details in Confluence. |
| read:content.metadata:confluence | Data ingestion | Allows the connector to read content metadata. |
| read:space:confluence | Data ingestion | Allows the connector to read spaces. |
| read:whiteboard:confluence | Data ingestion | Allows the connector to read whiteboards. |
| read:attachment:confluence | Data ingestion | Allows the connector to read attachments. |
| read:configuration:confluence | Enforce ACLs | Enables enforcement of ACLs to access the Confluence site. |
| read:group:confluence | Enforce ACLs | Enables enforcement of ACLs to read user and group details. |
| read:user:confluence | Enforce ACLs | Enables enforcement of ACLs to read user details. |
Set up an API token in Confluence
If you plan to use an API token for authentication, you must create an API token without scopes. This connector doesn't support API token with scopes.
- Sign in to Atlassian Console.
- Click Create API token.
- Enter a name for the API token.
- Select an expiration date for the API token. The token expiration period ranges from 1 to 365 days.
- Click Create.
- Save the token for later use.
Obtain the instance URL
- Go to atlassian.net and sign in with your administrator account.
- Select the app you want to sync. For example, sync the first app.
- Find the instance URL. It appears as the subdomain in the address bar.
Manage user visibility and grant roles
To set the user visibility, do the following:
Sign in to Atlassian Developer Console.
Click the user profile icon and go to Manage account.
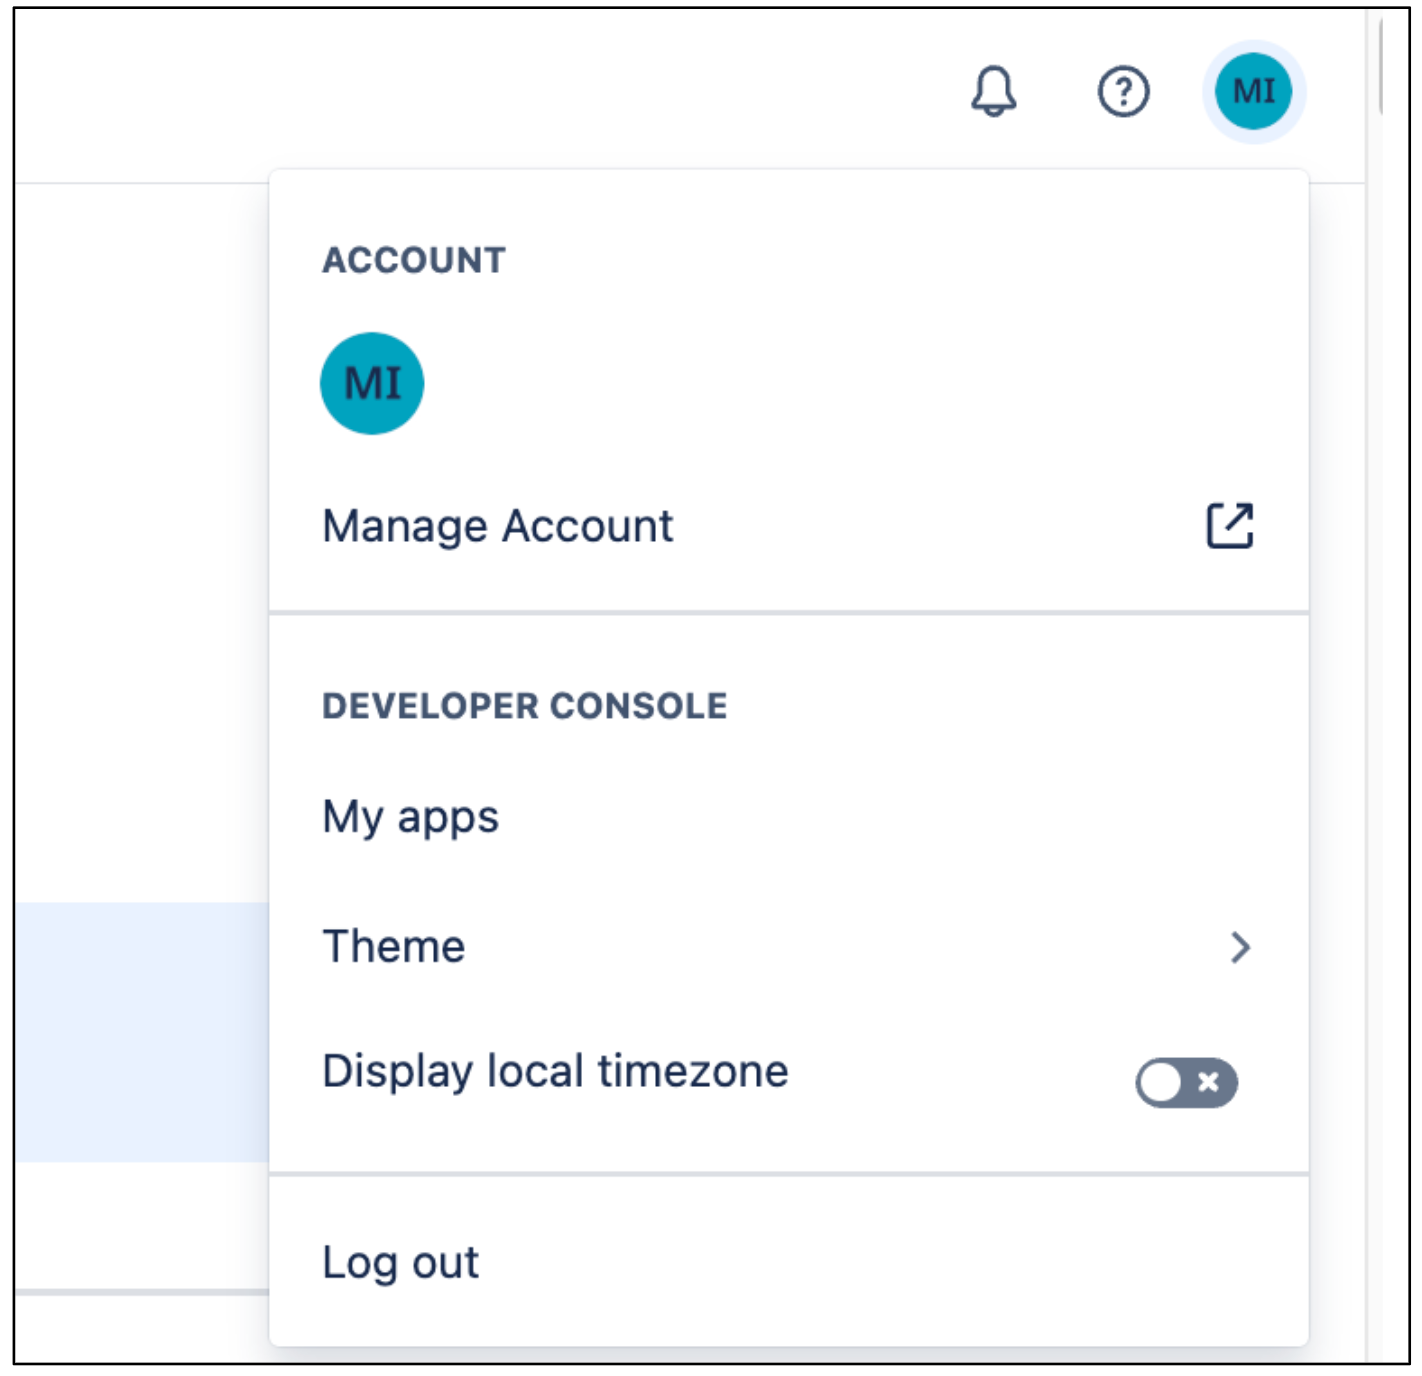
Manage account Navigate to the Profile and visibility.
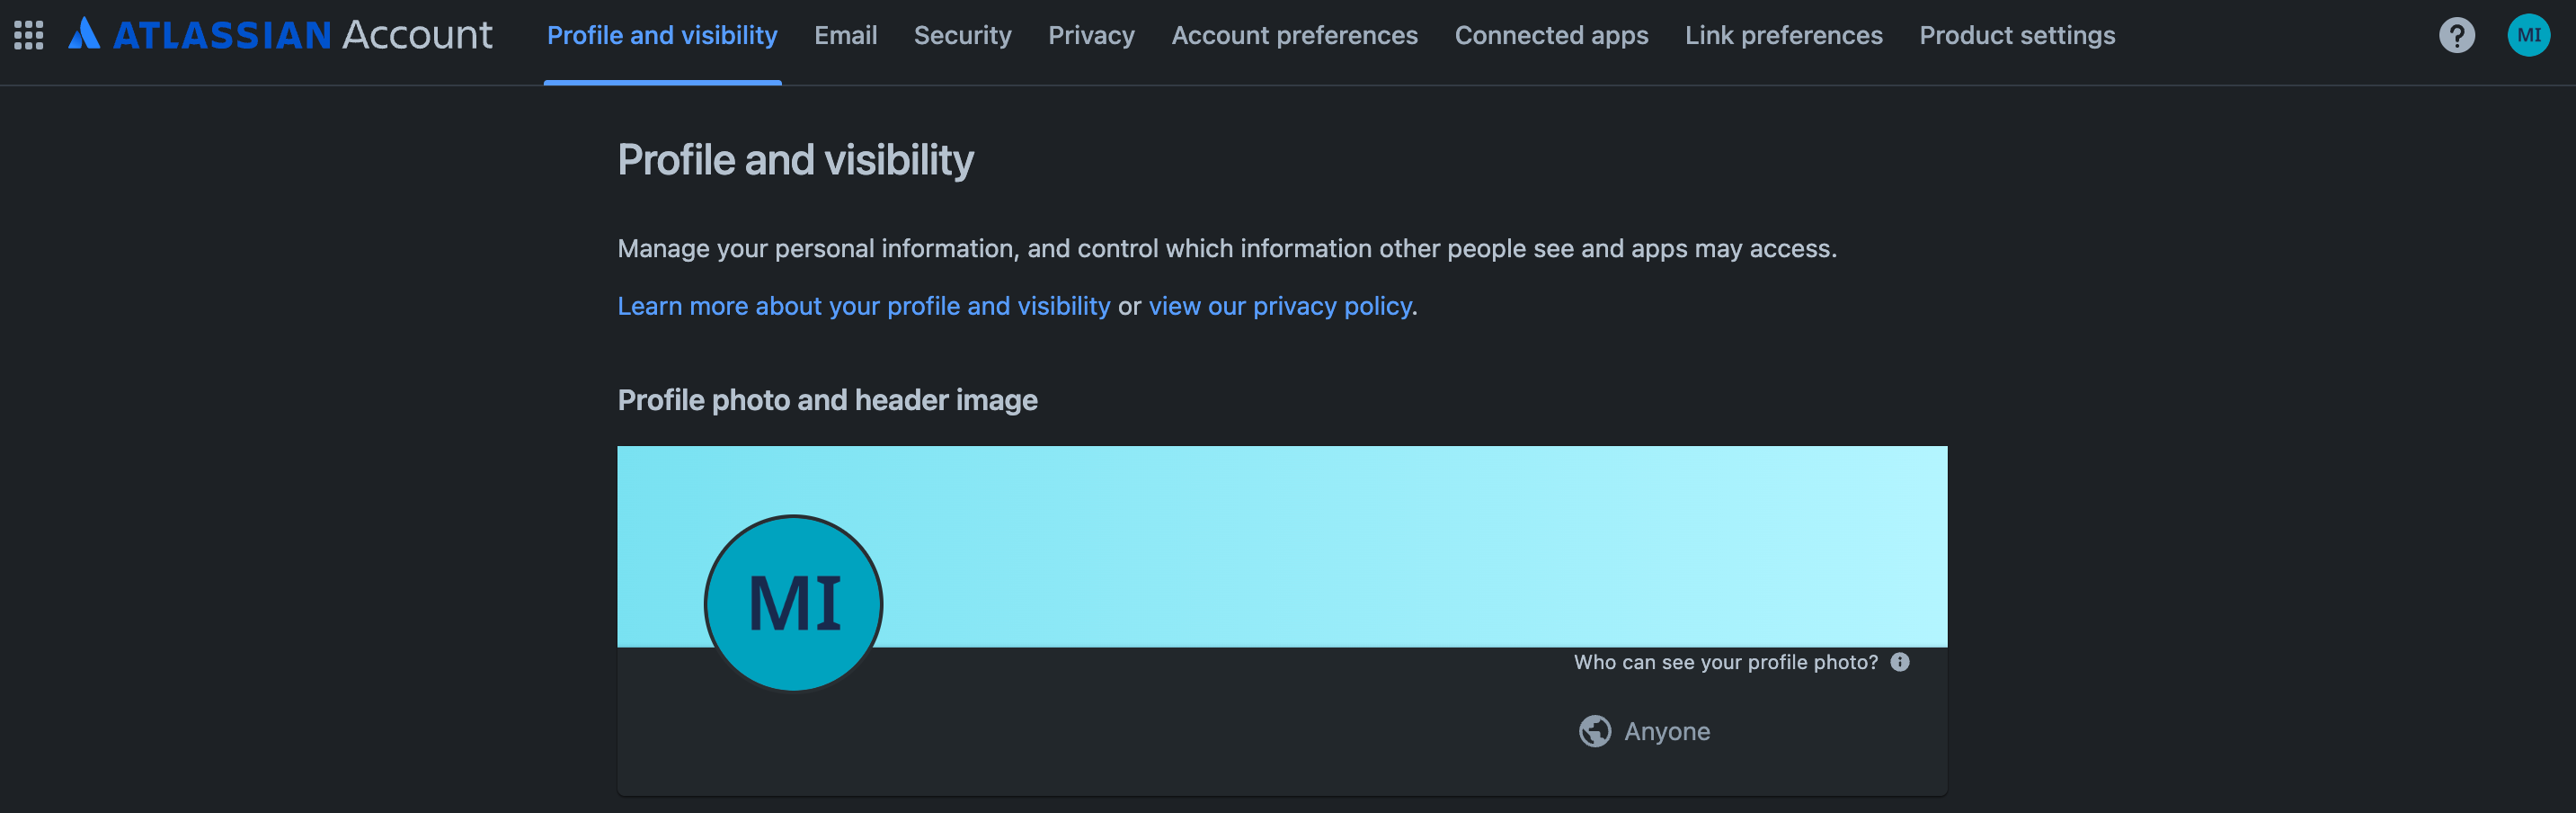
Profile and visibility Go to Contact and set the Who can see this as Anyone.

Contact
Grant a user an administrator role
Optionally, you can grant another user with an administrator role in Atlassian.
Sign in to Atlassian using an administrator account.
Click the menu icon and select your organization. Alternatively, you can go to admin.atlassian.com.
On the Apps page, click more_horiz (the ellipsis icon) next to Confluence and select the Manage users button.

Manage users Click Groups under User management.
On the Groups page:
- Click Create group.
- Enter a name for the group.
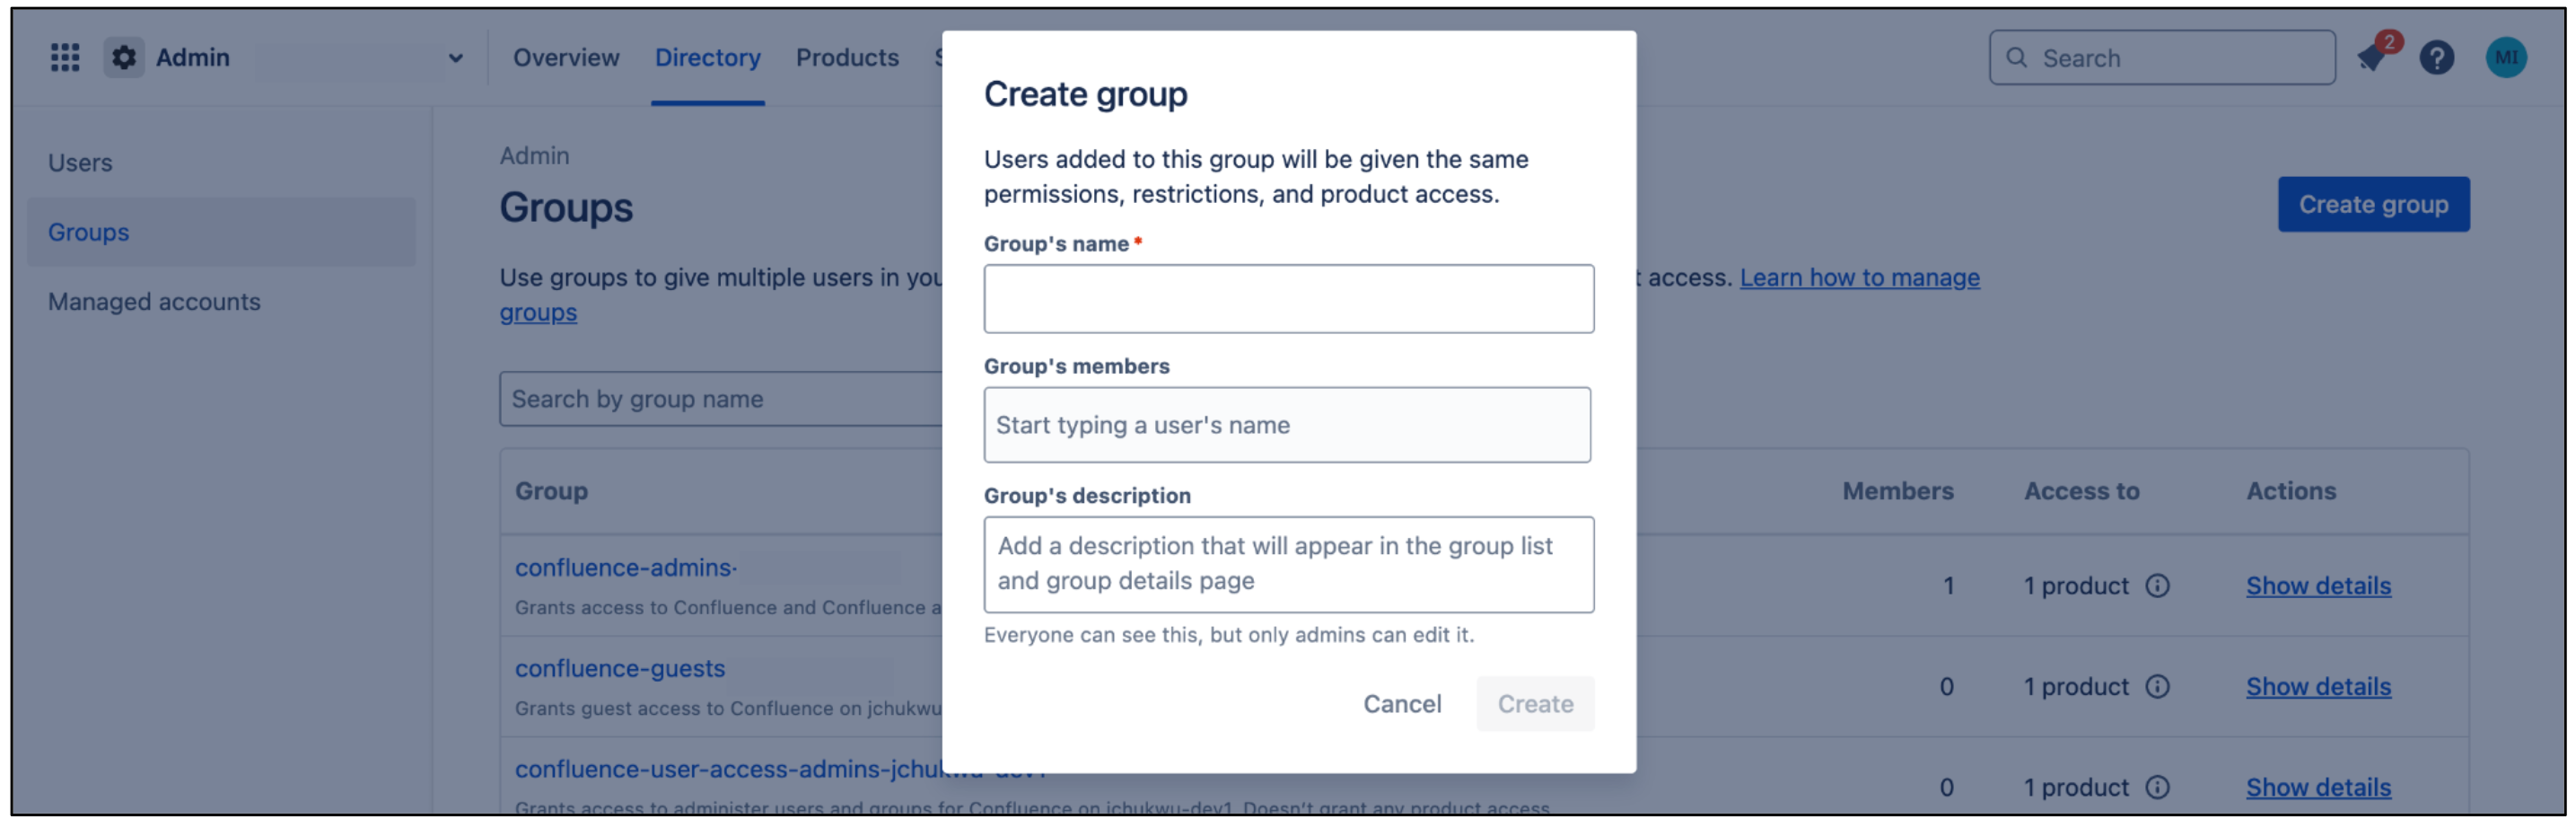
Create group This group receives permissions required by the connector. Users added to this group inherit these permissions. The connector uses this group to authenticate and fetch documents.
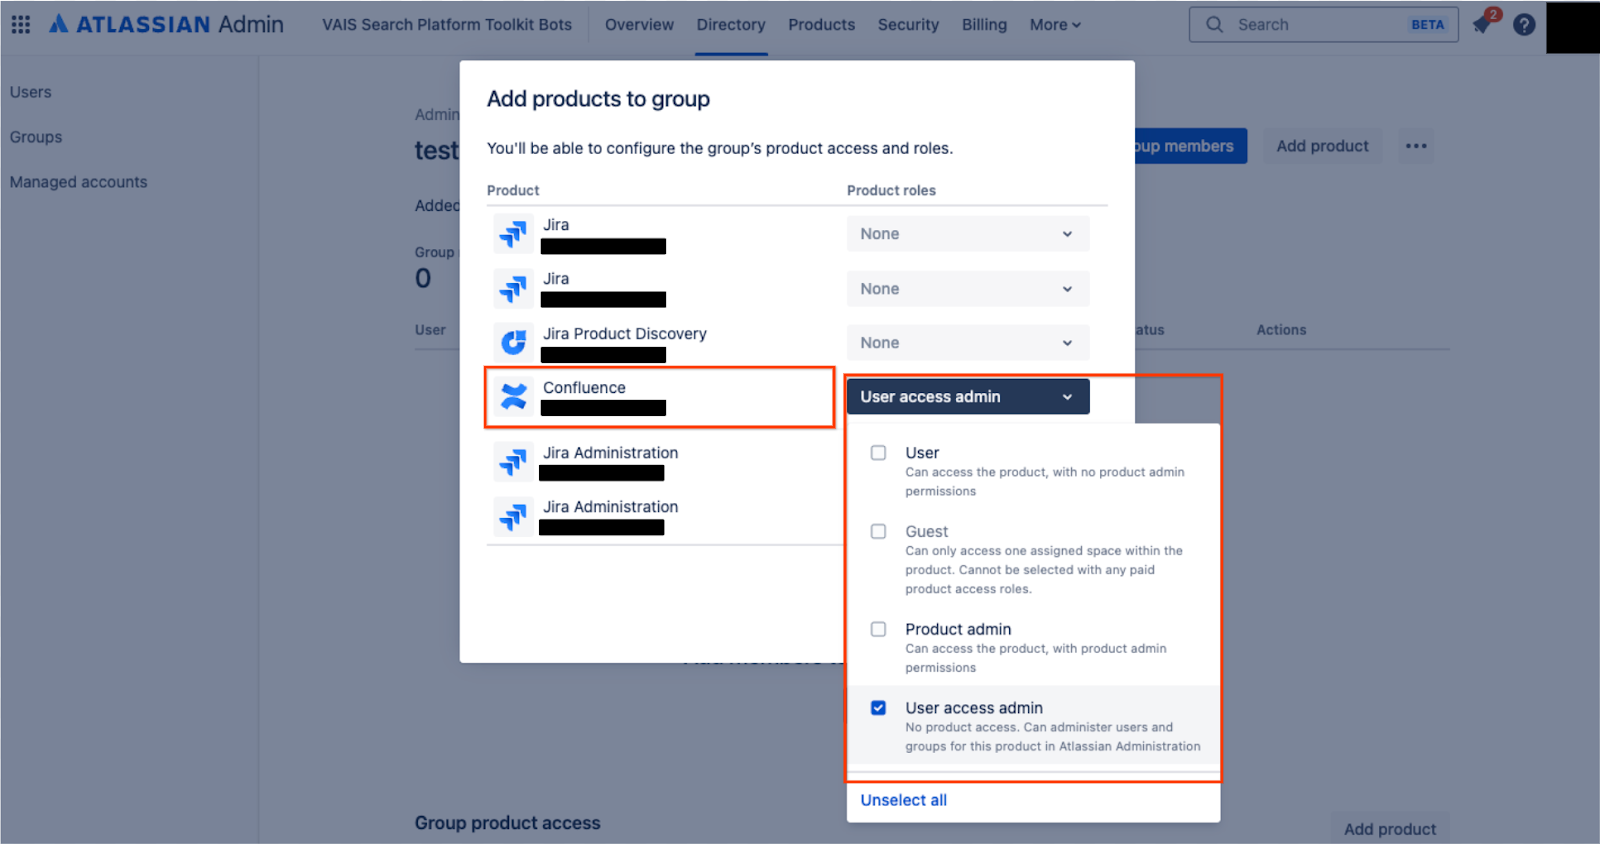
On the group page, click Add product.
- Select User access admin as the product role.
Click Add.
Confluence user access administrator
Click Add group members to add the user account or group members that the connector uses to authenticate.
Add group members
Install and configure User Identity Accessor for Confluence Cloud
If user email addresses aren't publicly accessible by default due to privacy settings in Confluence Cloud, you must install the User Identity Accessor for Confluence Cloud app to securely retrieve user email addresses. If user email addresses are already publicly visible, you might not need to install the app. For more information about restricted email visibility, see Manage user visibility and grant roles.
Roles and permissions
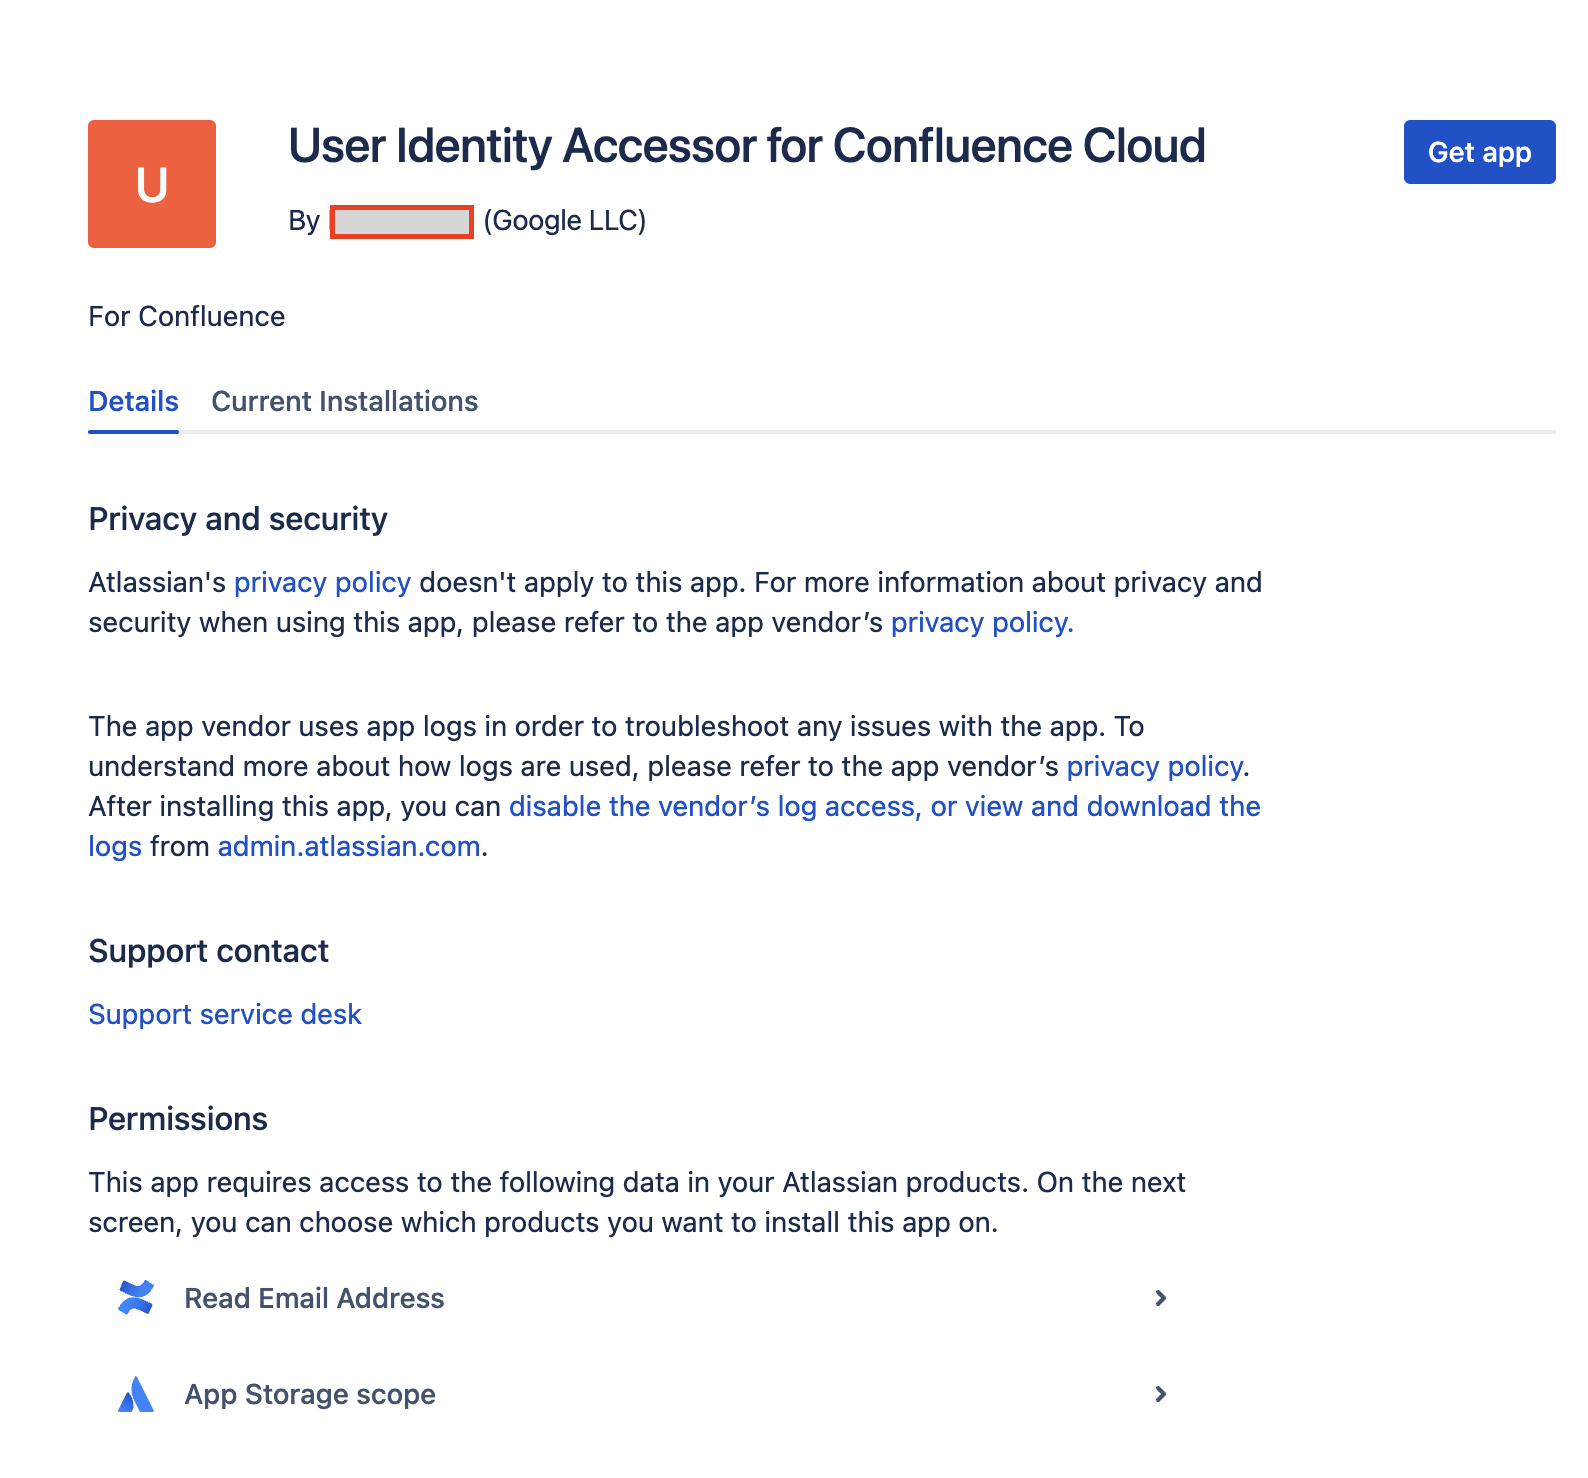
To install and configure the User Identity Accessor for Confluence Cloud app, you must have the appropriate administrative role and grant the required app-level permissions.
- Required role: You must be a
Confluence Site administratorto install and configure the app. - App-level permissions: You must grant the following permissions during the app installation:
Read Email Address: Allows the app to securely retrieve user email addresses, even when profile visibility is restricted.App Storage scope: Enables the app to read and write to its storage device.
Install User Identity Accessor for Confluence Cloud
To install the User Identity Accessor for Confluence Cloud app on your Confluence site, follow these steps:
- Navigate to Atlassian Developer Console.
Review the Read Email Address and App Storage scope permissions and click Get app.
Review permissions and get app From the Select a site to install this app on list, select the Confluence site where you want to install the app. This list displays only the sites for which you have administrator access.
Note: You must be an administrator of at least one Confluence site to install the app.
Click Install to complete the app installation.
Configure User Identity Accessor for Confluence Cloud
After you've installed the User Identity Accessor for Confluence Cloud app, configure an API key that your external system (for example, your Confluence Cloud Connector) uses to securely call the app's webtrigger to fetch emails.
Access the configuration page
To access the User Identity Accessor for Confluence Cloud app's configuration page in Confluence Cloud, follow these steps:
- In your Confluence Cloud instance, click the Settings ⚙️ icon in the navigation menu.
- Select Apps from the menu.
- On the Apps administration page, locate your app, User Identity Accessor for Confluence Cloud, in the Manage apps list.
Click Configure or the link associated with your app. The app's dedicated configuration page opens within Confluence.
Configure the User Identity Accessor for Confluence Cloud app
Set up the API key
To set up the API key on the configuration page, follow these steps:
In the API Key Configuration section, specify the secret key for authenticating requests to the app's webtrigger. You can authenticate requests using either of the following methods:
Enter your own key: Type or paste your own strong, unique API key into the API Key field. Use a key of at least 20–30 characters with a mix of uppercase letters, lowercase letters, numbers, and symbols.
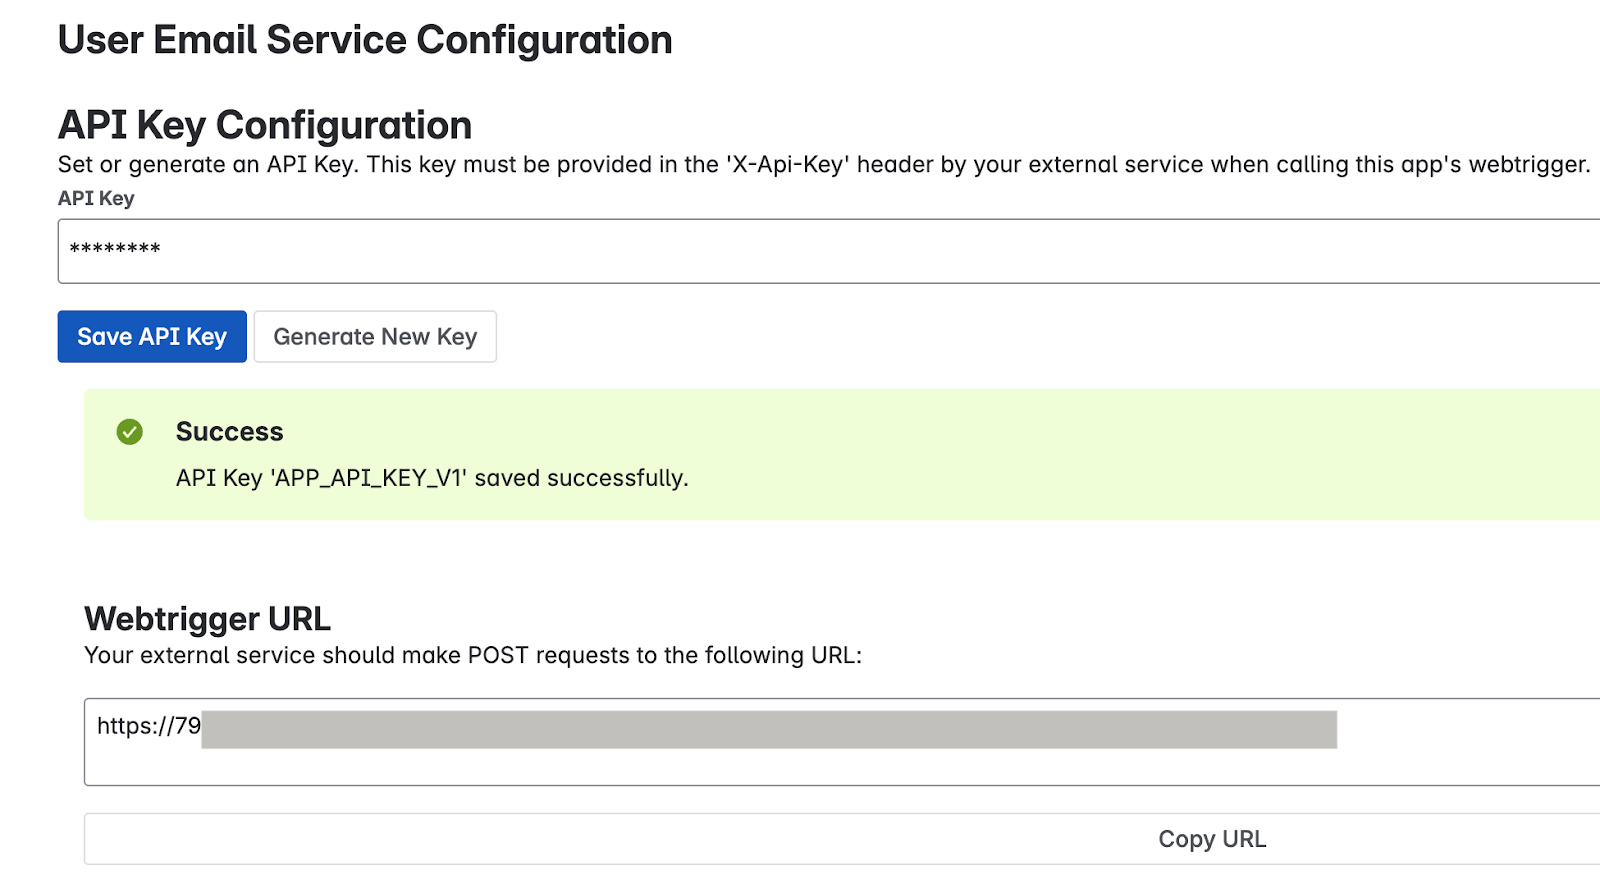
Enter your own key Generate a key: Click the Generate New Key button. The system generates and displays a strong, random key in the field.
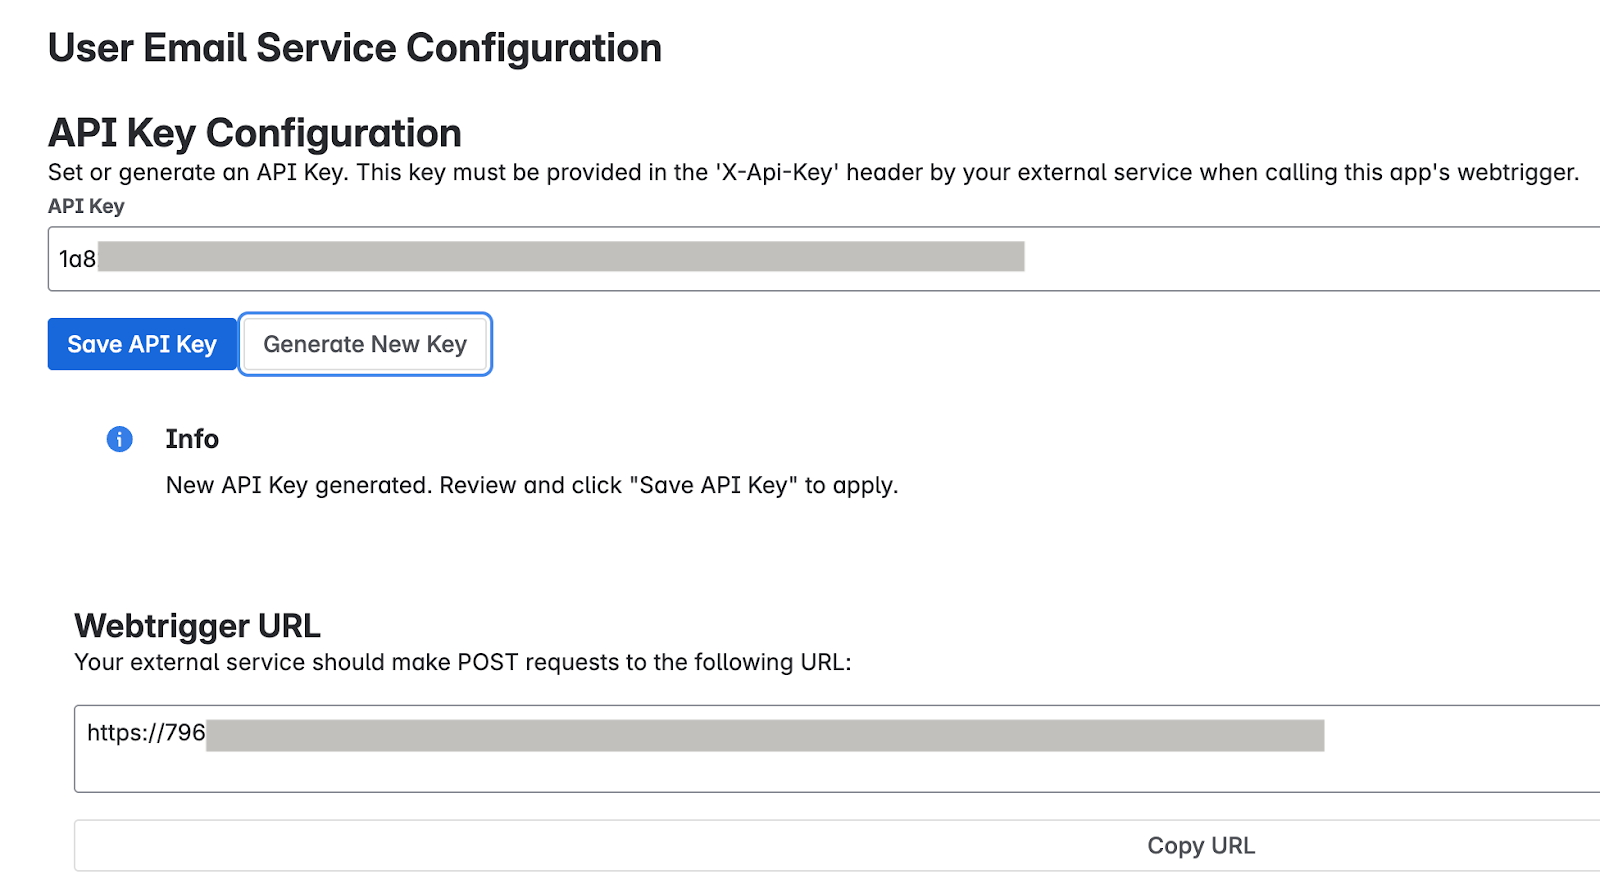
Generate a key Important: Immediately copy the API key displayed in the field. For security reasons, you might be unable to view the full key again after saving or navigating away. If lost, you need to set or generate a new one.
Click Save API Key. A success message confirms that the key is securely saved.
Test the app configuration
Verify if the User Identity Accessor for Confluence Cloud app is configured correctly by sending a request from your external system and confirming that user email addresses are returned successfully.
Get the webtrigger URL
- On the Apps administration page, locate the Webtrigger URL section, which displays the
unique URL specific to your Confluence site and this app installation:
- Your external system must call this URL to request user emails.
- The URL typically looks like:
http://uuid/domain.net/x1/randomId. For example,https://YOUR_INSTANCE_ID.hello.atlassian-dev.net/x1/WEBTRIGGER_ID, whereYOUR_INSTANCE_IDis your Confluence Cloud instance identifier andWEBTRIGGER_IDis the unique identifier for the webtrigger endpoint generated for your app.
- Click the Copy URL button or copy the entire URL.
Configure your external system
Configure your external system that needs to fetch Confluence user emails with the API key and webtrigger URL obtained in the previous steps.
- Endpoint URL: The webtrigger URL you copied.
- HTTP Method:
POST Required Headers:
- Content-Type:
application/json X-Api-Key:
YOUR_API_KEYReplace
YOUR_API_KEYwith the API key you set or generated in the Set up the API key section.
- Content-Type:
Example curl command
This example demonstrates calling the User Identity Accessor for Confluence Cloud webtrigger, which accepts an array of account IDs and returns the email addresses.
curl --location --request POST 'https://YOUR_INSTANCE_ID.hello.atlassian-dev.net/x1/ENDPOINT_PATH' \
--header 'X-Api-Key: YOUR-API-KEY' \
--header 'Content-Type: application/json' \
--data-raw '{
   "accountIds": [
       "ACCOUNT_ID_1",
       "ACCOUNT_ID_2"
   ]
}'
Replace:
YOUR_INSTANCE_IDwith your Confluence Cloud instance IDENDPOINT_PATHwith the API endpoint pathYOUR_API_KEYwith the API key you set or generated in the Set up the API key sectionACCOUNT_IDwith Atlassian account IDs you want to target
Expected response
[{"accountId":"ACCOUNT_ID_1","emailAddress":"EMAIL_ADDRESS_1"},
 {"accountId":"ACCOUNT_ID_2","emailAddress":"EMAIL_ADDRESS_2"}]
Replace:
ACCOUNT_ID_Xwith actual Atlassian account IDsUSER_EMAIL_Xwith user email addresses returned from your API call
Implement security best practices
To confirm the security of your API key, follow these recommendations:
- Store the API key securely within your Confluence Cloud Connector's configuration.
- Verify that all communication with the webhook URL occurs over HTTPS. This is the default for User Identity Accessor for Confluence Cloud webtriggers.
Support for User Identity Accessor for Confluence Cloud
Support offerings are available from Google for the User Identity Accessor for Confluence Cloud app that can include maintenance and regular updates to keep the app up-to-date. If you encounter any issues or have questions specific to the app functionality, contact Google Cloud Support.
Manage Confluence Cloud data stores
This section provides instructions on how to create, update, and upgrade a Confluence Cloud data store.
Create a Confluence Cloud data store
Console
To use the Google Cloud console to sync data from Confluence Cloud to Gemini Enterprise, follow these steps:
In the Google Cloud console, go to the Gemini Enterprise page.
In the navigation menu, click Data Stores.
Click Create Data Store.
On the Select a data source page, scroll or search for Confluence Cloud to connect your third-party source.
In the Specify the Confluence Cloud source for your data store page do the following:
Select your authentication method:
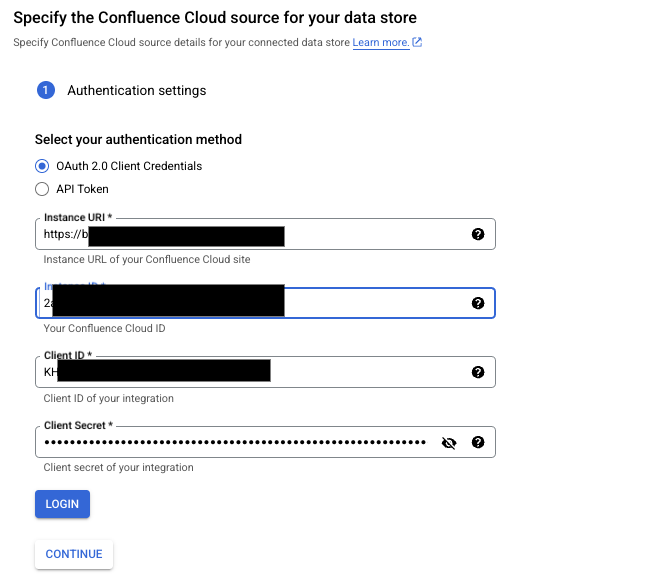
Enter the authentication details To use OAuth for authentication, select OAuth 2.0 Client Credentials and then specify the instance URI, instance ID, client ID, and client secret.
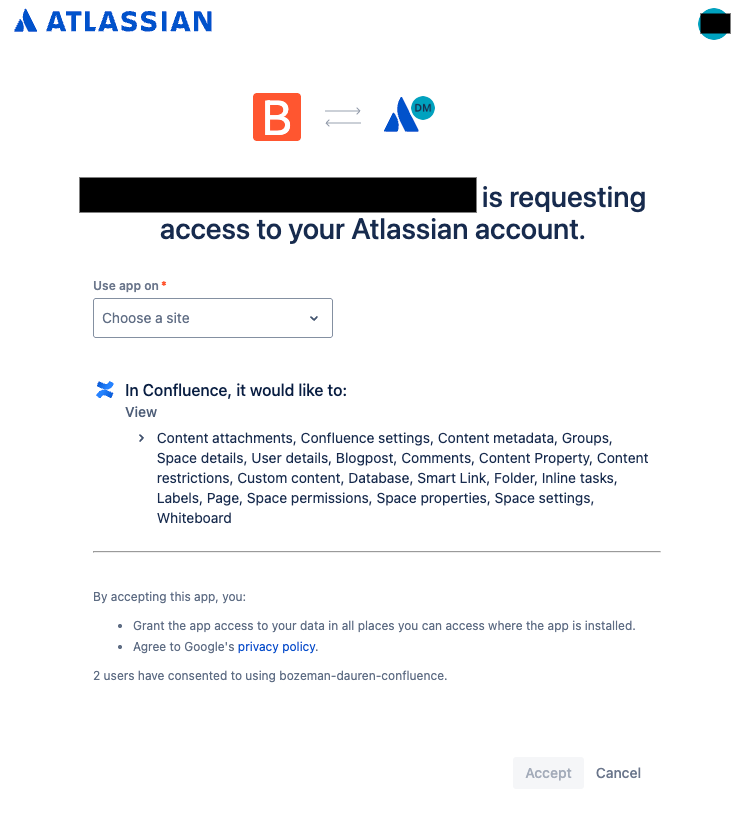
- Click Login, choose a site for the app.
- Click Accept.
The default expiry time for a refresh token is 365 days. If your refresh token expires or is revoked, you can do one of the following:
- Reinitiate the OAuth flow. The user who reauthenticates must have the administrator privileges.
- Use the refresh token to get a new access token and refresh token pair.
For more information, see Access token expires or is revoked.
Choose a site on which to use the app To use API token for authentication, select API Token and then specify the instance URI, Confluence username, and API token.
Click Continue.
(Optional) In the Advanced options section, do the following:
- To allowlist only a set of static IP addresses, select the Enable Static IP Addresses checkbox.
- To apply rate limits on the queries that the connectors sends to
the Confluence instance, in the Max QPS field, specify the maximum queries
per second. The default value is 20 QPS. You can incrementally increase the QPS value based on the Confluence server's performance.
Before you increase the QPS value, consider the following:
- The existing load on the Confluence server.
- The throughput of other third-party applications that are using the server.
- In the Confluence Identity Sync Forge URL field, enter the URL generated by the User Identity Accessor for Confluence Cloud app.
- In the Confluence Identity Sync Forge Client Secret field, enter the client secret configured in the User Identity Accessor for Confluence Cloud, which is the API key you generated or created in the Set up the API key section.
In the Entities to sync section, do the following:
Select the entities you want to sync:
Page
Whiteboard
Blog
Attachment
Comment
The data is ingested based on the administrator permissions that you have when you create the data store. In addition to the administrator permissions, you must also have access to the specific entity records, such as blogs or posts.
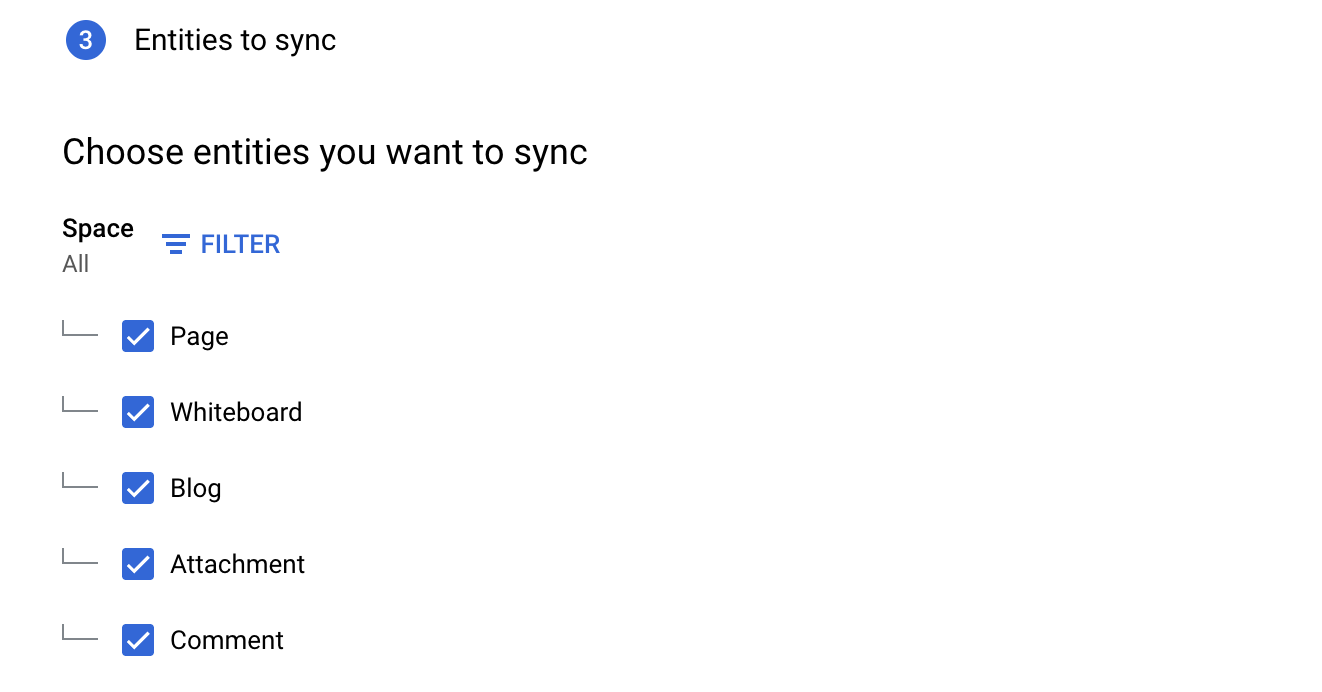
Select entities to sync Optionally, to sync from specific spaces, do the following:
- Click Filter.
- To filter entities out of the index select Exclude from the index or to ensure that they are included in the index select Include to the index.
- Enter the space keys. Press enter after each space key.
- Click Save.
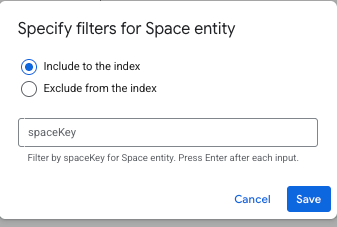
Specify filters to include or exclude entities. Click Continue.
Select the Sync frequency for Full sync and the Incremental sync frequency for Incremental data sync. For more information, see Sync schedules.
If you want to schedule separate full syncs of entity and identity data, expand the menu under Full sync and then select Custom options.
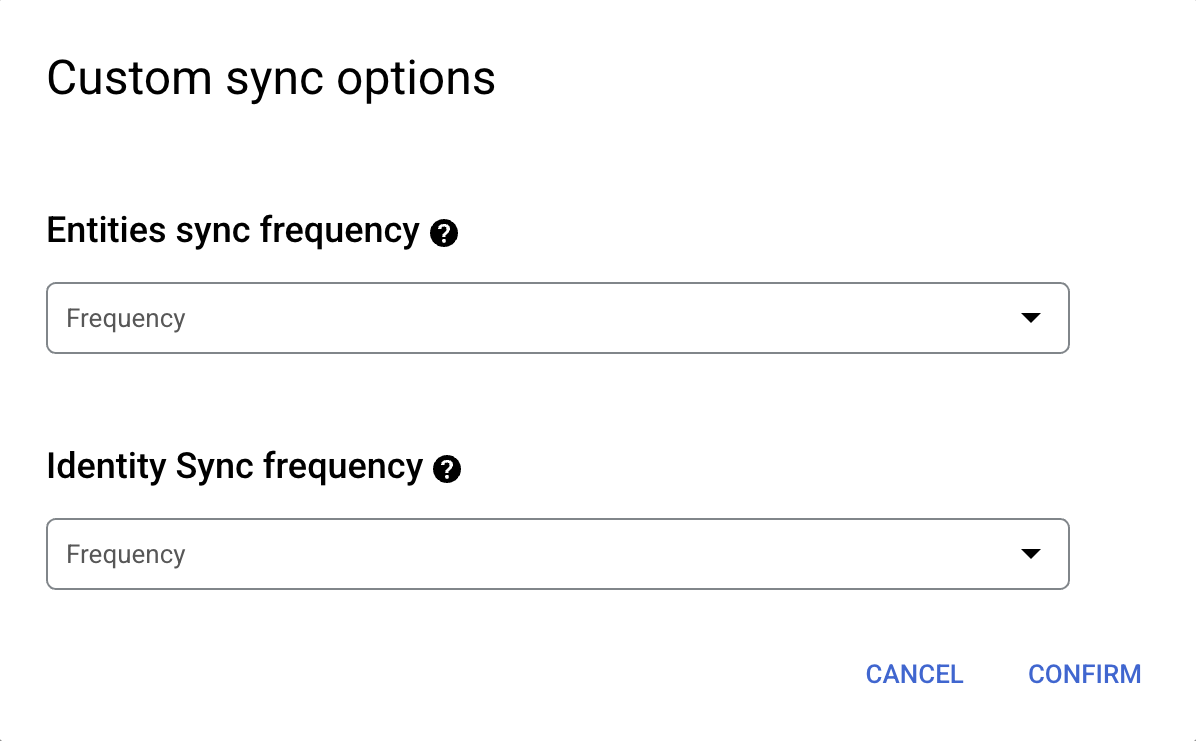
Setting separate schedules for full entity sync and full identity sync. Select a region for your data connector.
Enter a name for your data connector.
Click Create. Gemini Enterprise creates your data store and displays your data stores on the Data Stores page.
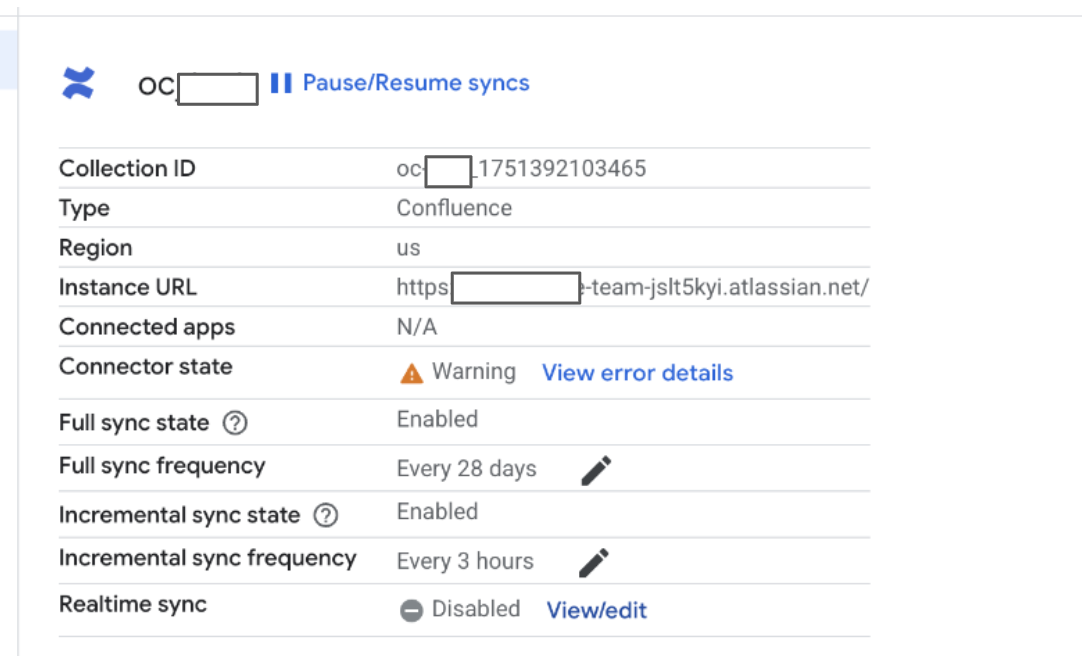
To check the status of your ingestion, go to the Data Stores page and click your data store name to see details about it on its Data page. The Connector state changes from Creating to Running when it starts synchronizing data. When ingestion is complete, the state changes to Active to indicate that the connection to your data source is set up and awaiting the next scheduled synchronization.
Depending on the size of your data, ingestion can take minutes or hours.
Update the data store
You can update the following data store parameters:
- Data store name
- Authentication credentials, such as client ID, client secret, user account, and API token.
- Max QPS and forge app parameters, such as the Confluence identity sync forge URL and client secret.
- Full sync frequency, incremental sync frequency, and real-time sync.
- Filter condition for ingesting entity data.
To update the data store, follow these steps:
In the Google Cloud console, go to the Gemini Enterprise page.
In the navigation menu, click Data Stores.
Click the name of the data store that you want to update.
Update the following values:
- To update the data store name, full sync frequency, or incremental sync frequency, click the Edit icon .
- To update the real-time sync frequency, click View/edit next to Real-time sync.
- To update authentication credentials, click Re-authenticate, and then specify the values.
- To update Max QPS or Forge app parameters, click View/edit Parameters, and then specify the values.
- To update the filter condition for the entities, in the Entities section, click Edit parameters, and then click Filters.
Upgrade to a new data store
If you experience issues with the accuracy of the page entity search results, do the following to upgrade to the latest version of data store:
- Identify whether you use the latest version of the data store:
- In the navigation menu, click Data Stores.
- Click the name of the data store.
- In the data store details page that appears, on the Entities tab, click the Page entity.
- On the Data page, check whether the value of the Type field. If the
value is
Unstructured data, the latest version of the data store is in use and no action is required. If the value isStructured data, proceed with the following steps to create and migrate to the new data store.
- Create a new data store.
- Make sure that one full sync gets completed for the new data store with the required data.
- Add the new data store to the app.
- Pause the syncs on the previous data store.
- After you verify that the new data store is working as intended for the page entity search, delete the previous data store from the app.
Enable real-time sync
Real-time sync only syncs document entities and doesn't sync data related to identity entities. The following table shows which document events are supported with real-time sync.
| Confluence entities | Create | Update | Delete | Permission changes |
|---|---|---|---|---|
| Spaces | ||||
| Pages | ||||
| Blogs | ||||
| Attachments | ||||
| Comments | ||||
| Whiteboards |
Enable real-time sync 20 minutes after creating the Confluence Cloud data store. To enable real-time sync for a Confluence data source, follow these steps:
Generate a webhook URL
- Navigate to the Gemini Enterprise page, and in the navigation menu, click Data Stores.
- Select a Confluence data store.
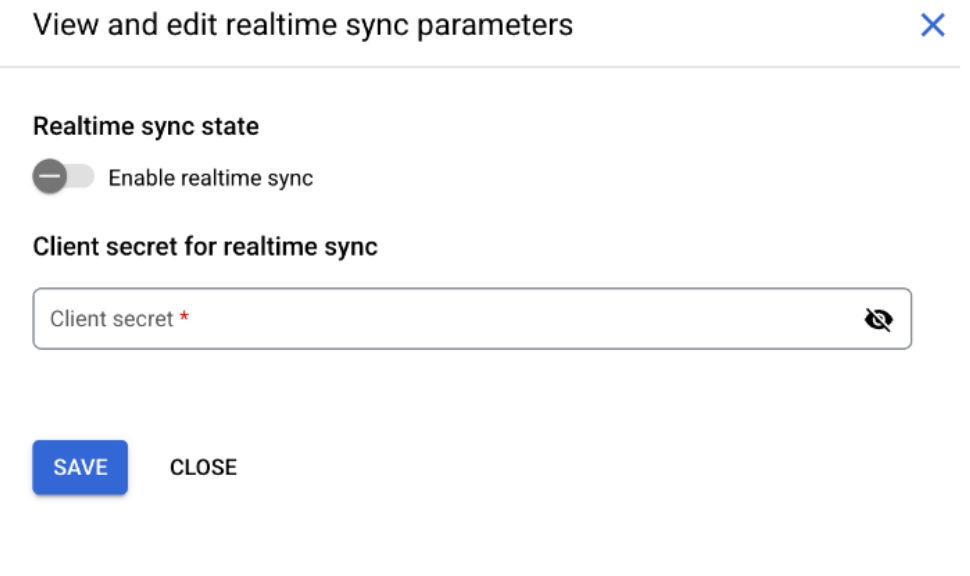
Click View/Edit in the Realtime sync row.
Realtime sync : Disabled state In the View and edit realtime sync parameters dialog, do the following:
- To turn on real-time sync, click the Enable realtime sync toggle.
- In the Client secret field, enter a placeholder value, such as
clientsecret. - Click Save.
Enable real-time sync
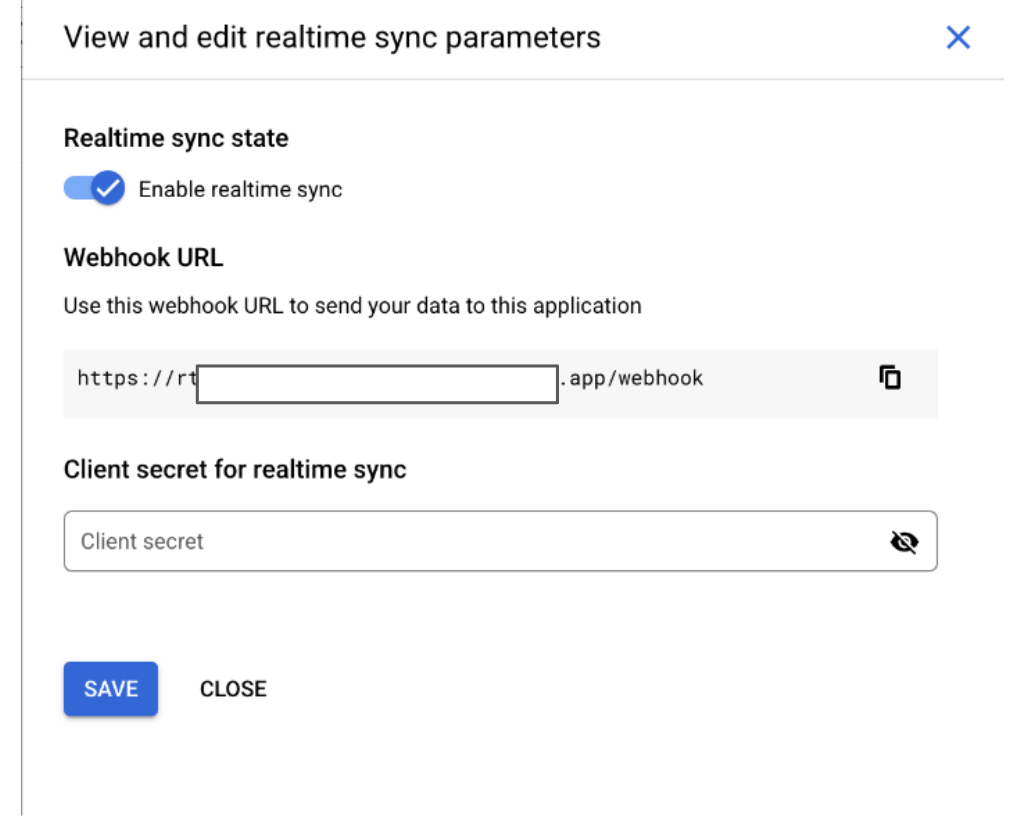
After the status of Realtime sync changes to
Running, click View/Edit.
Realtime sync : Running state In the View and edit realtime sync parameters dialog, do the following:
- Copy the Webhook URL.
- Click Close.
Copy webhook URL
Subscribe to events using the API
To receive real-time updates from Confluence, you must subscribe to specific events using a POST request. To make API calls, use the same administrator account used for setting up authentication and permissions in Confluence to create the data store.
      curl -X POST \
        INSTANCE_URL/wiki/rest/webhooks/1.0/webhook \
        -H "Content-Type: application/json" \
        -u "USERNAME:API_TOKEN" \
        -d '{
          "name": "SUBSCRIPTION_NAME",
          "url": "LISTENER_URL",
          "events": [
            "EVENT_TYPE_1",
            "EVENT_TYPE_2"
          ],
          "active": true
        }'
INSTANCE_URL: The base web address for your Atlassian Cloud site.
USERNAME: The Atlassian Cloud username.
API_TOKEN: The API token generated from your Atlassian account. For more information, see Set up an API token in Confluence
SUBSCRIPTION_NAME: A unique name for your event subscription.
LISTENER_URL: The webhook URL copied from the Google Cloud console once Real-Time Sync (RTS) is enabled on your data store.
EVENT_TYPE: The event types that you want to subscribe to. You can subscribe to create, update, and delete events for attachments, blog posts, pages, spaces, and comments.
The user can subscribe to the following events:
space_createdspace_updatedpage_createdpage_updatedattachment_createdattachment_updatedcomment_createdcomment_updatedblog_createdblog_updated
API error codes
This table lists common API error codes users encounter when creating webhooks.
| Error class | Error code | Error message | Troubleshooting |
|---|---|---|---|
403 |
FORBIDDEN |
Current user not permitted to use Confluence. | Ensure a valid token from an administrator account and correct API endpoint. |
Error messages
The following table describes the common error messages, their descriptions, and possible solutions when connecting Confluence Cloud with Gemini Enterprise.
| Error code | Error message | Description | Troubleshooting |
|---|---|---|---|
| CONFLUENCE_INVALID_AUTHENTICATION_1 | Authentication error. More information: | The connector cannot authenticate with Confluence Cloud. | Re-authenticate the data store with administrator credentials. |
| CONFLUENCE_INVALID_AUTHORIZATION_1 | Authorization error. More information: | A user account without administrator privileges attempted to access Confluence Cloud. | Re-authenticate the data store using administrator credentials. |
| CONFLUENCE_TOO_MANY_REQUEST | Too many 429 HTTP Requests to Confluence Cloud. | The number of requests that the connector sent exceeds the default QPS value. | If this issue persists, reduce the QPS value of the data store using the Max QPS field. |
Known limitations
- The legacy user management model is not supported for integration with Confluence Cloud. Only the centralized user management model is supported. For more information, see Atlassian organization consolidation guide
- The appearance of the macros that you added on Confluence pages might differ from user to user based on their access permissions.
- This connector doesn't support incremental sync for the spaces entity.
- You can't use a Google Cloud service account to authenticate to Confluence Cloud.
Next steps
To attach your data store to an app, create an app and select your data store following the steps in Create an app.
To preview how your search results appear after your app and data store are set up, see Preview search results.
To enable alerts for the data store, see Configure alerts for third-party data stores.