This document shows you how to set up Visual Studio's Publishing Wizard to simplify deployment of .NET apps to Google Cloud.
Introduction
Deploying .NET apps to Google Cloud is easier than ever with the latest release of Cloud Tools for Visual Studio. We now have a deployment wizard built into the extension that will deploy your app to the following supported targets:
- Compute Engine for ASP.NET 4.x apps
- App Engine flexible environment and Google Kubernetes Engine for ASP.NET Core apps
The deployment wizard will automatically detect what targets are supported for your project and guide you through the deployment process.
Getting started
The deployment wizard can be invoked by either going to Tools > Google Cloud Tools > Publish [PROJECT-NAME] to Google Cloud or by right-clicking on the project node in the Solution Explorer and clicking on Publish [PROJECT-NAME] to Google Cloud.
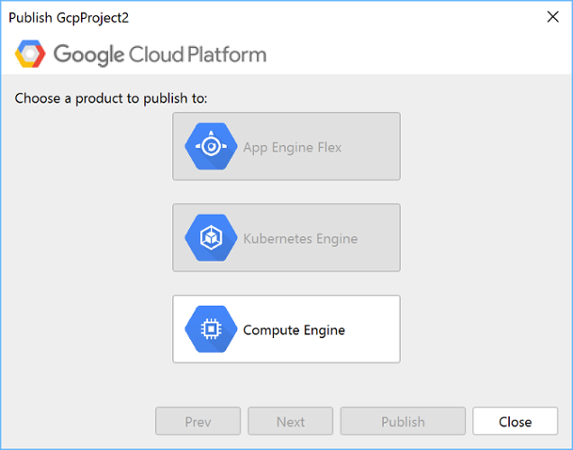
The deployment wizard will display Google Cloud deployments targets that are compatible with the selected project.
If you want to change the project, open the Cloud Explorer by clicking on Tools > Google Cloud Tools > Open Cloud Explorer and select the project you want to deploy.
Deploying ASP.NET 4.x Apps
To deploy your ASP.NET 4.x app on Compute Engine:
Open the deployment wizard by clicking Tools > Google Cloud Tools > Publish [PROJECT-NAME] to Google Cloud.
Select Compute Engine
Select the Windows VM instance and deployment credentials
The Windows VM has to be running IIS and capable of running ASP.NET 4.x apps, such as an ASP.NET VM created from the Deployment Manager.
Select credentials for the deployment. To create Windows credentials click on Manage Credentials.
Click Publish to build and deploy your app to the selected VM.
Deployment progress will be displayed in the Visual Studio output window and a progress indicator will be displayed in the Visual Studio shell status bar.
Deploying ASP.NET Core Apps
ASP.NET Core apps can run inside of a Docker container so your app can be deployed on the App Engine flexible environment and GKE.
Deploying on App Engine Flexible Environment
To deploy on flexible environment:
Open the deployment wizard by clicking Tools > Google Cloud Tools > Publish [PROJECT-NAME] to Google Cloud.
Select App Engine Flex
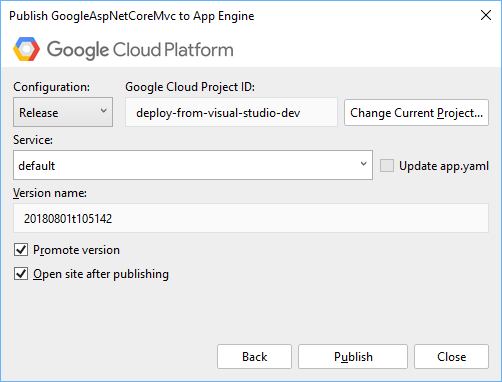
Enter your app's version name and traffic management choice.
- The default version name is based on the current system time. You can specify a different name.
- Promoting version lets you choose if this app version should receive 100% of the traffic. Checking this box will result in the new app receiving all of the traffic immediately after deployment.
Click Publish to build and deploy your app to the App Engine flexible environment.
That's it! Your app will be deployed and progress will be displayed in the Visual Studio output window.
Custom App Engine settings can be done by creating an app.yaml file
in the root folder of your project.
To generate app.yaml, right click on the project you want to deploy and
click Generate app.yaml and Dockerfile for [PROJECT-NAME]. You can delete
the Dockerfile if you want to run the default Docker image.
Deploying on GKE
To deploy on GKE:
Open the deployment wizard by clicking Tools > Google Cloud Tools > Publish [PROJECT-NAME] to Google Cloud.
Select Container Engine.
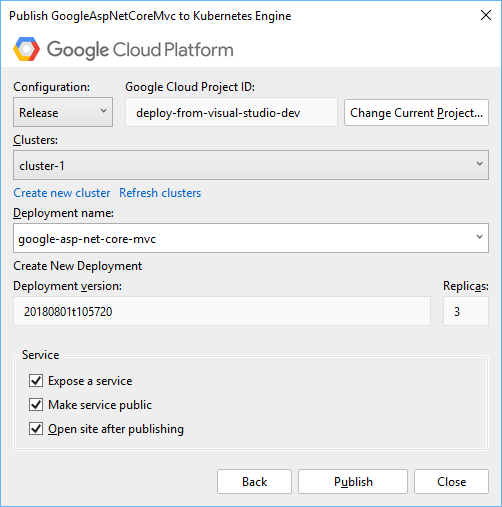
Select a cluster for deployment, enter your app's deployment name, version and the number of replicas.
To create a cluster, click Create new cluster. This will take you to the cluster creation page on Google Cloud console. To view the cluster in Visual Studio, click Refresh clusters.
The deployment name is used when creating the Kubernetes deployment and, if optionally selected, the kubernetes service to run your app on the cluster. You can change the name to something more descriptive.
- The default version name is based on the current system time. You can specify a different name.
The number of replicas can be changed, the default is three.
You can choose to expose a Kubernetes service on the Internet. By exposing a public service on the Internet you will get a public IP address that you can use to access your service from outside your cluster.
Click Publish
That's it! Your app will be packaged in a Docker image and deployed to your container. If your app is an exposed service then Visual Studio will wait until the service's IP address is available.