创建基于 Deployment Manager 的解决方案
在为组织中的用户创建 Service Catalog 解决方案时,您可以创建 Deployment Manager (DM) 解决方案,用户可以使用 Deployment Manager 模板启动该解决方案。创建解决方案后,您可以通过将解决方案添加到目录,与用户共享解决方案。
准备工作
您必须具有与 Google Cloud 启用了 Service Catalog 的项目相关联的 Google Cloud组织的 Catalog Admin (
roles/cloudprivatecatalogproducer.admin) 或 Catalog Manager (roles/cloudprivatecatalogproducer.manager) 角色。如果您没有此角色,请与 Organization Administrator 联系以申请访问权限。-
Enable the Cloud Deployment Manager and Compute Engine APIs.
Roles required to enable APIs
To enable APIs, you need the Service Usage Admin IAM role (
roles/serviceusage.serviceUsageAdmin), which contains theserviceusage.services.enablepermission. Learn how to grant roles.
准备部署模板
如需在 Service Catalog 中创建 Deployment Manager 解决方案,请先准备要上传的 Deployment Manager 模板 zip 文件,该文件必须包含以下文件:
- 一个以
.jinja扩展名结尾的 Jinja 模板文件或以.py扩展名结尾的 Python 模板文件。 - 一个以 Jinja 模板的
.jinja.schema扩展名或 Python 模板的py.schema扩展名结尾的架构文件。
zip 文件的名称必须与架构以及 Jinja 或 Python 文件的名称一致。例如,如果 zip 文件名为 android-dev-environment.zip,则 zip 内的 Jinja 架构文件必须命名为 android-dev-environment.jinja.schema,并且 Jinja 模板必须命名为 android-dev-environment.jinja。
以下代码示例演示了创建部署表单的架构文件:
info:
  title: Single Google Compute Engine Machine
  author: Google Inc.
  description: Creates a virtual machine based on zone and machine type selection.

required:
  - machinetype
  - zone

properties:
  machinetype:
    title: Machine type
    type: string
    enum:
      - n2-standard-2
      - n2-standard-4
      - n2-standard-8
      - n2-highmem-2
      - n2-highmem-4
      - n2-highmem-8
      - n2-highcpu-2
      - n2-highcpu-4
      - n2-highcpu-8
  zone:
    title: Zone
    type: string
    enum:
      - us-central1-a
      - us-central1-c
      - us-east1-b
      - us-east1-c
      - us-west1-a
      - us-west1-b
      - us-west1-c
以下代码示例说明了用于创建永久性虚拟机的 Jinja 文件:
# Creates a Persistent VM
resources:
- type: compute.v1.instance
  name: vm-{{ env["deployment"] }}
  properties:
    zone: {{ properties["zone"] }}
    # Note the machineType definition at the end. n2-custom-4-5120 specifies n2 machine family with 4 CPUs and 5GB (5120 MB) of RAM. For custom machine types, refer to https://cloud.google.com/compute/docs/instances/creating-instance-with-custom-machine-type
    machineType: https://www.googleapis.com/compute/v1/projects/{{ env["project"] }}/zones/{{ properties["zone"] }}/machineTypes/{{ properties["machinetype"] }}
    disks:
    - deviceName: boot
      type: PERSISTENT
      boot: true
      autoDelete: true
      initializeParams:
        diskName: disk-{{ env["deployment"] }}
        sourceImage: https://www.googleapis.com/compute/v1/projects/debian-cloud/global/images/family/debian-9
    networkInterfaces:
    - network: https://www.googleapis.com/compute/v1/projects/{{ env["project"] }}/global/networks/default
      # Access Config required to give the instance a public IP address
      accessConfigs:
      - name: External NAT
        type: ONE_TO_ONE_NAT
在 Service Catalog 中创建解决方案
要创建基于 Deployment Manager 模板的解决方案,请执行以下操作:
在 Google Cloud 控制台中,前往 Service Catalog“管理”解决方案页面。
前往“解决方案”页面点击选择以选择 Google Cloud 项目。
点击创建解决方案。在下拉列表中,选择创建 DM 解决方案。
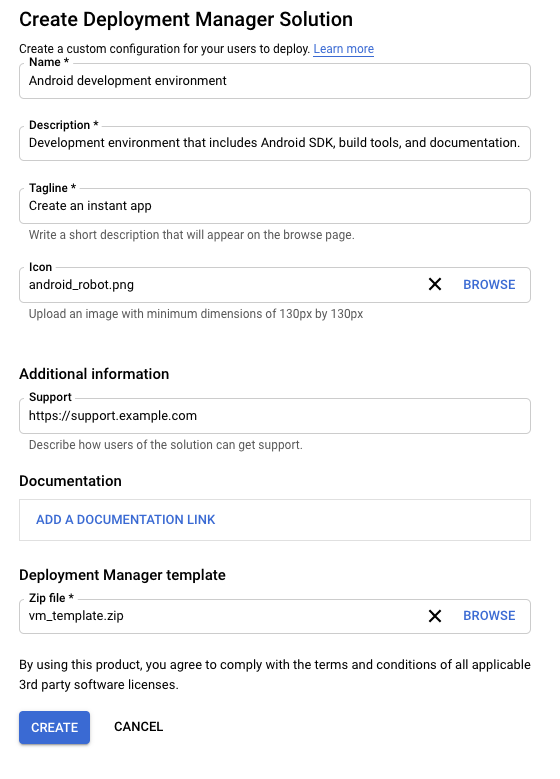
输入解决方案的名称、说明和宣传语。标语是用户在浏览 Service Catalog 时看到的解决方案简短说明。
上传包含部署配置的文件的 zip 文件。
(可选)上传解决方案的图标。 建议的图标尺寸为 80 × 80 像素。
(可选)输入创建者的支持链接和联系信息。
(可选)添加关联到解决方案文档的链接。
点击创建。
以下屏幕截图说明了如何创建基于 DM 的解决方案:
后续步骤
- 将解决方案分配给目录,让组织中的用户能够访问和部署该解决方案。