Cloud Build 트리거를 사용하면 자동으로 빌드하고 Knative serving에 배포하는 Cloud Build를 사용하여 새 커밋을 지정된 Git 저장소 브랜치로 내보낼 때마다 자동으로 코드를 빌드하여 배포할 수 있습니다.
Cloud Build 트리거를 사용하여 컨테이너를 빌드하면 Knative serving에 배포한 후 Google Cloud 콘솔에 서비스의 소스 저장소 정보가 표시됩니다.
시작하기 전에
Dockerfile이 포함된 git 저장소가 있거나 코드베이스가 Google Cloud 빌드팩(예: Go, Node.js, Python, 자바, .NET Core)에서 지원하는 언어 중 하나로 작성됩니다.-
Enable the Cloud Build and Cloud Source Repositories APIs.
Roles required to enable APIs
To enable APIs, you need the Service Usage Admin IAM role (
roles/serviceusage.serviceUsageAdmin), which contains theserviceusage.services.enablepermission. Learn how to grant roles.
Knative serving 사용자 인터페이스에서 지속적 배포 설정
새 서비스 또는 기존 서비스에 지속적 배포를 설정하는 지에 따라 절차가 약간 다릅니다. 자세히 알아보려면 해당 탭을 클릭하세요.
새 서비스
Google Cloud 콘솔에서 Knative serving으로 이동합니다.
서비스 만들기를 클릭합니다.
서비스 설정을 원하는 대로 지정합니다.
다음을 클릭합니다.
소스 저장소에서 지속적으로 새 버전 배포를 선택합니다.
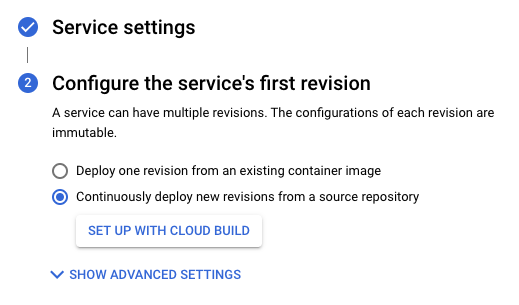
Cloud Build로 설정을 클릭합니다.
제공업체와 저장소를 선택합니다.
- GitHub - 아직 인증되지 않은 경우 인증을 클릭하고 안내를 따릅니다. 기본적으로 저장소 연결은 Cloud Build GitHub 앱을 통해 수행됩니다. 또는 Cloud Source Repositories에서 GitHub 저장소를 미러링할 수 있습니다. 이렇게 하려면 고급 옵션을 클릭하고 Cloud Source Repositories를 사용한 GitHub 저장소 미러링을 선택합니다. 자세히 알아보기
- Bitbucket - 아직 인증되지 않은 경우 인증을 클릭하고 안내를 따릅니다.
- Cloud Source Repositories
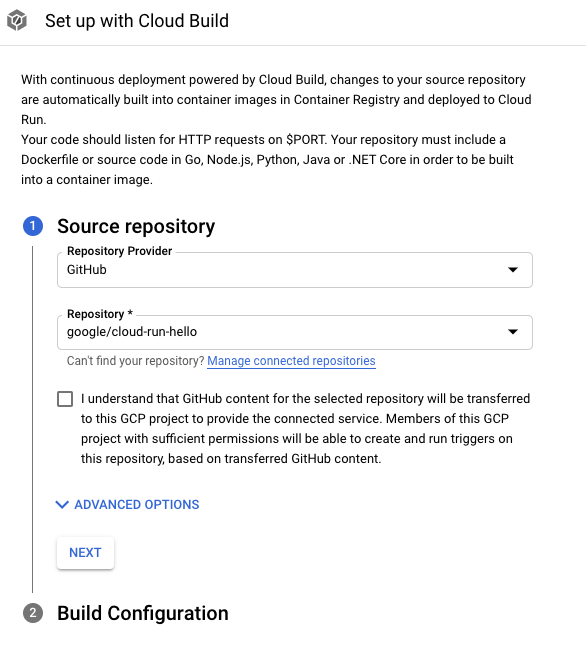
다음을 클릭합니다.
빌드 구성 단계의 옵션을 지정합니다.
- 브랜치 - 트리거를 실행할 때 사용할 소스를 나타냅니다. 여기에 regex을 입력할 수 있습니다. 일치하는 브랜치가 자동으로 확인되며 입력 아래에 표시됩니다. 정확히 브랜치 하나가 일치하면 트리거가 생성된 후 자동으로 실행됩니다.
빌드 유형
Docker를 사용하여 저장소를 빌드해야 하는 경우 Dockerfile이 포함되어 있으면 Dockerfile을 선택합니다. 소스 위치는 Dockerfile의 위치와 이름을 나타냅니다. 이 디렉터리는 Docker 빌드 컨텍스트로 사용됩니다. 모든 경로는 현재 디렉터리를 기준으로 합니다.
그렇지 않으면 Google Cloud 빌드팩을 선택합니다. 빌드팩 컨텍스트를 사용하여 디렉터리를 지정하고 진입점(선택사항)을 사용하여 서버를 시작할 명령어를 입력합니다. 예를 들면 Python의 경우
gunicorn -p :8080 main:app, 자바의 경우java -jar target/myjar.jar입니다. 기본 동작을 사용하려면 비워 두세요.
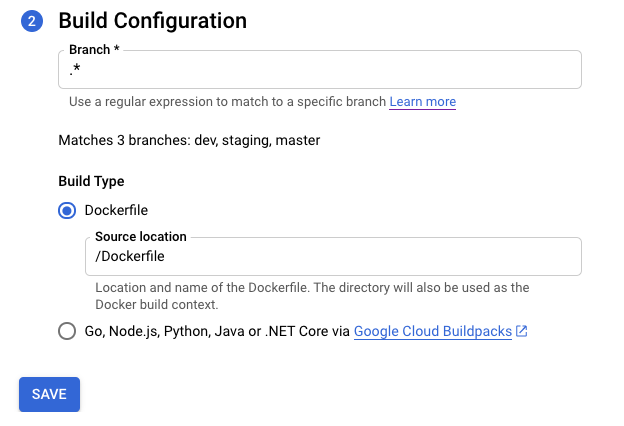
저장을 클릭합니다.
선택한 설정을 확인합니다.
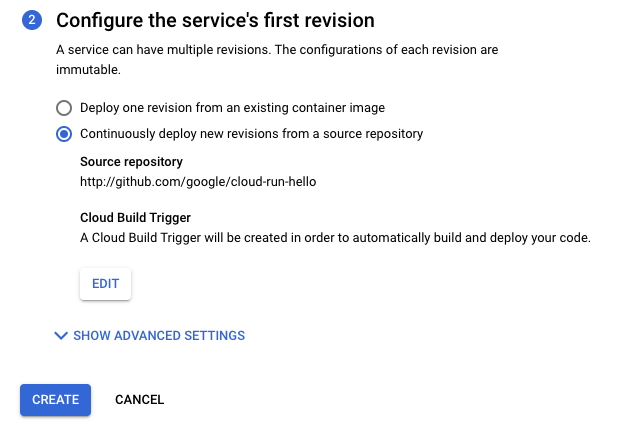
만들기를 클릭합니다.
지속적 배포 설정의 진행상황을 추적할 수 있는 서비스 세부정보 페이지로 리디렉션됩니다.
모든 단계가 완료되면 다음 추가 옵션을 참고합니다.
- 지속적 배포 수정 버튼
- 빌드 기록
- 버전 세부정보 섹션의 소스 세부정보
기존 서비스
Google Cloud 콘솔에서 Knative serving으로 이동합니다.
서비스 목록에서 서비스를 찾고 클릭합니다.
지속적 배포 설정을 클릭합니다.
제공업체와 저장소를 선택합니다.
- GitHub - 아직 인증되지 않은 경우 인증을 클릭하고 안내를 따릅니다. 기본적으로 저장소 연결은 Cloud Build GitHub 앱을 통해 수행됩니다. 또는 Cloud Source Repositories에서 GitHub 저장소를 미러링할 수 있습니다. 이렇게 하려면 고급 옵션을 클릭하고 Cloud Source Repositories를 사용한 GitHub 저장소 미러링을 선택합니다. 자세히 알아보기
- Bitbucket - 아직 인증되지 않은 경우 인증을 클릭하고 안내를 따릅니다.
- Cloud Source Repositories
다음을 클릭합니다.
빌드 구성 단계의 옵션을 지정합니다.
- 브랜치 - 트리거를 실행할 때 사용할 소스를 나타냅니다. 여기에 regex을 입력할 수 있습니다. 일치하는 브랜치가 자동으로 확인되며 입력 아래에 표시됩니다. 정확히 브랜치 하나가 일치하면 트리거가 생성된 후 자동으로 실행됩니다.
빌드 유형
Docker를 사용하여 저장소를 빌드해야 하는 경우 Dockerfile이 포함되어 있으면 Dockerfile을 선택합니다. 소스 위치는 Dockerfile의 위치와 이름을 나타냅니다. 이 디렉터리는 Docker 빌드 컨텍스트로 사용됩니다. 모든 경로는 현재 디렉터리를 기준으로 합니다.
그렇지 않으면 Google Cloud 빌드팩을 선택합니다. 빌드팩 컨텍스트를 사용하여 디렉터리를 지정하고 진입점(선택사항)을 사용하여 서버를 시작할 명령어를 입력합니다. 예를 들면 Python의 경우
gunicorn -p :8080 main:app, 자바의 경우java -jar target/myjar.jar입니다. 기본 동작을 사용하려면 비워 두세요.
저장을 클릭합니다.
페이지가 다시 로드되고 지속적 배포 설정의 진행상황이 표시됩니다.
모든 단계가 완료되면 다음 추가 옵션을 참고합니다.
- 지속적 배포 수정 버튼
- 빌드 기록
- 버전 세부정보 섹션의 소스 세부정보
수동으로 지속적 배포 설정
UI가 아닌 수동 절차를 사용해야 하는 경우에는 지속적 배포 수동 설정을 참조하세요.
기존 Cloud Build 트리거를 Knative serving 서비스에 연결
기존 Cloud Build 트리거가 이미 있으면 서비스에 연결하고 서비스 세부정보 페이지에서 Google Cloud 콘솔 기능을 활용할 수 있습니다(지속적 배포 수정 버튼과 빌드 기록 차트).
이렇게 하려면 gcb-trigger-id를 키로 사용하고 Cloud Build 트리거의 고유 식별자를 트리거 이름이 아닌 값으로 사용하는 라벨을 추가해야 합니다. 라벨을 설정하는 방법은 안내를 참조하세요.