이 튜토리얼에서는 Google Distributed Cloud의 수동 부하 분산 모드를 사용하여 Google Distributed Cloud와 통합 할 때 F5 BIG-IP를 설정하는 방법을 보여줍니다.
F5 BIG-IP 플랫폼은 앱의 보안, 가용성, 성능을 개선하는 데 도움이 되는 다양한 서비스를 제공합니다. 이러한 서비스에는 L7 부하 분산, 네트워크 방화벽, 웹 애플리케이션 방화벽(WAF), DNS 서비스 등이 포함됩니다. Google Distributed Cloud의 경우 BIG-IP는 외부 액세스와 L3/4 부하 분산 서비스를 제공합니다.
추가 구성
설정 유틸리티가 완료되면 노출하고 액세스하려는 각 사용자 클러스터에 대해 관리 파티션을 만들어야 합니다.
처음에는 첫 번째 사용자 클러스터의 파티션을 정의합니다. 클러스터 파티션을 다른 용도로 사용하지 마세요. 각 클러스터에는 해당 클러스터를 단독으로 사용하는 파티션이 있어야 합니다.
Google Distributed Cloud 외부 엔드포인트용 BIG-IP 구성
번들 인그레스를 사용 중지하지 않은 경우 다음 Google Distributed Cloud 엔드포인트에 해당하는 가상 서버(VIP)로 BIG-IP를 구성해야 합니다.
사용자 파티션
- 사용자 클러스터 인그레스 컨트롤러의 VIP(노출된 포트:
443) - 사용자 클러스터 인그레스 컨트롤러의 VIP(노출된 포트:
80)
- 사용자 클러스터 인그레스 컨트롤러의 VIP(노출된 포트:
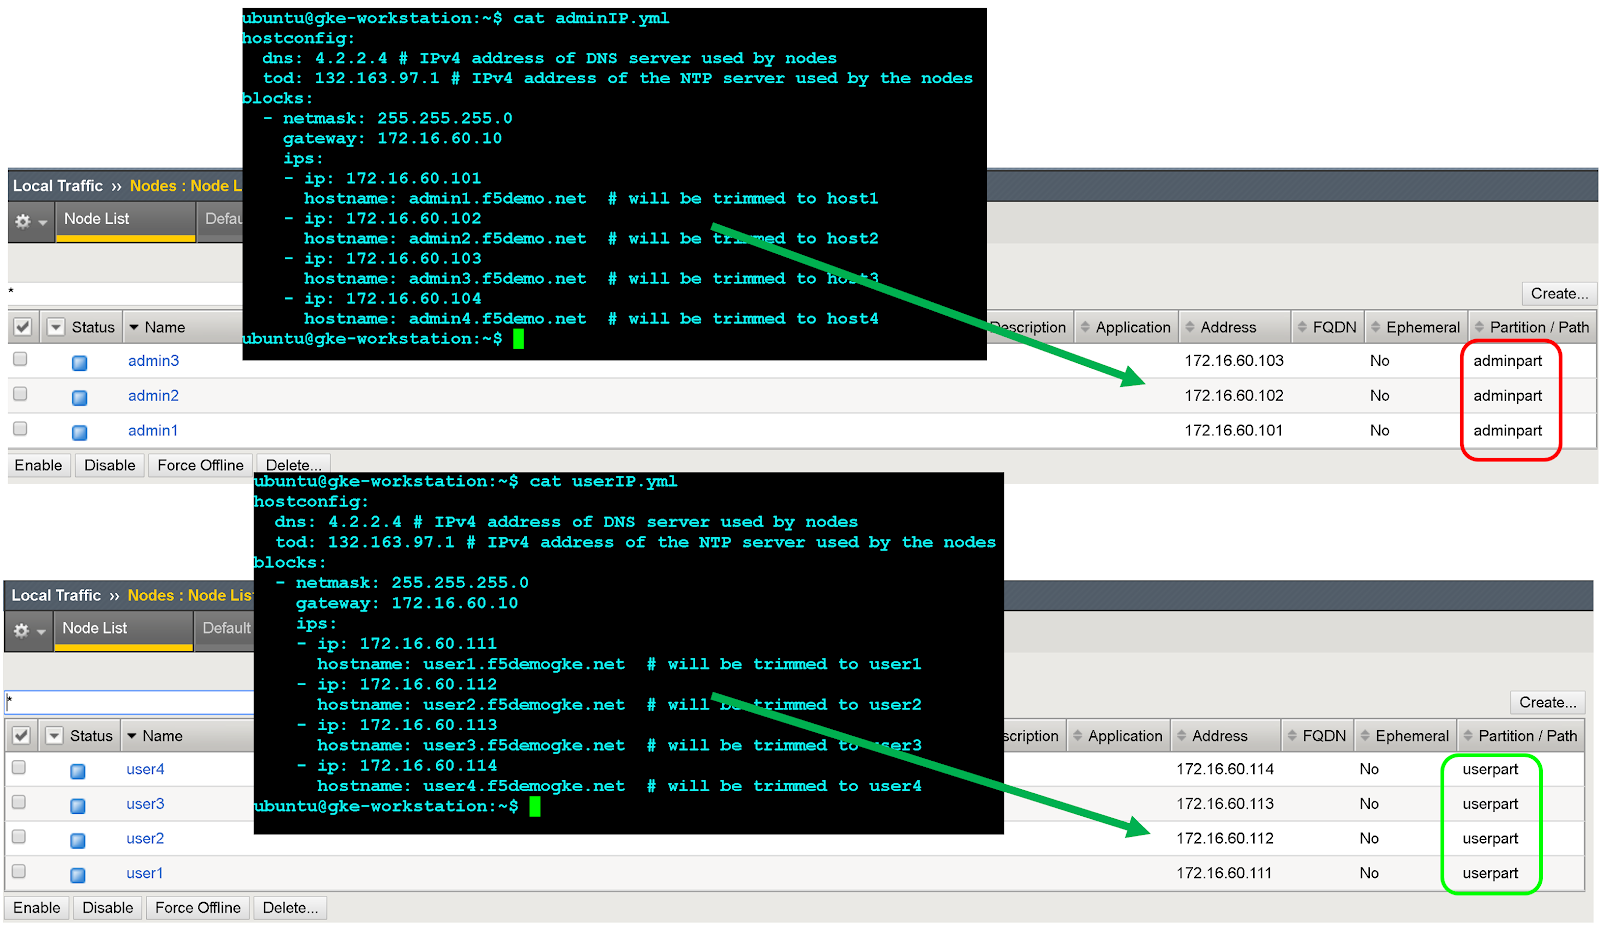
노드 객체 만들기
클러스터 노드 외부 IP 주소는 BIG-IP 시스템에서 노드 객체를 구성하는 데 사용됩니다. Google Distributed Cloud 클러스터 노드마다 노드 객체를 만듭니다. 노드는 백엔드 풀에 추가된 후 가상 서버와 연결됩니다.
- BIG-IP 관리 콘솔에 로그인하려면 IP 주소로 이동합니다. 주소는 설치 중에 제공됩니다.
- 이전에 만든 사용자 파티션을 클릭합니다.
- 로컬 트래픽 > 노드 > 노드 목록으로 이동합니다.
- 만들기를 클릭합니다.
각 클러스터 호스트의 이름과 IP 주소를 입력하고 완료를 클릭합니다.
백엔드 풀 만들기
각 노드 포트에 백엔드 풀을 만듭니다.
- BIG-IP 관리 콘솔에서 이전에 만든 사용자 파티션의 사용자 파티션을 클릭합니다.
- 로컬 트래픽 > 풀 > 풀 목록으로 이동합니다.
- 만들기를 클릭합니다.
- 구성 드롭다운 목록에서 고급을 클릭합니다.
- 이름 필드에
Istio-80-pool을 입력합니다. - 풀 구성원 액세스 권한을 확인하려면 상태 모니터에서 tcp를 클릭합니다. 선택사항: 수동 구성이므로 배포에 적합한 더 많은 고급 모니터를 활용할 수도 있습니다.
서비스 중단 시 작업에서 거부를 클릭합니다.
이 튜토리얼에서는 부하 분산 방법 드롭다운 목록에서 라운드 로빈을 클릭합니다.
새 구성원 섹션에서 노드 목록을 클릭한 다음 이전에 만든 노드를 선택합니다.
서비스 포트 필드에 구성 파일의 적절한
nodePort또는 런타임 istio 인그레스 Kubernetes 서비스(이름:istio-ingress, 네임스페이스:gke-system)의spec.ports[?].nodePort를 입력합니다.추가를 클릭합니다.
8~9단계를 반복하여 각 클러스터 노드 인스턴스를 추가합니다.
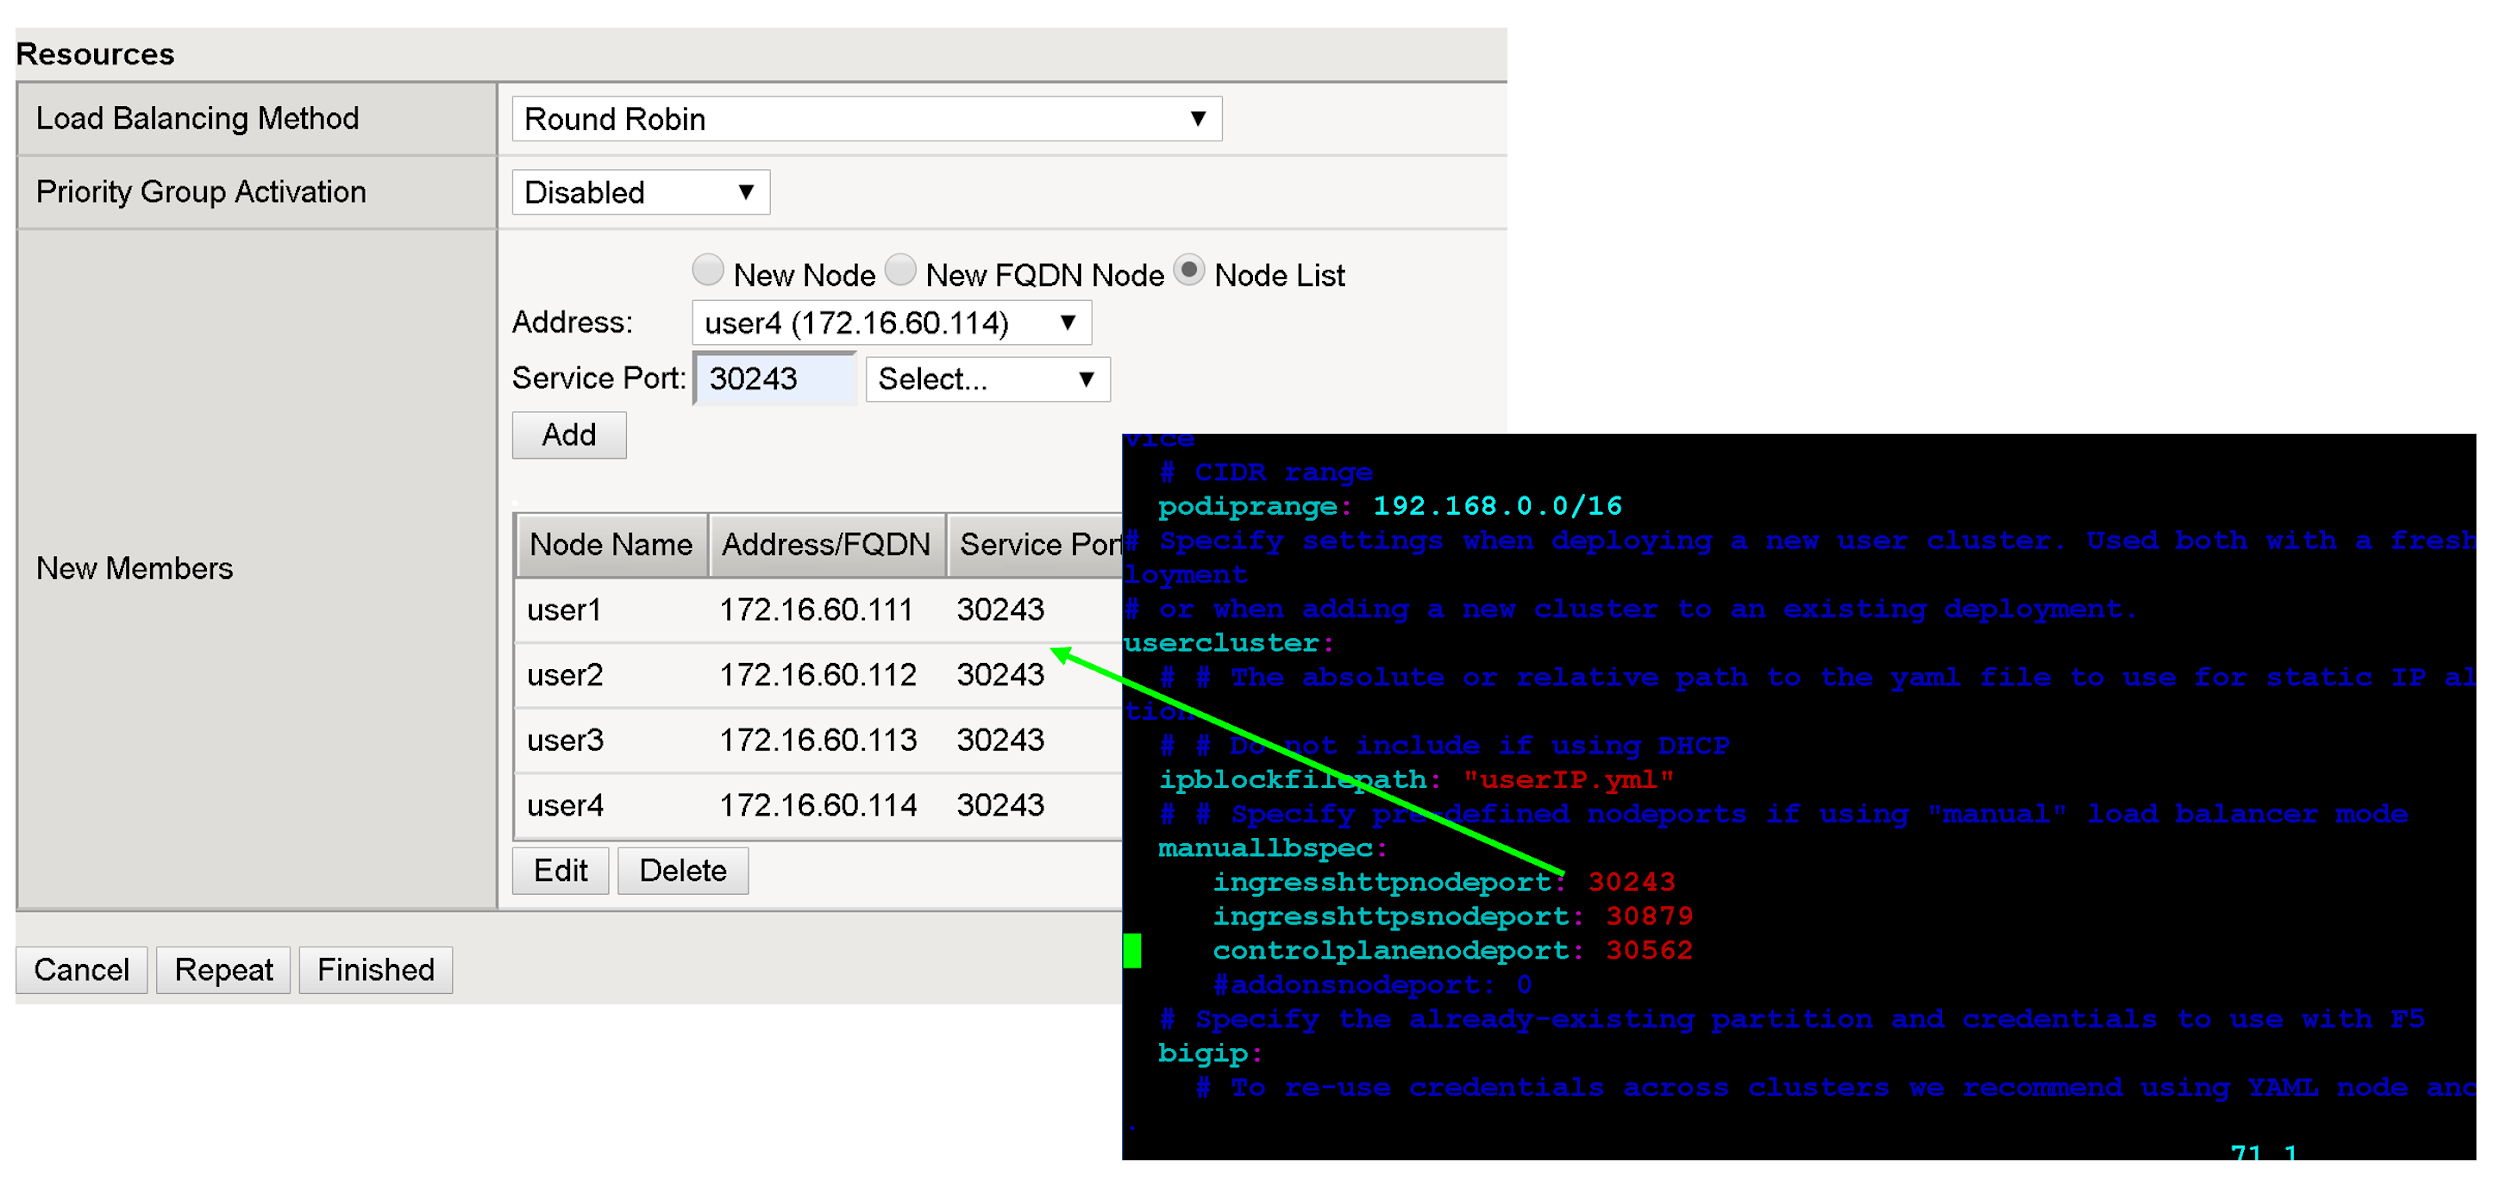
완료됨을 클릭합니다.
나머지 사용자 클러스터 nodePorts에 대해 이 섹션의 모든 단계를 반복합니다.
가상 서버 만들기
첫 번째 사용자 클러스터의 BIG-IP에서 총 2개의 가상 서버를 만듭니다. 가상 서버는 'VIP + 포트' 조합에 해당합니다.
- BIG-IP 관리 콘솔에서 이전에 만든 사용자 파티션을 클릭합니다.
- 로컬 트래픽 > 가상 서버 > 가상 서버 목록으로 이동합니다.
- 만들기를 클릭합니다.
- 이름 필드에
istio-ingress-80을 입력합니다. 대상 주소/마스크 필드에 VIP의 IP 주소를 입력합니다. 이 튜토리얼에서는 런타임 istio 인그레스 Kubernetes 서비스(이름:
istio-ingress, 네임스페이스:gke-system)에서configuration file또는spec.loadBalancerIP의 HTTP 인그레스 VIP를 사용합니다.서비스 포트 필드에 VIP에 적절한 리스너 포트를 입력합니다. 이 튜토리얼에서는 런타임 istio 인그레스 Kubernetes 서비스(이름:
istio-ingress, 네임스페이스:gke-system)에서 포트80또는spec.ports[?].port를 사용합니다.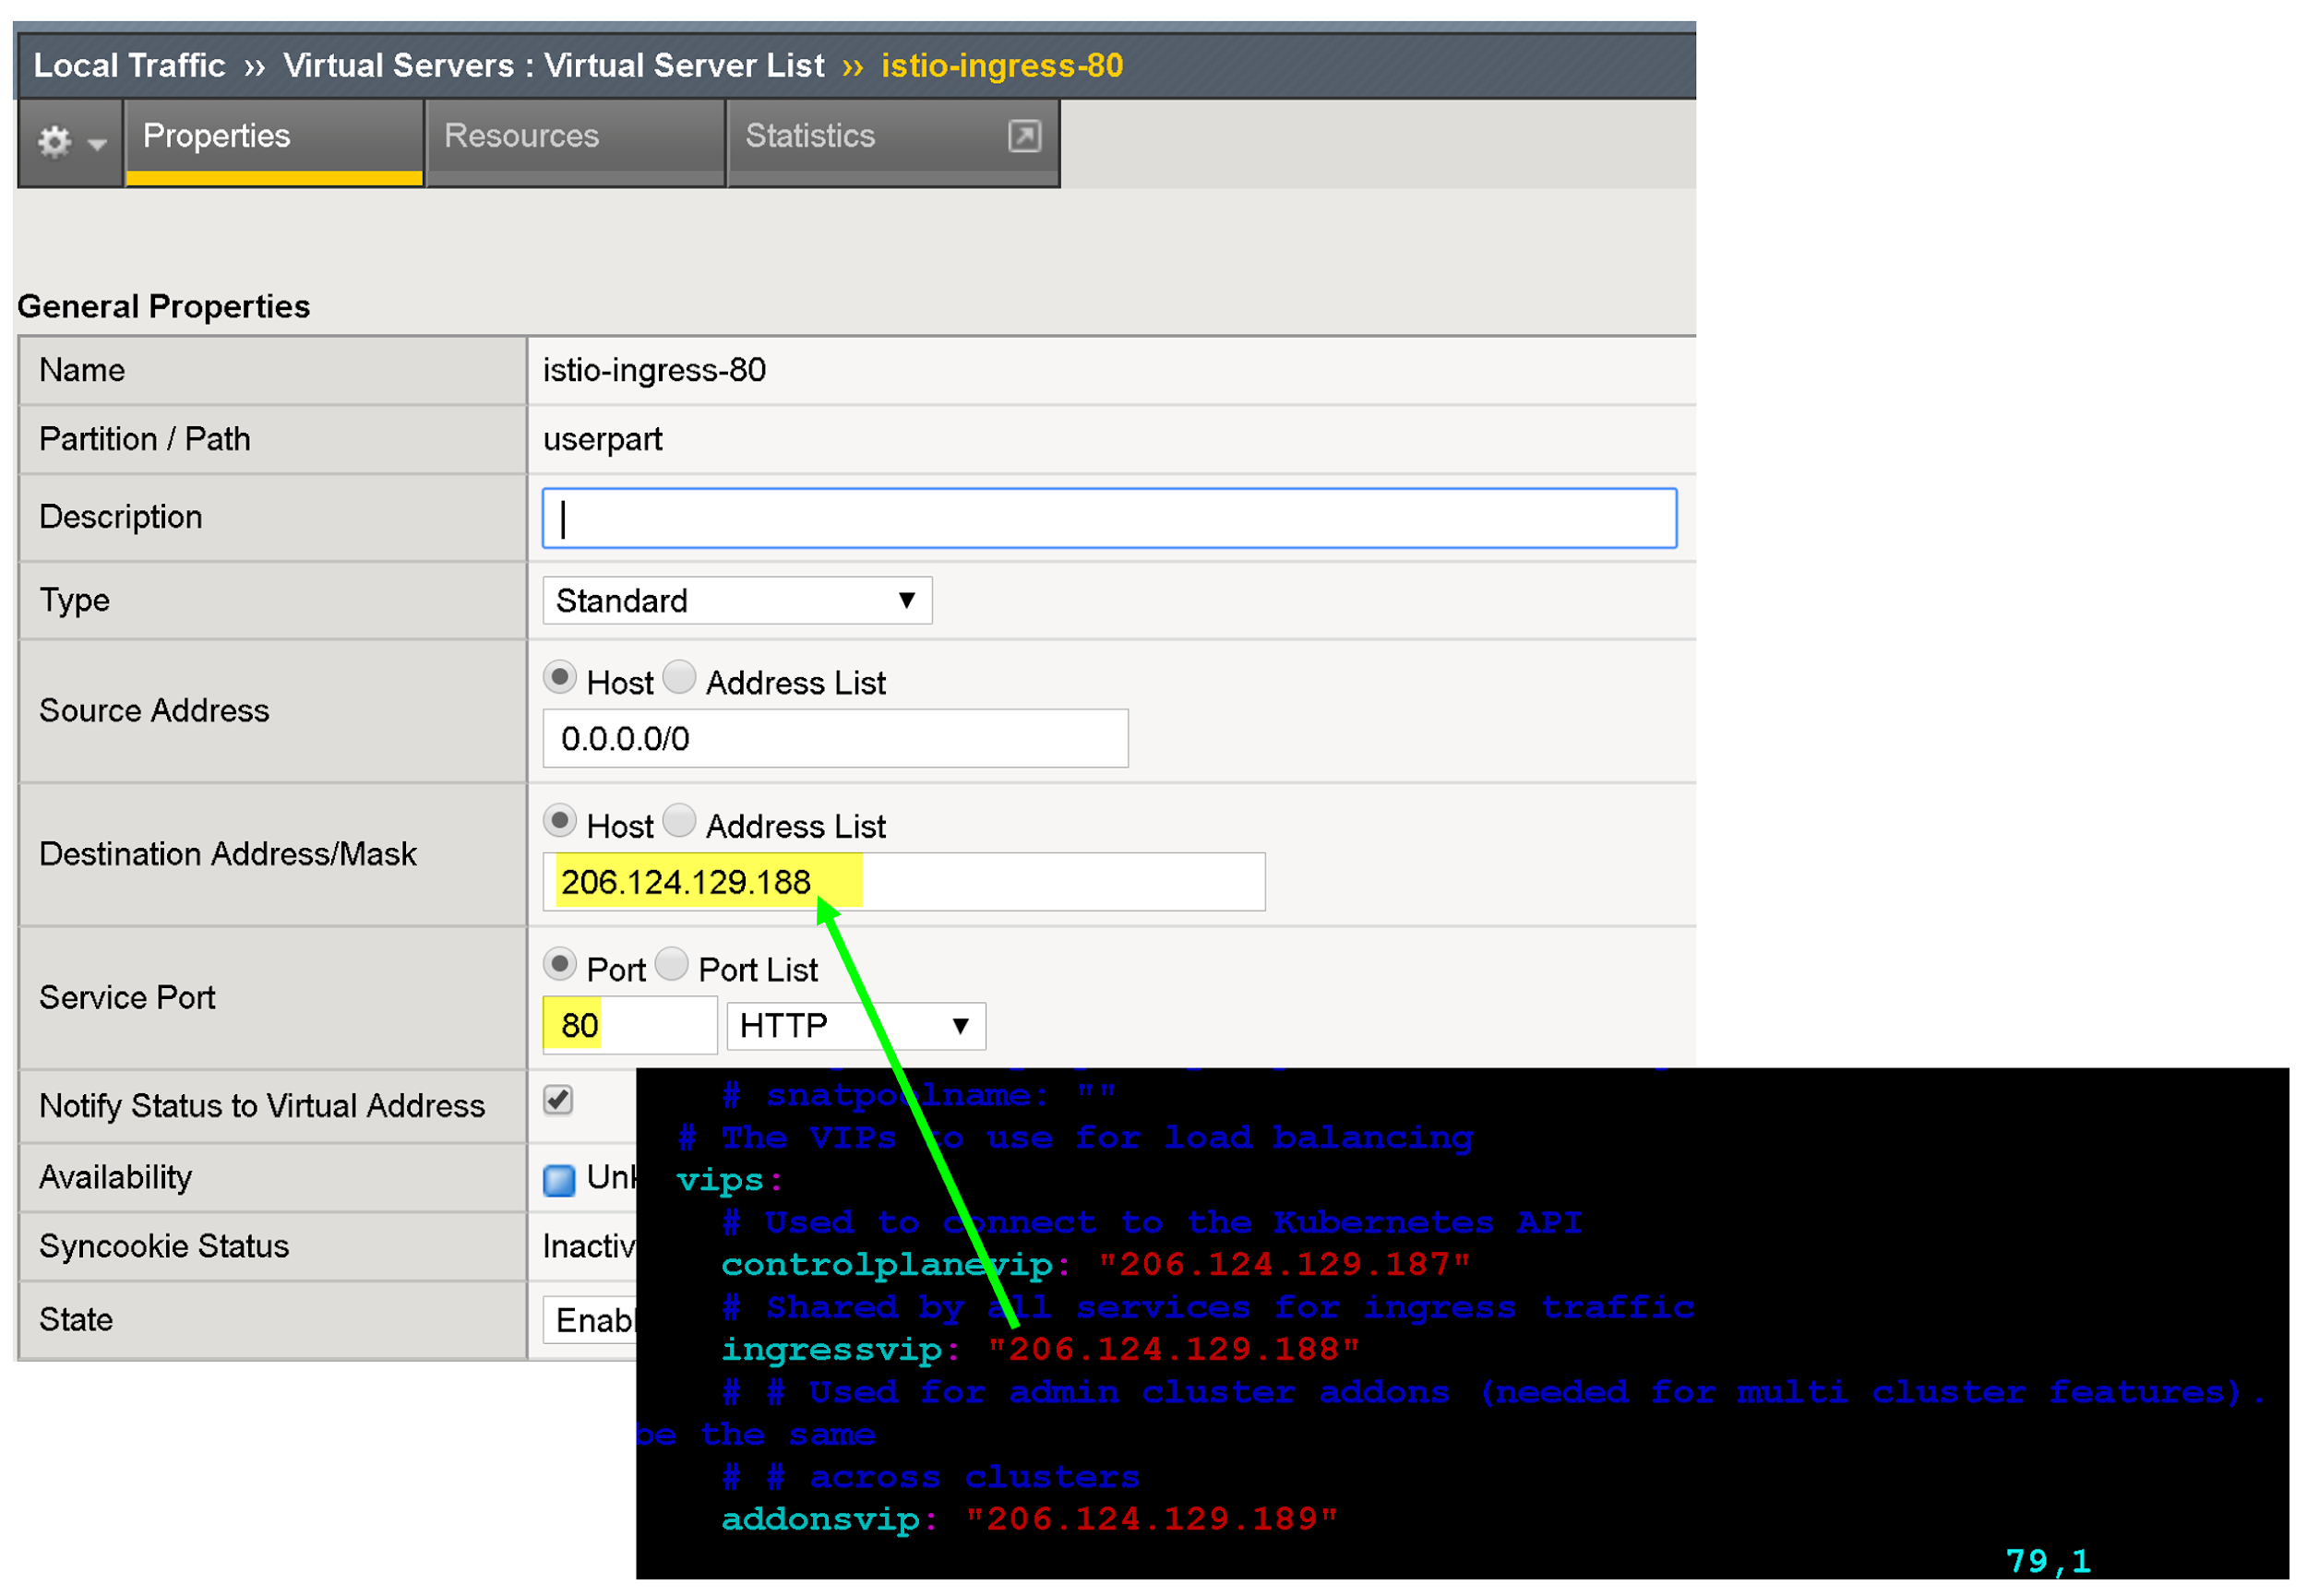
프로토콜별 프로필, 인증서 프로필, WAF 정책 연결과 같이 앱의 엔드포인트를 개선하기 위한 여러 구성 옵션이 있습니다.
소스 주소 변환에서 자동 맵을 클릭합니다.
기본 풀에서 이전에 만든 적절한 풀을 선택합니다.
완료됨을 클릭합니다.
다음 단계
외부 VIP의 보안과 성능을 더욱 강화하려면 다음 사항을 고려하세요.
F5 BIG-IP 애플리케이션 서비스에 대해 자세히 알아보세요.
BIG-IP 구성 및 기능에 대해 자세히 알아보세요.