La piattaforma F5 BIG-IP fornisce diversi servizi per aiutarti a migliorare la sicurezza, la disponibilità e le prestazioni delle tue app. Questi servizi includono bilanciamento del carico L7, firewall di rete,
firewall per applicazioni web (WAF),
servizi DNS e altro ancora. Per Google Distributed Cloud, BIG-IP fornisce accesso esterno e servizi di bilanciamento del carico L3/4.
Configurazione aggiuntiva
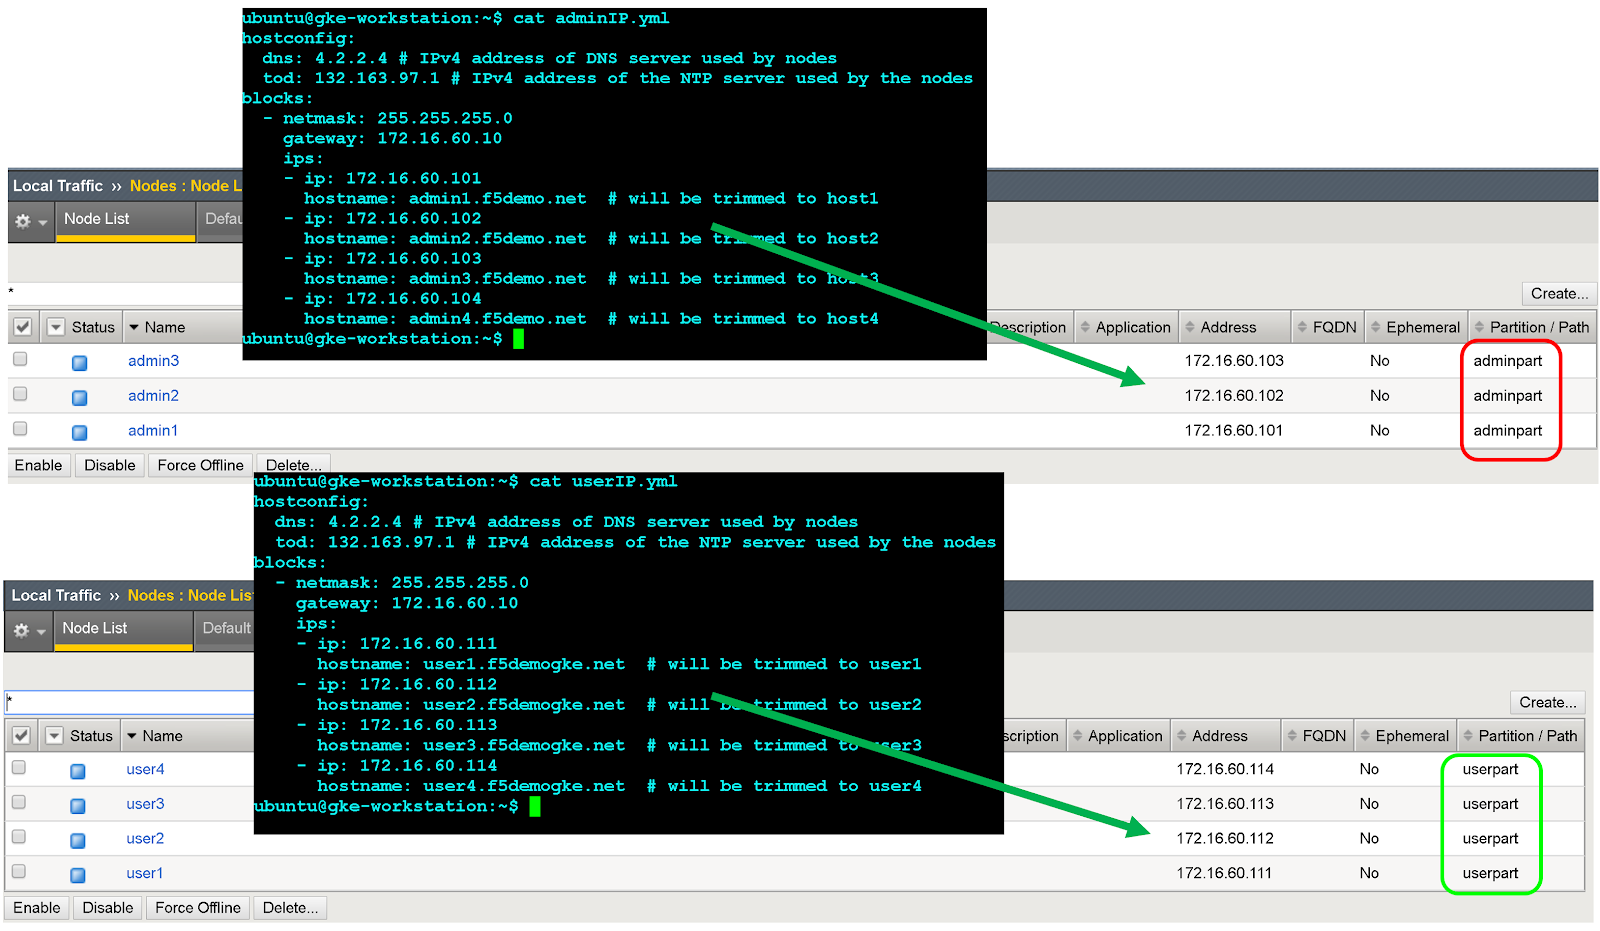
Al termine dell'utilità di configurazione,
devi creare una partizione amministrativa
per ogni cluster utente che intendi esporre e a cui vuoi accedere.
Inizialmente, definisci una partizione per il primo cluster di utenti. Non utilizzare le partizioni del cluster per altri scopi.
Ciascun cluster deve avere una partizione riservata esclusivamente al suo utilizzo.
Configurazione degli endpoint esterni BIG-IP per Google Distributed Cloud
VIP per il controller ingress del cluster utente (porta esposta: 443)
VIP per il controller ingress del cluster utente (porta esposta: 80)
Crea oggetto node
Gli indirizzi IP esterni dei nodi del cluster vengono a loro volta utilizzati per configurare gli oggetti nodo sul sistema BIG-IP. Dovrai creare un oggetto node per ogni node del cluster Google Distributed Cloud. I nodi vengono aggiunti ai pool di backend che vengono poi associati ai server virtuali.
Per accedere alla console di gestione BIG-IP, vai all'indirizzo IP. L'indirizzo viene fornito durante l'installazione.
Fai clic sulla partizione utente che hai creato in precedenza.
Vai a Traffico locale > Nodi > Elenco nodi.
Fai clic su Crea.
Inserisci un nome e un indirizzo IP per ogni host del cluster e fai clic su Fine.
Crea pool di backend
Devi creare un pool di backend per ogni porta del nodo.
Nella console di gestione BIG-IP, fai clic su Partizione utente per la partizione utente che hai creato in precedenza.
Vai a Traffico locale > Pool > Elenco pool.
Fai clic su Crea.
Nell'elenco a discesa Configurazione, fai clic su Avanzate.
Nel campo Nome, inserisci Istio-80-pool.
Per verificare l'accessibilità dei membri del pool, fai clic su tcp in Monitoraggio dell'integrità. (Facoltativo) Poiché si tratta di una configurazione manuale, puoi anche usufruire di monitor più avanzati in base alle esigenze del tuo deployment.
Per Azione in caso di interruzione del servizio, fai clic su Rifiuta.
Per questo tutorial, nell'elenco a discesa Metodo di bilanciamento del carico,
fai clic su Fila a rotazione.
Nella sezione Nuovi membri, fai clic su Elenco nodi e seleziona il node creato in precedenza.
Nel campo Porta servizio, inserisci il valore nodePort appropriato dal
file di configurazione o spec.ports[?].nodePort nel servizio Kubernetes Istio ingress in fase di esecuzione (nome: istio-ingress, spazio dei nomi: gke-system).
Fai clic su Aggiungi.
Ripeti i passaggi 8-9 e aggiungi ogni istanza del nodo del cluster.
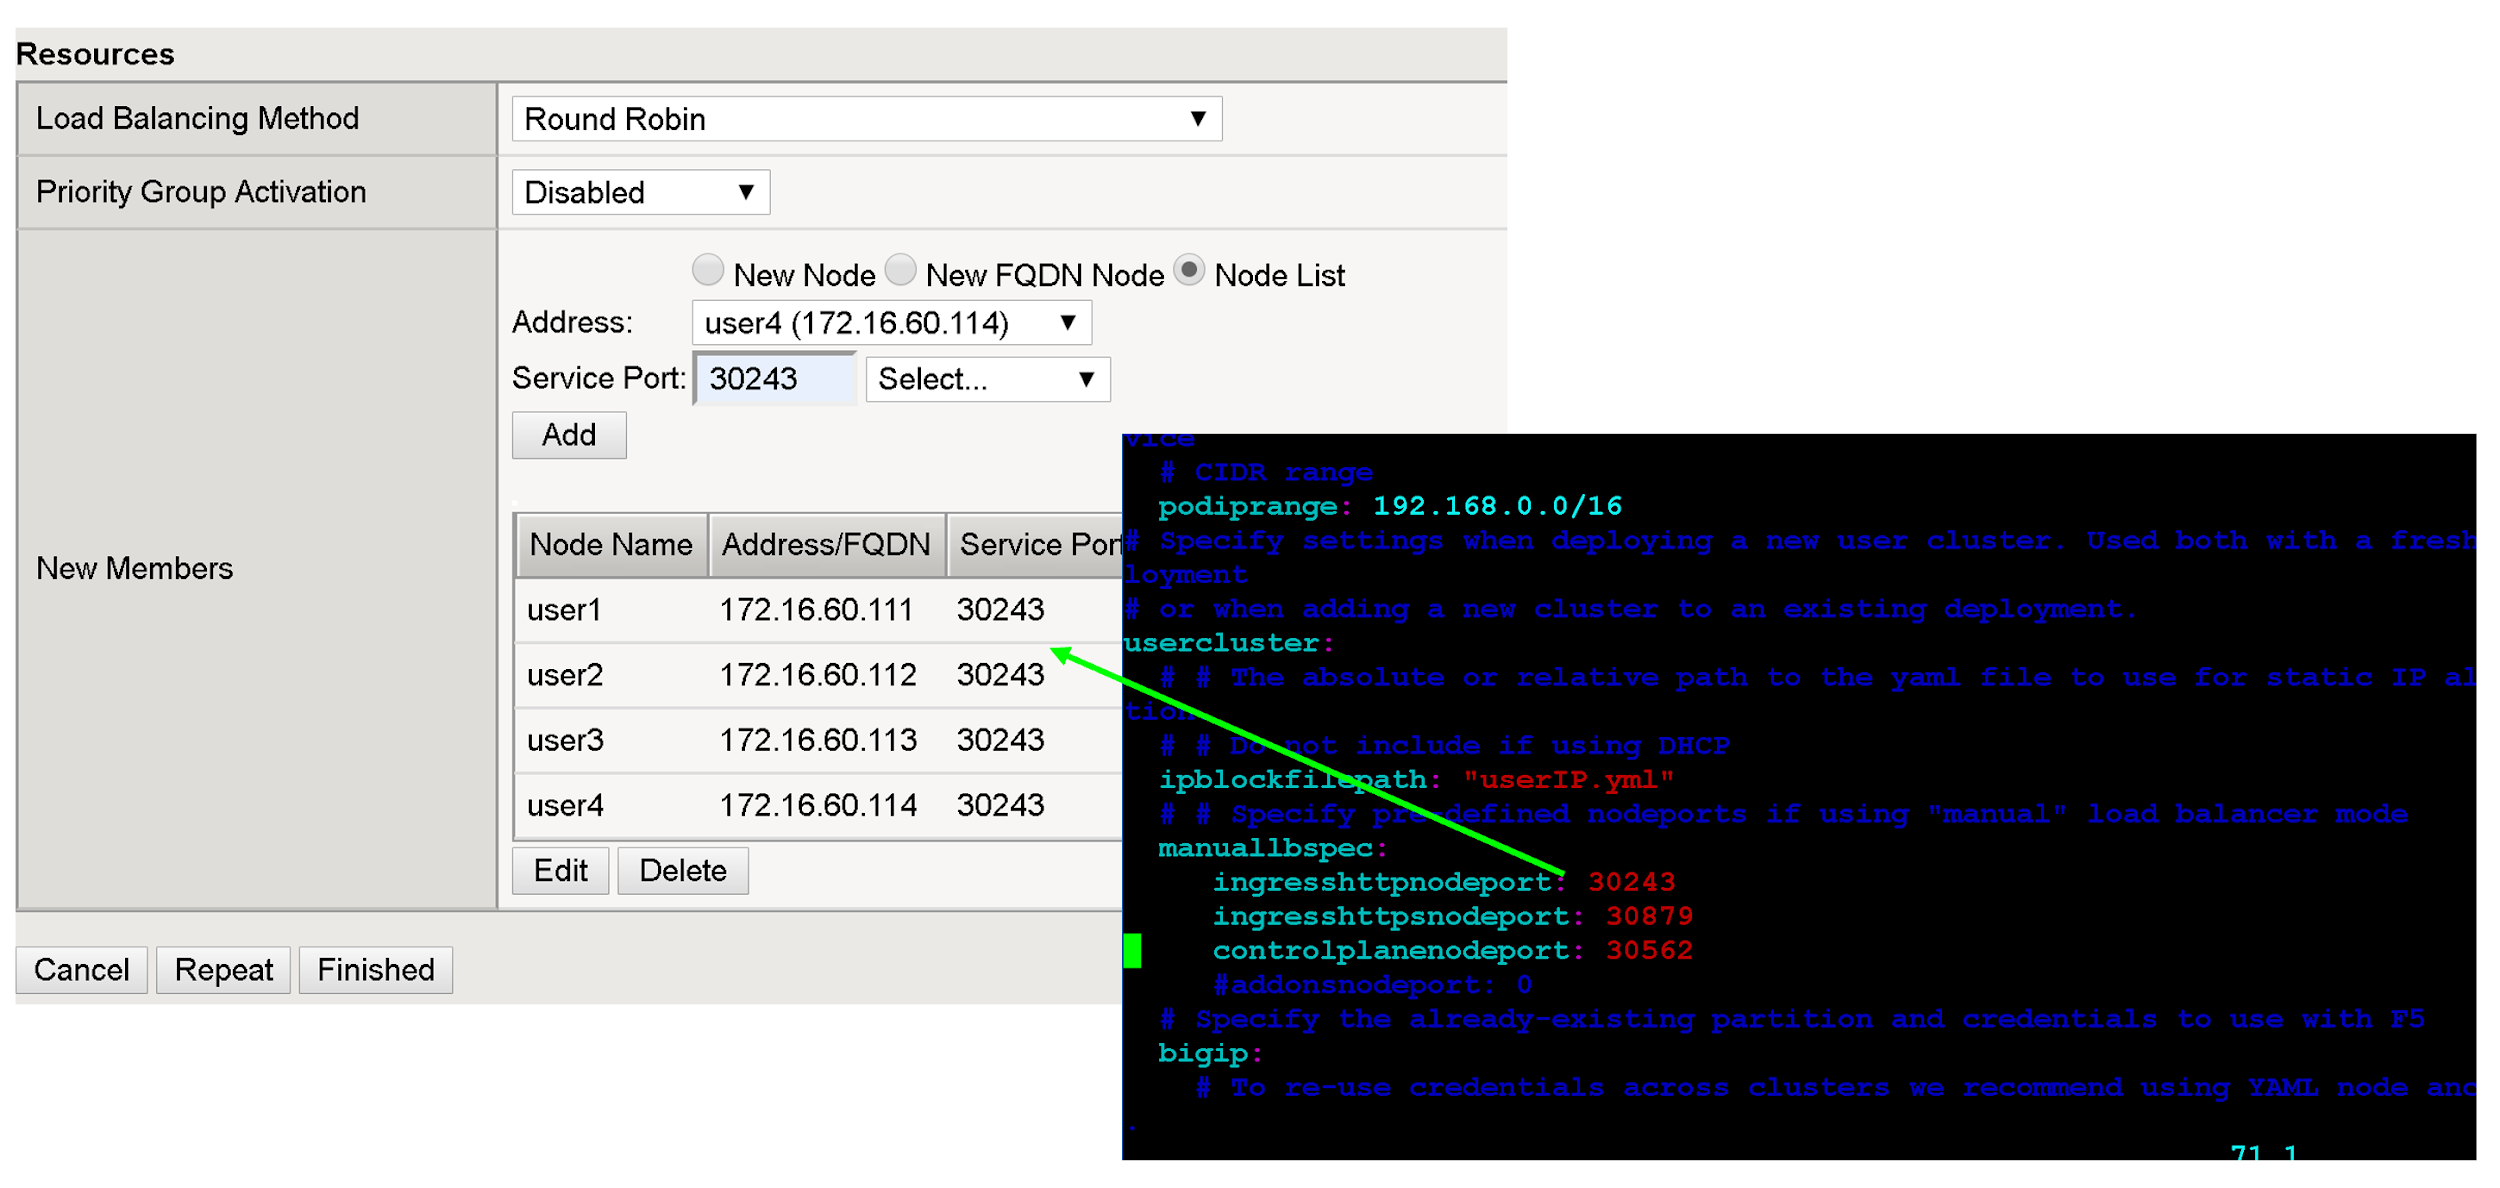
Crea un totale di due server virtuali su BIG-IP per il primo cluster utente. I server virtuali corrispondono alle combinazioni "VIP + porta".
Nella console di gestione BIG-IP, fai clic sulla partizione utente che hai creato in precedenza.
Vai a Traffico locale > Server virtuali > Elenco server virtuali.
Fai clic su Crea.
Nel campo Nome, inserisci istio-ingress-80.
Nel campo Indirizzo/maschera di destinazione, inserisci l'indirizzo IP del VIP. Per questo tutorial, utilizza il VIP di ingresso HTTP in configuration file o spec.loadBalancerIP nel servizio Kubernetes di ingresso Istio (nome: istio-ingress, spazio dei nomi: gke-system).
Nel campo Porta servizio, inserisci la porta di ascolto appropriata per il VIP. Per questo tutorial, utilizza la porta 80 o spec.ports[?].port nel servizio Kubernetes Ingress Istio (nome: istio-ingress, spazio dei nomi: gke-system).
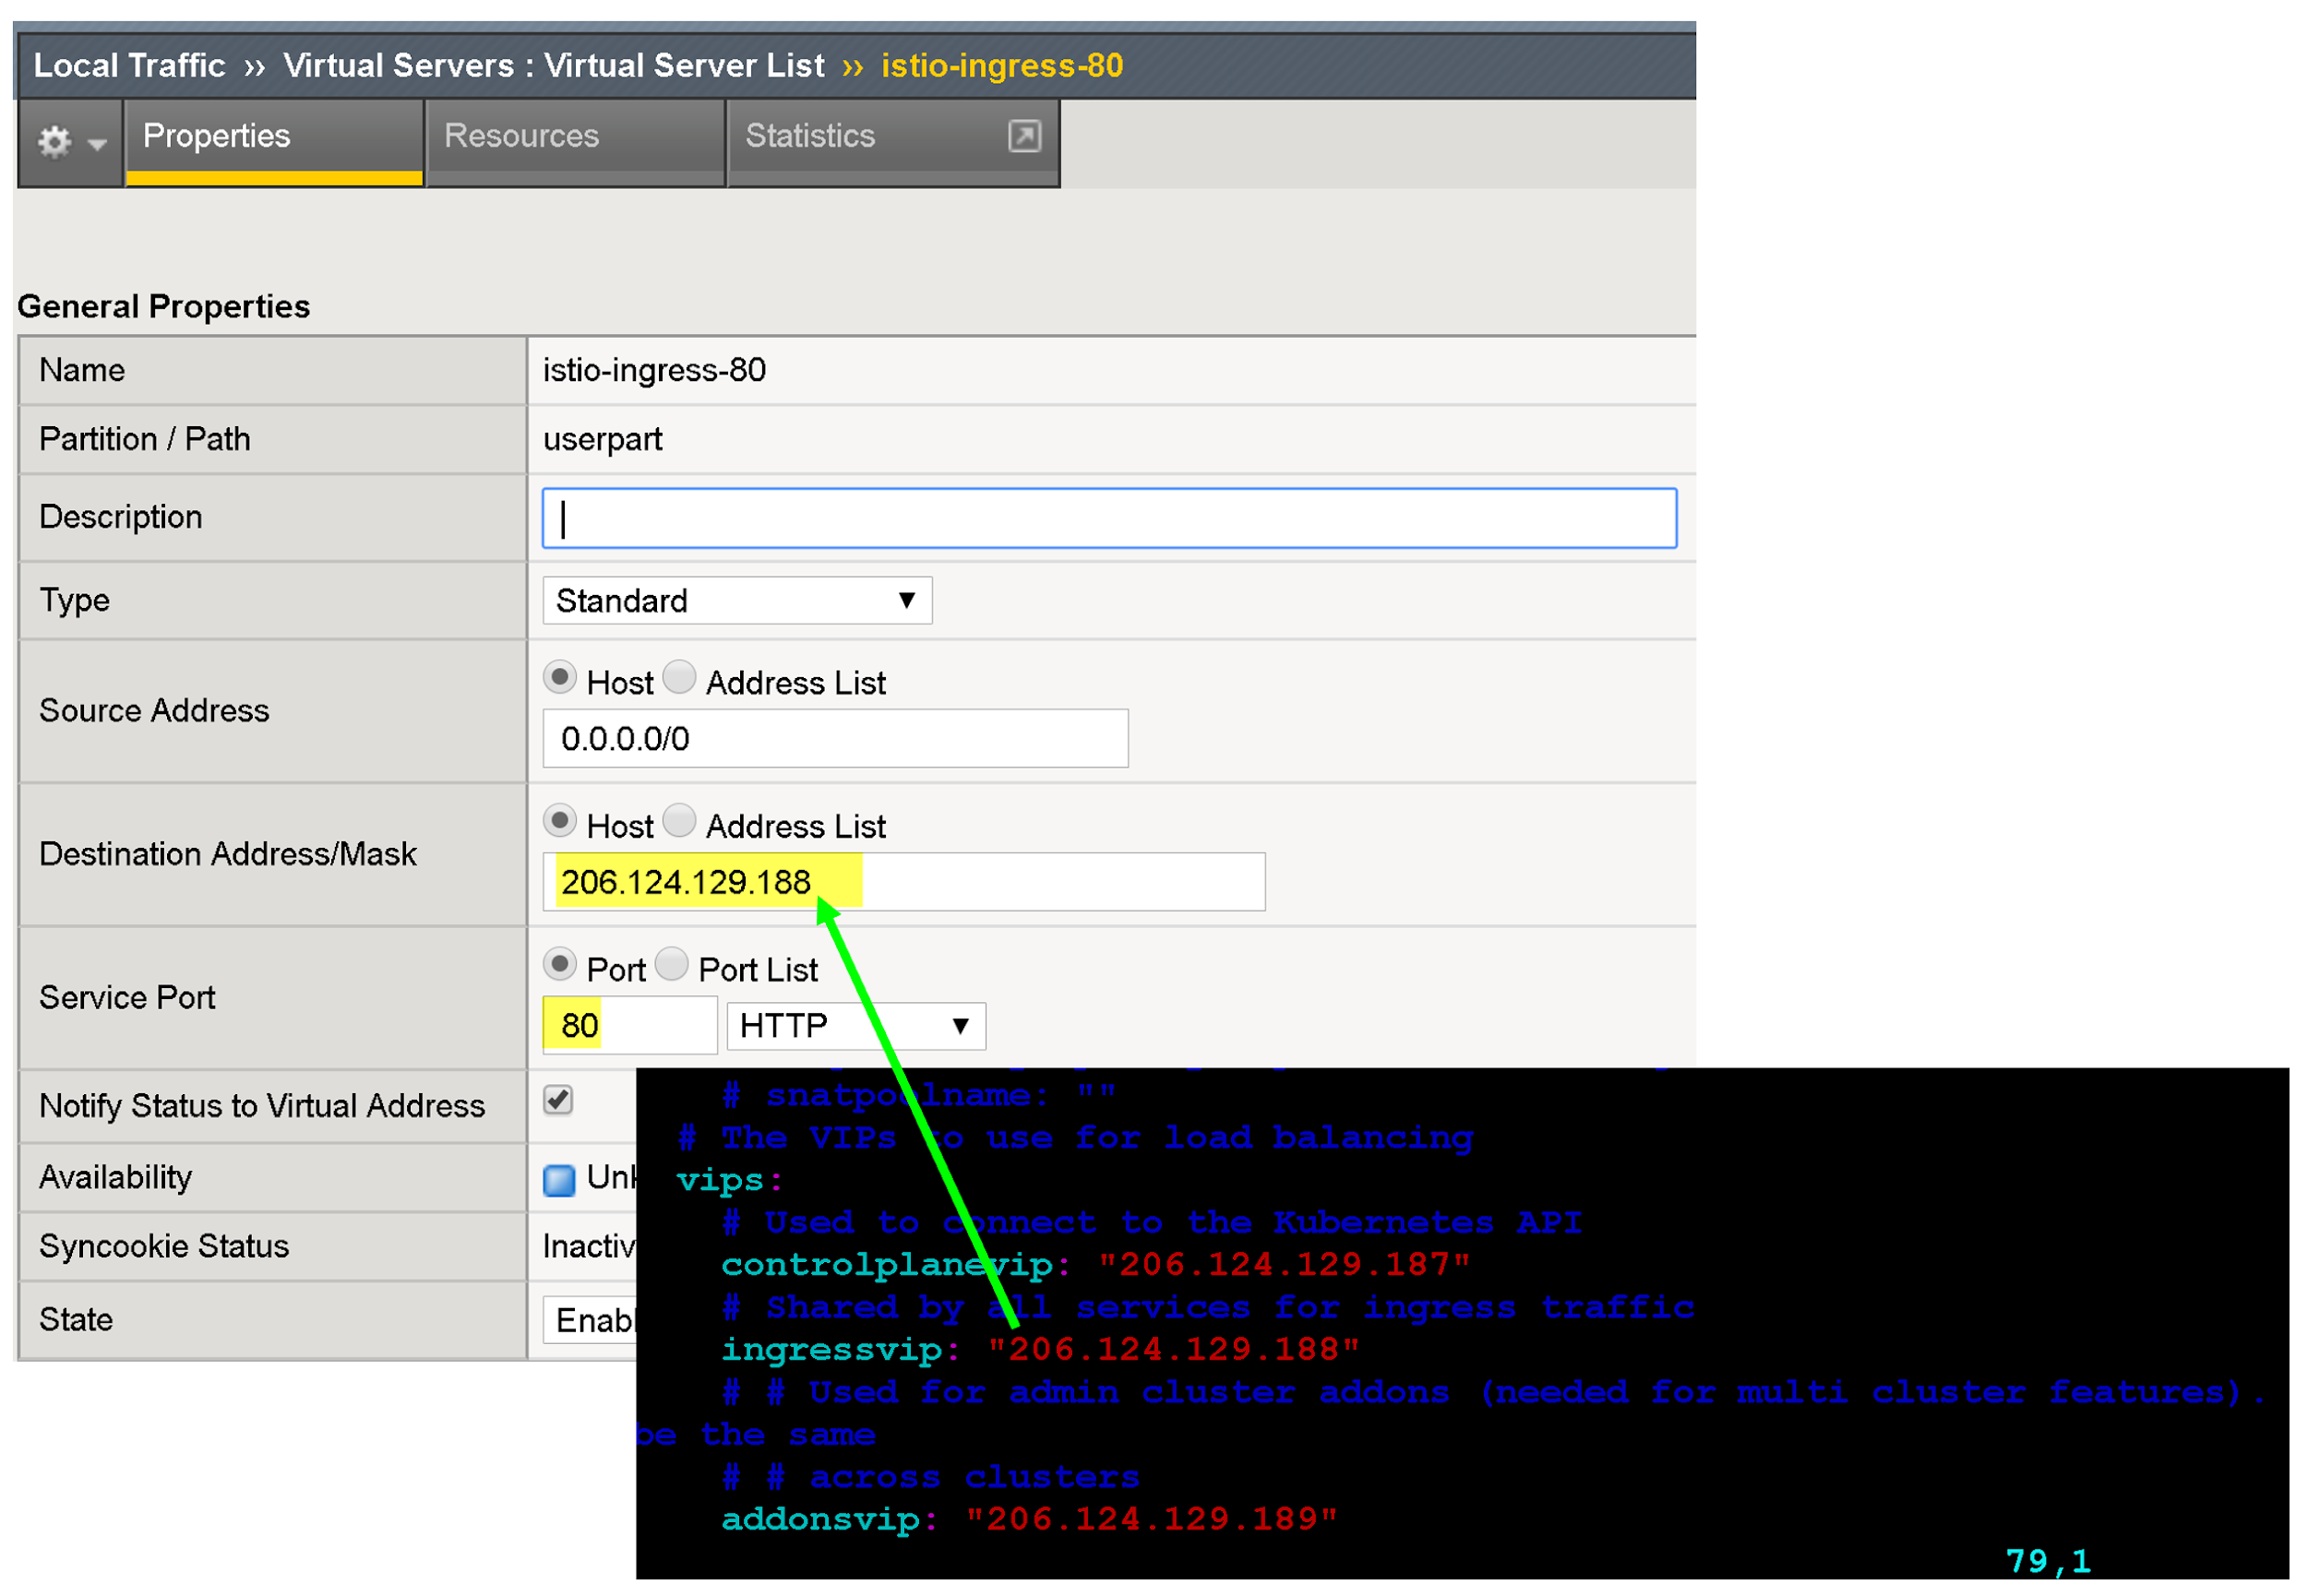
Esistono diverse opzioni di configurazione per migliorare l'endpoint dell'app, come l'associazione di profili specifici per protocollo, profili dei certificati e criteri WAF.
Per la Traduzione dell'indirizzo di origine, fai clic su Mappa automaticamente.
Per Pool predefinito, seleziona il pool appropriato creato in precedenza.
[[["Facile da capire","easyToUnderstand","thumb-up"],["Il problema è stato risolto","solvedMyProblem","thumb-up"],["Altra","otherUp","thumb-up"]],[["Difficile da capire","hardToUnderstand","thumb-down"],["Informazioni o codice di esempio errati","incorrectInformationOrSampleCode","thumb-down"],["Mancano le informazioni o gli esempi di cui ho bisogno","missingTheInformationSamplesINeed","thumb-down"],["Problema di traduzione","translationIssue","thumb-down"],["Altra","otherDown","thumb-down"]],["Ultimo aggiornamento 2025-07-22 UTC."],[],[],null,["This tutorial shows how to set up the\n[F5 BIG-IP](https://www.f5.com/products/big-ip-services) when\nyou [integrate with Google Distributed Cloud](/kubernetes-engine/distributed-cloud/vmware/docs)\nusing the\n[manual load-balancing mode on Google Distributed Cloud](/kubernetes-engine/distributed-cloud/vmware/docs/how-to/manual-load-balance).\n\nThe F5 BIG-IP platform provides\nvarious services to help you enhance the security, availability, and performance\nof your apps. These services include, L7 load balancing, network firewalling,\n[web application firewalling\n(WAF)](https://wikipedia.org/wiki/Web_application_firewall),\nDNS services, and more. For Google Distributed Cloud, BIG-IP provides\nexternal access and L3/4 load-balancing services.\n\nAdditional configuration\n\nAfter the Setup utility completes,\nyou need to [Create an administrative partition](https://techdocs.f5.com/kb/en-us/products/big-ip_ltm/manuals/product/bigip-user-account-administration-12-0-0/3.html)\nfor each user cluster you intend to expose and access.\n\nInitially, you define a partition\nfor the first user cluster. Don't use cluster partitions for anything else.\nEach of the clusters must have a partition that is for the sole use of that\ncluster.\n\nConfiguring the BIG-IP for Google Distributed Cloud external endpoints\n\nIf you didn't [disable bundled ingress](/kubernetes-engine/distributed-cloud/vmware/docs/how-to/disable-bundled-ingress), you must\n[configure the BIG-IP with the virtual servers](/kubernetes-engine/distributed-cloud/vmware/docs/how-to/manual-load-balance#cp-v2-user-cluster_4)\n(VIPs), corresponding to the following Google Distributed Cloud endpoints:\n\n- **User partition**\n\n - VIP for user cluster ingress controller (port exposed: `443`)\n - VIP for user cluster ingress controller (port exposed: `80`)\n\n| **Note:** Because Google Distributed Cloud blocks creating clusters with [legacy features](/kubernetes-engine/distributed-cloud/vmware/docs/concepts/migrate-recommended-features), this document doesn't cover the BIG-IP configuration for legacy features.\n\nCreate node object\n\nThe cluster node external IP addresses are in turn used to configure node objects on the BIG-IP\nsystem. You will create a node object for each Google Distributed Cloud\ncluster node. The nodes are added to backend pools that are then associated with\nvirtual servers.\n| **Important:** If you choose [DHCP IP Mode](/kubernetes-engine/distributed-cloud/vmware/docs/how-to/user-cluster-configuration-file-latest#network-ipmode-type-field), you need to update IP addresses for each node object on the BIG-IP system once the Google Distributed Cloud cluster node IP addresses changed.\n\n1. To sign in to the BIG-IP management console, go to the IP address. The address is provided during the installation.\n2. Click the **User partition** that you previously created.\n3. Go to **Local Traffic** \\\u003e **Nodes** \\\u003e **Node List**.\n4. Click **Create**.\n5. Enter a name and IP address for each cluster host and click **Finished**.\n\nCreate backend pools\n\nYou create a backend pool for each node Port.\n\n1. In the BIG-IP management console, click **User partition** for the user partition that you previously created.\n2. Go to **Local Traffic** \\\u003e **Pools** \\\u003e **Pool List**.\n3. Click **Create**.\n4. In the **Configuration** drop-down list, click **Advanced**.\n5. In the **Name** field, enter `Istio-80-pool`.\n6. To verify the pool member accessibility, under **Health Monitor** , click **tcp** . Optional: Because this is a manual configuration, you can also take advantage of more [advanced monitors](https://techdocs.f5.com/kb/en-us/products/big-ip_ltm/manuals/product/bigip-local-traffic-manager-monitors-reference-13-1-0.html) as appropriate for your deployment.\n7. For **Action on Service Down** , click **Reject**.\n\n8. For this tutorial, in the **Load Balancing Method** drop-down list,\n click **Round Robin**.\n\n9. In the **New Members** section, click **Node List** and then select the\n previously created node.\n\n10. In the **Service Port** field, enter the appropriate `nodePort` from the\n [configuration file](/kubernetes-engine/distributed-cloud/vmware/docs/how-to/manual-load-balance#cp-v2-user-cluster_2) or `spec.ports[?].nodePort` in the runtime\n istio ingress Kubernetes Service (name: `istio-ingress`, namespace: `gke-system`).\n\n11. Click **Add**.\n\n12. Repeat steps 8-9 and add each cluster node instance.\n\n13. Click **Finished**.\n\n14. Repeat all of these steps in this section for the remaining\n [user cluster nodePorts](/kubernetes-engine/distributed-cloud/vmware/docs/how-to/manual-load-balance#cp-v2-user-cluster_4).\n\nCreate virtual servers\n\nYou create a total of two virtual servers on the BIG-IP for the first user cluster. The virtual servers correspond to\nthe \"VIP + port\" combinations.\n\n1. In the BIG-IP management console, click the **User partition** that you previously created.\n2. Go to **Local Traffic** \\\u003e **Virtual Servers** \\\u003e **Virtual Server List**.\n3. Click **Create**.\n4. In the **Name** field, enter `istio-ingress-80`.\n5. In the **Destination Address/Mask** field, enter the IP address for the\n VIP. For this tutorial, use the HTTP ingress VIP in the\n [`configuration file`](/kubernetes-engine/distributed-cloud/vmware/docs/how-to/manual-load-balance#cp-v2-user-cluster_1) or `spec.loadBalancerIP` in the runtime\n istio ingress Kubernetes Service (name: `istio-ingress`, namespace: `gke-system`).\n\n | **Warning:** Don't setup a virtual server for `controlPlaneVIP`.\n6. In the **Service Port** field, enter the appropriate listener port for\n the VIP. For this tutorial, use port `80` or `spec.ports[?].port` in the runtime\n istio ingress Kubernetes Service (name: `istio-ingress`, namespace: `gke-system`).\n\n There are several configuration options for enhancing your app's endpoint,\n such as associating protocol-specific profiles,\n [certificate profiles](https://techdocs.f5.com/kb/en-us/products/big-ip_ltm/manuals/product/ltm-profiles-reference-13-1-0/6.html#guid-cc146765-9237-474b-9faf-0e18a208cb23),\n and\n [WAF policies](https://support.f5.com/csp/article/K85426947).\n7. For **Source Address Translation** click **Auto Map**.\n\n8. For **Default Pool** select the appropriate pool that you previously\n created.\n\n9. Click **Finished**.\n\n10. [Create and download an archive of the current configuration](https://support.f5.com/csp/article/K4423).\n\nWhat's next\n\n- To further enhance the security and performance of the external-facing\n VIPs, consider the following:\n\n - [F5 Advanced WAF](https://www.f5.com/products/security/advanced-waf)\n - [F5 Access Policy Manager (APM)](https://www.f5.com/products/security/access-policy-manager)\n - [Caching \\& Compression](https://www.f5.com/products/big-ip-services/local-traffic-manager)\n - [Health monitoring](https://techdocs.f5.com/en-us/bigip-15-0-0/big-ip-local-traffic-manager-implementations/implementing-health-and-performance-monitoring.html)\n - [Intelligent application traffic management](https://www.f5.com/products/big-ip-services/local-traffic-manager)\n- Learn more about F5\n [BIG-IP Application Services](https://www.f5.com/products/big-ip-services).\n\n- Learn more about BIG-IP configurations and capabilities:\n\n - [Certificate profiles](https://techdocs.f5.com/kb/en-us/products/big-ip_ltm/manuals/product/ltm-profiles-reference-13-1-0/6.html#guid-cc146765-9237-474b-9faf-0e18a208cb23)\n - [WAF policies](https://support.f5.com/csp/article/K85426947)"]]