En este instructivo, se muestra cómo configurar F5 BIG-IP cuando realizas la integración con Google Distributed Cloud a través del modo de balanceo de cargas manual en Google Distributed Cloud.
La plataforma BIG-IP de F5 ofrece varios servicios para ayudarte a mejorar la seguridad, la disponibilidad y el rendimiento de tus apps. Estos servicios incluyen el balanceo de cargas de L7, el firewall de red, el firewall de aplicaciones web (WAF), los servicios de DNS y mucho más. Para Google Distributed Cloud, BIG-IP proporciona acceso externo y servicios de balanceo de cargas L3/4.
Configuración adicional
Después de que se complete la utilidad de configuración, debes crear una partición administrativa para cada clúster de usuario que desees exponer y al que quieras acceder.
Inicialmente, defines una partición para el primer clúster de usuario. No uses las particiones del clúster para nada más. Cada uno de los clústeres debe tener una partición para uso exclusivo de ese clúster.
Configura BIG-IP para los extremos externos de Google Distributed Cloud
Si no inhabilitaste el ingreso agrupado, debes configurar el BIG-IP con los servidores virtuales (VIP) correspondientes a los siguientes extremos de Google Distributed Cloud:
Partición del usuario
- VIP para el controlador de entrada del clúster de usuario (puerto expuesto:
443) - VIP para el controlador de entrada del clúster de usuario (puerto expuesto:
80)
- VIP para el controlador de entrada del clúster de usuario (puerto expuesto:
Crea un objeto de nodo
A su vez, las direcciones IP externas de los nodos del clúster se usan para configurar objetos de nodo en el sistema BIG-IP. Crearás un objeto de nodo para cada nodo del clúster de Google Distributed Cloud. Los nodos se agregan a grupos de backends que luego se asocian con servidores virtuales.
- Para acceder a la consola de administración de BIG-IP, ve a la dirección IP. La dirección se proporciona durante la instalación.
- Haz clic en la Partición de usuarios que creaste anteriormente.
- Ve a Tráfico local > Nodos > Lista de nodos.
- Haz clic en Crear.
Ingresa un nombre y una dirección IP para cada host del clúster y haz clic en Finalizar.

Crea grupos de backend
Creas un grupo de backends para cada puerto de nodo.
- En la consola de administración de BIG-IP, haz clic en User partition para la partición de usuario que creaste anteriormente.
- Ve a Tráfico local > Grupos > Lista de grupos.
- Haz clic en Crear.
- En la lista desplegable Configuración, haz clic en Avanzado.
- En el campo Nombre, ingresa
Istio-80-pool. - Para verificar la accesibilidad del miembro del grupo, en Monitor de estado, haz clic en tcp. Opcional: Como se trata de una configuración manual, también puedes aprovechar monitores avanzados según corresponda a tu implementación.
En Action on Service Down, haz clic en Reject.
En este instructivo, en la lista desplegable Método de balanceo de cargas, haz clic en Round Robin.
En la sección Miembros nuevos, haz clic en Lista de nodos y, luego, selecciona el nodo que se creó antes.
En el campo Puerto de servicio, ingresa el
nodePortadecuado del archivo de configuración ospec.ports[?].nodePorten el servicio de entrada de Istio de Kubernetes en tiempo de ejecución (nombre:istio-ingress, espacio de nombres:gke-system).Haz clic en Agregar.
Repite los pasos 8 y 9, y agrega cada instancia de nodo de clúster.
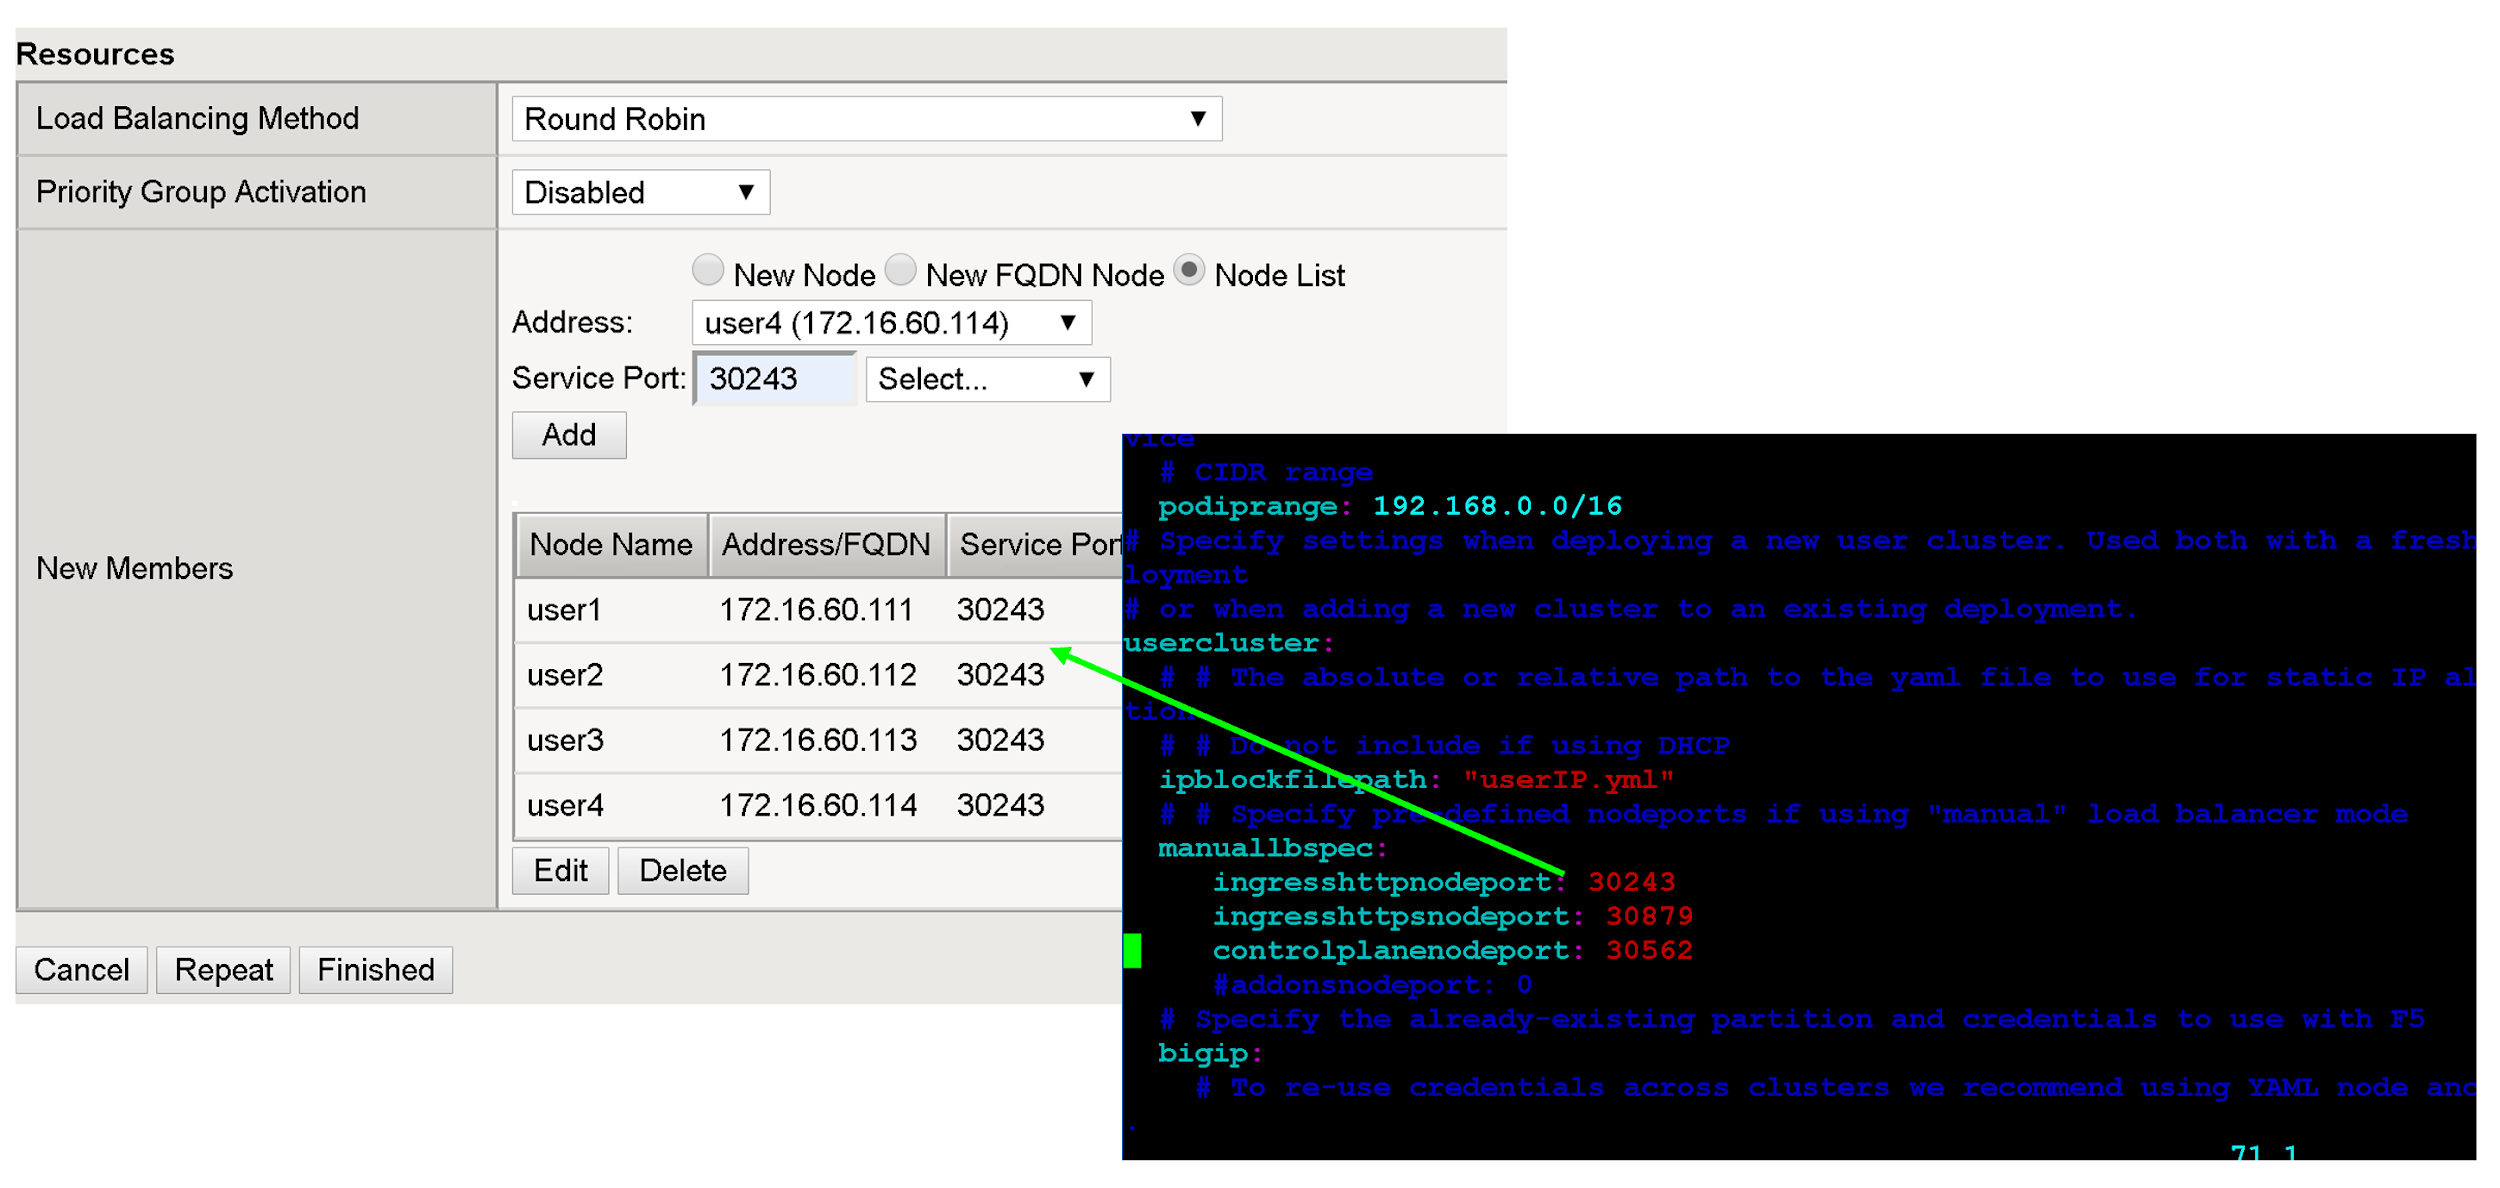
Haz clic en Finalizado.
Repite todos los pasos de esta sección para los nodePorts del clúster de usuario restantes.
Crea servidores virtuales
Creas un total de dos servidores virtuales en BIG-IP para el primer clúster de usuario. Los servidores virtuales corresponden a las combinaciones de "VIP + puerto".
- En la consola de administración de BIG-IP, haz clic en la partición del usuario que creaste anteriormente.
- Ve a Tráfico local > Servidores virtuales > Lista de servidores virtuales.
- Haz clic en Crear.
- En el campo Nombre, ingresa
istio-ingress-80. En el campo Dirección/máscara de destino, ingresa la dirección IP de la VIP. En este instructivo, usa la VIP de entrada HTTP en
configuration fileospec.loadBalancerIPen el servicio de entrada de Istio de Kubernetes en tiempo de ejecución (nombre:istio-ingress, espacio de nombres:gke-system).En el campo Puerto de servicio, ingresa el puerto de escucha adecuado para la VIP. En este instructivo, usa el puerto
80ospec.ports[?].porten el servicio de Kubernetes de Istio Ingress en tiempo de ejecución (nombre:istio-ingress, espacio de nombres:gke-system).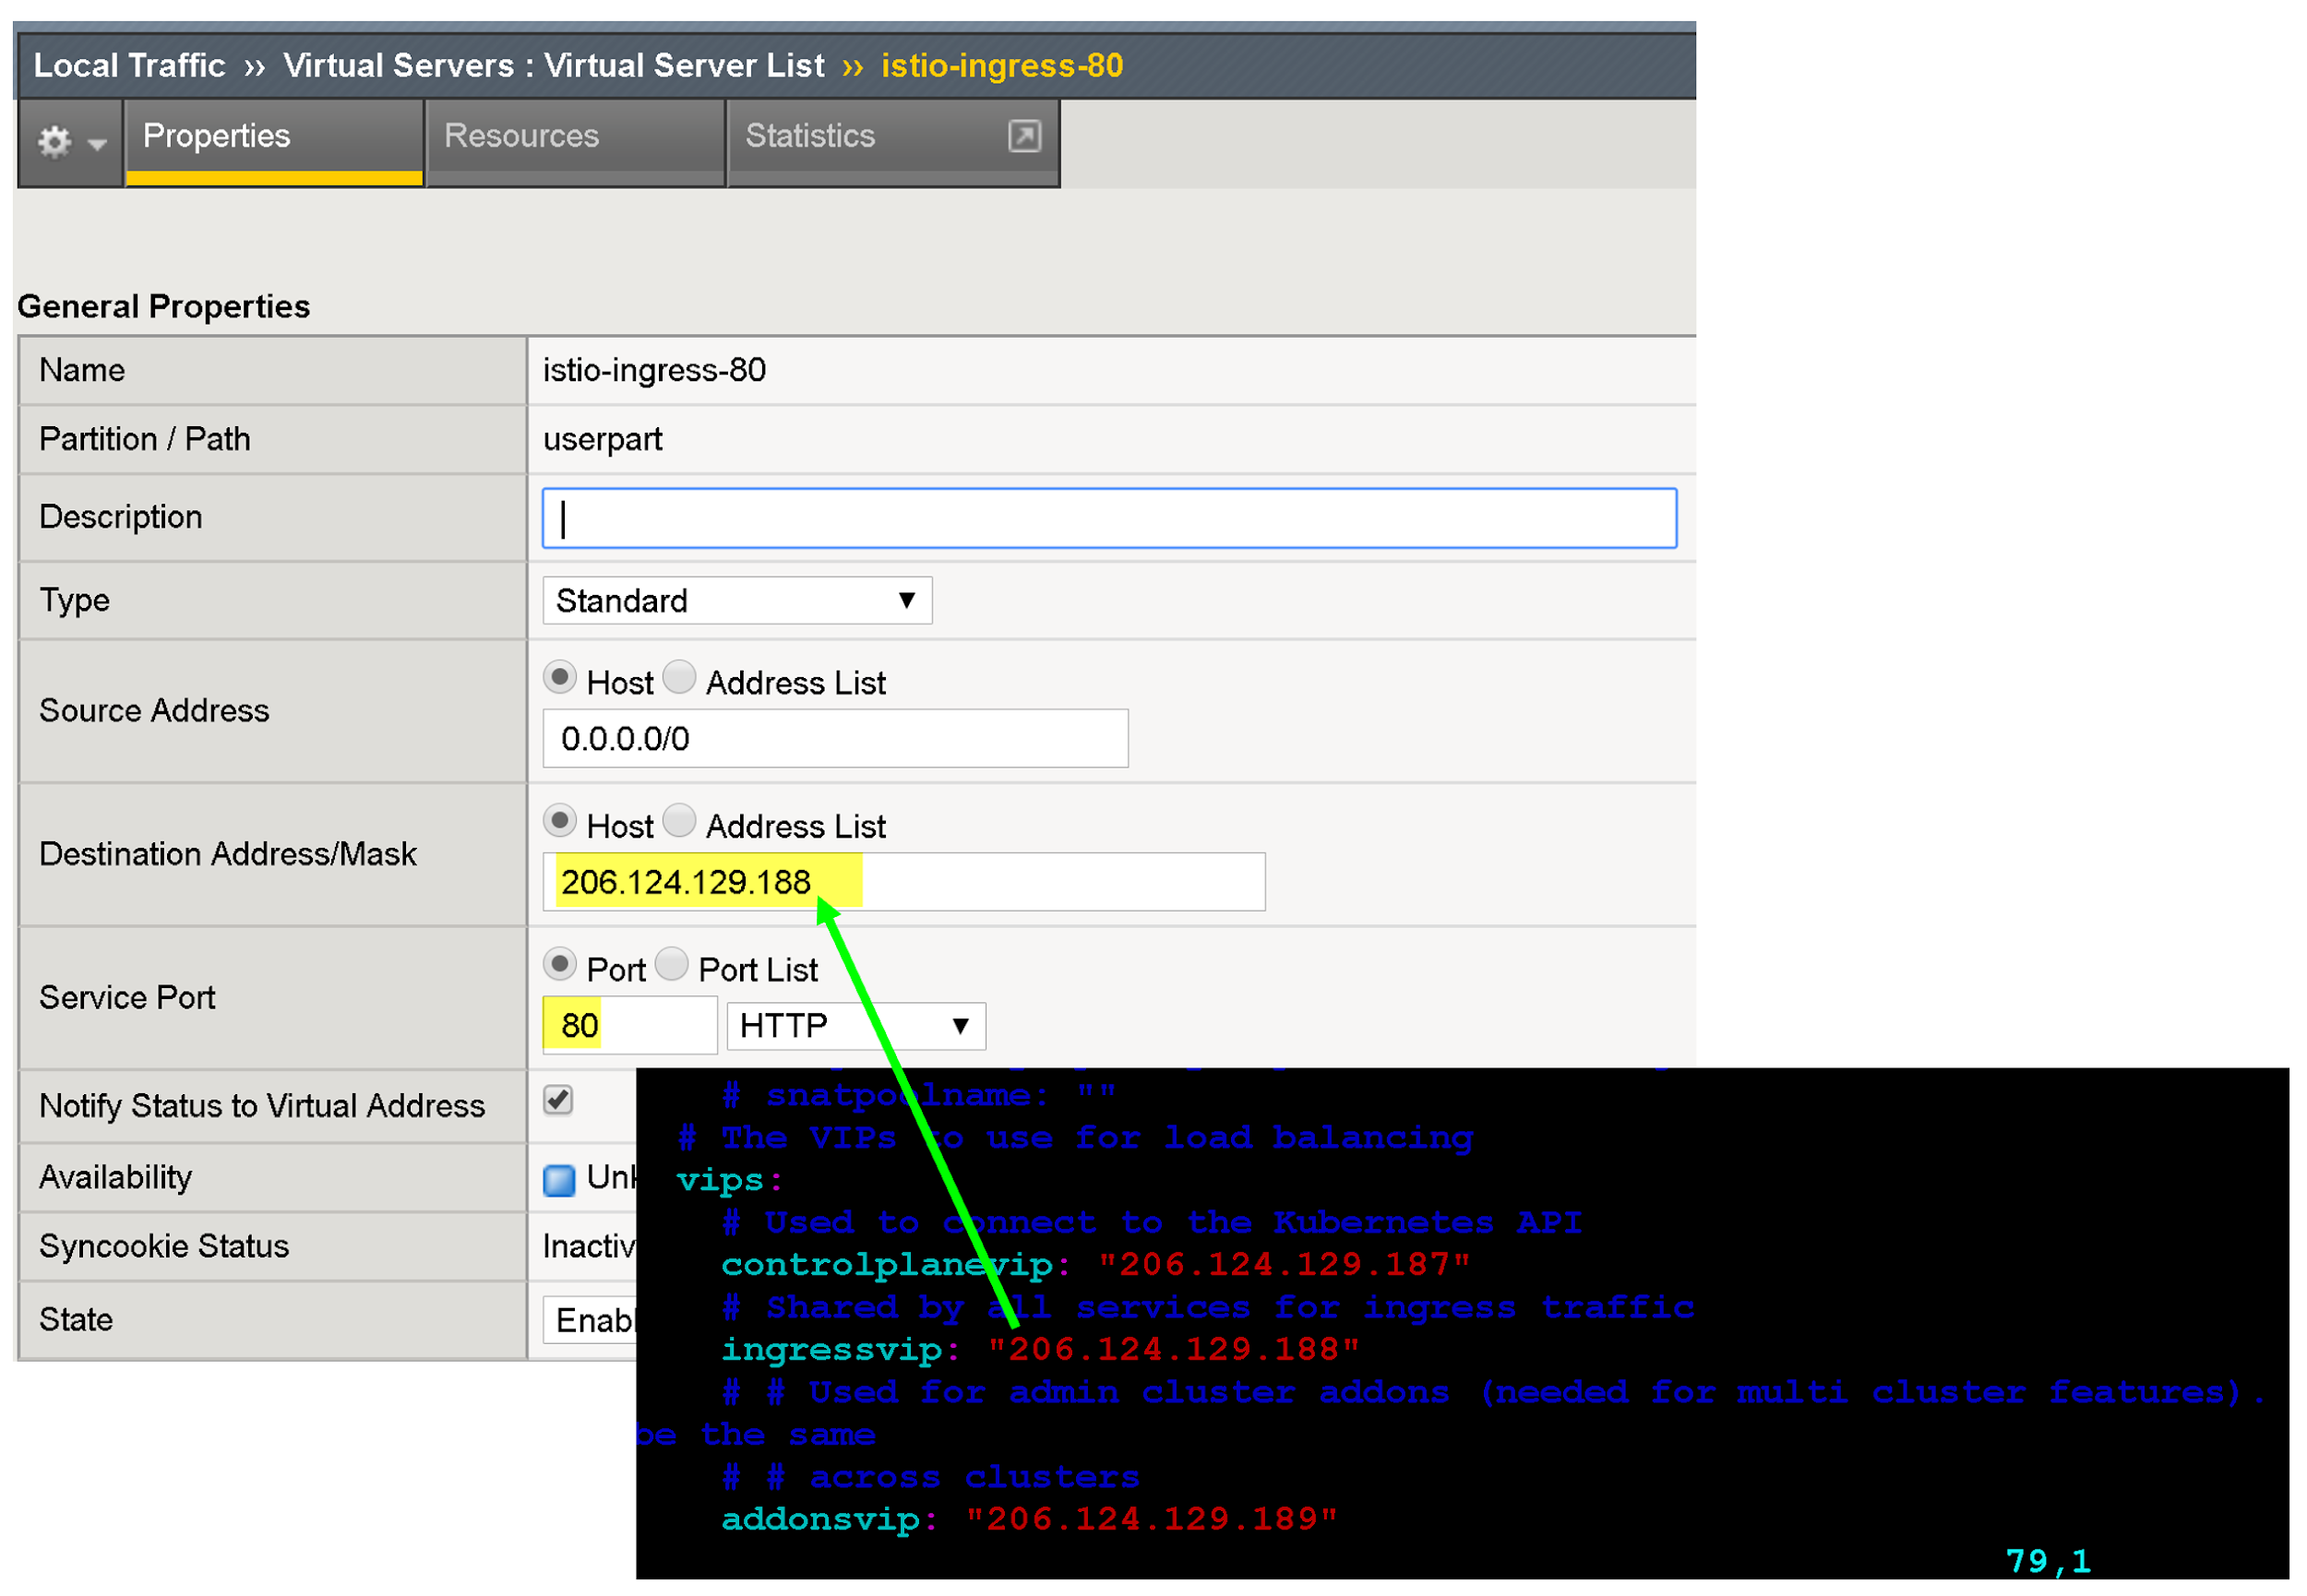
Existen varias opciones de configuración para mejorar el extremo de tu app, como asociar perfiles específicos del protocolo, perfiles de certificados y políticas del WAF.
En Traducción de direcciones de origen, haz clic en Asignación automática.
En Grupo predeterminado, selecciona el grupo adecuado que creaste anteriormente.
Haz clic en Finalizado.
¿Qué sigue?
Para mejorar aún más la seguridad y el rendimiento de las VIP externas, considera lo siguiente:
Obtén más información sobre los servicios de aplicación de BIG-IP de F5.
Obtén más información sobre las configuraciones y capacidades de BIG-IP: