En esta página se muestra cómo servir una API desde un dominio personalizado que te pertenezca. Por ejemplo, example.com.
Como alternativa a usar tu propio nombre de dominio, puedes usar un nombre de dominio gestionado por Google. Para obtener más información, consulta el artículo Usar un dominio gestionado por Google.
Antes de empezar
Obtén un nombre de dominio de un registrador de nombres de dominio si aún no tienes uno para usarlo en tu API.
Configurar el proyecto de API para usar tu nombre de dominio
Sigue las instrucciones de la pestaña correspondiente.
Compute Engine
La forma recomendada de servir una API desde instancias de Compute Engine es usar un balanceador de carga en un grupo de instancias. Debes reservar una dirección IP externa para el nombre de dominio y usarla en el balanceador de carga.
Para servir la API desde un nombre de dominio, sigue estos pasos:
Reserva al menos una dirección IP externa estática en tu proyecto:
Asigna el nombre que quieras a la dirección IP reservada
En Type (Tipo), haga clic en Global (Global).
En Adjunto a, haz clic en Ninguno. Más adelante, asociarás la dirección IP a un balanceador de carga.
Visita la cuenta de tu proveedor de dominios y edita la configuración de tu dominio. Debes crear un registro A que contenga el nombre de tu API, por ejemplo, myapi.example.com, con la dirección IP externa en su campo de datos.
Crea un grupo de instancias que incluya las instancias que ejecutan tu API y
Extensible Service Proxy (ESP:
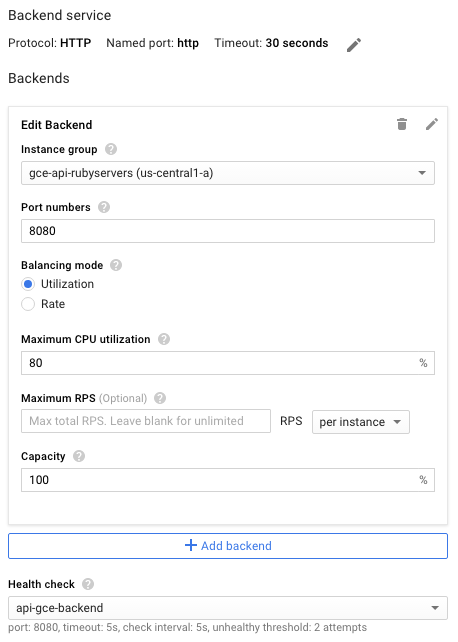
Haz clic en Define a Backend Service (Definir un servicio de backend) > Create or select a backend service (Crear o seleccionar un servicio de backend).
Asigna el nombre y la descripción que quieras a esta configuración de servicio de backend.
En el campo Protocol (Protocolo), selecciona el protocolo que quieras admitir a través del balanceador de carga: HTTP o HTTPS.
En la lista Grupo de instancias, haz clic en el grupo de instancias que quieras.
En el campo Números de puerto, introduce 8080.
Haz clic en Comprobación del estado para configurar las comprobaciones del estado:
Introduce un nombre para la configuración de la comprobación del estado.
Asigna el puerto 8080.
Para aceptar los valores predeterminados restantes, haz clic en Guardar.
Por ahora, acepta los valores predeterminados del resto de la configuración.
Puedes hacer cambios más adelante si lo necesitas, como añadir puertos.
No es necesario que definas nada en las reglas de host y ruta. Puedes reenviar todo a tu API de backend mediante los filtros predeterminados Cualquier resultado sin coincidencia. Esto significa que todo el tráfico que llega al balanceador de carga se dirige a la API en el puerto 8080
(el puerto predeterminado), tal como se ha definido en los pasos anteriores.
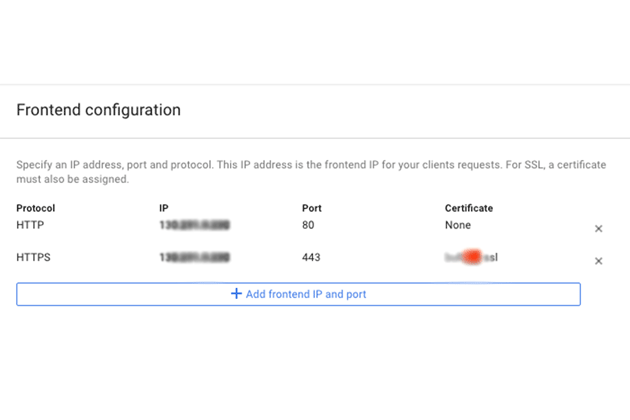
Haz clic en Configuración de frontend.
En el campo Protocol (Protocolo), selecciona el protocolo que quieras admitir a través del balanceador de carga: HTTP o HTTPS.
En la lista IP, haz clic en la dirección IP externa que has creado antes.
Para el protocolo HTTPS, debe usar SSL. En la lista Certificado, haz clic en el certificado que quieras.
Si quieres admitir otro protocolo, haz clic en Añadir IP y puerto de frontend, especifica el protocolo, la misma dirección IP externa y un puerto diferente.
Para crear el balanceador de carga totalmente configurado, haz clic en Crear. Si el botón Crear no está habilitado, comprueba los componentes que acabas de configurar: debería aparecer una marca de verificación junto a cada uno de los componentes de configuración. Si no aparece la marca de verificación, significa que no has
completado la configuración.
Una vez que se propaguen los cambios de DNS, las solicitudes se enviarán a tu API mediante el balanceador de carga.
GKE
Para ofrecer una API a través de un dominio en Google Kubernetes Engine (GKE), debes exponer ESP como un servicio. Para ello, usa la dirección IP externa devuelta en la configuración DNS de tu dominio. Ten en cuenta que GKE
hace el balanceo de carga automáticamente.
Para exponer tu API como un servicio, sigue estos pasos:
Si aún no lo has hecho, configura un servicio de Kubernetes para tus back-ends de API. Crea un archivo de configuración de servicio, service.yaml, con un contenido similar al siguiente:
En la lista Type (Tipo), haz clic en Static (Estático).
Visita la cuenta de tu proveedor de dominios y edita la configuración de tu dominio. Debe crear un registro A que contenga el nombre de su API (por ejemplo, myapi.example.com) y la dirección IP externa en su campo de datos.
[[["Es fácil de entender","easyToUnderstand","thumb-up"],["Me ofreció una solución al problema","solvedMyProblem","thumb-up"],["Otro","otherUp","thumb-up"]],[["Es difícil de entender","hardToUnderstand","thumb-down"],["La información o el código de muestra no son correctos","incorrectInformationOrSampleCode","thumb-down"],["Me faltan las muestras o la información que necesito","missingTheInformationSamplesINeed","thumb-down"],["Problema de traducción","translationIssue","thumb-down"],["Otro","otherDown","thumb-down"]],["Última actualización: 2025-09-11 (UTC)."],[[["\u003cp\u003eThis page guides users on serving an API from a custom domain they own, such as \u003ccode\u003eexample.com\u003c/code\u003e, as an alternative to using a Google-managed domain.\u003c/p\u003e\n"],["\u003cp\u003eBefore beginning, users must obtain a domain name, verify ownership, name their API host, obtain an SSL certificate if needed, and deploy their API and Extensible Service Proxy (ESP).\u003c/p\u003e\n"],["\u003cp\u003eFor Compute Engine, users need to reserve a static external IP address, create an A record with their API name and the external IP, set up an instance group, and configure an HTTP(S) load balancer.\u003c/p\u003e\n"],["\u003cp\u003eFor Google Kubernetes Engine (GKE), users must configure a Kubernetes service, expose ESP as a service to get an external IP address, change this address to static, and create an A record with the API name and the static IP.\u003c/p\u003e\n"],["\u003cp\u003eAfter completing the configuration steps and DNS changes propagate, requests will be sent to the user's API through the load balancer or service.\u003c/p\u003e\n"]]],[],null,["# Serving an API from your domain name\n\n[OpenAPI](/endpoints/docs/openapi/serving-apis-from-domains \"View this page for the Cloud Endpoints OpenAPI docs\") \\| gRPC\n\n\u003cbr /\u003e\n\nThis page shows how to serve an API from a custom domain that you own, for\nexample, `example.com`.\n\nAs an alternative to using your own domain name, you can use a domain name\nmanaged by Google. See\n[Using a domain managed by Google](/endpoints/docs/grpc/configure-endpoints#using_a_domain_managed_by_google)\nfor more information.\n\nBefore you begin\n----------------\n\n- Obtain a domain name from a domain name registrar if you don't already have a domain name to use for your API.\n- [Verify domain ownership](/endpoints/docs/grpc/verify-domain-name).\n- [Name your API host name](/endpoints/docs/grpc/configure-endpoints) with your domain name.\n- If you are using SSL with your domain, obtain and upload your SSL certificate.\n- [Deploy your API and Extensible Service Proxy (ESP)](/endpoints/docs/grpc/deploy-api-backend).\n\nConfigure your API project to use your domain name\n--------------------------------------------------\n\nFollow the instructions in the appropriate tab. \n\n### Compute Engine\n\nThe recommended way to serve an API from Compute Engine instances is\nto use a load balancer across an instance group. You need to reserve an\nexternal IP address for the domain name and use that external IP address for\nthe load balancer.\n\nTo serve the API from a domain name:\n\n1. Reserve at least one static external IP address in your project: \n\n [Go to the External IP Addresses page](https://console.cloud.google.com/networking/addresses/add)\n 1. Assign any name you want to the reserved IP address\n 2. For **Type** , click **Global**.\n 3. For **Attached to** , click **None**. You attach the IP address to a load balancer later.\n2. Visit your domain provider account and edit your domain settings. You must create an *A record* that contains your API name, for example, `myapi.example.com` with the external IP address in its data field\n3. Create an instance group that includes the instances running your API and Extensible Service Proxy (ESP: \n\n [Go to the Create a New Instance group page](https://console.cloud.google.com/compute/instanceGroups/add)\n 1. Assign any name you want for the group and add a description.\n 2. From the **Zone** list, click the zone used by your API instance.\n 3. In the **Instance definition** list, click **Select existing instances**\n 4. In the **VM Instances** field, add the VM instance running the API.\n 5. Click **Create**.\n4. Create and configure an HTTP(S) load balancer: \n\n [Go to the Create a New HTTP(S) load balancer page](https://console.cloud.google.com/networking/loadbalancing/http/add)\n 1. Click **Define a Backend Service** \\\u003e **Create or select a backend service** . \n 2. Assign any name and description you want for this backend service configuration.\n 3. In the **Protocol** field, select the protocol you want to support through the load balancer, **HTTP** or **HTTPS**.\n 4. In the **Instance group** list, click your instance group.\n 5. In the **Port Numbers** field, enter `8080`.\n 6. Click **Health check** to configure health checks:\n - Enter a name for the health check configuration.\n - Assign the port `8080`.\n - To accept the remaining default values, click **Save**.\n 7. For now, accept the defaults for the rest of the configuration. You can make changes later as needed, such as additional ports.\n 8. You don't need to set anything in the **Host and path rules** ; you can forward everything to your backend API by using the default **Any unmatched** filters. This means that all traffic into the load balancer is directed to the API on the port `8080` (the default port) as defined in the preceding steps.\n 9. Click **Frontend configuration** . \n - In the **Protocol** field, select the protocol you want to support through the load balancer, **HTTP** or **HTTPS**.\n - In the **IP** list, click the external IP address you created earlier.\n - For the HTTPS protocol, you need to use SSL. In the **Certificate** list, click the certificate you want.\n - Optionally, if you want to support another protocol, click **Add frontend IP and port**, specify the protocol, the same external IP address, and a different port.\n 10. To create the fully configured load balancer, click **Create** . If the **Create** button isn't enabled, check the components you just configured: a checkmark should appear beside each of the configuration components. A missing checkmark means you haven't completed the configuration.\n 11. After your DNS changes propagate, requests are sent to your API by using the load balancer.\n | **Note:** If requests aren't making it through to your API backend, check your project's [firewall rules](https://console.cloud.google.com/networking/firewalls/list) to make sure your instances can accept traffic on the default ESP port `8080`. For more information, see [Firewalls](/compute/docs/networking#firewalls).\n\n### GKE\n\nTo serve an API over a domain for\nGoogle Kubernetes Engine (GKE), you need to\nexpose ESP as a service, by using the returned external IP\naddress for your domain's DNS settings. Note that GKE\nautomatically does load balancing for you.\n\nTo expose your API as a service:\n\n1. If you don't have one already, [Configure a Kubernetes service](https://kubernetes.io/docs/tasks/access-application-cluster/connecting-frontend-backend/) for your API backends. Create a service configuration file, `service.yaml`, with content similar to the following: \n\n ```\n apiVersion: v1\n kind: Service\n metadata:\n name: echo\n spec:\n ports:\n - port: 80\n targetPort: 8081\n protocol: TCP\n selector:\n app: echo-app\n type: LoadBalancer\n \n ```\n - Change the `selector` label to match your backend labels (`app: echo-app` in this example)\n - Make sure the `targetPort` matches the port used by ESP configured in your API backends. ESP uses port `8081` by default.\n2. Deploy the Kubernetes service: \n\n ```\n kubectl apply -f service.yaml\n \n ```\n3. View the external IP address assigned to your exposed service: \n\n ```\n kubectl get services\n \n ```\n The output displays an `EXTERNAL-IP` address similar to the following: \n\n ```\n NAME CLUSTER-IP EXTERNAL-IP PORT(S) AGE\n hello-node 10.X.XXX.202 10X.XXX.XX.123 8080/TCP 1m\n \n ```\n | **Note:** It takes awhile for the API to be exposed as a service, and the external IP isn't visible until this process is complete. So you might have to run `kubectl get services` several times before you see the IP address.\n4. Change the generated external IP from ephemeral to static. \n\n [Go to the External IP Addresses page](https://console.cloud.google.com/networking/addresses/list)\n 1. Select your external IP address from the list.\n 2. In the **Type** list, click **Static**.\n5. Visit your domain provider account and edit your domain settings. You must create an *A record* that contains your API name, for example, `myapi.example.com`, with the external IP address in its data field.\n\nWhat's next\n-----------\n\n- [Serving multiple APIs from a domain](/endpoints/docs/grpc/deploying-apis-subdomains)"]]