API 키로 API 액세스 제한

API 키를 사용하여 특정 API 메서드나 API의 모든 메서드에 대한 액세스를 제한할 수 있습니다. 이 페이지에서는 API 키가 있는 클라이언트로 API 액세스를 제한하는 방법을 설명하고 API 키를 만드는 방법을 보여줍니다.

Extensible Service Proxy(ESP)는 Service Control API를 사용하여 API 키를 검증하고 API 키와 프로젝트의 사용 설정된 API 간의 연결을 검증합니다. API에 API 키 요구사항을 설정하면 보호되는 메서드, 클래스 또는 API에 대한 요청은 내 프로젝트나 내가 API 사용 설정 권한을 부여한 개발자가 소유한 다른 프로젝트에서 생성된 키가 포함된 경우를 제외하고는 모두 거부됩니다. API 키가 생성된 프로젝트는 로깅되지 않으며 요청 헤더에 추가되지 않습니다. 그러나 특정 소비자 프로젝트를 위한 필터에 설명된 대로 Endpoints > 서비스에서 클라이언트가 연결된 Google Cloud 프로젝트를 볼 수 있습니다.

API 키를 만들어야 하는 Google Cloud 프로젝트에 대한 자세한 내용은 API 키로 보호되는 API 공유를 참조하세요.

기본적으로 gRPC 서비스에서는 모든 API 메서드에 액세스하려면 API 키가 필요합니다. 전체 API나 특정 메서드에 대해 API 키 요구사항을 사용 중지할 수 있습니다. 이렇게 하려면 서비스 구성에 usage 섹션을 추가하고 아래 절차의 설명에 따라 규칙과 선택기를 구성합니다.

모든 API 메서드에 대한 액세스 제한 또는 부여

API에 액세스하는 데 API 키가 필요 없게 지정하려면 다음 안내를 따르세요.

  1. 텍스트 편집기에서 프로젝트의 gRPC 서비스 구성 파일을 열고 usage 섹션을 찾거나 추가합니다.

  2. usage 섹션에서 다음과 같이 allow_unregistered_calls 규칙을 지정합니다. selector의 와일드 카드 "*"은 API의 모든 메서드에서 규칙이 적용됨을 의미합니다.

    usage:
      rules:
      # All methods can be called without an API Key.
      - selector: "*"
        allow_unregistered_calls: true
    

메서드의 API 키 제한 삭제

API에 대한 API 액세스를 제한했더라도 다음과 같이 특정 메서드에 대한 API 키 검증을 끌 수 있습니다.

  1. 텍스트 편집기에서 프로젝트의 gRPC 서비스 구성 파일을 열고 usage 섹션을 찾거나 추가합니다.

  2. usage 섹션에서 다음과 같이 allow_unregistered_calls 규칙을 지정합니다. selector는 규칙이 지정된 메서드(이 경우 ListShelves)에만 적용됨을 의미합니다.

    usage:
      rules:
      # ListShelves method can be called without an API Key.
      - selector: endpoints.examples.bookstore.Bookstore.ListShelves
        allow_unregistered_calls: true
    

API 키를 사용하여 API 호출

API 호출은 gRPC 클라이언트에서 호출하는지 아니면 HTTP 클라이언트에서 호출하는지에 따라 다릅니다.

gRPC 클라이언트

메서드에 API 키가 필요한 경우 gRPC 클라이언트는 키 값을 x-api-key메타데이터로 메서드 호출과 함께 전달합니다.

Python

def run(host, port, api_key, auth_token, timeout, use_tls, servername_override, ca_path):
    """Makes a basic ListShelves call against a gRPC Bookstore server."""

    if use_tls:
        with open(ca_path, 'rb') as f:
            creds = grpc.ssl_channel_credentials(f.read())
        channel_opts = ()
        if servername_override:
            channel_opts += ((
                        'grpc.ssl_target_name_override', servername_override,),)
        channel = grpc.secure_channel(f'{host}:{port}', creds, channel_opts)
    else:
        channel = grpc.insecure_channel(f'{host}:{port}')

    stub = bookstore_pb2_grpc.BookstoreStub(channel)
    metadata = []
    if api_key:
        metadata.append(('x-api-key', api_key))
    if auth_token:
        metadata.append(('authorization', 'Bearer ' + auth_token))
    shelves = stub.ListShelves(empty_pb2.Empty(), timeout, metadata=metadata)
    print(f'ListShelves: {shelves}')

자바

private static final class Interceptor implements ClientInterceptor {
  private final String apiKey;
  private final String authToken;

  private static Logger LOGGER = Logger.getLogger("InfoLogging");

  private static Metadata.Key<String> API_KEY_HEADER =
      Metadata.Key.of("x-api-key", Metadata.ASCII_STRING_MARSHALLER);
  private static Metadata.Key<String> AUTHORIZATION_HEADER =
      Metadata.Key.of("authorization", Metadata.ASCII_STRING_MARSHALLER);

  public Interceptor(String apiKey, String authToken) {
    this.apiKey = apiKey;
    this.authToken = authToken;
  }

  @Override
  public <ReqT, RespT> ClientCall<ReqT, RespT> interceptCall(
      MethodDescriptor<ReqT,RespT> method, CallOptions callOptions, Channel next) {
    LOGGER.info("Intercepted " + method.getFullMethodName());
    ClientCall<ReqT, RespT> call = next.newCall(method, callOptions);

    call = new ForwardingClientCall.SimpleForwardingClientCall<ReqT, RespT>(call) {
      @Override
      public void start(Listener<RespT> responseListener, Metadata headers) {
        if (apiKey != null && !apiKey.isEmpty()) {
          LOGGER.info("Attaching API Key: " + apiKey);
          headers.put(API_KEY_HEADER, apiKey);
        }
        if (authToken != null && !authToken.isEmpty()) {
          System.out.println("Attaching auth token");
          headers.put(AUTHORIZATION_HEADER, "Bearer " + authToken);
        }
        super.start(responseListener, headers);
      }
    };
    return call;
  }
}

Go

func main() {
	flag.Parse()

	// Set up a connection to the server.
	conn, err := grpc.Dial(*addr, grpc.WithInsecure())
	if err != nil {
		log.Fatalf("did not connect: %v", err)
	}
	defer conn.Close()
	c := pb.NewGreeterClient(conn)

	if *keyfile != "" {
		log.Printf("Authenticating using Google service account key in %s", *keyfile)
		keyBytes, err := ioutil.ReadFile(*keyfile)
		if err != nil {
			log.Fatalf("Unable to read service account key file %s: %v", *keyfile, err)
		}

		tokenSource, err := google.JWTAccessTokenSourceFromJSON(keyBytes, *audience)
		if err != nil {
			log.Fatalf("Error building JWT access token source: %v", err)
		}
		jwt, err := tokenSource.Token()
		if err != nil {
			log.Fatalf("Unable to generate JWT token: %v", err)
		}
		*token = jwt.AccessToken
		// NOTE: the generated JWT token has a 1h TTL.
		// Make sure to refresh the token before it expires by calling TokenSource.Token() for each outgoing requests.
		// Calls to this particular implementation of TokenSource.Token() are cheap.
	}

	ctx := context.Background()
	if *key != "" {
		log.Printf("Using API key: %s", *key)
		ctx = metadata.AppendToOutgoingContext(ctx, "x-api-key", *key)
	}
	if *token != "" {
		log.Printf("Using authentication token: %s", *token)
		ctx = metadata.AppendToOutgoingContext(ctx, "Authorization", fmt.Sprintf("Bearer %s", *token))
	}

	// Contact the server and print out its response.
	name := defaultName
	if len(flag.Args()) > 0 {
		name = flag.Arg(0)
	}
	r, err := c.SayHello(ctx, &pb.HelloRequest{Name: name})
	if err != nil {
		log.Fatalf("could not greet: %v", err)
	}
	log.Printf("Greeting: %s", r.Message)
}

Node.js

const makeGrpcRequest = (JWT_AUTH_TOKEN, API_KEY, HOST, GREETEE) => {
  // Uncomment these lines to set their values
  // const JWT_AUTH_TOKEN = 'YOUR_JWT_AUTH_TOKEN';
  // const API_KEY = 'YOUR_API_KEY';
  // const HOST = 'localhost:50051'; // The IP address of your endpoints host
  // const GREETEE = 'world';

  // Import required libraries
  const grpc = require('grpc');
  const path = require('path');

  // Load protobuf spec for an example API
  const PROTO_PATH = path.join(__dirname, '/protos/helloworld.proto');
  const protoObj = grpc.load(PROTO_PATH).helloworld;

  // Create a client for the protobuf spec
  const client = new protoObj.Greeter(HOST, grpc.credentials.createInsecure());

  // Build gRPC request
  const metadata = new grpc.Metadata();
  if (API_KEY) {
    metadata.add('x-api-key', API_KEY);
  } else if (JWT_AUTH_TOKEN) {
    metadata.add('authorization', `Bearer ${JWT_AUTH_TOKEN}`);
  }

  // Execute gRPC request
  client.sayHello({name: GREETEE}, metadata, (err, response) => {
    if (err) {
      console.error(err);
    }

    if (response) {
      console.log(response.message);
    }
  });
};

HTTP 클라이언트

gRPC의 HTTP 트랜스코딩 기능에 Cloud Endpoints를 사용하는 경우 HTTP 클라이언트는 OpenAPI 서비스와 동일한 방식으로 키를 쿼리 매개변수로 보낼 수 있습니다.

API 키로 보호되는 API 공유

API 키는 키가 생성된 Google Cloud 프로젝트와 연결됩니다. API에 API 키가 필요하도록 결정했다면 API 키가 생성되는 Google Cloud 프로젝트는 다음 질문에 대한 답에 따라 달라집니다.

  • 할당량과 같은 Endpoints 기능을 사용할 수 있도록 API 호출자를 구별해야 하나요?
  • 모든 API 호출자에게 자체 Google Cloud 프로젝트가 있나요?
  • API 키 제한을 다양하게 설정해야 하나요?

다음과 같은 결정 트리를 참조하여 API 키를 만들 Google Cloud 프로젝트를 결정할 수 있습니다.
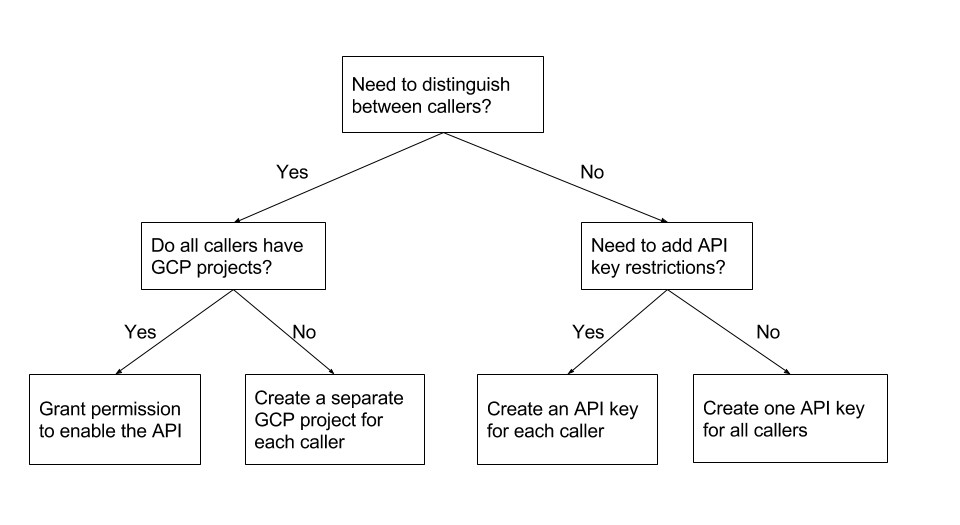
API 키 결정 트리

API를 사용 설정하도록 권한 부여

API 호출자를 구분하고 각 호출자에게 자체 Google Cloud 프로젝트가 있도록 해야 한다면 주 구성원에게 자체 Google Cloud 프로젝트에서 API를 사용 설정할 수 있는 권한을 부여하면 됩니다. 이렇게 하면 API 사용자는 API에서 사용할 자체 API 키를 만들 수 있습니다.

예를 들어 팀에서 회사의 다양한 클라이언트 프로그램에서 내부적으로 사용할 API를 만들었고 각 클라이언트 프로그램에 자체 Google Cloud 프로젝트가 있다고 가정해 보겠습니다. API 호출자를 구분하기 위해 각 호출자의 API 키는 서로 다른 Google Cloud 프로젝트에서 생성되어야 합니다. 동료에게 클라이언트 프로그램이 연결된 Google Cloud 프로젝트에서 API를 사용 설정할 수 있는 권한을 부여할 수 있습니다.

사용자가 자체 API 키를 만들도록 허용하려면 다음 안내를 따르세요.

  1. API가 구성된 Google Cloud 프로젝트에서 각 사용자에게 API 사용 설정 권한을 부여합니다.
  2. 사용자에게 자체 Google Cloud 프로젝트에서 API를 사용 설정하고 API 키를 만들 수 있음을 알립니다.

각 호출자별로 별도의 Google Cloud 프로젝트 만들기

API 호출자를 구분해야 하고 호출자 중에 Google Cloud 프로젝트가 없는 경우가 있으면 각 호출자별로 별도의 Google Cloud 프로젝트와 API 키를 만들 수 있습니다. 프로젝트를 만들기 전에 프로젝트와 연결된 호출자를 손쉽게 식별할 수 있도록 프로젝트 이름을 생각해 둡니다.

예를 들어 외부 API 고객이 있고, API를 호출하는 클라이언트 프로그램이 어떻게 만들어졌는지 모르는 경우를 가정해 보겠습니다. Google Cloud 서비스를 사용하고 Google Cloud 프로젝트가 있는 클라이언트도 있고 그렇지 않은 클라이언트도 있습니다. 호출자를 구분하려면 각 호출자별로 별도의 Google Cloud 프로젝트와 API 키를 만들어야 합니다.

각 호출자별로 별도의 Google Cloud 프로젝트와 API 키를 만들려면 다음 안내를 따르세요.

  1. 각 호출자별로 별도의 프로젝트를 만듭니다.
  2. 각 프로젝트에서 API를 사용 설정하고 API 키를 만듭니다.
  3. 각 호출자에게 API 키를 제공합니다.

각 호출자별 API 키 만들기

API 호출자를 구분할 필요가 없지만 API 키 제한사항을 추가하려는 경우, 동일 프로젝트에서 각 호출자에 대해 별도의 API 키를 만들 수 있습니다.

동일한 프로젝트 내 각 호출자별로 API 키를 만들려면 다음 안내를 따르세요.

  1. API가 구성된 프로젝트 또는 API가 사용 설정된 프로젝트에서 필요한 API 키 제한이 있는 각 고객의 API 키를 만듭니다.
  2. 각 호출자에게 API 키를 제공합니다.

모든 호출자를 위한 하나의 API 키 만들기

API 호출자를 구분할 필요가 없고 API 제한사항을 추가할 필요가 없지만 API 키가 여전히 필요한 경우(예: 익명 액세스 방지), 모든 호출자가 사용할 하나의 API 키를 만들 수 있습니다.

모든 호출자를 위한 하나의 API 키를 만들려면 다음 안내를 따르세요.
  1. API가 구성된 프로젝트 또는 API가 사용 설정된 프로젝트에서 모든 호출자를 위한 API 키를 만듭니다.
  2. 모든 호출자에게 동일한 API 키를 제공합니다.

다음 단계