開始使用人機迴圈
本快速入門導覽課程將介紹「人機迴圈」。在這個快速入門導覽課程中,您將透過 Google Cloud 控制台設定 Google Cloud 專案與授權、建立處理器,然後在該處理器上啟用專人審查。
如要直接在 Google Cloud 控制台按照逐步指南操作,請按一下「Guide me」(逐步引導):
事前準備
- Sign in to your Google Cloud account. If you're new to Google Cloud, create an account to evaluate how our products perform in real-world scenarios. New customers also get $300 in free credits to run, test, and deploy workloads.
-
In the Google Cloud console, on the project selector page, select or create a Google Cloud project.
Roles required to select or create a project
- Select a project: Selecting a project doesn't require a specific IAM role—you can select any project that you've been granted a role on.
-
Create a project: To create a project, you need the Project Creator
(
roles/resourcemanager.projectCreator), which contains theresourcemanager.projects.createpermission. Learn how to grant roles.
-
Verify that billing is enabled for your Google Cloud project.
-
Enable the Document AI, Cloud Storage, Vertex AI APIs.
Roles required to enable APIs
To enable APIs, you need the Service Usage Admin IAM role (
roles/serviceusage.serviceUsageAdmin), which contains theserviceusage.services.enablepermission. Learn how to grant roles. -
In the Google Cloud console, on the project selector page, select or create a Google Cloud project.
Roles required to select or create a project
- Select a project: Selecting a project doesn't require a specific IAM role—you can select any project that you've been granted a role on.
-
Create a project: To create a project, you need the Project Creator
(
roles/resourcemanager.projectCreator), which contains theresourcemanager.projects.createpermission. Learn how to grant roles.
-
Verify that billing is enabled for your Google Cloud project.
-
Enable the Document AI, Cloud Storage, Vertex AI APIs.
Roles required to enable APIs
To enable APIs, you need the Service Usage Admin IAM role (
roles/serviceusage.serviceUsageAdmin), which contains theserviceusage.services.enablepermission. Learn how to grant roles. 按一下 Google Cloud 控制台導覽選單中的「Document AI」,然後選取「Processor Gallery」(處理器庫)。 處理器庫
在「Processor Gallery」(處理器庫) 中
搜尋 「Invoice Parser」(應付憑據剖析器),然後選取「Create」(建立)。在
「Create processor」(建立處理器) 選單中,輸入處理器名稱,例如my-invoice-processor。請選取最近的區域。
點選「Create」(建立)。系統隨即會將您導向新處理器的詳細資料頁面。
前往處理器的
「Human-in-the-Loop」(人機迴圈) 分頁。選取
「Configure Human-in-the-Loop」(設定人機迴圈) 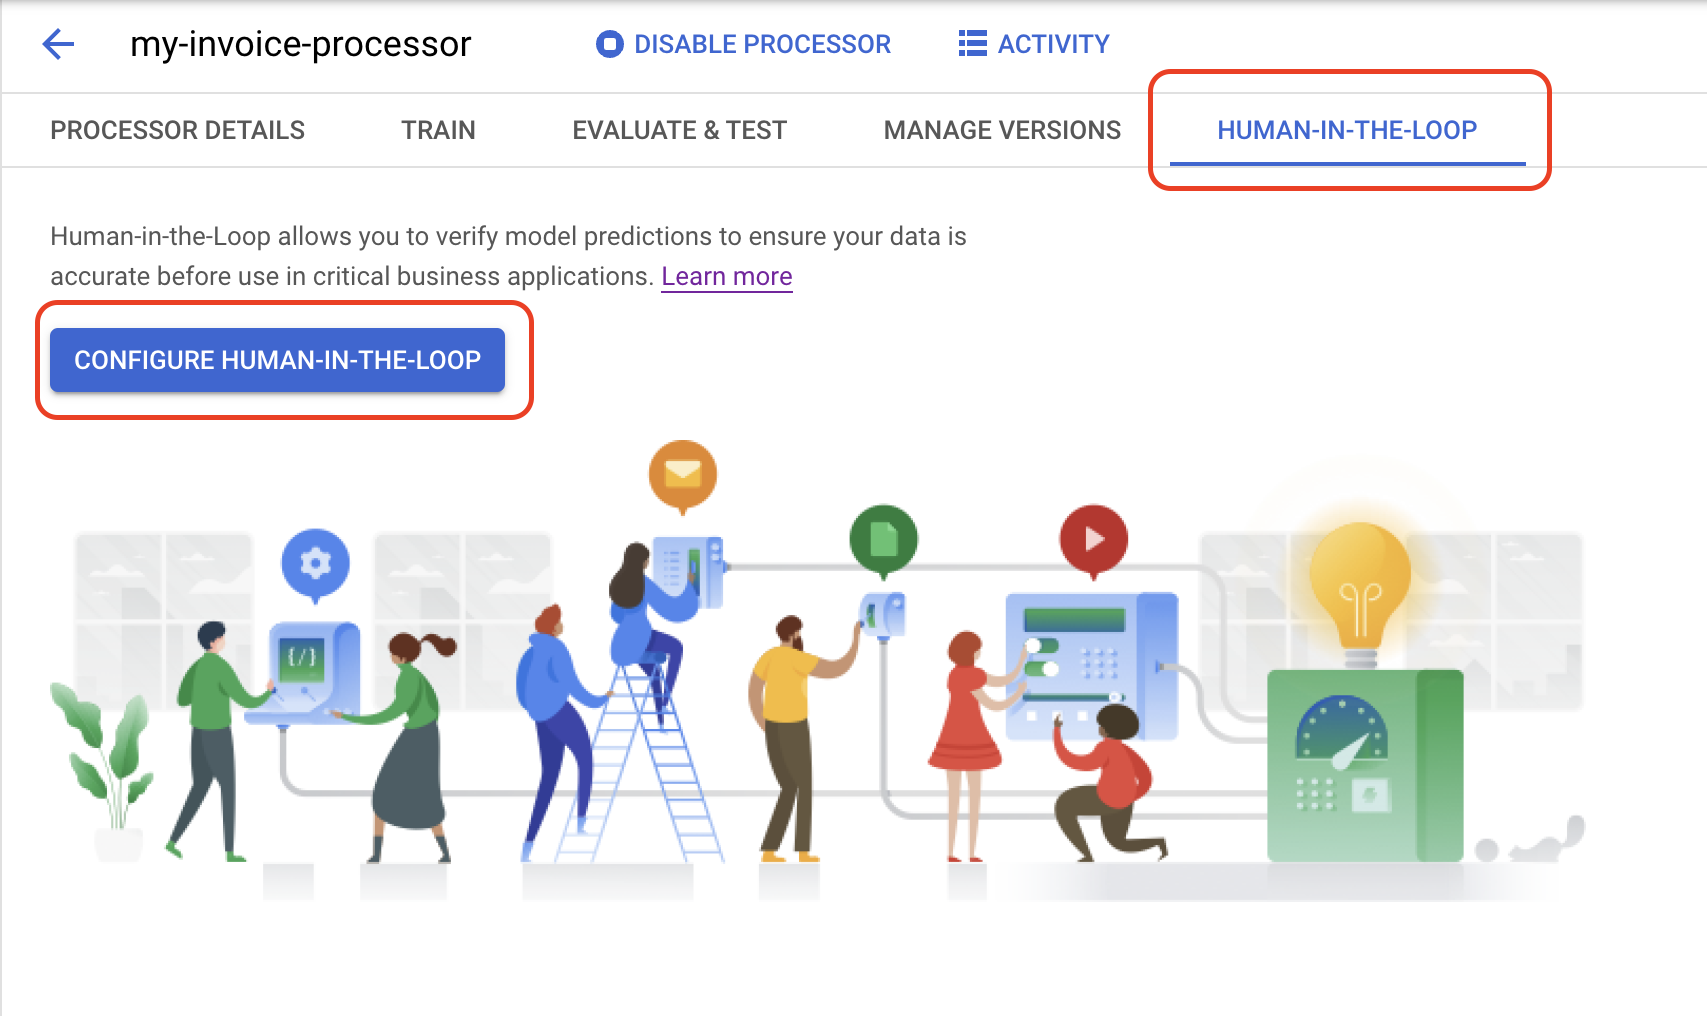
在
「Select specialists」(選取專員) 清單中 選取「Use my own specialists」(使用自己的專員)。在
「Labeler Pool」(標籤人員集區) 清單中 ,選取「New Specialist Pool」(新增專員集區)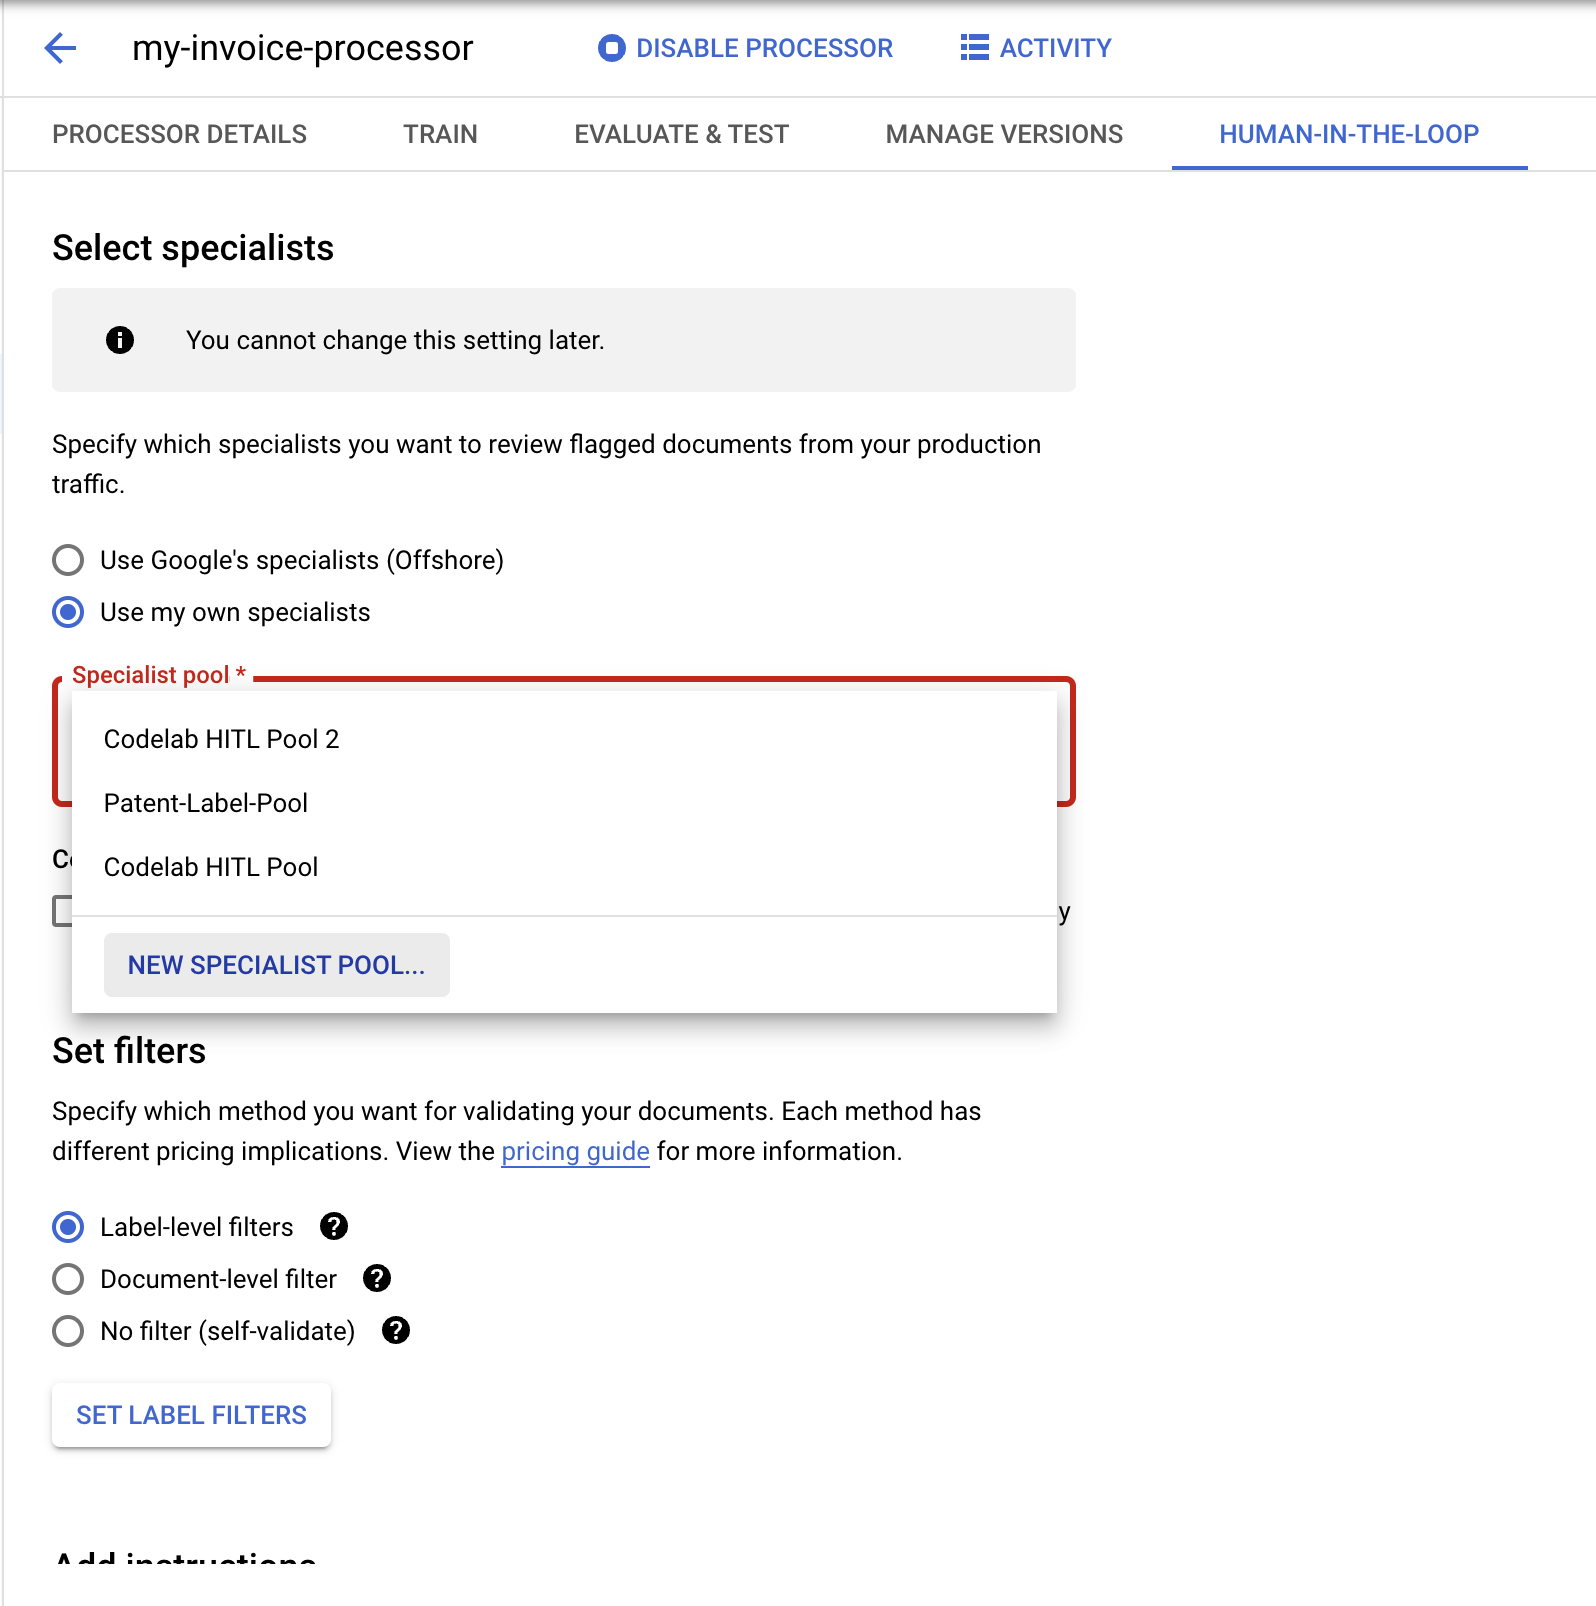
在彈出式對話方塊中輸入
「Pool name」(集區名稱) ,例如My Labeler Pool。
輸入「Pool managers」(集區管理員) 和「Specialists」(專員) 的電子郵件地址。
按一下「Create Pool」(建立集區)。這項作業需要幾秒鐘才能完成。
(選用) 勾選
「Enable Auto-Assignment」(啟用自動指派) 方塊。勾選
「Confirm Charge」(確認費用) 方塊。在
「Set filter」(設定篩選器) 專區中 ,選取「Document-level filter」(文件層級篩選器)。- (選用) 您也可以設定「Label-level filters」(標籤層級的篩選器),根據個別欄位進行篩選。
將
「Confidence threshold」(可信度門檻) 設為 100%。系統將傳送所有預測文件以進行人工審查。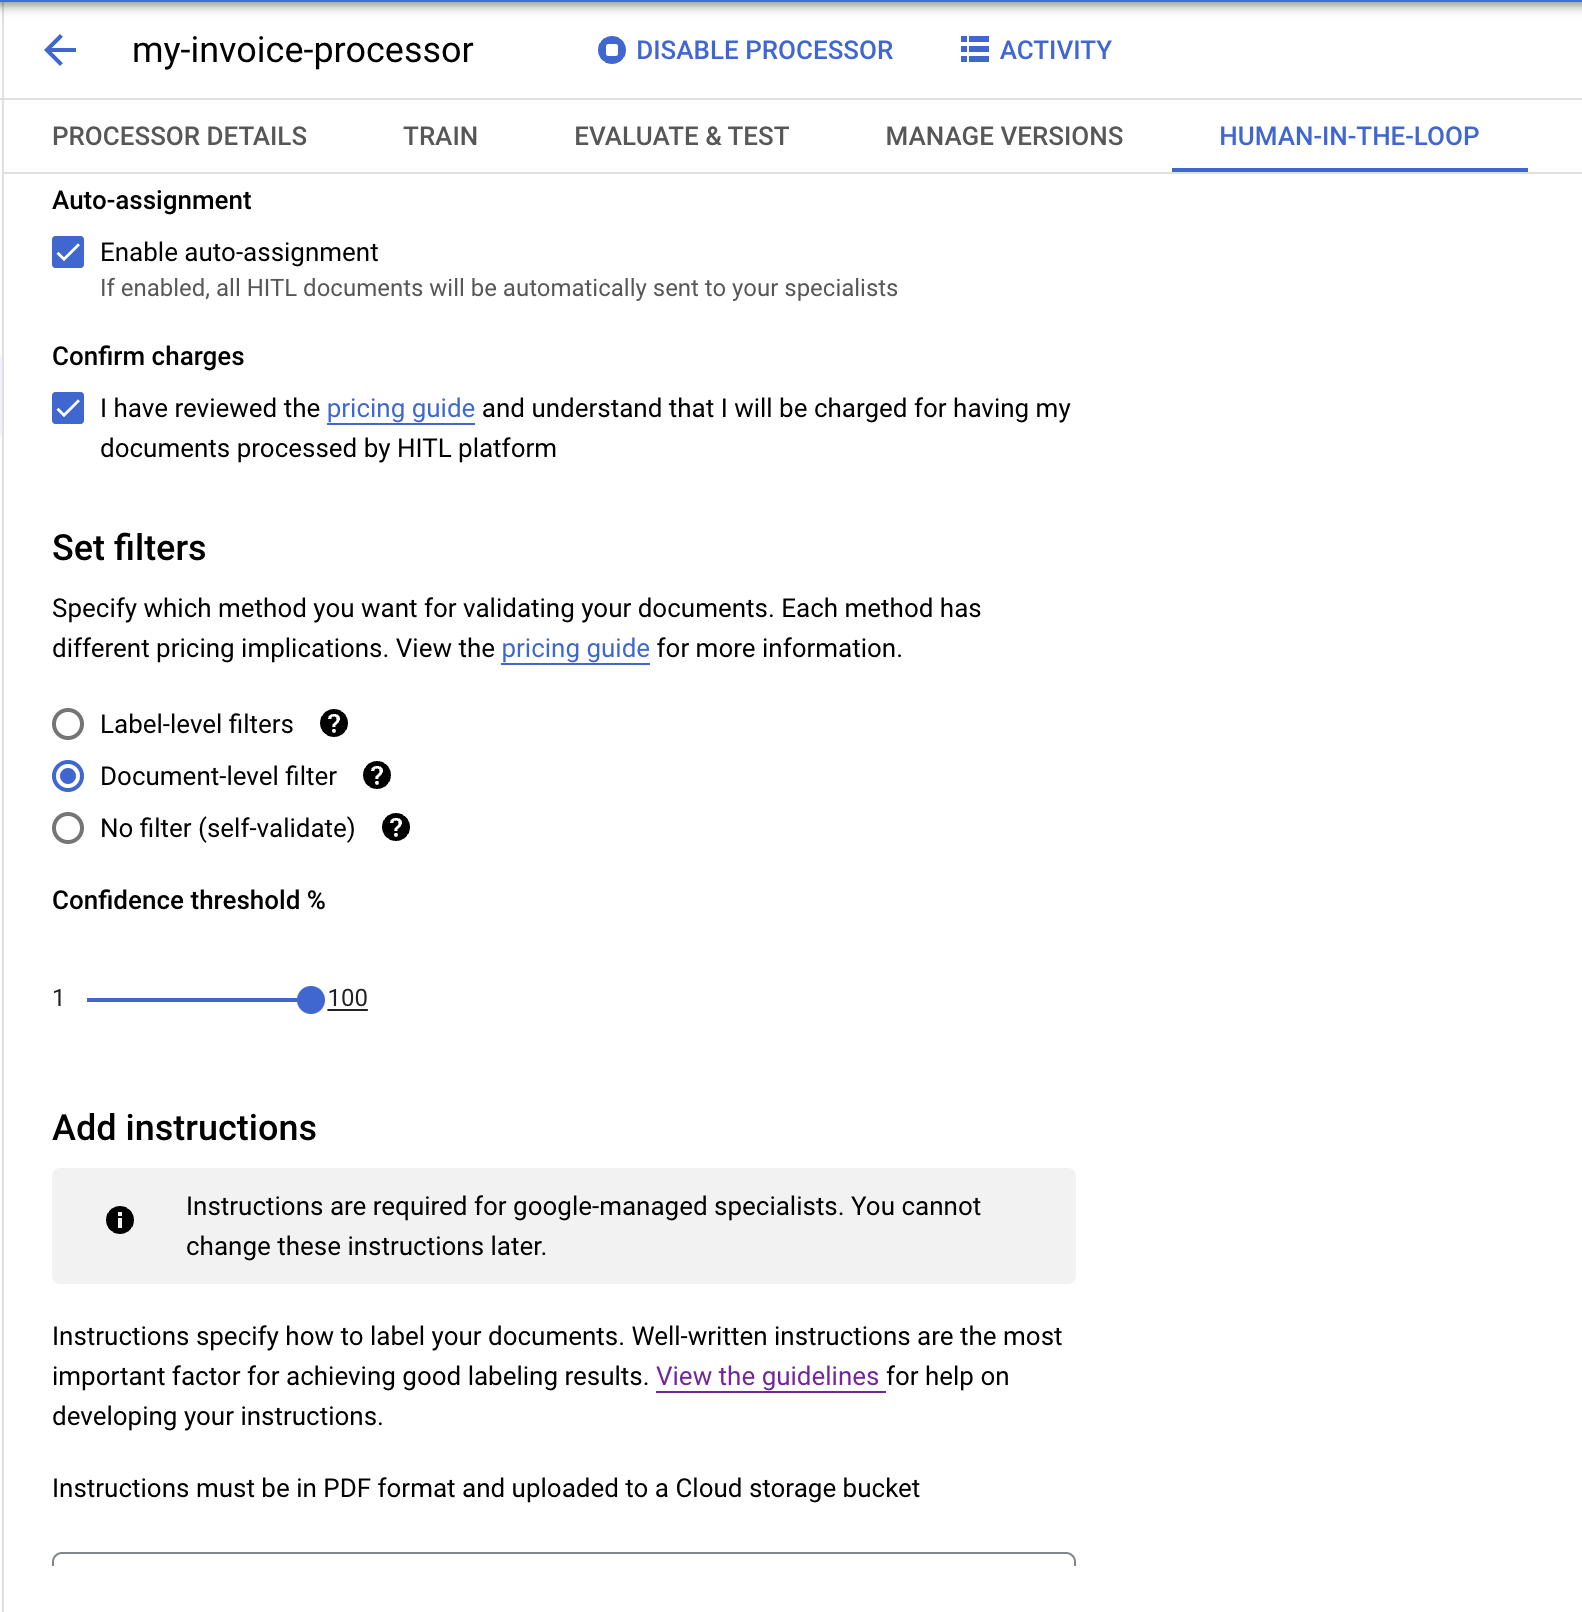
在「Add instructions」(新增指示) 專區,在
「Instructions location」(操作說明位置) 欄位中輸入下列 Cloud Storage 路徑。這份 PDF 檔案包含預先建立的應付憑據剖析器操作說明。您也可以視需要自行建立操作說明。
cloud-samples-data/documentai/labeling-instructions/pretrained-invoice-v1.3-2022-07-15.pdf在
「Results location」(結果位置) 欄位中,選取或建立人工審查輸出內容的值區。按一下
「Save Configuration」(儲存設定) 按鈕。這項作業需要幾秒鐘才能完成。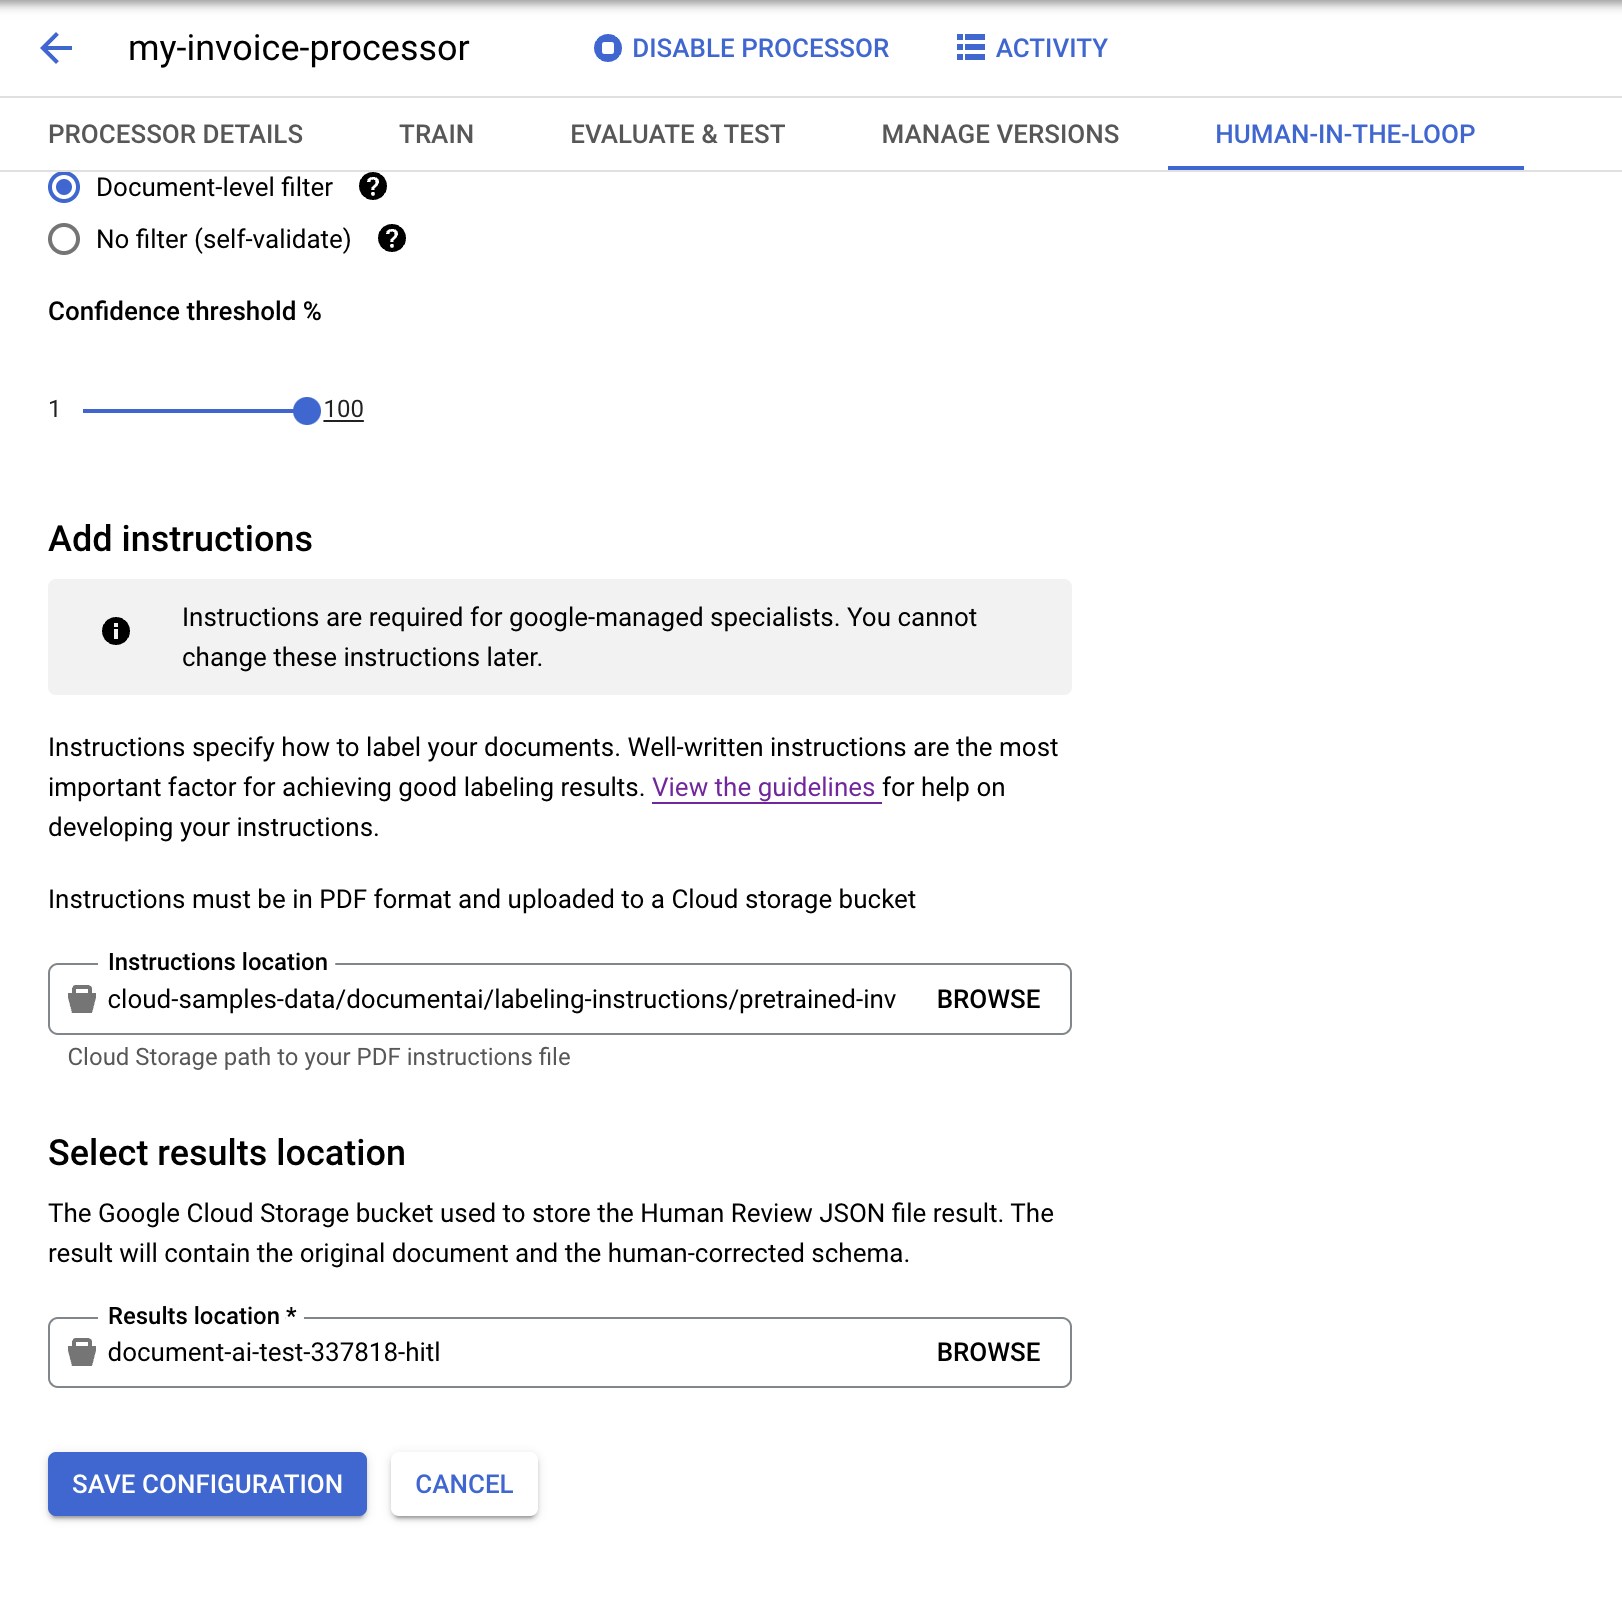
設定完成之後,請選取
「Enable Human-in-the-Loop」(啟用人機迴圈) 滑桿。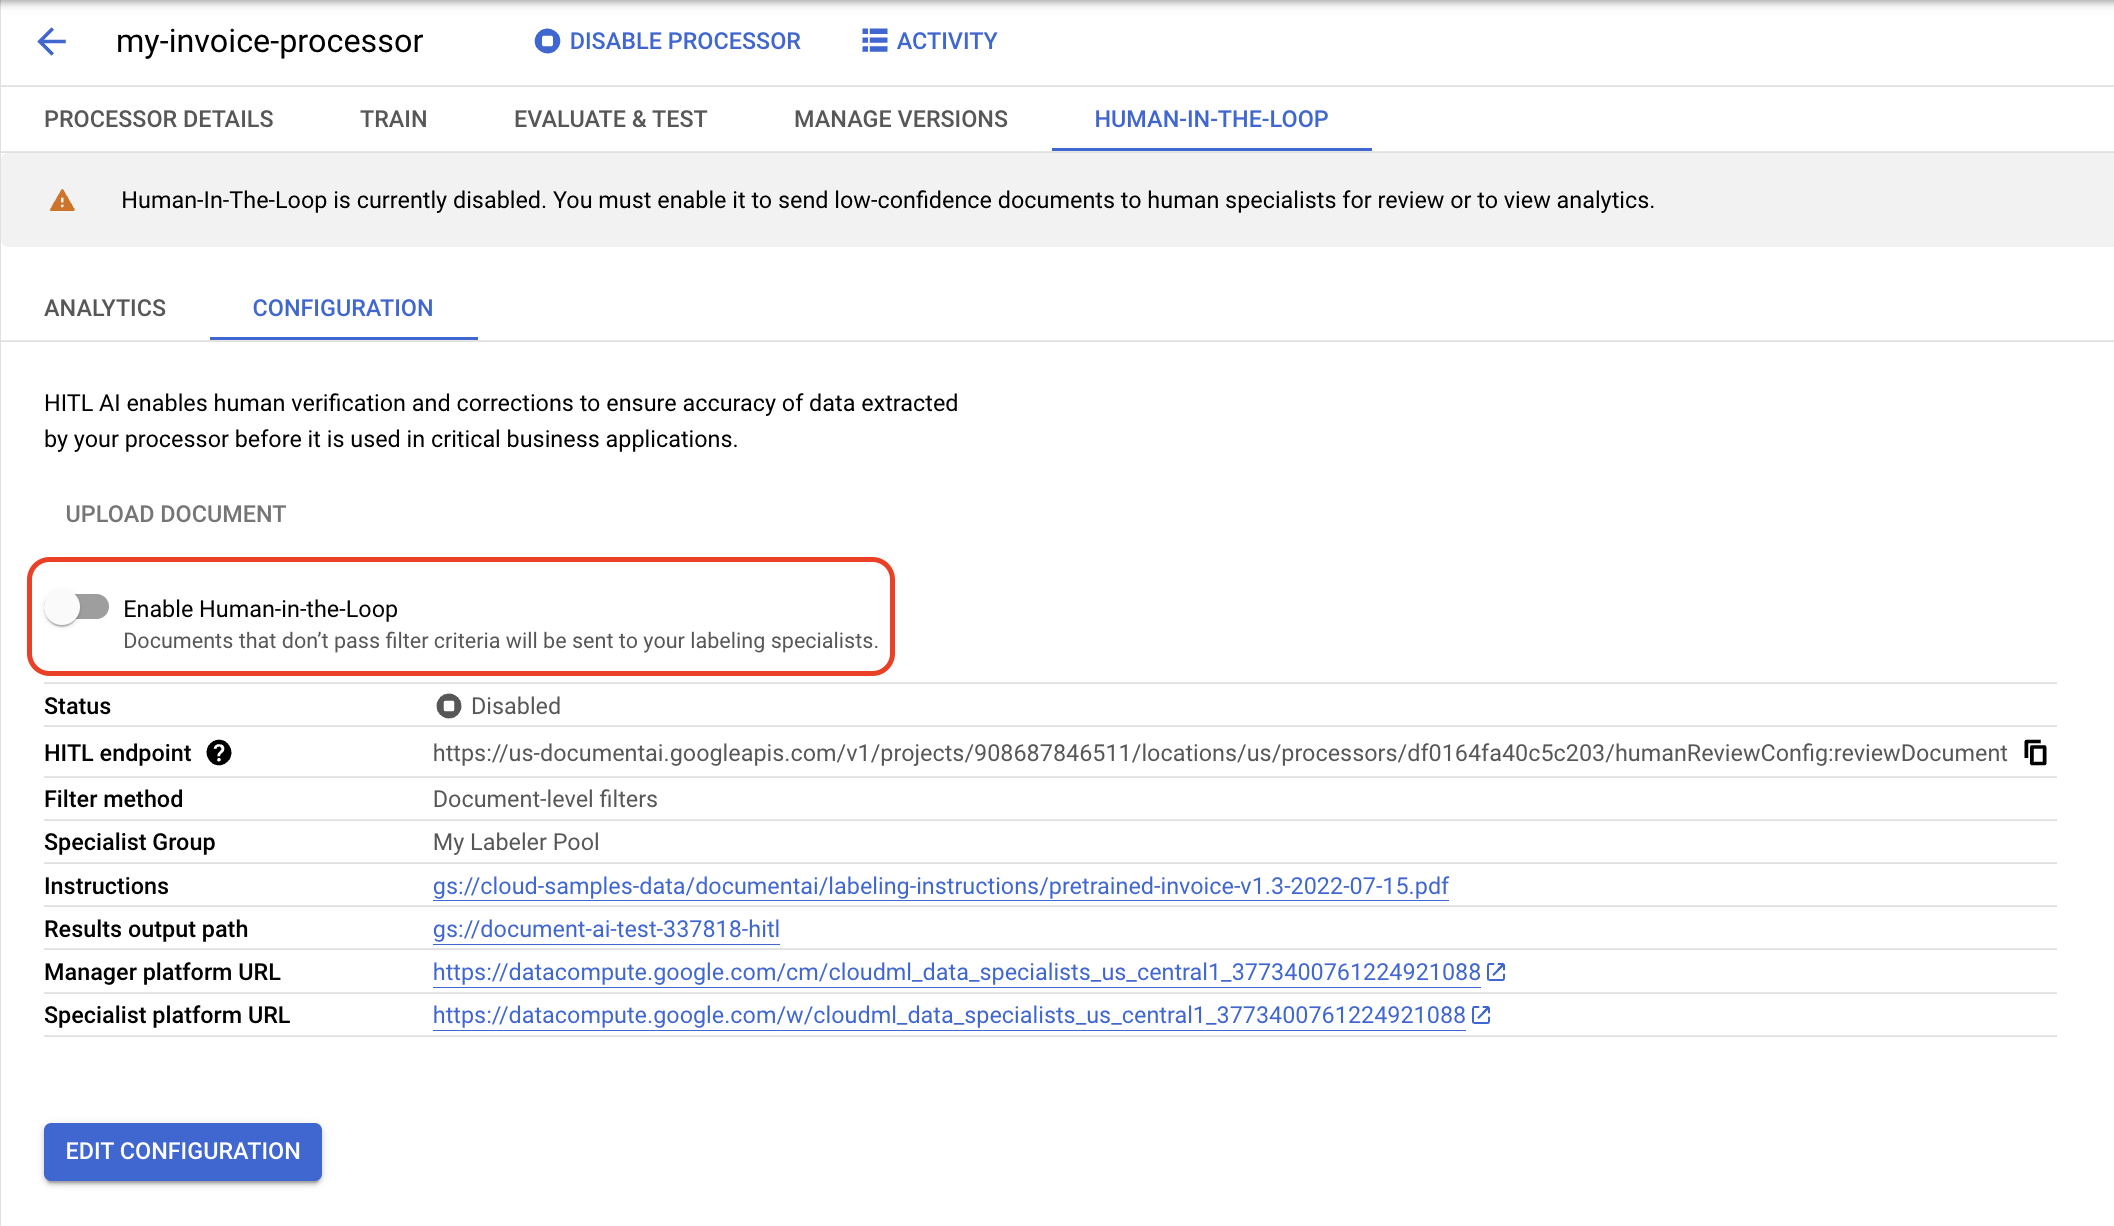
在彈出式對話方塊中選取
「Enable」(啟用) 。完成設定人工審查後,您應該會收到類似以下的電子郵件:
From: AI Platform <noreply-aiplatform@google.com>\
Subject: Added to AI Platform SpecialistPool Test Labeler Group

Hello AI Platform Customer,

You are added as a manager to specialist pool
cloudml_data_specialists_us_central1_785484070008756xxxx.
To view details, visit Manager console
https://datacompute.google.com/cm/

Sincerely,
The Google Cloud AI Team
建立處理器
注意:總覽頁面中列出的處理器支援人工審查工作流程。
在處理器上啟用人工審查
您已成功在應付憑據剖析器中設定人機迴圈。