本教學課程說明如何使用 Dataflow SQL,彙整 Pub/Sub 的資料串流與 BigQuery 資料表中的資料。
目標
在本教學課程中,您將執行下列作業:
- 撰寫 Dataflow SQL 查詢,彙整 Pub/Sub 串流資料和 BigQuery 資料表中的資料。
- 透過 Dataflow SQL UI 部署 Dataflow 工作。
費用
本文使用下列 Google Cloud Platform 計費元件:
- Dataflow
- Cloud Storage
- Pub/Sub
- Data Catalog
如要根據預測用量估算費用,請使用 Pricing Calculator。
事前準備
- Sign in to your Google Cloud Platform account. If you're new to Google Cloud, create an account to evaluate how our products perform in real-world scenarios. New customers also get $300 in free credits to run, test, and deploy workloads.
-
In the Google Cloud console, on the project selector page, select or create a Google Cloud project.
Roles required to select or create a project
- Select a project: Selecting a project doesn't require a specific IAM role—you can select any project that you've been granted a role on.
-
Create a project: To create a project, you need the Project Creator
(
roles/resourcemanager.projectCreator), which contains theresourcemanager.projects.createpermission. Learn how to grant roles.
-
Verify that billing is enabled for your Google Cloud project.
-
Enable the Cloud Dataflow, Compute Engine, Logging, Cloud Storage, Cloud Storage JSON, BigQuery, Cloud Pub/Sub, Cloud Resource Manager and Data Catalog. APIs.
Roles required to enable APIs
To enable APIs, you need the Service Usage Admin IAM role (
roles/serviceusage.serviceUsageAdmin), which contains theserviceusage.services.enablepermission. Learn how to grant roles. -
Create a service account:
-
Ensure that you have the Create Service Accounts IAM role
(
roles/iam.serviceAccountCreator). Learn how to grant roles. -
In the Google Cloud console, go to the Create service account page.
Go to Create service account - Select your project.
-
In the Service account name field, enter a name. The Google Cloud console fills in the Service account ID field based on this name.
In the Service account description field, enter a description. For example,
Service account for quickstart. - Click Create and continue.
-
Grant the Project > Owner role to the service account.
To grant the role, find the Select a role list, then select Project > Owner.
- Click Continue.
-
Click Done to finish creating the service account.
Do not close your browser window. You will use it in the next step.
-
Ensure that you have the Create Service Accounts IAM role
(
-
Create a service account key:
- In the Google Cloud console, click the email address for the service account that you created.
- Click Keys.
- Click Add key, and then click Create new key.
- Click Create. A JSON key file is downloaded to your computer.
- Click Close.
-
Set the environment variable
GOOGLE_APPLICATION_CREDENTIALSto the path of the JSON file that contains your credentials. This variable applies only to your current shell session, so if you open a new session, set the variable again. -
In the Google Cloud console, on the project selector page, select or create a Google Cloud project.
Roles required to select or create a project
- Select a project: Selecting a project doesn't require a specific IAM role—you can select any project that you've been granted a role on.
-
Create a project: To create a project, you need the Project Creator
(
roles/resourcemanager.projectCreator), which contains theresourcemanager.projects.createpermission. Learn how to grant roles.
-
Verify that billing is enabled for your Google Cloud project.
-
Enable the Cloud Dataflow, Compute Engine, Logging, Cloud Storage, Cloud Storage JSON, BigQuery, Cloud Pub/Sub, Cloud Resource Manager and Data Catalog. APIs.
Roles required to enable APIs
To enable APIs, you need the Service Usage Admin IAM role (
roles/serviceusage.serviceUsageAdmin), which contains theserviceusage.services.enablepermission. Learn how to grant roles. -
Create a service account:
-
Ensure that you have the Create Service Accounts IAM role
(
roles/iam.serviceAccountCreator). Learn how to grant roles. -
In the Google Cloud console, go to the Create service account page.
Go to Create service account - Select your project.
-
In the Service account name field, enter a name. The Google Cloud console fills in the Service account ID field based on this name.
In the Service account description field, enter a description. For example,
Service account for quickstart. - Click Create and continue.
-
Grant the Project > Owner role to the service account.
To grant the role, find the Select a role list, then select Project > Owner.
- Click Continue.
-
Click Done to finish creating the service account.
Do not close your browser window. You will use it in the next step.
-
Ensure that you have the Create Service Accounts IAM role
(
-
Create a service account key:
- In the Google Cloud console, click the email address for the service account that you created.
- Click Keys.
- Click Add key, and then click Create new key.
- Click Create. A JSON key file is downloaded to your computer.
- Click Close.
-
Set the environment variable
GOOGLE_APPLICATION_CREDENTIALSto the path of the JSON file that contains your credentials. This variable applies only to your current shell session, so if you open a new session, set the variable again. - 安裝並初始化 gcloud CLI。請選擇其中一個安裝選項。您可能需要將
project屬性設為要用於本逐步教學的專案。 - 前往 Google Cloud 控制台中的 Dataflow SQL 網頁版 UI。這會開啟您最近存取過的專案。如要切換至其他專案,請按一下 Dataflow SQL 網頁版 UI 頂端的專案名稱,然後搜尋您要使用的專案。
前往 Dataflow SQL 網頁版 UI
- 名為
transactions的 Pub/Sub 主題:透過訂閱項目抵達 Pub/Sub 主題的交易資料串流。每筆交易的資料包括購買的產品、售價、發生購買交易的城市和州等資訊。建立 Pub/Sub 主題後,請建立一個可將訊息發布至您主題的指令碼。您會在本教學課程的後續部分中執行這個指令碼。 - 名為
us_state_salesregions的 BigQuery 資料表:提供州和銷售地區對應關係的資料表。建立這個資料表前,您必須先建立 BigQuery 資料集。 - 在 BigQuery 網頁版 UI 中,建立 BigQuery 資料集。BigQuery 資料集是用來存放資料表的頂層容器。BigQuery 資料表必須屬於某個資料集。
- 在「Explorer」面板中,開啟專案的動作。在選單中,按一下「建立資料集」。在下方螢幕截圖中,專案 ID 為
dataflow-sql。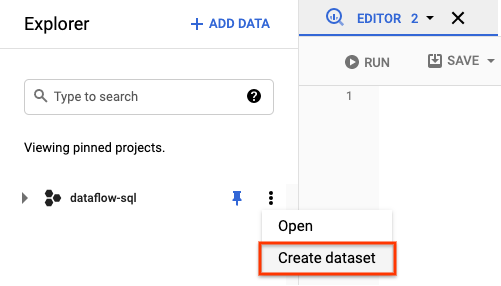
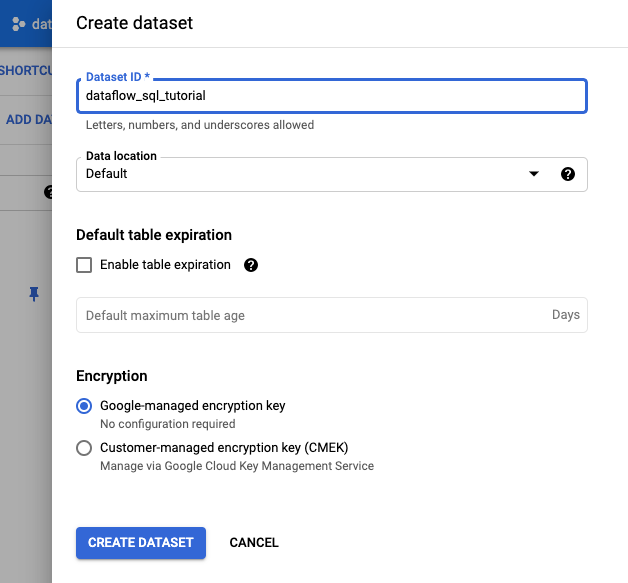
- 在開啟的「建立資料集」面板中,輸入「資料集 ID」
dataflow_sql_tutorial。 - 針對「資料位置」,從選單中選取所需選項。
- 按一下「建立資料集」。
- 在「Explorer」面板中,開啟專案的動作。在選單中,按一下「建立資料集」。在下方螢幕截圖中,專案 ID 為
- 建立 BigQuery 資料表。
- 建立文字檔案並將其命名為
us_state_salesregions.csv。 - 複製下列資料並貼到
us_state_salesregions.csv。在後續步驟中,您將會把這些資料載入 BigQuery 資料表。state_id,state_code,state_name,sales_region 1,MO,Missouri,Region_1 2,SC,South Carolina,Region_1 3,IN,Indiana,Region_1 6,DE,Delaware,Region_2 15,VT,Vermont,Region_2 16,DC,District of Columbia,Region_2 19,CT,Connecticut,Region_2 20,ME,Maine,Region_2 35,PA,Pennsylvania,Region_2 38,NJ,New Jersey,Region_2 47,MA,Massachusetts,Region_2 54,RI,Rhode Island,Region_2 55,NY,New York,Region_2 60,MD,Maryland,Region_2 66,NH,New Hampshire,Region_2 4,CA,California,Region_3 8,AK,Alaska,Region_3 37,WA,Washington,Region_3 61,OR,Oregon,Region_3 33,HI,Hawaii,Region_4 59,AS,American Samoa,Region_4 65,GU,Guam,Region_4 5,IA,Iowa,Region_5 32,NV,Nevada,Region_5 11,PR,Puerto Rico,Region_6 17,CO,Colorado,Region_6 18,MS,Mississippi,Region_6 41,AL,Alabama,Region_6 42,AR,Arkansas,Region_6 43,FL,Florida,Region_6 44,NM,New Mexico,Region_6 46,GA,Georgia,Region_6 48,KS,Kansas,Region_6 52,AZ,Arizona,Region_6 56,TN,Tennessee,Region_6 58,TX,Texas,Region_6 63,LA,Louisiana,Region_6 7,ID,Idaho,Region_7 12,IL,Illinois,Region_7 13,ND,North Dakota,Region_7 31,MN,Minnesota,Region_7 34,MT,Montana,Region_7 36,SD,South Dakota,Region_7 50,MI,Michigan,Region_7 51,UT,Utah,Region_7 64,WY,Wyoming,Region_7 9,NE,Nebraska,Region_8 10,VA,Virginia,Region_8 14,OK,Oklahoma,Region_8 39,NC,North Carolina,Region_8 40,WV,West Virginia,Region_8 45,KY,Kentucky,Region_8 53,WI,Wisconsin,Region_8 57,OH,Ohio,Region_8 49,VI,United States Virgin Islands,Region_9 62,MP,Commonwealth of the Northern Mariana Islands,Region_9
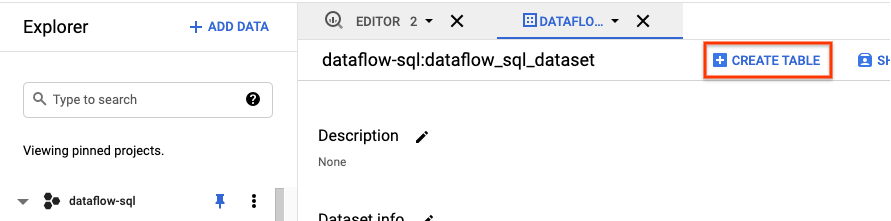
- 在 BigQuery UI 的「Explorer」面板中展開專案,查看
dataflow_sql_tutorial資料集。 - 開啟
dataflow_sql_tutorial資料集的動作選單,然後點選「開啟」。 - 按一下「建立資料表」。
- 在開啟的「Create table」(建立資料表) 面板中:
- 在「Create table from」(使用下列資料建立資料表) 部分,選取「Upload」(上傳)。
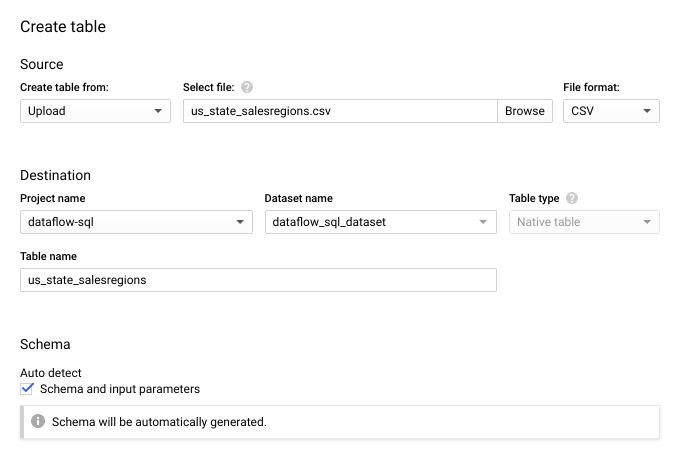
- 針對「Select file」(選取檔案),按一下「Browse」(瀏覽),並選擇您的
us_state_salesregions.csv檔案。 - 在「Table」(資料表) 中輸入
us_state_salesregions。 - 在「Schema」(結構定義) 下方,選取「Auto detect」(自動偵測)。
- 按一下 [Advanced options] (進階選項) 展開「Advanced options」(進階選項) 部分。
- 在「Header rows to skip」(要略過的標題列) 中輸入
1,然後按一下「Create table」(建立資料表)。
- 在「Create table from」(使用下列資料建立資料表) 部分,選取「Upload」(上傳)。
- 在「Explorer」面板中,按一下
us_state_salesregions。在「Schema」(結構定義) 下方,您可以查看自動產生的結構定義。在「Preview」(預覽) 下方,您可以查看資料表資料。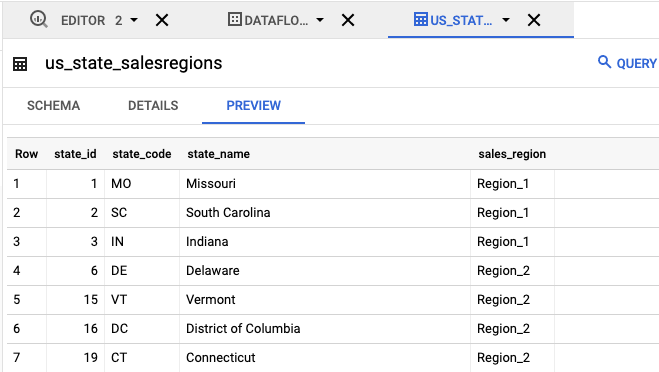
- 建立文字檔案並將其命名為
建立文字檔案並將其命名為
transactions_schema.yaml。複製下列查詢語法並貼至transactions_schema.yaml。- column: event_timestamp description: Pub/Sub event timestamp mode: REQUIRED type: TIMESTAMP - column: tr_time_str description: Transaction time string mode: NULLABLE type: STRING - column: first_name description: First name mode: NULLABLE type: STRING - column: last_name description: Last name mode: NULLABLE type: STRING - column: city description: City mode: NULLABLE type: STRING - column: state description: State mode: NULLABLE type: STRING - column: product description: Product mode: NULLABLE type: STRING - column: amount description: Amount of transaction mode: NULLABLE type: FLOAT使用 Google Cloud CLI 指派結構定義。
a. 使用以下指令更新 gcloud CLI。請確認 gcloud CLI 為 242.0.0 以上版本。
gcloud components update
b. 在指令列視窗中執行以下指令。將 project-id 改為專案 ID,並將 path-to-file 改為
transactions_schema.yaml檔案路徑。gcloud data-catalog entries update \ --lookup-entry='pubsub.topic.`project-id`.transactions' \ --schema-from-file=path-to-file/transactions_schema.yaml
如要進一步瞭解指令的參數和允許的結構定義檔案格式,請參閱 gcloud data-catalog entries update 的說明文件頁面。
c. 確認已成功將結構定義指派給
transactionsPub/Sub 主題,將 project-id 替換為專案 ID。gcloud data-catalog entries lookup 'pubsub.topic.`project-id`.transactions'
前往 SQL 工作區。
在「Dataflow SQL Editor」(Dataflow SQL 編輯器) 面板的搜尋列中,搜尋
projectid=project-id
transactions
。將 project-id 替換為您的專案 ID。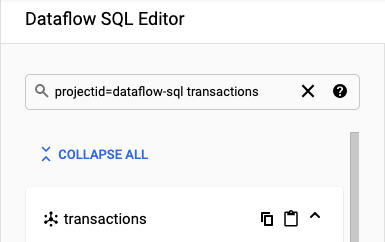
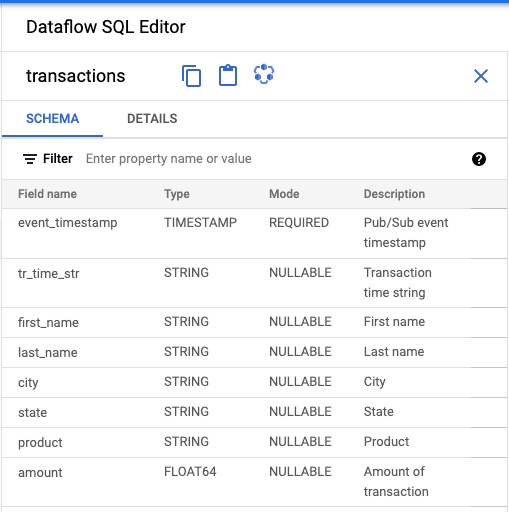
- 在 Dataflow SQL UI 的「Dataflow SQL Editor」(Dataflow SQL 編輯器) 面板中,按一下「transactions」(交易),或輸入
projectid=project-id system=cloud_pubsub搜尋 Pub/Sub 主題,然後選取該主題。 在「Schema」(結構定義) 下方,您可以查看指派給 Pub/Sub 主題的結構定義。
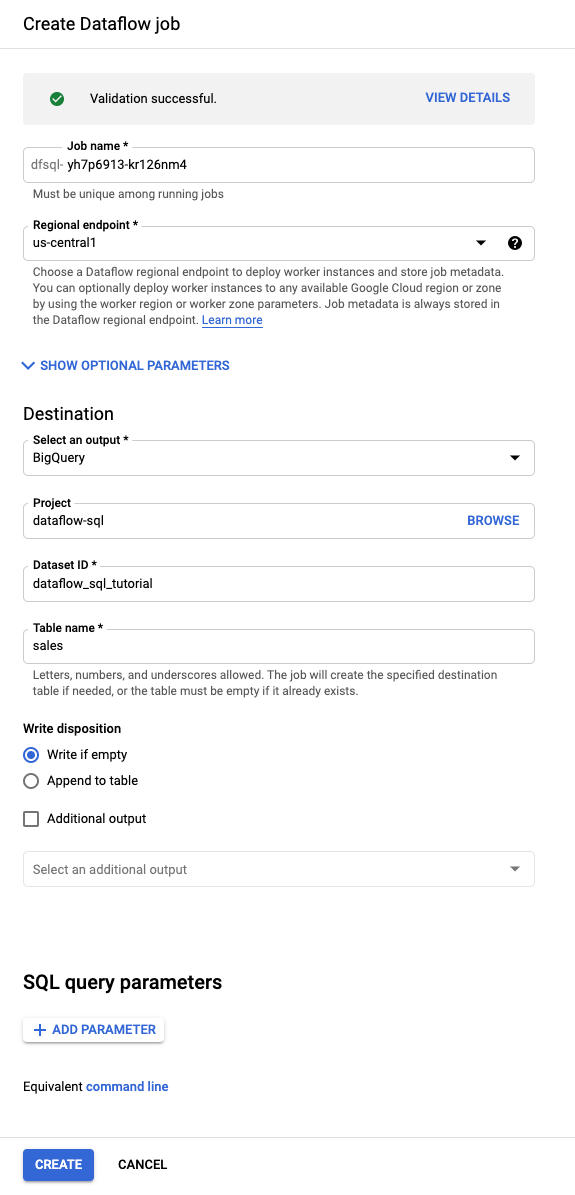
在「Query editor」(查詢編輯器) 中,按一下「Create job」(建立工作)。
在開啟的「建立 Dataflow 工作」面板中:
- 在「目的地」中,選取「BigQuery」。
- 在「Dataset ID」(資料集 ID) 部分,選取
dataflow_sql_tutorial。 - 在「Table name」(資料表名稱) 部分輸入
sales。
選用:Dataflow 會自動選擇最適合 Dataflow SQL 工作的設定,但您可以展開「Optional parameters」(選用參數) 選單,手動指定下列管道選項:
- 工作站數量上限
- 可用區
- 服務帳戶電子郵件地址
- 機型
- 其他實驗
- 工作站 IP 位址設定
- 網路
- 子網路
按一下「Create」(建立)。Dataflow 工作需要幾分鐘的時間才會開始執行。
在 Dataflow 的「Jobs」(工作) 頁面中,按一下要編輯的工作。
在「Job details」(工作詳細資料) 頁面的「Job info」(工作資訊) 面板中,找出「Pipeline options」(管道選項) 下方的 SQL 查詢。找出 queryString 的資料列。
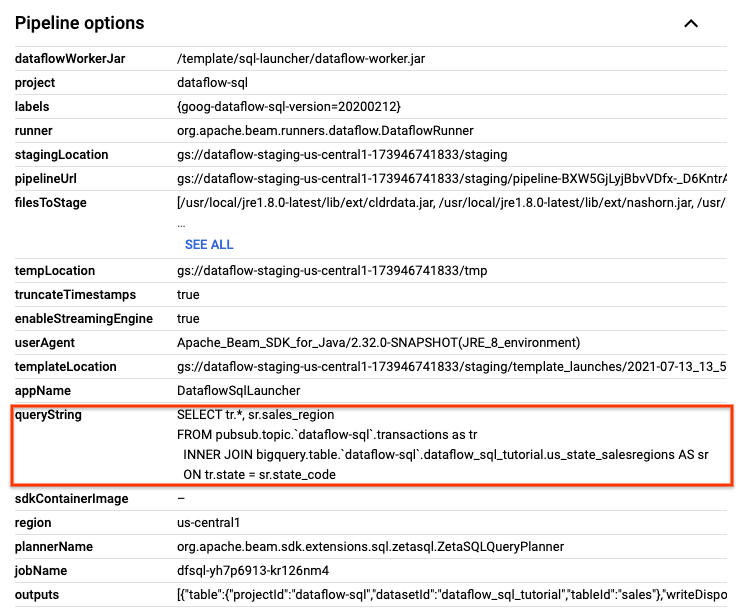
複製下列 SQL 查詢,並貼到「SQL Workspace」(SQL 工作區) 的「Dataflow SQL Editor」(Dataflow SQL 編輯器) 中,新增滾動式時間區間。將 project-id 替換為您的專案 ID。
SELECT sr.sales_region, TUMBLE_START("INTERVAL 15 SECOND") AS period_start, SUM(tr.amount) as amount FROM pubsub.topic.`project-id`.transactions AS tr INNER JOIN bigquery.table.`project-id`.dataflow_sql_tutorial.us_state_salesregions AS sr ON tr.state = sr.state_code GROUP BY sr.sales_region, TUMBLE(tr.event_timestamp, "INTERVAL 15 SECOND")
按一下「建立工作」,使用修改過的查詢建立新工作。
如果
transactions_injector.py發布指令碼仍在執行,請停止該指令碼。停止執行中的 Dataflow 工作。前往 Google Cloud 控制台的 Dataflow 網頁版 UI。
針對您在本逐步教學課程中建立的每個工作,分別執行下列步驟:
按一下工作名稱。
在「Job details」(工作詳細資料) 頁面上,按一下「Stop」(停止)。「Stop Job」(停止工作) 對話方塊隨即出現,其中包含停止工作的選項。
選取「取消」。
按一下 [Stop job] (停止工作)。該服務會儘快停止所有資料擷取和處理作業。由於「Cancel」(取消) 選項會立即停止處理作業,因此您可能會遺失任何「傳輸中」的資料。工作可能要幾分鐘才會停止。
刪除您的 BigQuery 資料集。前往 Google Cloud 控制台中的 BigQuery 網頁版 UI。
在「Explorer」面板的「Resources」區段中,按一下您建立的「dataflow_sql_tutorial」資料集。
在詳細資料面板中,按一下「刪除」。系統會開啟確認對話方塊。
在「Delete dataset」(刪除資料集) 對話方塊中,輸入
delete,然後按一下「Delete」(刪除) 來確認刪除指令。
刪除 Pub/Sub 主題。前往 Google Cloud 控制台的 Pub/Sub 主題頁面。
選取
transactions主題。按一下「刪除」以永久刪除主題。系統會開啟確認對話方塊。
在「Delete topic」(刪除主題) 對話方塊中,輸入
delete,然後按一下「Delete」(刪除),確認刪除指令。前往 Pub/Sub 訂閱項目頁面。
選取任何剩餘的
transactions訂閱項目。如果您的工作已停止執行,就可能不會有任何訂閱項目。按一下「刪除」即可永久刪除訂閱項目。在確認對話方塊中,按一下「刪除」。
刪除 Cloud Storage 中的 Dataflow 暫存值區。 前往 Google Cloud 控制台的 Cloud Storage「Buckets」(值區) 頁面。
選取 Dataflow 暫存值區。
按一下「刪除」即可刪除值區。系統會開啟確認對話方塊。
在「Delete bucket」(刪除 bucket) 對話方塊中,輸入
DELETE,然後按一下「Delete」(刪除),確認刪除指令。
建立範例來源
如果您想按照本教學課程提供的範例操作,請建立下列來源,並在教學課程的各個步驟中使用這些來源。
建立 BigQuery 資料集與資料表
為 Pub/Sub 主題指派結構定義
指派結構定義後,您就能對 Pub/Sub 主題資料執行 SQL 查詢。目前 Dataflow SQL 預期 Pub/Sub 主題中的訊息都是以 JSON 格式序列化。
如何為Pub/Sub 主題範例 transactions 指派結構定義:
尋找 Pub/Sub 來源
透過 Dataflow SQL UI,您可以針對自己有權存取的任何專案,尋找其 Pub/Sub 資料來源物件,因此不必記住物件的完整名稱。
針對本教學課程中的範例,請前往 Dataflow SQL 編輯器,並搜尋您建立的 transactions Pub/Sub 主題:
查看結構定義
建立 SQL 查詢
透過 Dataflow SQL UI,您可以建立 SQL 查詢來執行 Dataflow 工作。
以下 SQL 查詢是資料擴充查詢,會使用州與銷售地區對應關係 BigQuery 資料表 (us_state_salesregions),為 Pub/Sub 事件串流 (transactions) 新增額外欄位 sales_region。
請複製以下 SQL 查詢,並貼到「Query editor」(查詢編輯器) 中,將 project-id 替換為您的專案 ID。
SELECT tr.*, sr.sales_region
FROM pubsub.topic.`project-id`.transactions as tr
  INNER JOIN bigquery.table.`project-id`.dataflow_sql_tutorial.us_state_salesregions AS sr
  ON tr.state = sr.state_code
當您在 Dataflow SQL UI 中輸入查詢時,查詢驗證工具會驗證查詢語法。如果查詢有效,就會顯示綠色勾號圖示。如果查詢無效,則會顯示紅色驚嘆號圖示。如果查詢語法無效,您可以按一下「驗證工具」圖示查看問題修正資訊。
以下是「Query editor」(查詢編輯器) 的螢幕擷圖,圖中的查詢有效,因此驗證工具顯示綠色勾號。

建立 Dataflow 工作來執行 SQL 查詢
如要執行 SQL 查詢,請透過 Dataflow SQL UI 建立 Dataflow 工作。
查看 Dataflow 工作
Dataflow 會將您的 SQL 查詢轉換成 Apache Beam 管道。按一下「查看工作」開啟 Dataflow 網頁版 UI,即可查看管道示意圖。
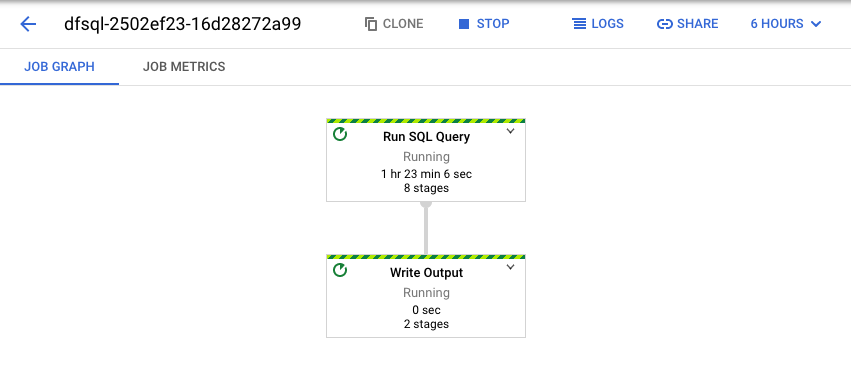
如要查看管道中各轉換作業的詳細資料,請按一下各個方塊。舉例來說,如果您按一下示意圖中的第一個方塊 (標有「Run SQL Query」),系統會顯示一個圖表,列出在幕後進行的作業。
最上面的兩個方塊代表您彙整的輸入項目:Pub/Sub 主題 transactions 和 BigQuery 資料表 us_state_salesregions。

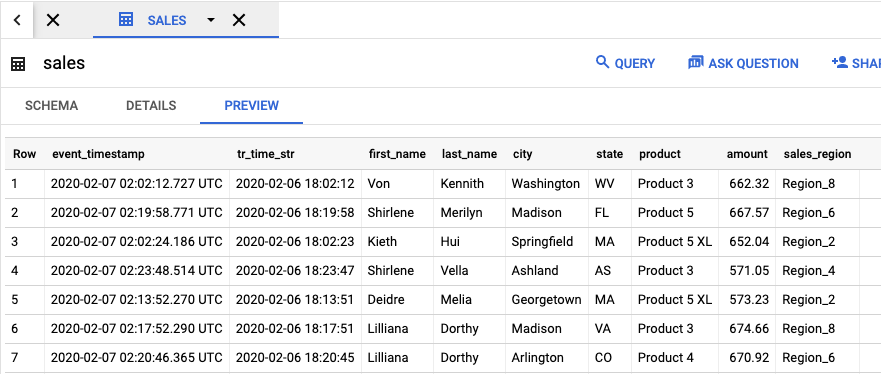
如要查看包含工作結果的輸出資料表,請前往 BigQuery UI。
在「Explorer」面板中,按一下專案中您建立的 dataflow_sql_tutorial 資料集。接著,按一下輸出資料表 sales。「Preview」(預覽) 分頁會顯示輸出資料表的內容。
查看過去的工作並編輯查詢
Dataflow 使用者介面會將過去的工作和查詢儲存在 Dataflow 的「Jobs」(工作) 頁面中。
您可以使用工作記錄清單查看先前的 SQL 查詢。舉例來說,假設您要修改查詢,讓系統每 15 秒就依銷售地區匯總銷售量。請使用「Jobs」(工作) 頁面,存取您先前在本教學課程中啟動的執行中工作,接著複製 SQL 查詢,然後使用修改過的查詢執行新工作。
清除所用資源
如要避免系統向您的 Cloud 帳單帳戶收取您在本教學課程中所用資源的相關費用:
後續步驟
- 參閱 Dataflow SQL 簡介。
- 瞭解串流管道基本概念。
- 瀏覽 Dataflow SQL 參考資料。
- 觀看 2019 年 Cloud Next 大會的串流數據分析示範影片。