Cloud Composer 3 | Cloud Composer 2 | Cloud Composer 1
本页介绍了如何使用 DataflowTemplateOperator 从 Cloud Composer 启动 Dataflow 流水线。Cloud Storage Text to BigQuery 流水线是一个批处理流水线,可让您上传 Cloud Storage 中存储的文本文件,使用您提供的 JavaScript 用户定义函数 (UDF) 进行转换,并将结果输出到 BigQuery。
概览
在启动工作流之前,您需要创建以下实体:
来自空数据集的空 BigQuery 表,其中包含以下信息列:
location、average_temperature、month以及可选的inches_of_rain、is_current和latest_measurement。一个 JSON 文件,用于将
.txt文件中的数据标准化为 BigQuery 表架构的正确格式。JSON 对象将具有一个BigQuery Schema数组,其中每个对象都包含一个列名称、输入类型以及是否为必填字段。输入
.txt文件,用于保存要批量上传到 BigQuery 表格的数据。以 JavaScript 编写的用户定义函数,该函数会将
.txt文件的每一行转换为表的相关变量。指向这些文件位置的 Airflow DAG 文件。
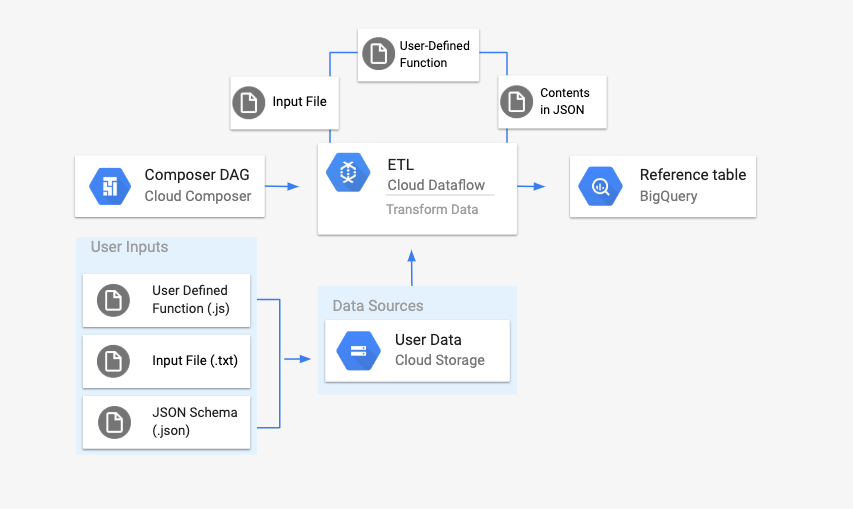
接下来,您将
.txt文件、.jsUDF 文件和.json架构文件上传到 Cloud Storage 存储分区。您还需要将 DAG 上传到 Cloud Composer 环境。上传 DAG 后,Airflow 将运行其中的任务。此任务将启动一个 Dataflow 流水线,该流水线将用户定义的函数应用于
.txt文件,并根据 JSON 架构设置其格式。最后,数据将上传到您之前创建的 BigQuery 表格。
准备工作
- 本指南要求熟悉 JavaScript 以编写用户定义的函数。
- 本指南假定您已拥有 Cloud Composer 环境。如需创建环境,请参阅创建环境。您可以使用本指南搭配任何版本的 Cloud Composer。
-
Enable the Cloud Composer, Dataflow, Cloud Storage, BigQuery APIs.
创建具有架构定义的空 BigQuery 表
创建具有架构定义的 BigQuery 表。在本指南的后面部分,您将使用此架构定义。此 BigQuery 表格将保存批量上传的结果。
要创建具有架构定义的空表,请执行以下操作:
控制台
在 Google Cloud 控制台中,前往 BigQuery 页面:
在导航面板的资源部分中,展开您的项目。
在详细信息面板中,点击创建数据集。
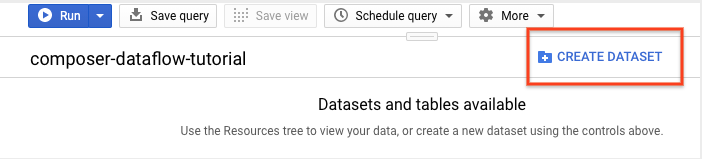
在“创建数据集”页面的数据集 ID 部分中,将数据集命名为
average_weather。保留其他所有字段的默认状态。
点击创建数据集。
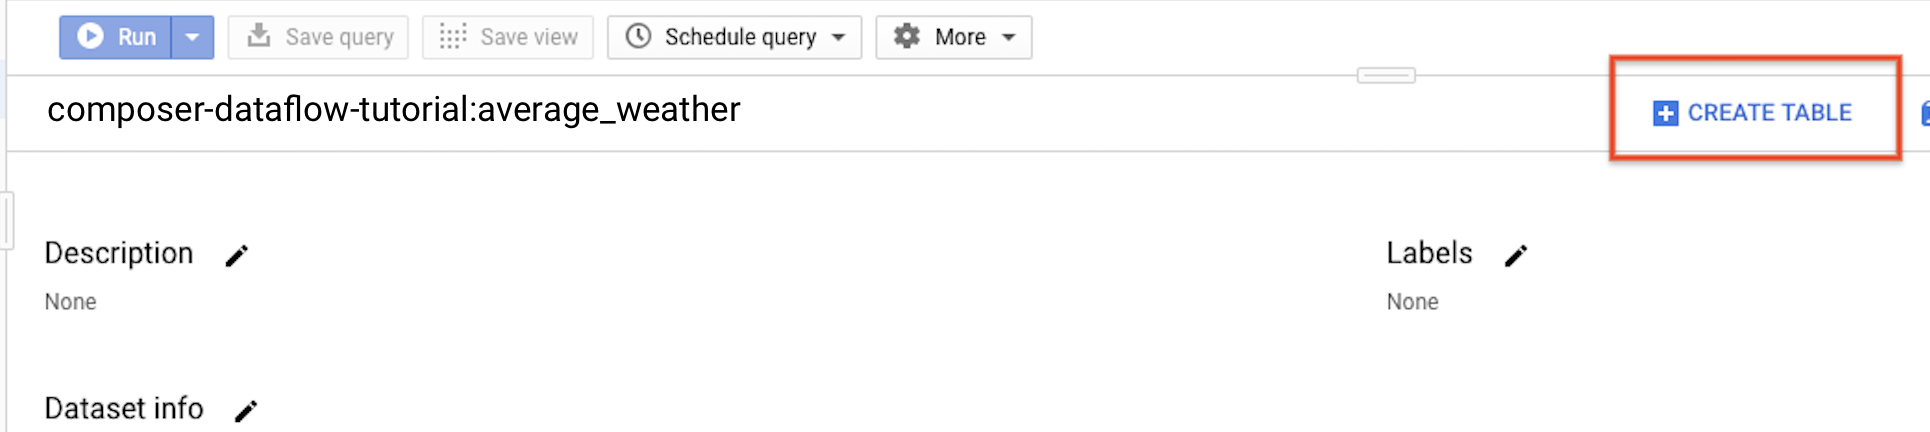
返回导航面板,在资源部分中,展开您的项目。然后,点击
average_weather数据集。在详细信息面板中,点击创建表。
在创建表页面的来源部分,选择空表。
在创建表页面的目标部分,执行以下操作:
对于数据集名称,选择
average_weather数据集。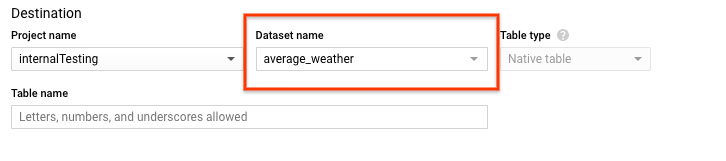
在表名称字段中,输入名称
average_weather。确认表类型设置为原生表。
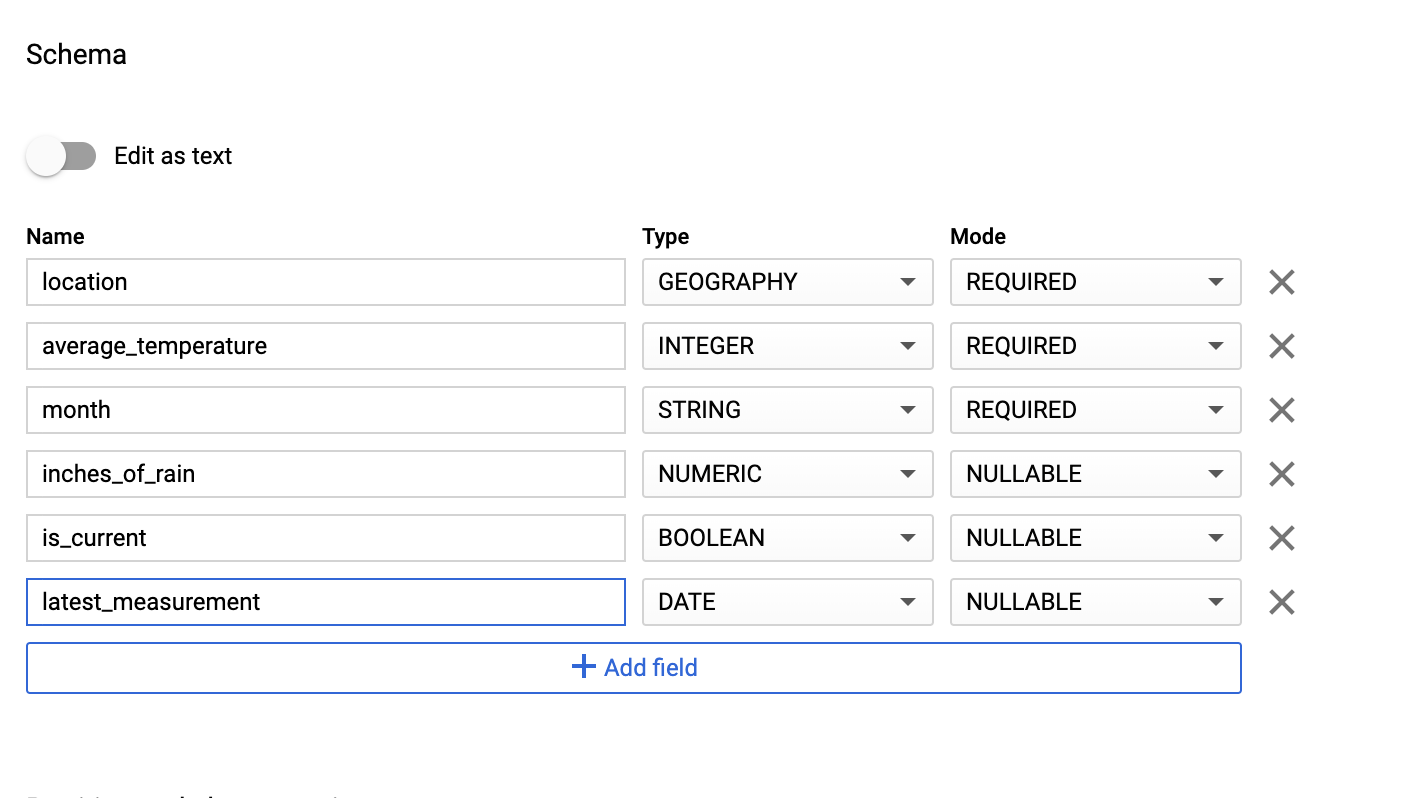
在 Schema 部分中,输入架构定义。您可以使用以下任一方法:
启用以文本形式修改,并以 JSON 数组格式输入表架构,以手动输入架构信息。在以下字段中输入相应内容:
[ { "name": "location", "type": "GEOGRAPHY", "mode": "REQUIRED" }, { "name": "average_temperature", "type": "INTEGER", "mode": "REQUIRED" }, { "name": "month", "type": "STRING", "mode": "REQUIRED" }, { "name": "inches_of_rain", "type": "NUMERIC" }, { "name": "is_current", "type": "BOOLEAN" }, { "name": "latest_measurement", "type": "DATE" } ]使用添加字段手动输入架构:
对于分区和集群设置,保留默认值
No partitioning。对于高级选项部分的加密,保留默认值
Google-owned and managed key。点击创建表。
bq
使用 bq mk 命令在此数据集中创建一个空数据集和一个表。
运行以下命令,创建平均全球天气数据集:
bq --location=LOCATION mk \
    --dataset PROJECT_ID:average_weather
替换以下内容:
LOCATION:环境所在的区域。PROJECT_ID:项目 ID。
运行以下命令,以使用架构定义在此数据集中创建一个空表:
bq mk --table \
PROJECT_ID:average_weather.average_weather \
location:GEOGRAPHY,average_temperature:INTEGER,month:STRING,inches_of_rain:NUMERIC,is_current:BOOLEAN,latest_measurement:DATE
Python
将此代码保存为 dataflowtemplateoperator_create_dataset_and_table_helper.py 并更新其中的变量以反映您的项目和位置,然后使用以下命令运行该代码:
python dataflowtemplateoperator_create_dataset_and_table_helper.py
Python
如需向 Cloud Composer 进行身份验证,请设置应用默认凭据。 如需了解详情,请参阅为本地开发环境设置身份验证。
创建 Cloud Storage 存储桶
创建一个存储分区来存放工作流所需的所有文件。您在本指南稍后创建的 DAG 将引用您上传到此存储分区的文件。要创建新的存储分区,请执行以下操作:
控制台
在 Google Cloud 控制台中打开 Cloud Storage。
点击创建存储分区,打开存储分区创建表单。
输入您的存储桶信息,然后点击继续以完成各个步骤:
为您的存储分区指定一个全局唯一的名称。本指南以
bucketName为例。选择区域作为位置类型。接下来,选择一个要用于存储该存储分区数据的位置。
选择标准作为数据的默认存储类别。
选择统一访问权限控制以访问您的对象。
点击完成。
gcloud
使用 gcloud storage buckets create 命令:
gcloud storage buckets create gs://bucketName/
替换以下内容:
bucketName:您在本指南前面部分创建的存储分区的名称。
代码示例
C#
如需向 Cloud Composer 进行身份验证,请设置应用默认凭据。 如需了解详情,请参阅为本地开发环境设置身份验证。
Go
如需向 Cloud Composer 进行身份验证,请设置应用默认凭据。 如需了解详情,请参阅为本地开发环境设置身份验证。
Java
如需向 Cloud Composer 进行身份验证,请设置应用默认凭据。 如需了解详情,请参阅为本地开发环境设置身份验证。
Python
如需向 Cloud Composer 进行身份验证,请设置应用默认凭据。 如需了解详情,请参阅为本地开发环境设置身份验证。
Ruby
如需向 Cloud Composer 进行身份验证,请设置应用默认凭据。 如需了解详情,请参阅为本地开发环境设置身份验证。
为输出表创建 JSON 格式的 BigQuery 架构
创建与您之前创建的输出表匹配的 JSON 格式的 BigQuery 架构文件。请注意,字段名称、类型和模式必须与之前在 BigQuery 表架构中的定义相匹配。此文件会将 .txt 文件中的数据标准化为与 BigQuery 架构兼容的格式。将此文件命名为 jsonSchema.json。
{
    "BigQuery Schema": [
    {
        "name": "location",
        "type": "GEOGRAPHY",
        "mode": "REQUIRED"
    },
    {
        "name": "average_temperature",
        "type": "INTEGER",
        "mode": "REQUIRED"
    },
    {
        "name": "month",
        "type": "STRING",
        "mode": "REQUIRED"
    },
    {
        "name": "inches_of_rain",
        "type": "NUMERIC"
    },
    {
        "name": "is_current",
        "type": "BOOLEAN"
    },
    {
        "name": "latest_measurement",
        "type": "DATE"
    }]
}
创建 JavaScript 文件以设置数据格式
在此文件中,您将定义 UDF(用户定义的函数),该函数提供转换输入文件中文本行的逻辑。请注意,此函数会将输入文件中的每一行文本作为其参数,因此该函数将针对输入文件的每一行运行一次。将此文件命名为 transformCSVtoJSON.js。
创建输入文件
此文件将保存您要上传到 BigQuery 表格的信息。在本地复制此文件并将其命名为 inputFile.txt。
POINT(40.7128 74.006),45,'July',null,true,2020-02-16
POINT(41.8781 87.6298),23,'October',13,false,2015-02-13
POINT(48.8566 2.3522),80,'December',null,true,null
POINT(6.5244 3.3792),15,'March',14,true,null
将文件上传到存储分区
将以下文件上传到您之前创建的 Cloud Storage 存储分区中:
- JSON 格式的 BigQuery 架构 (
.json) - JavaScript 用户定义的函数 (
transformCSVtoJSON.js) 您要处理的文本的输入文件 (
.txt)
控制台
- 在 Google Cloud 控制台中,进入 Cloud Storage 存储桶页面。
在存储分区列表中,点击您的存储分区。
在存储分区的对象标签页中,执行以下任一操作:
将所需文件从桌面或文件管理器拖放到 Google Cloud 控制台的主窗格中。
点击上传文件按钮,在随即显示的对话框中选择要上传的文件,然后点击打开。
gcloud
运行 gcloud storage cp 命令:
gcloud storage cp OBJECT_LOCATION gs://bucketName
替换以下内容:
bucketName:您在本指南前面部分创建的存储分区的名称。OBJECT_LOCATION:对象的本地路径。例如Desktop/transformCSVtoJSON.js。
代码示例
Python
如需向 Cloud Composer 进行身份验证,请设置应用默认凭据。 如需了解详情,请参阅为本地开发环境设置身份验证。
Ruby
如需向 Cloud Composer 进行身份验证,请设置应用默认凭据。 如需了解详情,请参阅为本地开发环境设置身份验证。
配置 DataflowTemplateOperator
在运行 DAG 之前,请设置以下 Airflow 变量。
| Airflow 变量 | 值 |
|---|---|
project_id
|
项目 ID |
gce_zone
|
必须在其中创建 Dataflow 集群的 Compute Engine 可用区 |
bucket_path
|
您之前创建的 Cloud Storage 存储分区的位置 |
现在,您将引用之前创建的文件来创建启动 Dataflow 工作流的 DAG。复制此 DAG 并在本地将其保存为 composer-dataflow-dag.py。
Airflow 2
Airflow 1
将 DAG 上传到 Cloud Storage
将您的 DAG 上传到环境存储分区中的 /dags 文件夹。上传成功完成后,您可以在 Cloud Composer 环境页面上点击 DAG 文件夹链接来查看上传的 DAG。

查看任务的状态
- 转到 Airflow 网页界面。
- 在 DAG 页面上,点击 DAG 名称(例如
composerDataflowDAG)。 - 在 DAG 详细信息页面上,点击 Graph View。
检查状态:
Failed:任务被红色框圈起。 您还可以将指针悬停在任务上,然后查看 State: Failed。Success:任务被绿色框圈起。您还可以将指针悬停在任务上,然后查看 State: Success。
几分钟后,您可以在 Dataflow 和 BigQuery 中查看结果。
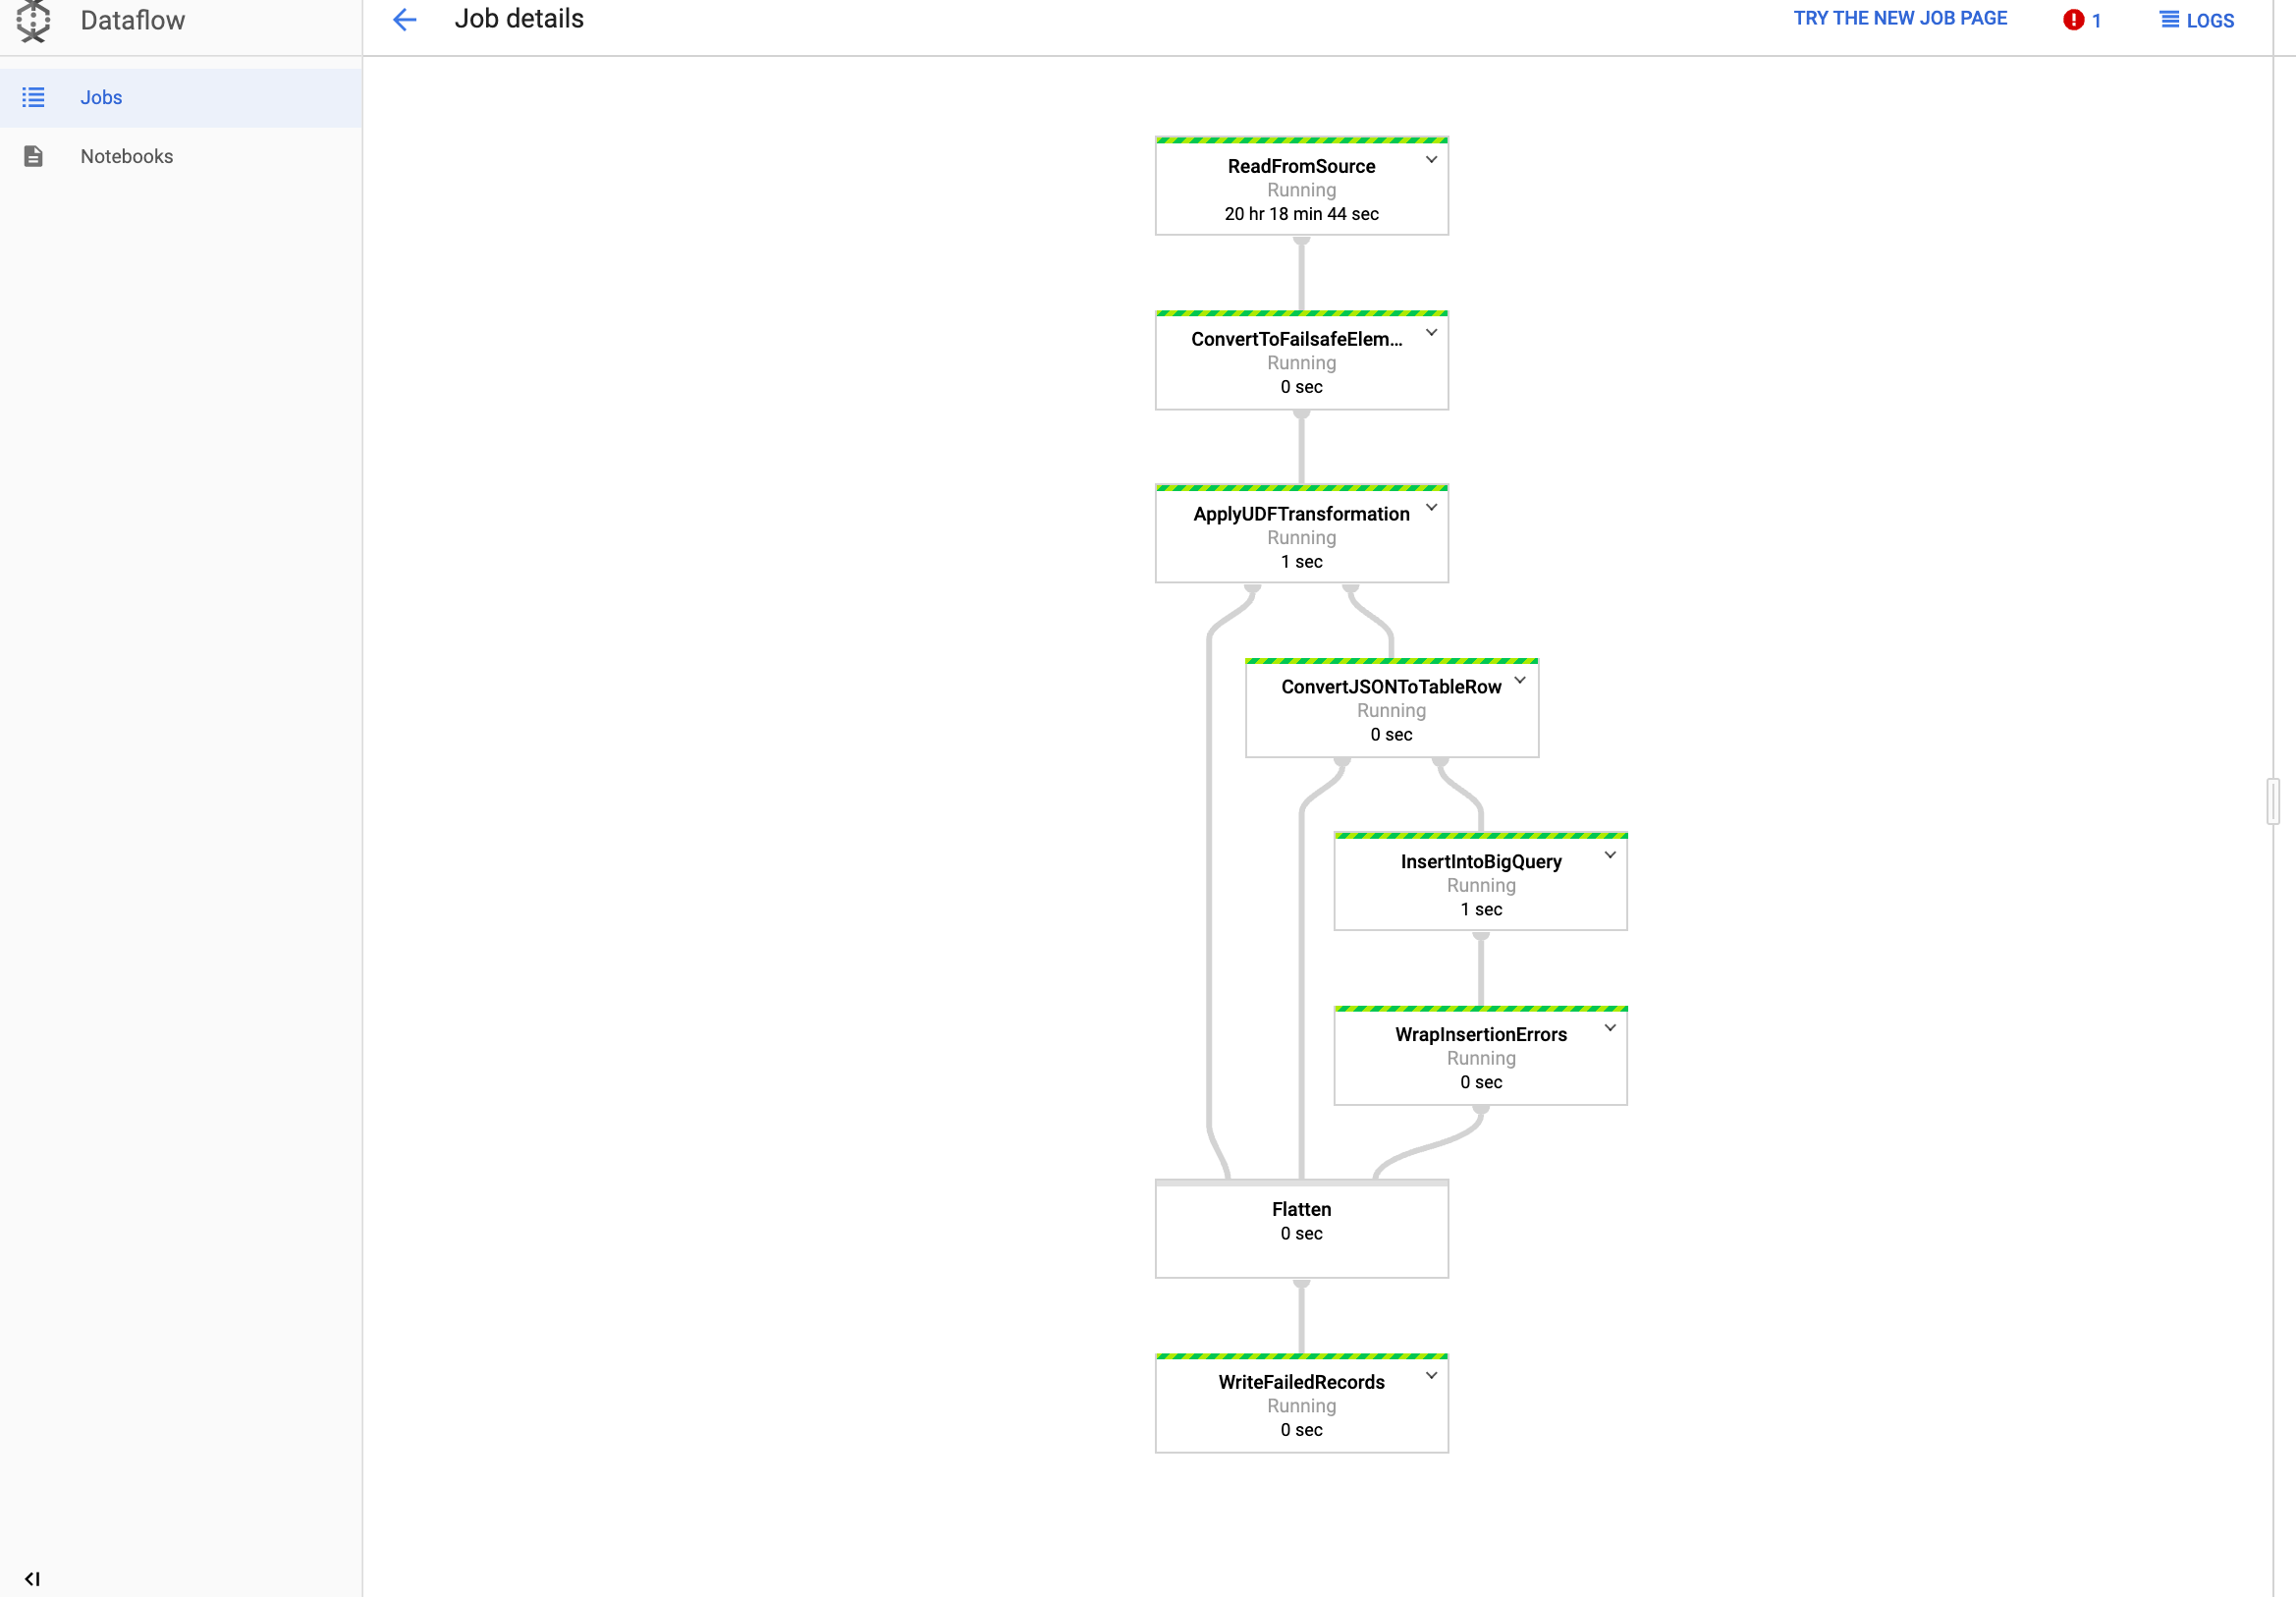
在 Dataflow 中查看作业
在 Google Cloud 控制台中,转到 Dataflow 页面。
您的作业将命名为
dataflow_operator_transform_csv_to_bq,并在名称末尾附加一个唯一 ID,以连字符连接,例如:
点击名称可查看作业详情。
在 BigQuery 中查看结果
在 Google Cloud 控制台中,转到 BigQuery 页面。
您可以使用标准 SQL 提交查询。使用以下查询可查看已添加到表中的行:
SELECT * FROM projectId.average_weather.average_weather