從 GitHub 測試、同步處理及部署 DAG

Cloud Composer 3 | Cloud Composer 2 | Cloud Composer 1

本指南說明如何建立 CI/CD 管道,從 GitHub 存放區測試、同步及部署 DAG 至 Cloud Composer 環境。

如要只同步處理其他服務的資料,請參閱「從其他服務轉移資料」。

CI/CD 管道總覽

架構圖,顯示流程步驟。預先提交和 PR 審查位於 GitHub 區段,DAG 同步和手動 DAG 驗證則位於 Google Cloud 區段。
圖 1. 架構圖,顯示流程步驟 (按一下即可放大)

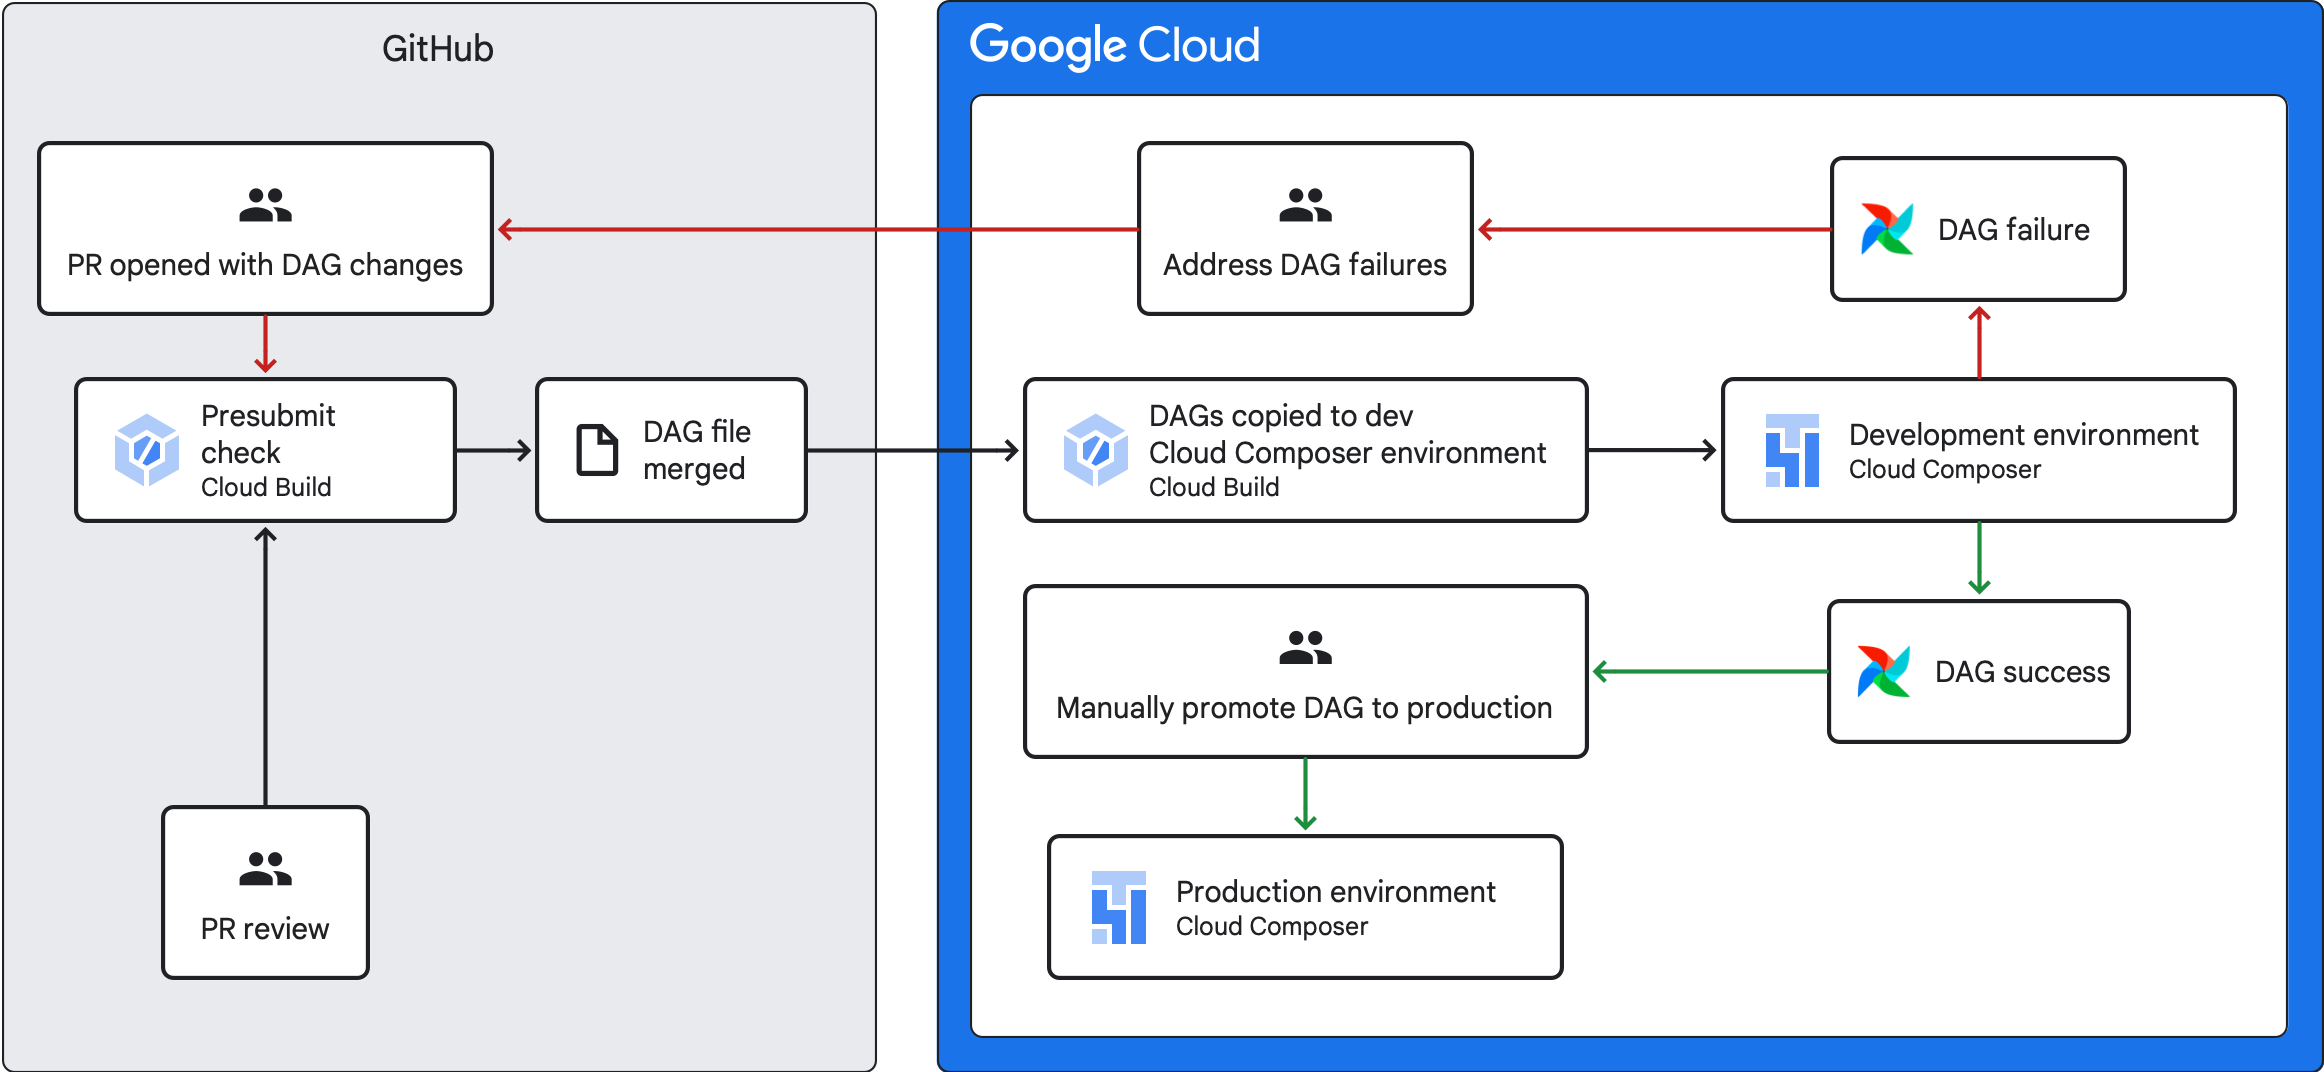
用於測試、同步及部署 DAG 的 CI/CD 管道包含下列步驟:

  1. 您變更 DAG,並將變更推送至存放區的開發分支。

  2. 您針對存放區的主要分支版本開啟提取要求。

  3. Cloud Build 會執行單元測試,檢查 DAG 是否有效。

  4. 您的提取要求已獲准,並合併至存放區的主要分支。

  5. Cloud Build 會將開發 Cloud Composer 環境與這些新變更同步處理。

  6. 確認 DAG 在開發環境中運作正常。

  7. 如果 DAG 運作正常,請將 DAG 上傳至實際工作環境 Cloud Composer 環境。

目標

事前準備

  • 本指南假設您使用兩個相同的 Cloud Composer 環境:開發環境和實際工作環境。

    在本指南中,您只會為開發環境設定 CI/CD 管道。請確認您使用的環境不是實際工作環境。

  • 本指南假設您已將 DAG 和相關測試儲存在 GitHub 存放區中。

    這個CI/CD 管道範例會顯示範例存放區的內容。DAG 和測試會儲存在 dags/ 目錄中,而需求檔案、限制檔案和 Cloud Build 設定檔則儲存在頂層。DAG 同步公用程式及其需求位於 utils 目錄中。

    這個結構可用於 Airflow 1、Airflow 2、Cloud Composer 1 和 Cloud Composer 2 環境。

建立預先提交檢查工作和單元測試

第一個 Cloud Build 工作會執行預先提交檢查,為 DAG 執行單元測試。

新增單元測試

如果尚未為 DAG 編寫「單元測試」,將這些測試與存放區中的 DAG 一併儲存,每個測試都加上 _test 後置字串。舉例來說,example_dag.py 中 DAG 的測試檔案為 example_dag_test.py。這些是會在存放區中以預先提交檢查形式執行的測試。

為預先提交檢查建立 Cloud Build YAML 設定

在存放區中,建立名為 test-dags.cloudbuild.yaml 的 YAML 檔案,設定預先提交檢查的 Cloud Build 工作。其中包含三個步驟:

  1. 安裝 DAG 需用的依附元件。
  2. 安裝單元測試所需的依附元件。
  3. 執行 DAG 測試。

steps:
  # install dependencies
  - name: python:3.8-slim
    entrypoint: pip
    args: ["install", "-r", "requirements.txt", "-c", "constraints.txt", "--user"]

  - name: python:3.8-slim
    entrypoint: pip
    args: ["install", "-r", "requirements-test.txt", "--user"]

  # run in python 3.8 which is latest version in Cloud Composer
  - name: python:3.8-slim
    entrypoint: python3.8
    args: ["-m", "pytest", "-s", "dags/"]

為預先提交檢查建立 Cloud Build 觸發條件

請按照「從 GitHub 建構存放區」指南,使用下列設定建立以 GitHub 應用程式為基礎的觸發條件:

  • Name (名稱):test-dags

  • 事件:提取要求

  • 來源 - 存放區:選擇您的存放區

  • 來源 - 基礎分支:^main$ (視需要將 main 變更為存放區基礎分支的名稱)

  • 來源 - 留言控管:不需設定

  • 建構設定 - Cloud Build 設定檔: /test-dags.cloudbuild.yaml (建構檔案的路徑)

建立 DAG 同步工作,並新增 DAG 公用程式指令碼

接著,設定執行 DAG 公用程式指令碼的 Cloud Build 工作。這項作業中的公用程式指令碼會將 DAG 合併至存放區的主要分支後,與 Cloud Composer 環境同步處理。

新增 DAG 公用程式指令碼

將 DAG 公用程式指令碼新增至存放區。這項公用程式指令碼會將存放區 dags/ 目錄中的所有 DAG 檔案複製到暫時目錄,並忽略所有非 DAG 的 Python 檔案。然後,指令碼會使用 Cloud Storage 用戶端程式庫,將該暫時目錄中的所有檔案上傳至 Cloud Composer 環境值區的 dags/ 目錄。

from __future__ import annotations

import argparse
import glob
import os
from shutil import copytree, ignore_patterns
import tempfile

# Imports the Google Cloud client library
from google.cloud import storage


def _create_dags_list(dags_directory: str) -> tuple[str, list[str]]:
    temp_dir = tempfile.mkdtemp()

    # ignore non-DAG Python files
    files_to_ignore = ignore_patterns("__init__.py", "*_test.py")

    # Copy everything but the ignored files to a temp directory
    copytree(dags_directory, f"{temp_dir}/", ignore=files_to_ignore, dirs_exist_ok=True)

    # The only Python files left in our temp directory are DAG files
    # so we can exclude all non Python files
    dags = glob.glob(f"{temp_dir}/*.py")
    return (temp_dir, dags)


def upload_dags_to_composer(
    dags_directory: str, bucket_name: str, name_replacement: str = "dags/"
) -> None:
    """
    Given a directory, this function moves all DAG files from that directory
    to a temporary directory, then uploads all contents of the temporary directory
    to a given cloud storage bucket
    Args:
        dags_directory (str): a fully qualified path to a directory that contains a "dags/" subdirectory
        bucket_name (str): the GCS bucket of the Cloud Composer environment to upload DAGs to
        name_replacement (str, optional): the name of the "dags/" subdirectory that will be used when constructing the temporary directory path name Defaults to "dags/".
    """
    temp_dir, dags = _create_dags_list(dags_directory)

    if len(dags) > 0:
        # Note - the GCS client library does not currently support batch requests on uploads
        # if you have a large number of files, consider using
        # the Python subprocess module to run gsutil -m cp -r on your dags
        # See https://cloud.google.com/storage/docs/gsutil/commands/cp for more info
        storage_client = storage.Client()
        bucket = storage_client.bucket(bucket_name)

        for dag in dags:
            # Remove path to temp dir
            dag = dag.replace(f"{temp_dir}/", name_replacement)

            try:
                # Upload to your bucket
                blob = bucket.blob(dag)
                blob.upload_from_filename(dag)
                print(f"File {dag} uploaded to {bucket_name}/{dag}.")
            except FileNotFoundError:
                current_directory = os.listdir()
                print(
                    f"{name_replacement} directory not found in {current_directory}, you may need to override the default value of name_replacement to point to a relative directory"
                )
                raise

    else:
        print("No DAGs to upload.")


if __name__ == "__main__":
    parser = argparse.ArgumentParser(
        description=__doc__, formatter_class=argparse.RawDescriptionHelpFormatter
    )
    parser.add_argument(
        "--dags_directory",
        help="Relative path to the source directory containing your DAGs",
    )
    parser.add_argument(
        "--dags_bucket",
        help="Name of the DAGs bucket of your Composer environment without the gs:// prefix",
    )

    args = parser.parse_args()

    upload_dags_to_composer(args.dags_directory, args.dags_bucket)

建立 Cloud Build YAML 設定,用於同步處理 DAG

在存放區中,建立名為 add-dags-to-composer.cloudbuild.yaml 的 YAML 檔案,設定 Cloud Build 工作,以同步處理 DAG。其中包含兩個步驟:

  1. 安裝 DAG 公用程式指令碼所需的依附元件。

  2. 執行公用程式指令碼,將存放區中的 DAG 與 Cloud Composer 環境同步。

steps:
  # install dependencies
  - name: python
    entrypoint: pip
    args: ["install", "-r", "utils/requirements.txt", "--user"]

  # run
  - name: python
    entrypoint: python
    args: ["utils/add_dags_to_composer.py", "--dags_directory=${_DAGS_DIRECTORY}", "--dags_bucket=${_DAGS_BUCKET}"]

建立 Cloud Build 觸發條件

請按照「從 GitHub 建構存放區」指南,使用下列設定建立以 GitHub 應用程式為基礎的觸發條件:

  • Name (名稱):add-dags-to-composer

  • 事件:推送至分支版本

  • 來源 - 存放區:選擇您的存放區

  • 來源 - 基礎分支:^main$ (視需要將 main 變更為存放區基礎分支的名稱)

  • 來源 - 納入的檔案篩選器 (glob):dags/**

  • 建構設定 - Cloud Build 設定檔: /add-dags-to-composer.cloudbuild.yaml (建構檔案的路徑)

在「進階設定」中,新增兩個替代變數

  • _DAGS_DIRECTORY:存放 DAG 的存放區目錄。如果您使用本指南的範例存放區,則為 dags/

  • _DAGS_BUCKET:Cloud Storage bucket,其中包含開發 Cloud Composer 環境中的 dags/ 目錄。省略 gs:// 前置字串。例如: us-central1-example-env-1234ab56-bucket

測試 CI/CD 管道

在本節中,請按照 DAG 開發流程操作,並使用您新建立的 Cloud Build 觸發條件。

執行預先提交工作

對主要分支建立提取要求,測試建構作業。在頁面上找到預先提交檢查。按一下「詳細資料」,然後選擇「在 Google Cloud Build 中查看更多詳細資料」,即可在Google Cloud 控制台中查看建構作業記錄。

螢幕截圖:名為 test-dags 的 GitHub 檢查,紅色箭頭指向括號中的專案名稱
圖 2. GitHub 上 Cloud Build 預先提交檢查狀態的螢幕截圖 (按一下即可放大)

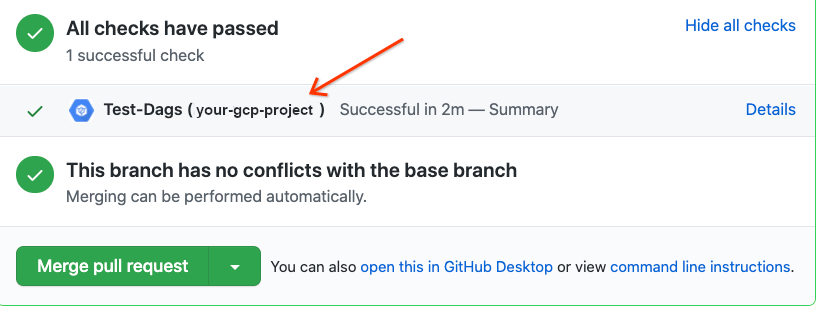
如果預先提交檢查失敗,請參閱「解決建構失敗問題」。

確認 DAG 在開發 Cloud Composer 環境中運作

提取要求獲准後,請將其合併至主要分支。使用Google Cloud 控制台查看建構結果。如果您有多個 Cloud Build 觸發條件,可以依觸發條件名稱 add-dags-to-composer 篩選建構作業。

Cloud Build 同步處理作業成功後,同步處理的 DAG 會顯示在開發 Cloud Composer 環境中。您可以在這裡驗證 DAG 是否正常運作。

將 DAG 新增至實際工作環境

確認 DAG 運作正常後,請手動將其新增至正式環境。如要這麼做,請將 DAG 檔案上傳到實際工作環境 Cloud Composer bucket 的 dags/ 目錄。

如果 DAG 同步作業失敗,或 DAG 在開發 Cloud Composer 環境中無法如預期運作,請參閱「解決建構失敗問題」。

解決建構失敗問題

本節說明如何解決常見的建構失敗情境。

如果預先提交檢查失敗,該怎麼辦?

在提取要求中,按一下「詳細資料」,然後選擇「在 Google Cloud Build 中查看更多詳細資料」,即可在Google Cloud 控制台中查看建構作業記錄。您可以使用這些記錄檔,協助偵錯 DAG 問題。解決問題後,請提交修正內容並推送至分支。預先提交檢查會再次執行,您可以使用記錄做為偵錯工具,繼續疊代。

如果 DAG 同步處理作業失敗,該怎麼辦?

使用 Google Cloud 控制台查看建構結果。如果您有多個 Cloud Build 觸發條件,可以依觸發條件名稱 add-dags-to-composer 篩選建構作業。檢查建構作業的記錄檔並修正錯誤。如需其他協助來解決錯誤,請利用支援管道

如果 DAG 無法在 Cloud Composer 環境中正常運作,該怎麼辦?

如果 DAG 在開發 Cloud Composer 環境中無法正常運作,請勿手動將 DAG 升級至正式版 Cloud Composer 環境。建議改用下列方法:

  • 還原提取要求,將 DAG 恢復到變更前的狀態 (這也會還原該提取要求中的所有其他檔案)。
  • 建立新的提取要求,手動將變更還原至損毀的 DAG。
  • 建立新的提取要求,修正 DAG 中的錯誤。

執行上述任一步驟都會觸發新的預先提交檢查,合併後則會觸發 DAG 同步工作。

後續步驟