Créer et déployer une fonction avec Cloud Code pour VS Code
Restez organisé à l'aide des collections
Enregistrez et classez les contenus selon vos préférences.
Cette page explique comment créer, télécharger, déployer et appeler une fonction HTTP de 2e génération à l'aide de Cloud Functions avec Cloud Code.
Avant de commencer
Sign in to your Google Cloud account. If you're new to
Google Cloud,
create an account to evaluate how our products perform in
real-world scenarios. New customers also get $300 in free credits to
run, test, and deploy workloads.
In the Google Cloud console, on the project selector page,
select or create a Google Cloud project.
Pour créer une fonction à l'aide d'un exemple, procédez comme suit :
Cliquez sur Cloud Code, puis développez la section Cloud Functions.
Cliquez sur Ajouter > Créer une fonction, puis sélectionnez un modèle.
Accédez au chemin d'accès dans lequel vous souhaitez créer votre fonction, saisissez un nom pour la fonction, puis sélectionnez Create New Application (Créer une application).
Si le dossier de votre application n'apparaît pas automatiquement dans l'explorateur, cliquez sur ActualiserActualiser.
Le fichier launch.json contient les configurations requises pour votre fonction :
Télécharger une fonction existante dans un nouvel espace de travail
Pour télécharger une fonction dans un nouvel espace de travail, procédez comme suit :
Cliquez sur Cloud Code, puis développez la section Cloud Functions.
Développez l'extrait de votre projet Google Cloud , effectuez un clic droit sur la fonction que vous souhaitez télécharger, puis sélectionnez Télécharger dans un nouvel espace de travail.
Lorsque vous y êtes invité, saisissez un nom pour la nouvelle application, puis cliquez sur Créer une application.
Cette opération télécharge votre fonction sur votre ordinateur local et l'ouvre dans un nouvel espace de travail dans votre IDE.
Déployer une fonction
Pour déployer une fonction, procédez comme suit :
Effectuez un clic droit sur une fonction, puis sélectionnez Déployer la fonction.
Dans le menu Quickpick, sélectionnez un projet Google Cloud sur lequel déployer votre fonction.
Sélectionnez la région dans laquelle la fonction sera déployée.
Sélectionnez un environnement d'exécution.
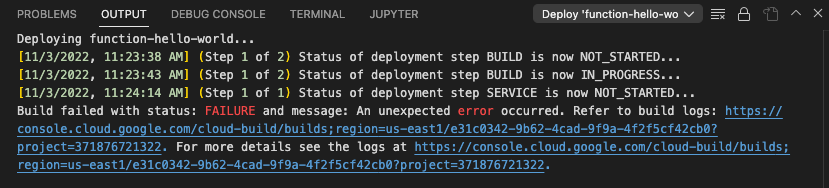
Le déploiement de la fonction peut prendre quelques minutes. Pendant l'opération, un indicateur de progression progress_activity s'affiche. Une fois l'opération terminée, une coche check_circle s'affiche. Si elle échoue, une erreur s'affiche.
Si le déploiement échoue, reportez-vous à l'onglet Sortie pour afficher le message d'erreur.
Cliquez sur le lien pour accéder aux journaux de compilation dans la console Google Cloud et obtenir plus de détails sur l'erreur.
Facultatif : Une fois la fonction déployée, vous pouvez effectuer les actions suivantes :
Pour afficher les fichiers en lecture seule de votre fonction déployée, développez la fonction, puis le dossier Code source. Vous pouvez alors afficher launch.json sous .vscode, le code déployé et package.json.
Pour afficher la fonction dans la console Google Cloud , effectuez un clic droit sur la fonction et sélectionnez Ouvrir dans la console Cloud. Si vous y êtes invité, sélectionnez Ouvrir.
Pour modifier les métadonnées de votre fonction, effectuez un clic droit sur la fonction et sélectionnez Modifier les métadonnées dans la console Cloud.
Pour afficher les journaux de la fonction déployée, effectuez un clic droit sur la fonction et sélectionnez Afficher les journaux.
Appeler une fonction
L'appel d'une fonction vous permet d'exécuter la fonction déployée dans la consoleGoogle Cloud à partir du terminal intégré de l'IDE. Pour appeler une fonction, procédez comme suit :
Effectuez un clic droit sur la fonction et sélectionnez Appeler la fonction via HTTP.
Dans le menu Quickpick Déclencher la fonction via HTTP qui s'affiche, sélectionnez l'une des deux options suivantes :
Par défaut : un terminal s'ouvre dans l'IDE et exécute une commande pour exécuter la fonction dans Google Cloud.
Importer des arguments à partir d'un fichier JSON : cette option prend le contenu du fichier JSON sélectionné, le convertit en chaîne et le transmet avec -d '{. Cela peut être utile lorsque vous avez une entrée pour vos fonctions et que vous souhaitez l'enregistrer, ce qui vous permet de l'exécuter sans avoir à la saisir plusieurs fois.
Pour envoyer vos commentaires, signalez tout problème sur GitHub ou posez une question sur Stack Overflow.
Sauf indication contraire, le contenu de cette page est régi par une licence Creative Commons Attribution 4.0, et les échantillons de code sont régis par une licence Apache 2.0. Pour en savoir plus, consultez les Règles du site Google Developers. Java est une marque déposée d'Oracle et/ou de ses sociétés affiliées.
Dernière mise à jour le 2025/09/04 (UTC).
[[["Facile à comprendre","easyToUnderstand","thumb-up"],["J'ai pu résoudre mon problème","solvedMyProblem","thumb-up"],["Autre","otherUp","thumb-up"]],[["Difficile à comprendre","hardToUnderstand","thumb-down"],["Informations ou exemple de code incorrects","incorrectInformationOrSampleCode","thumb-down"],["Il n'y a pas l'information/les exemples dont j'ai besoin","missingTheInformationSamplesINeed","thumb-down"],["Problème de traduction","translationIssue","thumb-down"],["Autre","otherDown","thumb-down"]],["Dernière mise à jour le 2025/09/04 (UTC)."],[[["\u003cp\u003eThis page guides users on how to manage 2nd gen HTTP functions using Cloud Functions with Cloud Code, covering creation, downloading, deployment, and invocation.\u003c/p\u003e\n"],["\u003cp\u003eNew functions can be created from templates within Cloud Code, allowing users to define function names and create new applications within specified pathways.\u003c/p\u003e\n"],["\u003cp\u003eExisting functions can be downloaded from Google Cloud to a new workspace on a local machine, allowing users to then edit locally.\u003c/p\u003e\n"],["\u003cp\u003eFunctions are deployed to a user-specified Google Cloud project, region, and runtime, with progress indicators and options to view source code, logs, or edit metadata.\u003c/p\u003e\n"],["\u003cp\u003eDeployed functions can be invoked directly from the IDE via HTTP, either with default settings or by importing arguments from a JSON file.\u003c/p\u003e\n"]]],[],null,["# Create and deploy a function with Cloud Code for VS Code\n\nThis page shows you how to create, download, deploy, and invoke a 2nd gen HTTP\nfunction using [Cloud Functions](https://cloud.google.com/functions/) with\nCloud Code.\n\nBefore you begin\n----------------\n\n- Sign in to your Google Cloud account. If you're new to Google Cloud, [create an account](https://console.cloud.google.com/freetrial) to evaluate how our products perform in real-world scenarios. New customers also get $300 in free credits to run, test, and deploy workloads.\n- In the Google Cloud console, on the project selector page,\n select or create a Google Cloud project.\n\n | **Note**: If you don't plan to keep the resources that you create in this procedure, create a project instead of selecting an existing project. After you finish these steps, you can delete the project, removing all resources associated with the project.\n\n [Go to project selector](https://console.cloud.google.com/projectselector2/home/dashboard)\n-\n [Verify that billing is enabled for your Google Cloud project](/billing/docs/how-to/verify-billing-enabled#confirm_billing_is_enabled_on_a_project).\n\n-\n\n\n Enable the Cloud Functions, Cloud Build, Artifact Registry, Cloud Run, Logging, and Pub/Sub APIs.\n\n\n [Enable the APIs](https://console.cloud.google.com/flows/enableapi?apiid=cloudfunctions,cloudbuild.googleapis.com,artifactregistry.googleapis.com,run.googleapis.com,logging.googleapis.com,pubsub.googleapis.com&redirect=https://cloud.google.com/functions/docs/create-deploy-nodejs)\n\n- In the Google Cloud console, on the project selector page,\n select or create a Google Cloud project.\n\n | **Note**: If you don't plan to keep the resources that you create in this procedure, create a project instead of selecting an existing project. After you finish these steps, you can delete the project, removing all resources associated with the project.\n\n [Go to project selector](https://console.cloud.google.com/projectselector2/home/dashboard)\n-\n [Verify that billing is enabled for your Google Cloud project](/billing/docs/how-to/verify-billing-enabled#confirm_billing_is_enabled_on_a_project).\n\n-\n\n\n Enable the Cloud Functions, Cloud Build, Artifact Registry, Cloud Run, Logging, and Pub/Sub APIs.\n\n\n [Enable the APIs](https://console.cloud.google.com/flows/enableapi?apiid=cloudfunctions,cloudbuild.googleapis.com,artifactregistry.googleapis.com,run.googleapis.com,logging.googleapis.com,pubsub.googleapis.com&redirect=https://cloud.google.com/functions/docs/create-deploy-nodejs)\n\n1. Install [Git](https://git-scm.com/book/en/v2/Getting-Started-Installing-Git). Git is required for copying samples to your machine.\n2. Install the [Cloud Code plugin](/code/docs/vscode/install#installing) if you haven't already.\n\nCreate a function\n-----------------\n\nIf you've created a function before, you can [download an existing function to a\nnew workspace](#download_an_existing_function_to_a_new_workspace) and edit it\nlocally.\n\nTo create a new function using a sample, follow these steps:\n\n1. Click **Cloud Code** and then expand the\n **Cloud Functions** section.\n\n2. Click add\n **Create function** and select a template.\n\n3. Navigate to the pathway that you'd like to create your new function in, enter\n a name for the function, and select **Create New Application**.\n\n If the folder of your application doesn't appear automatically in the\n **Explorer** , click\n refresh\n **Refresh**.\n\n The `launch.json` file contains the required configurations for your\n function: \n\n {\n \"configurations\": [\n {\n \"name\": \"Deploy Cloud Function\",\n \"type\": \"cloudcode.cloudfunctions\",\n \"request\": \"launch\",\n \"functionName\": \"function-hello-world\",\n \"gen\": \"GEN_2\",\n \"entryPoint\": \"helloHttp\",\n }\n ]\n }\n\nTo learn more about creating multiple functions in a single workspace, see\n[Manage functions in VS Code workspace](/code/docs/vscode/manage-functions-workspace).\n\nDownload an existing function to a new workspace\n------------------------------------------------\n\nTo download a function to a new workspace, follow these steps:\n\n1. Click **Cloud Code** and then expand the\n **Cloud Functions** section.\n\n2. Expand your Google Cloud project snippet, right-click the function\n that you wish to download, and select **Download to new workspace**.\n\n3. When prompted, enter a name for the new application and click\n **Create New Application**.\n\n This downloads the function to your local machine and opens it in a new\n workspace in your IDE.\n\nDeploy a function\n-----------------\n\nTo deploy a function, follow these steps:\n\n1. Right-click a function and select **Deploy function**.\n\n2. In the Quickpick menu, select a Google Cloud project to deploy your\n function to.\n\n3. Select a region that the function will be deployed to.\n\n4. Select a runtime.\n\n The function's deployment may take a few minutes. While in progress,\n a progress_activity\n progress indicator appears. After it is complete, a\n check_circle checkmark\n appears. If it fails, an\n error error mark appears.\n\n If the deployment fails, refer to the **Output** tab for the error message.\n Clicking the link takes you to the build logs in Google Cloud console and\n provides more detail about the error.\n\n5. Optional: Once the function is deployed, you can perform the following\n actions:\n\n - To view read-only files of your deployed function, expand the function\n and then expand the **Source Code** folder. Here you can view\n `launch.json` under `.vscode`, the deployed code, and `package.json`.\n\n - To view the function in Google Cloud console, right-click the\n function and select **Open in Cloud Console** , and if prompted, select\n **Open**.\n\n - To edit the metadata of your function, right-click the function and\n select **Edit metadata in Cloud Console**.\n\n - To view logs of the deployed function, right-click the function and\n select **View logs**.\n\nInvoke a function\n-----------------\n\nInvoking a function allows you to execute the deployed function in\nGoogle Cloud console from the IDE's built-in terminal. To invoke a function,\nfollow these steps:\n\n1. Right-click the function and select **Invoke function via HTTP**.\n\n2. In the **Trigger function via HTTP** Quickpick that appears, select one of\n the two options:\n\n - **Default**: A terminal opens in the IDE and runs a command to execute\n the function in Google Cloud.\n\n - **Import arguments from JSON file** : This option takes the content of\n the selected JSON file, turns it into a string, and passes it with\n `-d '{`. This is useful for when you have an input to your functions and\n want to save it, allowing you to execute it without having to retype it repeatedly.\n\nWhat's next\n-----------\n\n- See the [Work with Cloud Functions](/code/docs/vscode/functions-overview) overview to learn more about [managing your workspace](/code/docs/vscode/manage-functions-workspace) or [setting up a local development environment](/code/docs/vscode/setup-local-functions-dev-environment).\n\nGet Support\n-----------\n\nTo send feedback, report issues on [GitHub](https://github.com/GoogleCloudPlatform/cloud-code-vscode/issues), or ask a question on [Stack Overflow](https://stackoverflow.com/questions/ask?tags=cloud-code-vscode)."]]