本頁面說明如何使用 Cloud Functions 和 Cloud Code,建立、下載、部署及叫用第 2 代 HTTP 函式。
事前準備
- Sign in to your Google Cloud account. If you're new to Google Cloud, create an account to evaluate how our products perform in real-world scenarios. New customers also get $300 in free credits to run, test, and deploy workloads.
-
In the Google Cloud console, on the project selector page, select or create a Google Cloud project.
Roles required to select or create a project
- Select a project: Selecting a project doesn't require a specific IAM role—you can select any project that you've been granted a role on.
-
Create a project: To create a project, you need the Project Creator
(
roles/resourcemanager.projectCreator), which contains theresourcemanager.projects.createpermission. Learn how to grant roles.
-
Verify that billing is enabled for your Google Cloud project.
-
Enable the Cloud Functions, Cloud Build, Artifact Registry, Cloud Run, Logging, and Pub/Sub APIs.
Roles required to enable APIs
To enable APIs, you need the Service Usage Admin IAM role (
roles/serviceusage.serviceUsageAdmin), which contains theserviceusage.services.enablepermission. Learn how to grant roles. -
In the Google Cloud console, on the project selector page, select or create a Google Cloud project.
Roles required to select or create a project
- Select a project: Selecting a project doesn't require a specific IAM role—you can select any project that you've been granted a role on.
-
Create a project: To create a project, you need the Project Creator
(
roles/resourcemanager.projectCreator), which contains theresourcemanager.projects.createpermission. Learn how to grant roles.
-
Verify that billing is enabled for your Google Cloud project.
-
Enable the Cloud Functions, Cloud Build, Artifact Registry, Cloud Run, Logging, and Pub/Sub APIs.
Roles required to enable APIs
To enable APIs, you need the Service Usage Admin IAM role (
roles/serviceusage.serviceUsageAdmin), which contains theserviceusage.services.enablepermission. Learn how to grant roles. - 安裝 Git。 您必須使用 Git,才能將範例複製到電腦。
- 如果尚未安裝 Cloud Code 外掛程式,請先安裝。
按一下
 「Cloud Code」,然後展開「Cloud Functions」部分。
按一下「新增」 「建立函式」,然後選取範本。
前往要建立新函式的路徑,輸入函式名稱,然後選取「建立新應用程式」。
如果應用程式資料夾未自動顯示在「檔案總管」中,請按一下「重新整理」。
launch.json檔案包含函式所需的設定:{ "configurations": [ { "name": "Deploy Cloud Function", "type": "cloudcode.cloudfunctions", "request": "launch", "functionName": "function-hello-world", "gen": "GEN_2", "entryPoint": "helloHttp", } ] }按一下
「Cloud Code」,然後展開「Cloud Functions」部分。展開 Google Cloud 專案程式碼片段,對要下載的函式按一下滑鼠右鍵,然後選取「Download to new workspace」(下載至新的工作區)。
出現提示時,請輸入新應用程式的名稱,然後點選「Create New Application」(建立新應用程式)。
如此一來,系統便會將函式下載到本機電腦,並在 IDE 的新工作區中開啟該函式。
在函式上按一下滑鼠右鍵,然後選取「Deploy function」(部署函式)。
在快捷選單,選取要部署函式的 Google Cloud 專案。
選取要部署函式的區域。
選取執行階段。
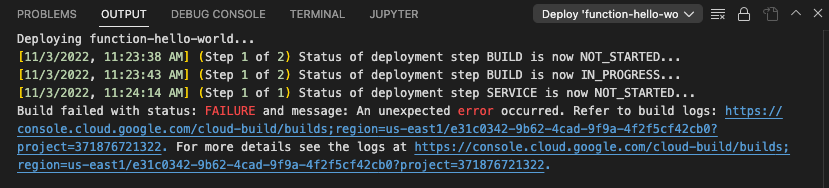
函式部署作業可能需要幾分鐘的時間才能完成。作業進行期間,系統會顯示 progress_activity 進度指標。完成後,系統會顯示 check_circle 勾號。如果失敗,系統會顯示錯誤標記。
如果部署失敗,請查看「Output」分頁中的錯誤訊息。如果點選連結,系統就會將您導向 Google Cloud 控制台中的建構作業記錄檔,並提供該錯誤的相關詳細資訊。
選用:部署函式後,您可以執行下列動作:
如要查看已部署函式的唯讀檔案,請展開函式,然後展開「Source Code」資料夾。您可在此查看
launch.json(在.vscode底下)、已部署的程式碼和package.json。如要在 Google Cloud 控制台中查看函式,請對該函式按一下滑鼠右鍵,並選取「Open in Cloud Console」(在 Cloud 控制台開啟)。出現提示時,請選取「Open」(開啟)。
如要編輯函式的中繼資料,請在函式上按一下滑鼠右鍵,然後選取「Edit metadata in Cloud Console」(在 Cloud 控制台中編輯中繼資料)。
如要查看已部署函式的記錄檔,請在函式上按一下滑鼠右鍵,然後選取「View logs」(查看記錄檔)。
在函式上按一下滑鼠右鍵,選取「Invoke function via HTTP」(透過 HTTP 叫用函式)。
在顯示的「Trigger function over HTTP」(透過 HTTP 觸發函式) 快捷選單中,選取下列其中一個選項:
Default:終端機會在 IDE 中開啟並執行指令,以便在 Google Cloud中執行函式。
Import arguments from JSON file (從 JSON 檔案匯入引數):這個選項會擷取所選 JSON 檔案的內容,然後將其轉換為字串並使用
-d '{傳送該字串。如果您要儲存函式的輸入內容,以便執行函式時不必重複輸入,這項功能就非常實用。
- 如要進一步瞭解如何管理工作區或設定本機開發環境,請參閱「使用 Cloud Functions」總覽。
建立函式
如果您先前已建立函式,可以將現有函式下載至新的工作區,並在本地編輯。
如要使用範例建立新函式,請按照下列步驟操作:
如要進一步瞭解如何在單一工作區中建立多個函式,請參閱「在 VS Code 工作區中管理函式」。
將現有函式下載至新的工作區
如要將函式下載至新的工作區,請按照下列步驟操作:
部署函式
如要部署函式,請按照下列步驟操作:
叫用函式
叫用函式可讓您在Google Cloud 控制台中,透過 IDE 的內建終端機執行部署的函式。如要叫用函式,請按照下列步驟操作: