Bio-pharma organizations can now leverage the groundbreaking protein folding system, AlphaFold, with Vertex AI
At Google Cloud, we believe the products we bring to market should be strongly informed by our research efforts across Alphabet. For example, Vertex AI was ideated, incubated and developed based on the pioneering research from Google’s research entities. Features like Vertex AI Forecast, Explainable AI, Vertex AI Neural Architecture Search (NAS) and Vertex AI Matching Engine were born out of discoveries by Google’s researchers, internally tested and deployed, and shared with data scientists across the globe as an enterprise-ready solution, each within a matter of a few short years.
Today, we’re proud to announce another deep integration between Google Cloud and Alphabet’s AI research organizations: the ability in Vertex AI to run DeepMind’s groundbreaking protein structure prediction system, AlphaFold.
We expect this capability to be a boon for data scientists and organizations of all types in the bio-pharma space, from those developing treatments for diseases to those creating new synthetic biomaterials. We’re thrilled to see Alphabet AI research continue to shape products and contribute to platforms on which Google Cloud customers can build.
This guide provides a way to easily predict the structure of a protein (or multiple proteins) using a simplified version of AlphaFold running in a Vertex AI. For most targets, this method obtains predictions that are near-identical in accuracy compared to the full version. To learn more about how to correctly interpret these predictions, take a look at the "Using the AlphaFold predictions" section of this blog post below.
Please refer to the Supplementary Information for a detailed description of the method.
Solution Overview
Vertex AI lets you develop the entire data science/machine learning workflow in a single development environment, helping you deploy models faster, with fewer lines of code and fewer distractions.
For running AlphaFold, we choose Vertex AI Workbench user-managed notebooks, which uses Jupyter notebooks and offers both various preinstalled suites of deep learning packages and full control over the environment. We also use Google Cloud Storage and Google Cloud Artifact Registry, as shown in the architecture diagram below.
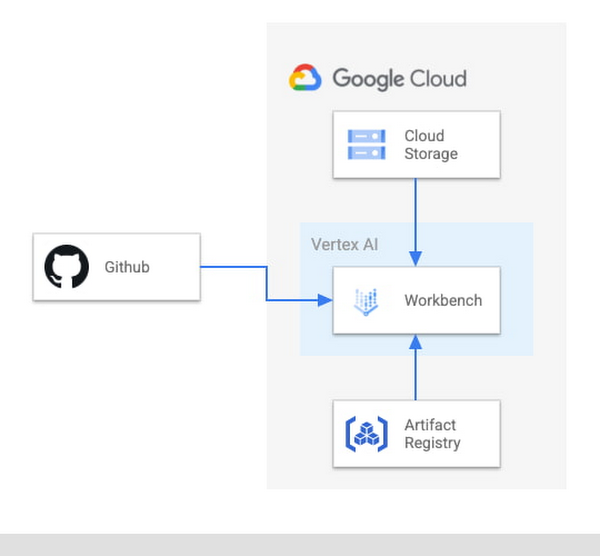
We provide a customized Docker image in Artifact Registry, with preinstalled packages for launching a notebook instance in Vertex AI Workbench and prerequisites for running AlphaFold. For users who want to further customize the docker image for the notebook instance, we also provide the Dockerfile and a build script you can build upon. You can find the notebook, the Dockerfile and the build script in the Vertex AI community content.
Getting Started
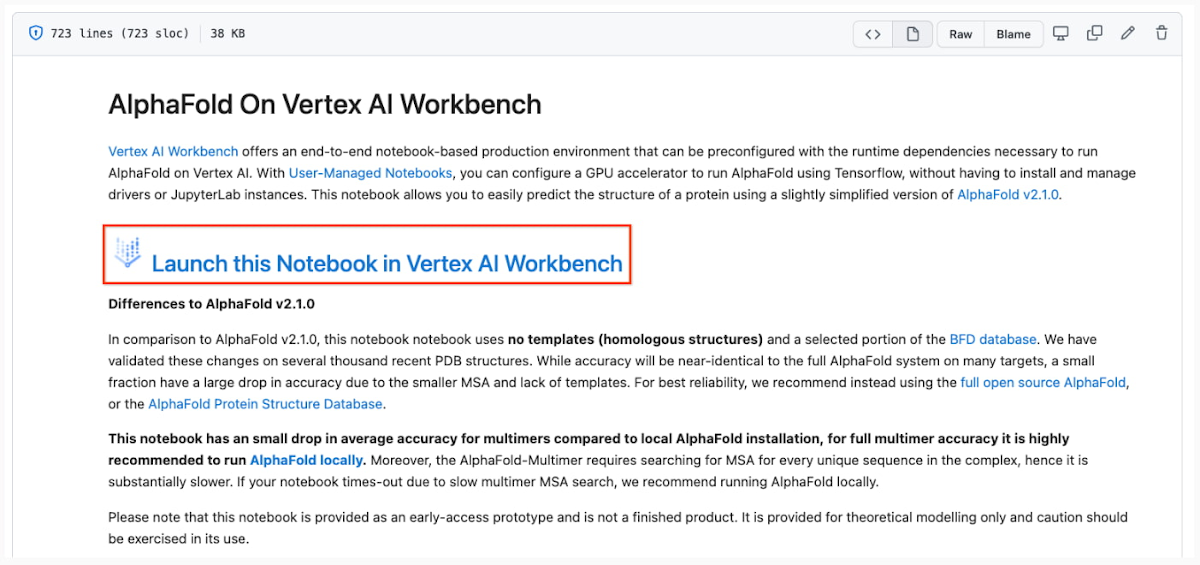
Vertex AI Workbench offers an end-to-end notebook-based production environment that can be preconfigured with the runtime dependencies necessary to run AlphaFold. With user-managed notebooks, you can configure a GPU accelerator to run AlphaFold using JAX, without having to install and manage drivers or JupyterLab instances. The following is a step-by-step walkthrough for launching a demonstration notebook that can predict the structure of a protein using a slightly simplified version of AlphaFold that does not use homologous protein structures or the full-sized BFD sequence database.
1. If you are new to Google Cloud, we suggest familiarizing yourself with the materials on the Getting Started page, and creating a first project to host the VM Instance that will manage the tutorial notebook. Once you have created a project, proceed to step 2 below.
2. Navigate to the tutorial notebook, hosted in the vertex-ai-samples repository on GitHub.
3. Launch the notebook on Vertex Workbench via the “Launch this Notebook in Vertex AI Workbench” link. This will redirect to the Google Cloud Platform Console and open Vertex AI Workbench using the last project that you used.
- If you have multiple Google Cloud user accounts, make sure you select the appropriate account using the icon on the right.
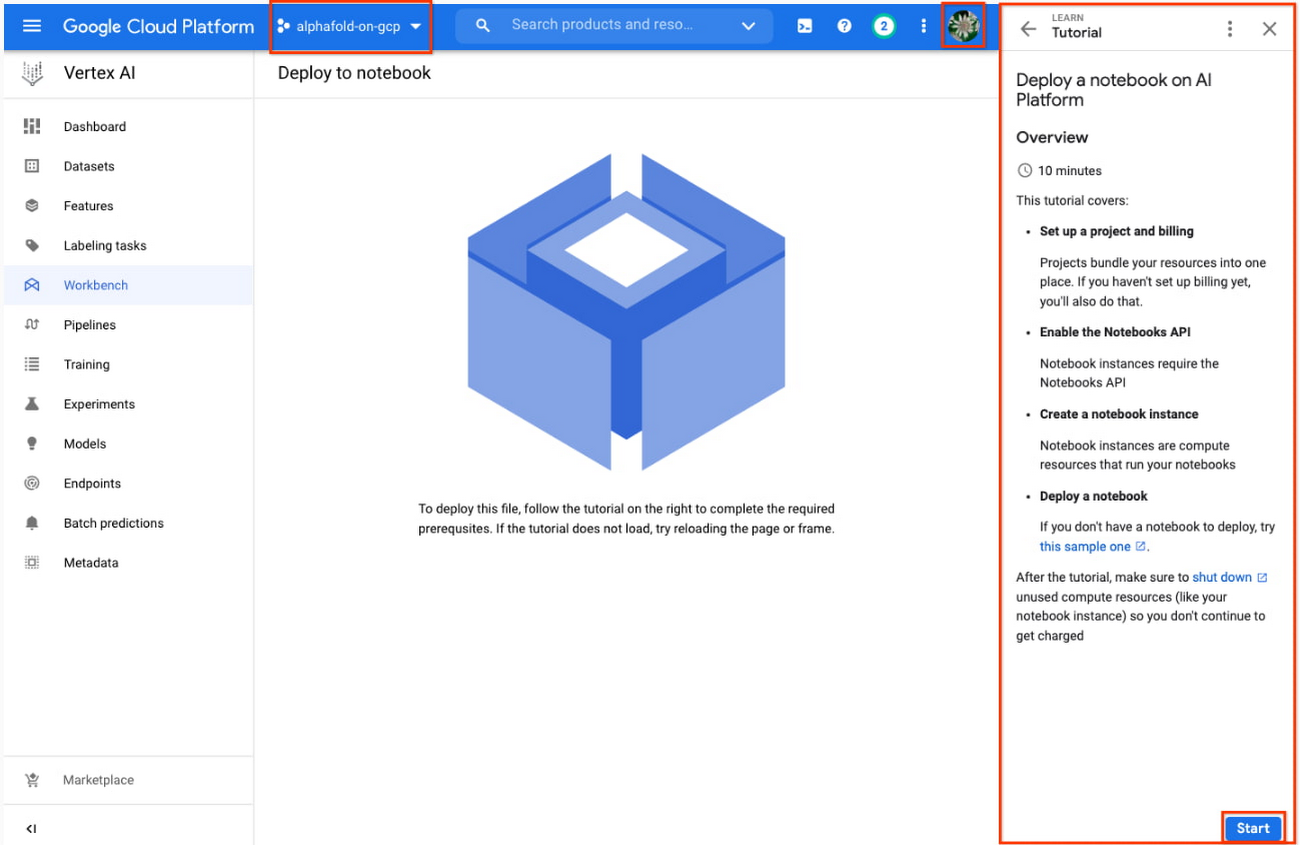
- First-time users will be prompted to take a tutorial titled “Deploy a notebook on AI Platform,” with the start button appearing on the bottom-right corner of the screen.
- This tutorial is necessary for first-time users; it will help orient you to the Workbench, as well as configure billing and enable the Notebooks API (both required).
- A full billing account is required for GPU acceleration, and is strongly recommended. Learn more here.
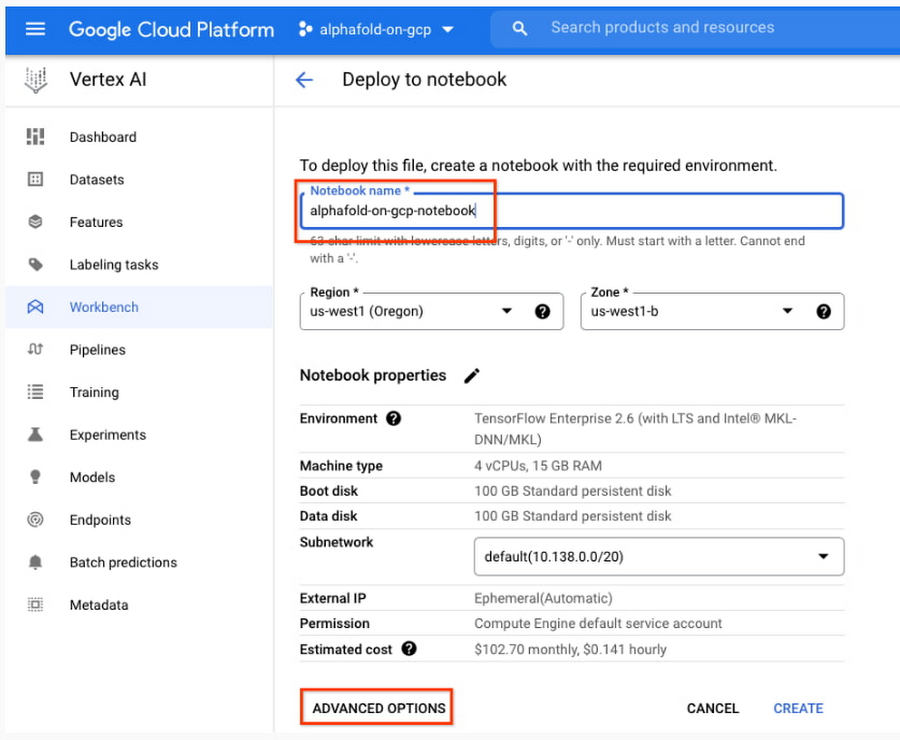
5. Enter a name for the notebook but don’t click “Create” just yet; you still need to configure some “Advanced Options.'' If you have used Vertex AI Workbench before, you may first need to select “Create a new notebook.”
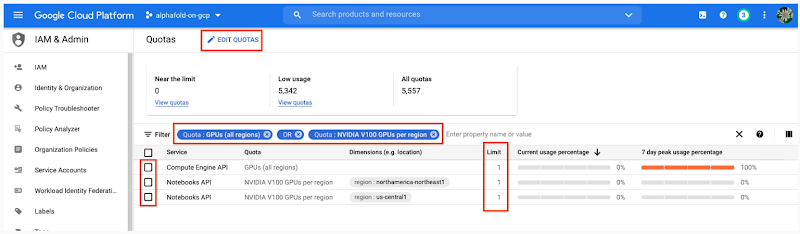
- Total GPU quota: “GPUs (all regions)”
- Quota for your specific GPU type: “NVIDIA V100 GPUs per region”
Enter the Quota into the “filter” box and ensure Limit > 0. If needed, you can spin up small quota increases in only a few minutes by selecting the checkbox, and the “Edit Quotas.”
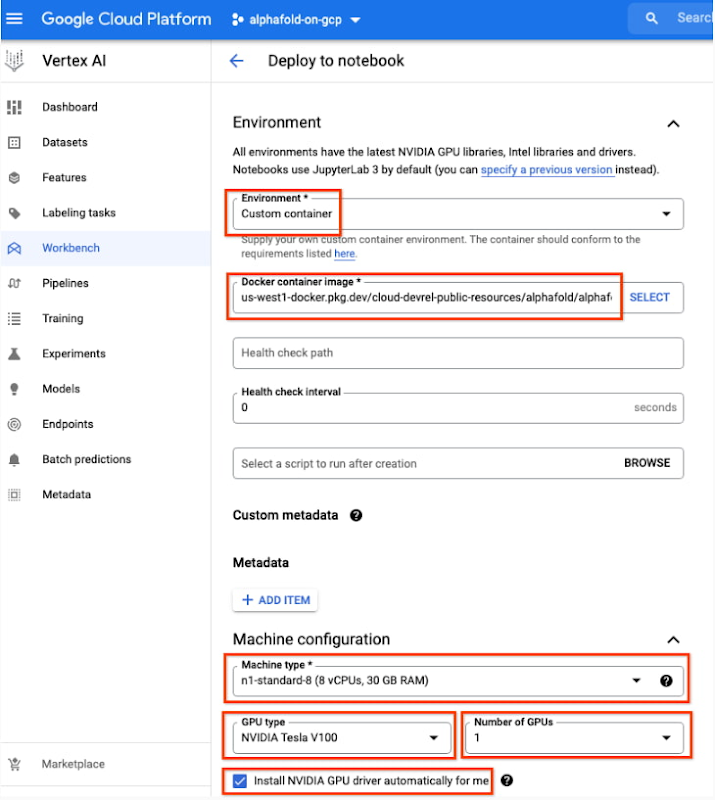
- Under Environment, configure “Custom container” (first in the drop-down menu)
- In the “Docker container image” text box, enter (without clicking “select”):
us-west1-docker.pkg.dev/cloud-devrel-public-resources/alphafold/alphafold-on-gcp:latest - Suggested VM configuration:
Machine type: n1-standard-8 (8 CPUs, 30 GB RAM)
GPU type: NVIDIA Tesla V100 GPU accelerator (recommended).
Longer proteins may require a powerful GPU; check your quota configuration for your specific configuration, and request a quota increase if necessary (as in Step 6).
If you don’t see the GPU that you want, you might need to change your Region / Zone settings from Step 5. Learn more here.
Number of GPUs: 1
Make sure the check box “Install NVIDIA GPU driver automatically for me” is checked.
- The defaults work for the rest of the menu items. Press Create!
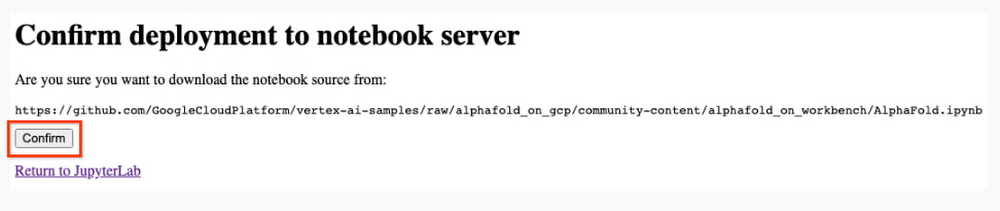
8. After several minutes, a virtual machine will be created and you will be redirected to a JupyterLab instance. When launching, you may need to confirm the connection to the Jupyter server running on the VM; click Confirm:
9. The notebook is ready to run! From the menu, select Run > Run all Cells to evaluate the notebook top-to-bottom, or run each cell by individually highlighting and clicking <shift>-return. The notebook has detailed instructions for every step, such as where to add the sequence(s) of a protein you want to fold.
10. Congratulations, you've just folded a protein using AlphaFold on the Vertex AI Workbench!
Using the AlphaFold predictions
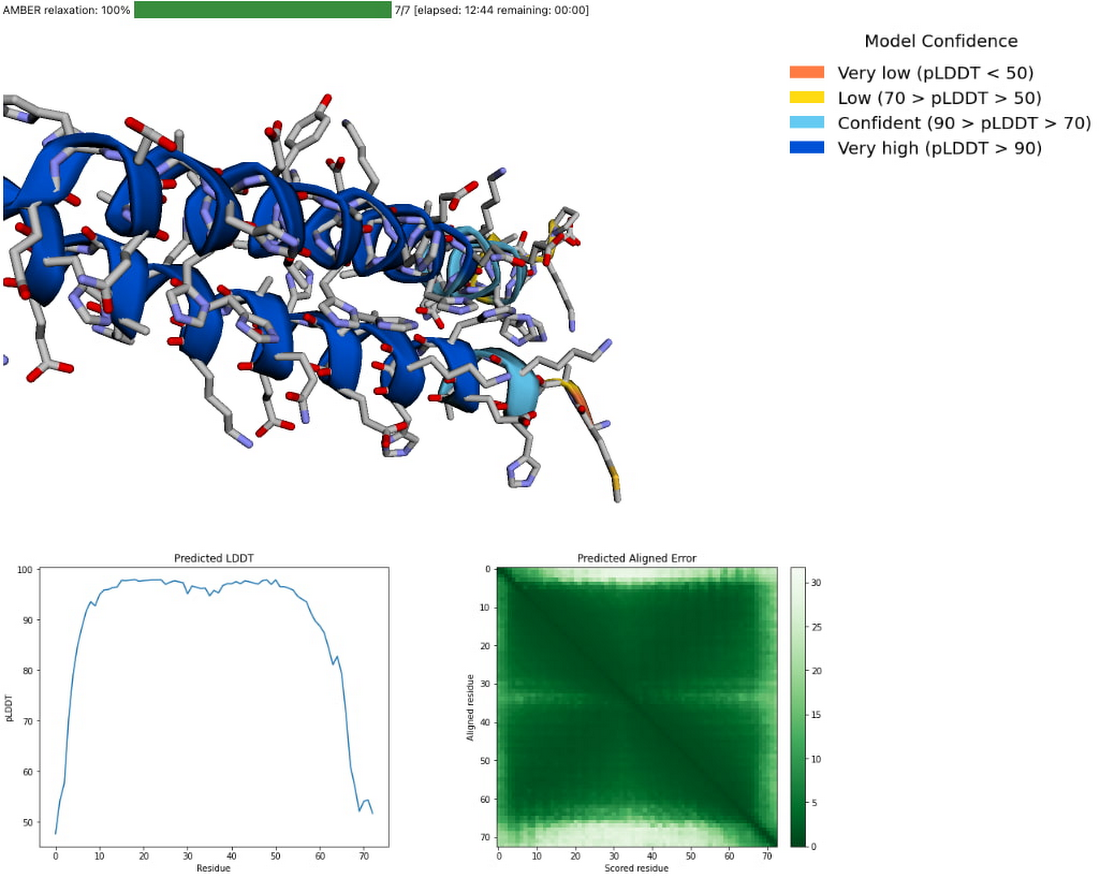
The protein structure that you just predicted has automatically been saved as ‘selected_prediction.pdb’ to the ‘prediction’ folder of your instance. To download it, use the File Browser on the left side to navigate to the ‘prediction’ folder, then right click on the ‘selected_prediction.pdb’ file and select ‘Download’. You can then use this file in your own viewers and pipelines.
You can also explore your prediction directly in the notebook by looking at it in the 3D viewer. While many predictions are highly accurate, it should be noted that a small proportion will likely be of lower accuracy. To help you interpret the prediction, take a look at the model confidence (the color of the 3D structure) as well as the Predicted LDDT and Predicted Aligned Error figures in the notebook. You can find out more about these metrics and how to interpret AlphaFold structures on this page and in this FAQ.
If you use AlphaFold (e.g. in publications, services or products), please cite the AlphaFold paper and, if applicable, the AlphaFold-Multimer paper.
Looking toward innovation in biology and medicine
In this guide, we covered how to get started with AlphaFold using Vertex AI, enabling a secure, scalable, and configurable environment for research in the Cloud. If you would like to learn more about AlphaFold, the scientific paper and source code are both openly accessible. We hope that insights you and others in the scientific community make will unlock many exciting future advances in our understanding of biology and medicine.