Analise automaticamente pacotes Go
Saiba como ativar a análise automática, enviar uma imagem de contentor para o Artifact Registry e ver uma lista de eventuais vulnerabilidades encontradas na imagem.
A Artifact Analysis procura vulnerabilidades sempre que uma imagem é enviada para o Artifact Registry. Os administradores de plataformas e os programadores de aplicações podem usar esta funcionalidade de análise automática para ajudar a identificar riscos no respetivo pipeline de entrega de software.
Este início rápido usa um pacote simples disponível publicamente para demonstrar um tipo de análise de pacotes. Por predefinição, a análise de artefactos procura vulnerabilidades em vários tipos de pacotes assim que ativa a API de análise. Os tipos de pacotes suportados incluem: SO, Go, Java (Maven), Python e Node.js (npm).
Antes de começar
- Sign in to your Google Cloud account. If you're new to Google Cloud, create an account to evaluate how our products perform in real-world scenarios. New customers also get $300 in free credits to run, test, and deploy workloads.
-
Install the Google Cloud CLI.
-
Se estiver a usar um fornecedor de identidade (IdP) externo, tem primeiro de iniciar sessão na CLI gcloud com a sua identidade federada.
-
Para inicializar a CLI gcloud, execute o seguinte comando:
gcloud init -
Create or select a Google Cloud project.
Roles required to select or create a project
- Select a project: Selecting a project doesn't require a specific IAM role—you can select any project that you've been granted a role on.
-
Create a project: To create a project, you need the Project Creator
(
roles/resourcemanager.projectCreator), which contains theresourcemanager.projects.createpermission. Learn how to grant roles.
-
Create a Google Cloud project:
gcloud projects create PROJECT_ID
Replace
PROJECT_IDwith a name for the Google Cloud project you are creating. -
Select the Google Cloud project that you created:
gcloud config set project PROJECT_ID
Replace
PROJECT_IDwith your Google Cloud project name.
-
Verify that billing is enabled for your Google Cloud project.
-
Enable the Artifact Registry and Container Scanning APIs:
Roles required to enable APIs
To enable APIs, you need the Service Usage Admin IAM role (
roles/serviceusage.serviceUsageAdmin), which contains theserviceusage.services.enablepermission. Learn how to grant roles.gcloud services enable containerscanning.googleapis.com
artifactregistry.googleapis.com -
Install the Google Cloud CLI.
-
Se estiver a usar um fornecedor de identidade (IdP) externo, tem primeiro de iniciar sessão na CLI gcloud com a sua identidade federada.
-
Para inicializar a CLI gcloud, execute o seguinte comando:
gcloud init -
Create or select a Google Cloud project.
Roles required to select or create a project
- Select a project: Selecting a project doesn't require a specific IAM role—you can select any project that you've been granted a role on.
-
Create a project: To create a project, you need the Project Creator
(
roles/resourcemanager.projectCreator), which contains theresourcemanager.projects.createpermission. Learn how to grant roles.
-
Create a Google Cloud project:
gcloud projects create PROJECT_ID
Replace
PROJECT_IDwith a name for the Google Cloud project you are creating. -
Select the Google Cloud project that you created:
gcloud config set project PROJECT_ID
Replace
PROJECT_IDwith your Google Cloud project name.
-
Verify that billing is enabled for your Google Cloud project.
-
Enable the Artifact Registry and Container Scanning APIs:
Roles required to enable APIs
To enable APIs, you need the Service Usage Admin IAM role (
roles/serviceusage.serviceUsageAdmin), which contains theserviceusage.services.enablepermission. Learn how to grant roles.gcloud services enable containerscanning.googleapis.com
artifactregistry.googleapis.com Abra a página Repositórios na Google Cloud consola.
Clique em Criar repositório.
Na página Criar repositório, introduza as seguintes definições:
- Nome:
quickstart-docker-repo - Formato: Docker
- Modo: padrão
- Tipo de localização: região
- Região:
us-central1
- Nome:
Clique em Criar.
Altere para um diretório onde quer guardar a imagem do contentor.
Copie uma imagem para o seu diretório local. Por exemplo, pode usar o Docker para extrair a imagem Go mais recente do Docker Hub.
docker pull golang:1.17.6-alpine- PROJECT é o seu Google Cloud
ID do projeto.
Se o ID do projeto contiver dois pontos (
:), consulte o artigo Projetos com âmbito de domínio. us-central1é a região do repositório do Artifact Registry.docker.pkg.devé o nome do anfitrião dos repositórios Docker.quickstart-imageé o nome da imagem que quer usar no repositório. O nome da imagem pode ser diferente do nome da imagem local.tag1é uma etiqueta que está a adicionar à imagem do Docker. Se não especificou uma etiqueta, o Docker aplica a etiqueta predefinidalatest.Obtenha a lista de repositórios.
Na lista de repositórios, clique num repositório.
Na lista de imagens, clique no nome de uma imagem.
Os totais de vulnerabilidades para cada resumo de imagem são apresentados na coluna Vulnerabilidades.

Para ver a lista de vulnerabilidades de uma imagem, clique no link na coluna Vulnerabilidades.
A secção Resultados da análise apresenta um resumo dos tipos de pacotes analisados, do total de vulnerabilidades, das vulnerabilidades com correções disponíveis, das vulnerabilidades sem correções e da gravidade efetiva.
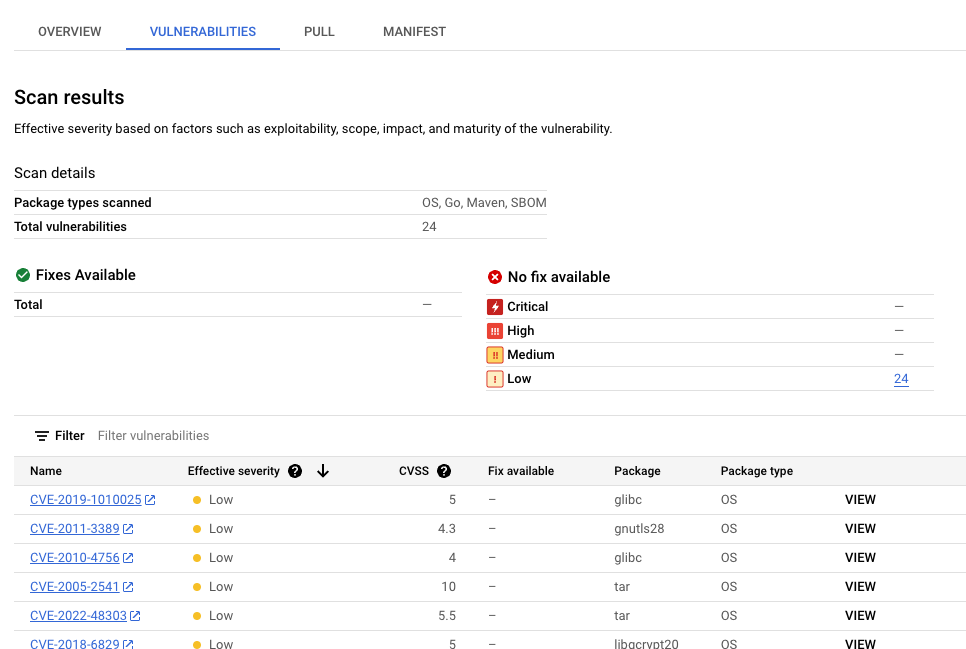
A tabela de vulnerabilidades apresenta o nome das Vulnerabilidades e exposições comuns (CVE) para cada vulnerabilidade encontrada, a gravidade efetiva, a pontuação do Common Vulnerability Scoring System (CVSS), as correções (quando disponíveis), o nome do pacote que contém a vulnerabilidade e o tipo de pacote.
AGoogle Cloud consola apresenta até 1200 vulnerabilidades por página nesta tabela. Pode filtrar e ordenar estes ficheiros para verificar um ficheiro específico, diretório, camada ou tipo de ficheiro por extensão do ficheiro.
Para ver detalhes sobre uma CVE específica, clique no nome da CVE.
Para ver detalhes da ocorrência de vulnerabilidades, como o número da versão e a localização afetada, na linha com o nome da vulnerabilidade, clique em Ver ou Ver corrigido. O texto do link é Ver para vulnerabilidades sem uma correção e Ver corrigido para vulnerabilidades às quais foi aplicada uma correção.
No Artifact Registry, abra a lista de repositórios.
Na página Repositórios, clique num repositório.
Na página Detalhes do repositório, clique numa imagem.
Na lista de versões de imagens, clique num resumo de imagens.
Na página de detalhes do resumo da imagem, clique no separador Vulnerabilidades.
Quando os metadados baseados em camadas estão disponíveis, a análise de artefactos mostra uma lista selecionável de camadas na barra Camada:

Para ver a lista de camadas, clique no menu pendente de camadas.
É apresentada uma lista pendente com uma lista numerada de camadas. A camada 0 representa a camada inferior, com cada camada seguinte a basear-se na camada anterior. Só são apresentadas as camadas onde foram encontradas vulnerabilidades.
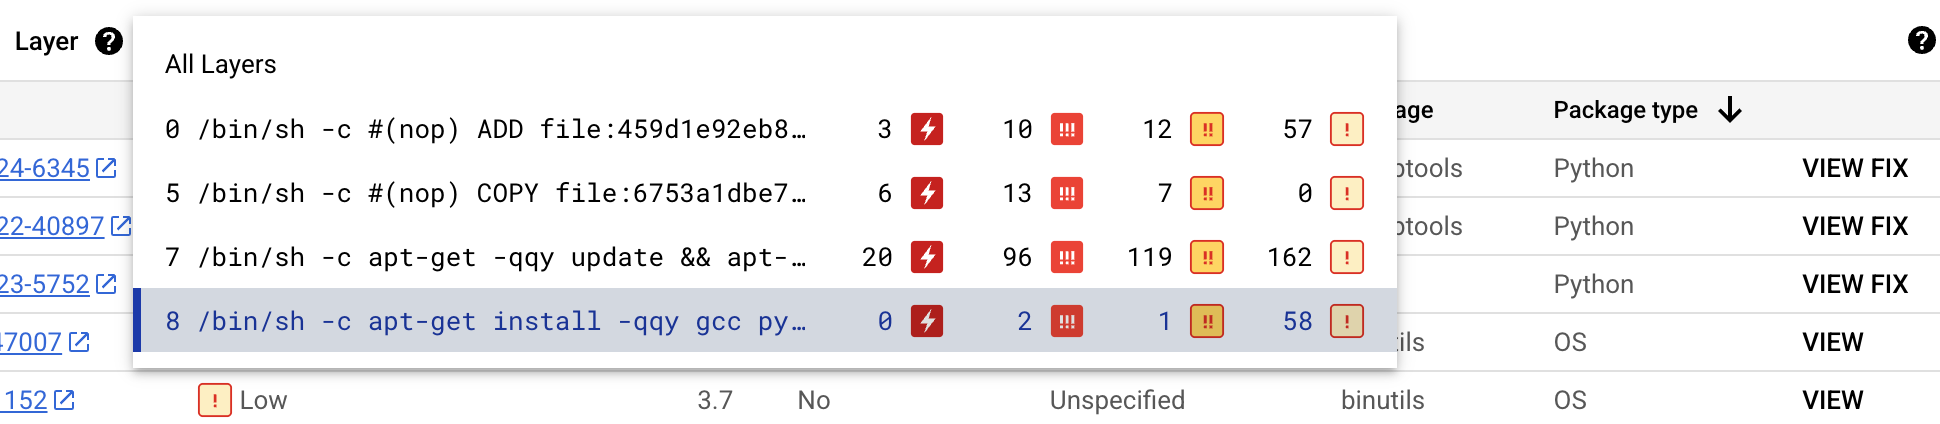
Para cada camada, a análise de artefactos mostra o comando Docker usado para criar a camada e o número de vulnerabilidades encontradas nessa camada.
Para saber mais sobre as vulnerabilidades numa camada específica, selecione uma camada na lista de camadas.
A tabela de vulnerabilidades é atualizada para mostrar apenas as vulnerabilidades encontradas na camada selecionada. Pode aplicar mais filtros ou investigar vulnerabilidades específicas.
Clique em VER ou VER CORREÇÃO junto a uma vulnerabilidade para ver informações mais detalhadas sobre a vulnerabilidade.
O painel lateral Detalhes da vulnerabilidade mostra as localizações dos ficheiros onde os pacotes têm vulnerabilidades.
Na tabela Localizações dos ficheiros, passe o cursor do rato sobre o ponto de interrogação para abrir metadados de camadas adicionais.
Uma caixa de diálogo apresenta o índice da camada, o comando de compilação da camada, o resumo da camada e a imagem base onde pode corrigir a vulnerabilidade.
Crie um repositório Docker no Artifact Registry
Crie um repositório Docker para armazenar a imagem de exemplo para este início rápido.
É apresentada a página Repositórios. O repositório quickstart-docker-repo é adicionado à lista de repositórios.
Configure a autenticação
Antes de poder enviar ou extrair imagens com o Artifact Registry, tem de configurar o Docker para usar a Google Cloud CLI para autenticar pedidos ao Artifact Registry.
No Cloud Shell ou na shell local, configure a autenticação para repositórios do Docker na região us-central1:
gcloud auth configure-docker us-central1-docker.pkg.dev
Obtenha um pacote
Etiquete o seu pacote com um nome de repositório
Quando quiser enviar um pacote para o Artifact Registry, tem de configurar o comando docker push para enviar a imagem para uma localização específica.
Execute o seguinte comando para etiquetar a imagem como quickstart-image:tag1:
docker tag golang:1.17.6-alpine \
us-central1-docker.pkg.dev/PROJECT/quickstart-docker-repo/quickstart-image:tag1
Onde:
Envie a imagem para o Artifact Registry
A análise de artefactos analisa automaticamente novos pacotes Go quando são carregados para o Artifact Registry.
Para enviar a imagem para o repositório do Docker no Artifact Registry, execute o seguinte comando:
docker push us-central1-docker.pkg.dev/PROJECT/quickstart-docker-repo/quickstart-image:tag1
Substitua PROJECT pelo seu Google Cloud
ID do projeto.
Se o ID do projeto contiver dois pontos (:), consulte o artigo
Projetos com âmbito de domínio.
Veja os resultados da análise de vulnerabilidades
Para ver as vulnerabilidades numa imagem:
Veja vulnerabilidades numa camada específica
A análise de artefactos fornece metadados específicos da camada para ajudar a identificar que pacote contém vulnerabilidades e que comando de compilação do Docker introduziu essa camada.
Para ver os metadados de vulnerabilidade baseados em camadas na Google Cloud consola:
Limpar
Para evitar incorrer em custos na sua Google Cloud conta pelos recursos usados nesta página, elimine o Google Cloud projeto com os recursos.
Se criou um novo projeto para este guia, pode eliminá-lo agora.Delete a Google Cloud project:
gcloud projects delete PROJECT_ID