고가용성 Patroni 설정의 안정성과 품질을 보장하는 것은 지속적인 데이터베이스 작업을 유지하고 다운타임을 최소화하는 데 매우 중요합니다.
이 페이지에서는 다양한 장애 시나리오, 복제 일관성, 장애 조치 메커니즘을 다루는 Patroni 클러스터 테스트에 관한 포괄적인 가이드를 제공합니다.
Patroni 설정 테스트
patroni 인스턴스 (alloydb-patroni1, alloydb-patroni2 또는 alloydb-patroni3)에 연결하고 AlloyDB Omni patroni 폴더로 이동합니다.
cd /alloydb/
Patroni 로그를 검사합니다.
docker compose logs alloydbomni-patroni
마지막 항목에는 Patroni 노드에 관한 정보가 반영되어야 합니다. 다음과 비슷한 내용이 표시됩니다.
alloydbomni-patroni        | 2024-06-12 15:10:29,020 INFO: no action. I am (patroni1), the leader with the lock
alloydbomni-patroni        | 2024-06-12 15:10:39,010 INFO: no action. I am (patroni1), the leader with the lock
alloydbomni-patroni        | 2024-06-12 15:10:49,007 INFO: no action. I am (patroni1), the leader with the lock
기본 Patroni 인스턴스 alloydb-patroni1에 네트워크로 연결되어 있고 Linux를 실행하는 인스턴스에 연결하여 인스턴스에 관한 정보를 가져옵니다. sudo apt-get install jq -y를 실행하여 jq 도구를 설치해야 할 수도 있습니다.
Patroni 노드에서 Patroni HTTP API 엔드포인트를 호출하면 클러스터 상태 정보, 타임라인, WAL 정보, 노드와 클러스터가 올바르게 실행되고 있는지 나타내는 상태 확인 등 Patroni에서 관리하는 특정 PostgreSQL 인스턴스의 상태와 구성에 관한 다양한 세부정보가 표시됩니다.
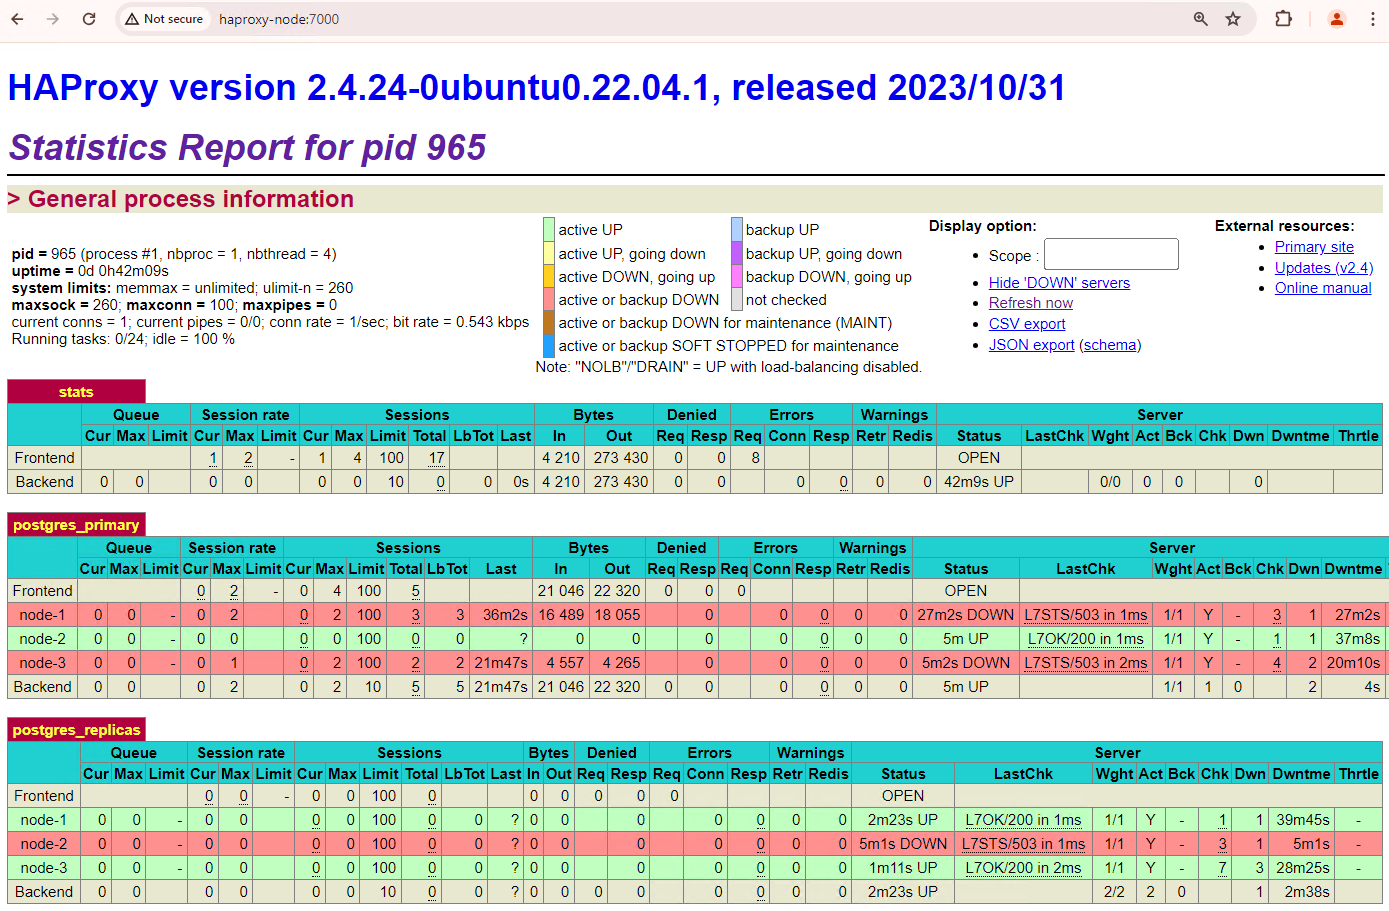
HAProxy 설정 테스트
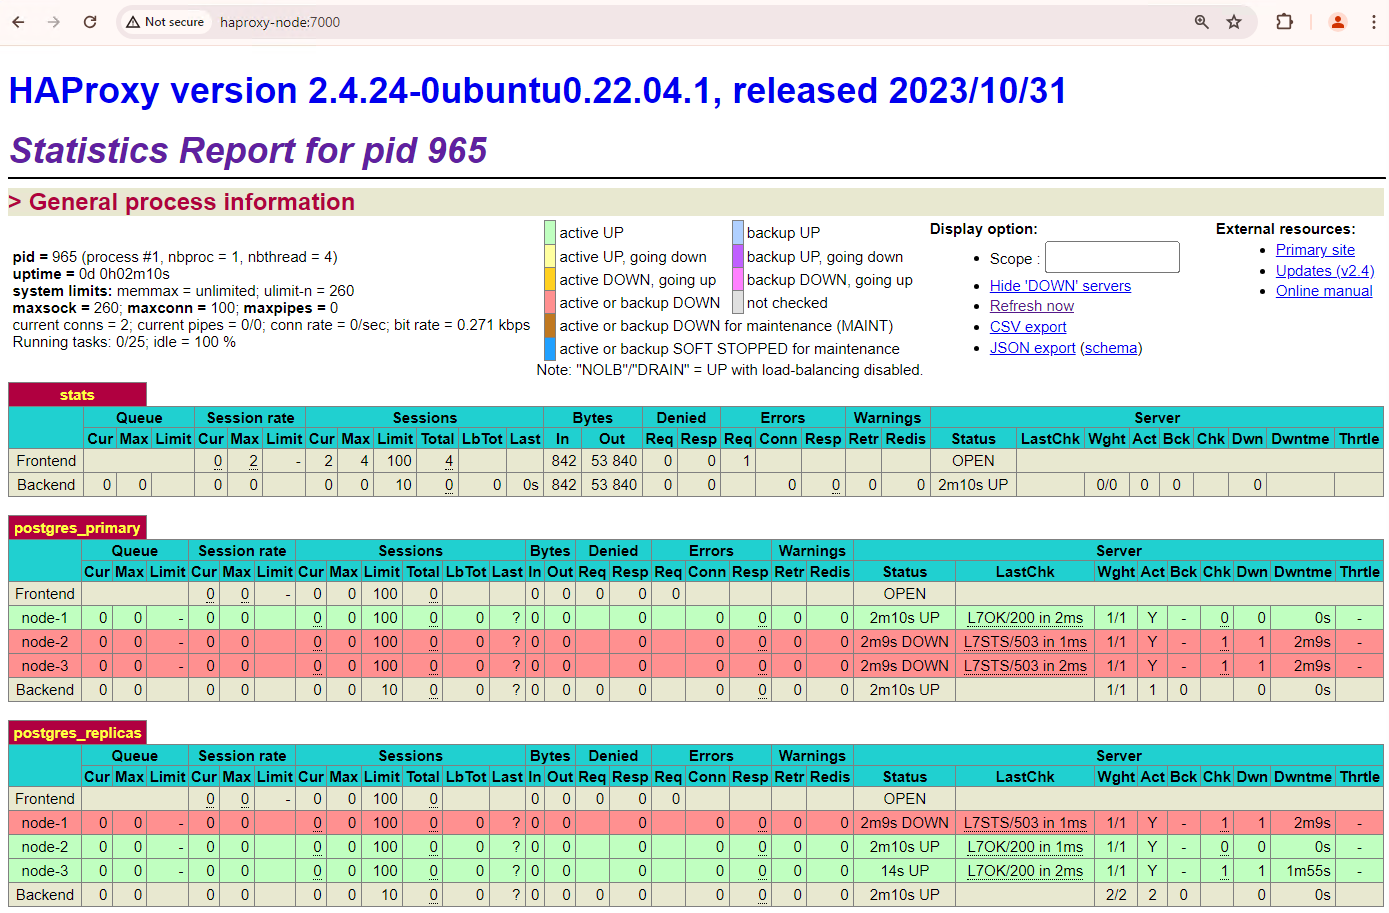
브라우저가 있고 HAProxy 노드에 네트워크가 연결된 머신에서 http://haproxy:7000 주소로 이동합니다. 또는 호스트 이름 대신 HAProxy 인스턴스의 외부 IP 주소를 사용할 수 있습니다.
다음 스크린샷과 비슷한 화면이 표시됩니다.
그림 1. Patroni 노드의 상태와 지연 시간을 보여주는 HAProxy 상태 페이지
HAProxy 대시보드에서 기본 Patroni 노드(patroni1)와 두 복제본(patroni2, patroni3)의 상태 및 지연 시간을 확인할 수 있습니다.
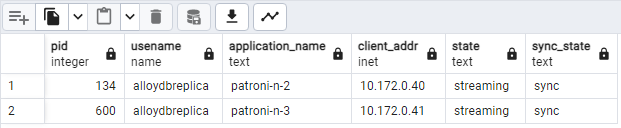
쿼리를 실행하여 클러스터의 복제 통계를 확인할 수 있습니다. pgAdmin과 같은 클라이언트에서 HAProxy를 통해 기본 데이터베이스 서버에 연결하고 다음 쿼리를 실행합니다.
patroni1에서 patroni2와 patroni3가 스트리밍되는 것을 보여주는 다음 다이어그램과 비슷한 내용이 표시됩니다.
그림 2. Patroni 노드의 복제 상태를 보여주는 pg_stat_replication 출력
자동 장애 조치 테스트
이 섹션에서는 3노드 클러스터에서 연결된 실행 중인 Patroni 컨테이너를 중지하여 기본 노드의 서비스 중단을 시뮬레이션합니다. 기본에서 Patroni 서비스를 중지하여 서비스 중단을 시뮬레이션하거나 일부 방화벽 규칙을 적용하여 해당 노드로의 통신을 중지할 수 있습니다.
기본 Patroni 인스턴스에서 AlloyDB Omni Patroni 폴더로 이동합니다.
cd /alloydb/
컨테이너를 중지합니다.
docker compose down
다음과 비슷한 출력이 표시됩니다. 이렇게 하면 컨테이너와 네트워크가 중지되었는지 확인할 수 있습니다.
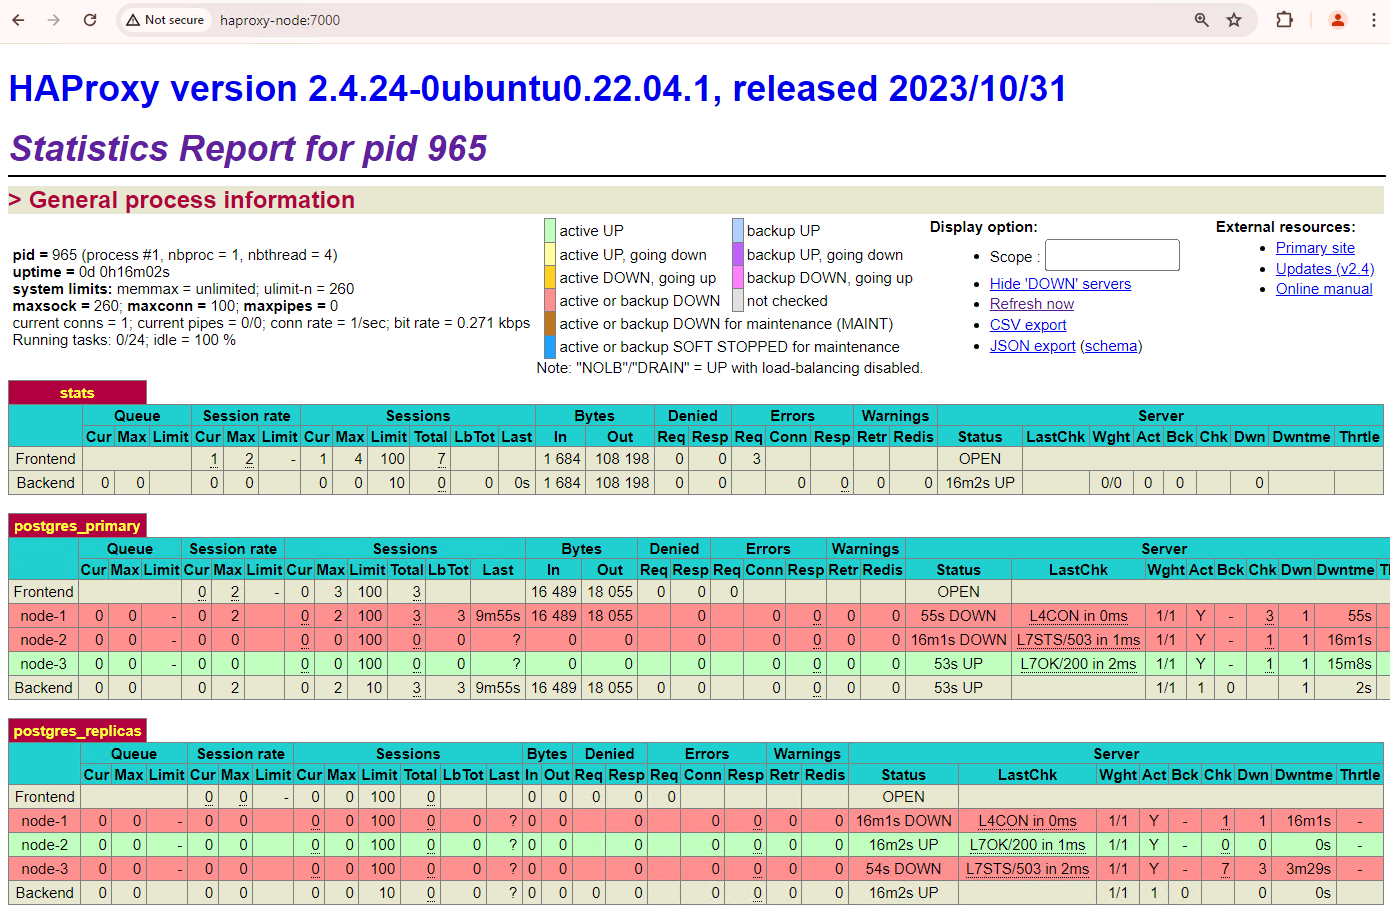
patroni3 인스턴스가 새 기본 인스턴스가 되었고 patroni2만 남은 복제본입니다. 이전 기본 서버인 patroni1이 다운되고 상태 점검이 실패합니다.
Patroni는 모니터링, 컨센서스, 자동화된 오케스트레이션의 조합을 통해 장애 조치를 실행하고 관리합니다. 기본 노드가 지정된 제한 시간 내에 리스를 갱신하지 못하거나 장애를 보고하면 클러스터의 다른 노드가 합의 시스템을 통해 이 조건을 인식합니다. 나머지 노드는 조정하여 새 기본으로 승격할 가장 적합한 복제본을 선택합니다. 후보 복제본이 선택되면 Patroni는 PostgreSQL 구성을 업데이트하고 미해결 WAL 레코드를 재생하는 등 필요한 변경사항을 적용하여 이 노드를 기본 노드로 승격합니다. 그런 다음 새 기본 노드가 합의 시스템을 상태로 업데이트하고 다른 복제본은 복제 소스를 전환하고 새 트랜잭션을 따라잡는 등 새 기본을 따르도록 자체적으로 재구성합니다. HAProxy는 새 기본 노드를 감지하고 그에 따라 클라이언트 연결을 리디렉션하여 중단을 최소화합니다.
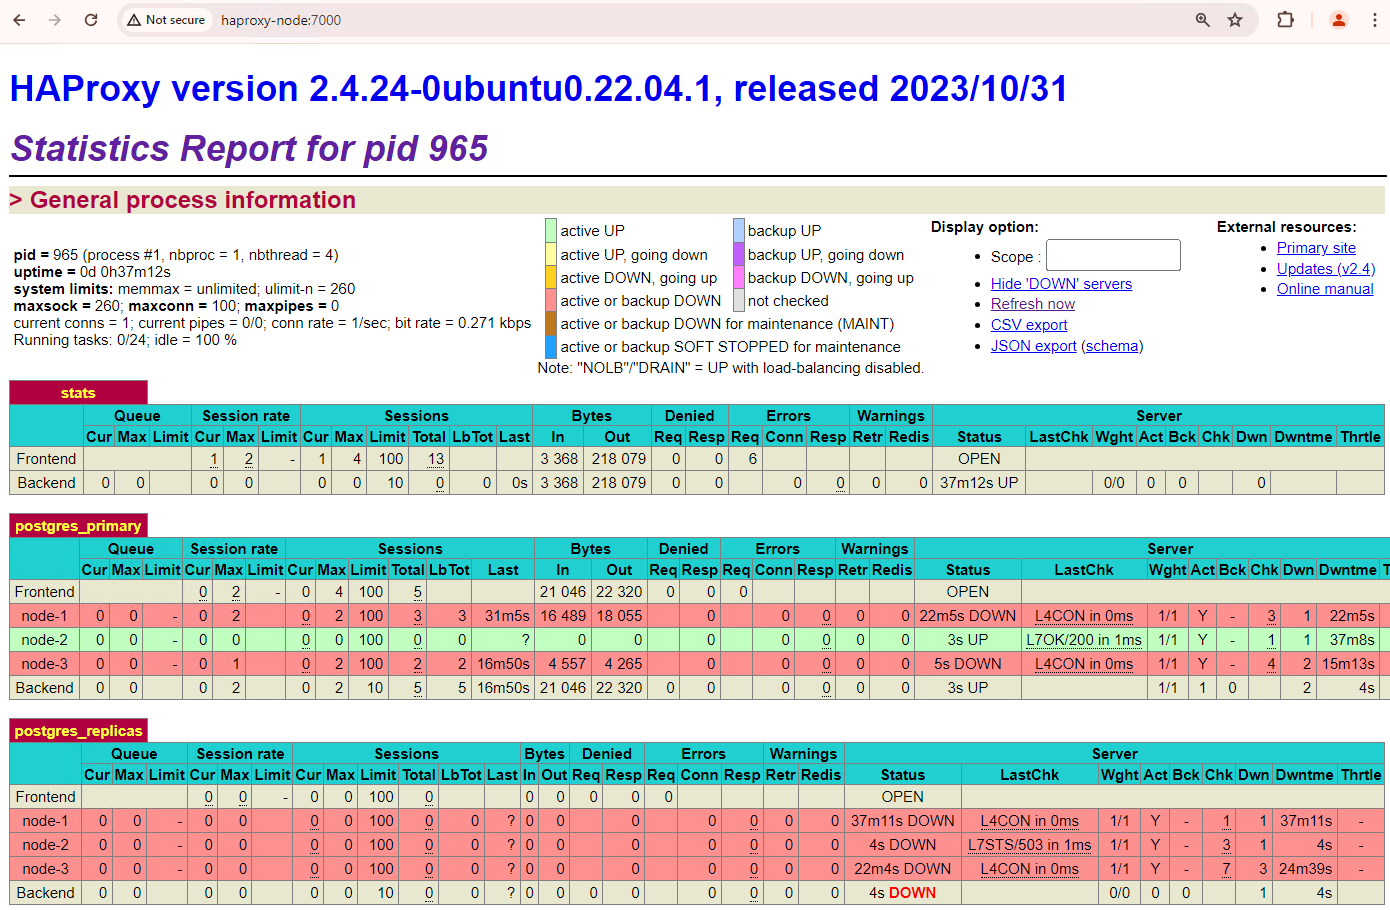
pgAdmin과 같은 클라이언트에서 HAProxy를 통해 데이터베이스 서버에 연결하고 장애 조치 후 클러스터의 복제 통계를 확인합니다.
[[["이해하기 쉬움","easyToUnderstand","thumb-up"],["문제가 해결됨","solvedMyProblem","thumb-up"],["기타","otherUp","thumb-up"]],[["이해하기 어려움","hardToUnderstand","thumb-down"],["잘못된 정보 또는 샘플 코드","incorrectInformationOrSampleCode","thumb-down"],["필요한 정보/샘플이 없음","missingTheInformationSamplesINeed","thumb-down"],["번역 문제","translationIssue","thumb-down"],["기타","otherDown","thumb-down"]],["최종 업데이트: 2025-09-05(UTC)"],[[["\u003cp\u003eThis guide outlines how to test a Patroni cluster for reliability, including failure scenarios, replication consistency, and failover mechanisms.\u003c/p\u003e\n"],["\u003cp\u003eYou can inspect the Patroni logs and use the Patroni HTTP API to view cluster health, configuration, and the state of each PostgreSQL instance.\u003c/p\u003e\n"],["\u003cp\u003eThe HAProxy dashboard provides a real-time view of the health and latency of each Patroni node within the cluster.\u003c/p\u003e\n"],["\u003cp\u003eSimulating a primary node outage by stopping the container demonstrates the automatic failover process, where a standby node is promoted to primary and HAProxy redirects client connections accordingly.\u003c/p\u003e\n"],["\u003cp\u003eWhile automatic fallback is not advised, manual fallback to the initial primary node is possible using the \u003ccode\u003epatronictl\u003c/code\u003e command-line interface to ensure a controlled and verified recovery.\u003c/p\u003e\n"]]],[],null,["# Test your high availability setup\n\nSelect a documentation version: Current (16.8.0)keyboard_arrow_down\n\n- [Current (16.8.0)](/alloydb/omni/current/docs/high-availability/test)\n- [16.8.0](/alloydb/omni/16.8.0/docs/high-availability/test)\n- [16.3.0](/alloydb/omni/16.3.0/docs/high-availability/test)\n- [15.12.0](/alloydb/omni/15.12.0/docs/high-availability/test)\n- [15.7.1](/alloydb/omni/15.7.1/docs/high-availability/test)\n- [15.7.0](/alloydb/omni/15.7.0/docs/high-availability/test)\n\n\u003cbr /\u003e\n\n| **Note:** Your use of AlloyDB Omni is subject to the agreement between you and Google that governs Google Cloud offerings. If you do not have a Google Cloud account, or have not otherwise entered into an agreement with Google that governs Google Cloud offerings, please do not proceed or download this software until you have done so. To create a Google Cloud account, see [the Google Cloud homepage](/docs/get-started).\n\n\u003cbr /\u003e\n\nEnsuring the reliability and quality of your high availability Patroni setup is\ncrucial for maintaining continuous database operations and minimizing downtime.\nThis page provides a comprehensive guide to testing your Patroni cluster,\ncovering various failure scenarios, replication consistency, and failover\nmechanisms.\n\nTest your Patroni setup\n-----------------------\n\n1. Connect to any of your patroni instances (`alloydb-patroni1`,\n `alloydb-patroni2`, or `alloydb-patroni3`) and navigate to the\n AlloyDB Omni patroni folder.\n\n ```\n cd /alloydb/\n ```\n2. Inspect the Patroni logs.\n\n ```\n docker compose logs alloydbomni-patroni\n ```\n\n The last entries should reflect information about the Patroni node. You\n should see something similar to the following. \n\n alloydbomni-patroni | 2024-06-12 15:10:29,020 INFO: no action. I am (patroni1), the leader with the lock\n alloydbomni-patroni | 2024-06-12 15:10:39,010 INFO: no action. I am (patroni1), the leader with the lock\n alloydbomni-patroni | 2024-06-12 15:10:49,007 INFO: no action. I am (patroni1), the leader with the lock\n\n3. Connect to any instance running Linux that has network connectivity to your\n primary Patroni instance, `alloydb-patroni1`, and get information about the\n instance. You might need to install the `jq` tool by running\n `sudo apt-get install jq -y`.\n\n ```\n curl -s http://alloydb-patroni1:8008/patroni | jq .\n ```\n\n You should see something similar to the following displayed. \n\n {\n \"state\": \"running\",\n \"postmaster_start_time\": \"2024-05-16 14:12:30.031673+00:00\",\n \"role\": \"master\",\n \"server_version\": 150005,\n \"xlog\": {\n \"location\": 83886408\n },\n \"timeline\": 1,\n \"replication\": [\n {\n \"usename\": \"alloydbreplica\",\n \"application_name\": \"patroni2\",\n \"client_addr\": \"10.172.0.40\",\n \"state\": \"streaming\",\n \"sync_state\": \"async\",\n \"sync_priority\": 0\n },\n {\n \"usename\": \"alloydbreplica\",\n \"application_name\": \"patroni3\",\n \"client_addr\": \"10.172.0.41\",\n \"state\": \"streaming\",\n \"sync_state\": \"async\",\n \"sync_priority\": 0\n }\n ],\n \"dcs_last_seen\": 1715870011,\n \"database_system_identifier\": \"7369600155531440151\",\n \"patroni\": {\n \"version\": \"3.3.0\",\n \"scope\": \"my-patroni-cluster\",\n \"name\": \"patroni1\"\n }\n }\n\nCalling the Patroni HTTP API endpoint on a Patroni node exposes various details\nabout the state and configuration of that particular PostgreSQL instance managed\nby Patroni, including cluster state information, timeline, WAL information, and\nhealth checks indicating whether the nodes and cluster are up and running\ncorrectly.\n\nTest your HAProxy setup\n-----------------------\n\n1. On a machine with a browser and network connectivity to your HAProxy node,\n go to the following address: `http://haproxy:7000`. Alternatively, you can\n use the external IP address of the HAProxy instance instead of its hostname.\n\n You should see something similar to the following screenshot.\n\n **Figure 1.** HAProxy status page showing health status and latency of\n Patroni nodes.\n\n In the HAProxy dashboard you can see the health status and latency of your\n primary Patroni node, `patroni1`, and of the two replicas, `patroni2` and\n `patroni3`.\n2. You can perform queries to check the replication stats in your cluster. From\n a client such as pgAdmin, connect to your primary database server through\n HAProxy and run the following query.\n\n SELECT\n pid, usename, application_name, client_addr, state, sync_state\n FROM\n pg_stat_replication;\n\n You should see something similar to the following diagram, showing that\n `patroni2` and `patroni3` are streaming from `patroni1`.\n\n **Figure 2.** pg_stat_replication output showing the replication state of\n the Patroni nodes.\n\nTest automatic failover\n-----------------------\n\nIn this section, in your three node cluster, we simulate an outage on the\nprimary node by stopping the attached running Patroni container. You can either\nstop the Patroni service on the primary to simulate an outage or enforce\nsome firewall rules to stop communication to that node.\n\n1. On the primary Patroni instance, navigate to the AlloyDB Omni\n Patroni folder.\n\n ```\n cd /alloydb/\n ```\n2. Stop the container.\n\n ```\n docker compose down\n ```\n\n You should see something similar to the following output. This should\n validate that the container and network were stopped. \n\n [+] Running 2/2\n ✔ Container alloydb-patroni Removed\n ✔ Network alloydbomni-patroni_default Removed\n\n3. Refresh the HAProxy dashboard and see how failover takes place.\n\n **Figure 3.** HAProxy dashboard showing the failover from the primary node\n to the standby node.\n\n The `patroni3` instance became the new primary, and `patroni2` is the only\n remaining replica. The previous primary, `patroni1`, is down and health\n checks fail for it.\n\n Patroni performs and manages the failover through a combination of\n monitoring, consensus, and automated orchestration. As soon as the primary\n node fails to renew its lease within a specified timeout, or if it reports a\n failure, the other nodes in the cluster recognize this condition through the\n consensus system. The remaining nodes coordinate to select the most suitable\n replica to promote as the new primary. Once a candidate replica is selected,\n Patroni promotes this node to primary by applying the necessary changes,\n such as updating the PostgreSQL configuration and replaying any outstanding\n WAL records. Then, the new primary node updates the consensus system with\n its status and the other replicas reconfigure themselves to follow the new\n primary, including switching their replication source and potentially\n catching up with any new transactions. HAProxy detects the new primary and\n redirects client connections accordingly, ensuring minimal disruption.\n4. From a client such as pgAdmin, connect to your database server through\n HAProxy and check the replication stats in your cluster after failover.\n\n SELECT\n pid, usename, application_name, client_addr, state, sync_state\n FROM\n pg_stat_replication;\n\n You should see something similar to the following diagram, showing that only\n `patroni2` is streaming now.\n\n **Figure 4.** pg_stat_replication output showing the replication state of\n the Patroni nodes after failover.\n5. Your three node cluster can survive one more outage. If you stop the current\n primary node, `patroni3`, another failover takes place.\n\n **Figure 5.** HAProxy dashboard showing the failover from the primary node,\n `patroni3`, to the standby node, `patroni2`.\n\nFallback considerations\n-----------------------\n\nFallback is the process to reinstate the former source node after a failover\nhas occurred. Automatic fallback is generally not recommended in a high\navailability database cluster because of several critical concerns, such as\nincomplete recovery, risk of split-brain scenarios, and replication lag.\n\nIn your Patroni cluster, if you bring up the two nodes that you simulated an\noutage with, they will rejoin the cluster as standby replicas.\n\n**Figure 6.** HAProxy dashboard showing the restoration of `patroni1` and\n`patroni3` as standby nodes.\n\nNow `patroni1` and `patroni3` are replicating from the current primary\n`patroni2`.\n\n**Figure 7.** pg_stat_replication output showing the replication state of the\nPatroni nodes after fallback.\n\nIf you want to manually fall back to your initial primary, you can do that by\nusing the [patronictl](https://patroni.readthedocs.io/en/latest/patronictl.html)\ncommand-line interface. By opting for manual fallback, you can ensure a more\nreliable, consistent, and thoroughly verified recovery process, maintaining the\nintegrity and availability of your database systems."]]